


![iFixit Tears Down New M4 MacBook Air [Video]](https://www.iclarified.com/images/news/96717/96717/96717-640.jpg)

![Apple Officially Announces Return of 'Ted Lasso' for Fourth Season [Video]](https://www.iclarified.com/images/news/96710/96710/96710-640.jpg)


![9to5Rewards: Last chance to win a MacBook Pro from Chargeasap [Giveaway]](https://i0.wp.com/9to5mac.com/wp-content/uploads/sites/6/2024/10/M4-MacBook-Pro-doesnt-tempt-me-because-Apple-Silicon-Macs-are-almost-too-good.jpg?resize=1200%2C628&quality=82&strip=all&ssl=1)


![[The AI Show Episode 139]: The Government Knows AGI Is Coming, Superintelligence Strategy, OpenAI’s $20,000 Per Month Agents & Top 100 Gen AI Apps](https://www.marketingaiinstitute.com/hubfs/ep%20139%20cover-2.png)


![[The AI Show Episode 138]: Introducing GPT-4.5, Claude 3.7 Sonnet, Alexa+, Deep Research Now in ChatGPT Plus & How AI Is Disrupting Writing](https://www.marketingaiinstitute.com/hubfs/ep%20138%20cover.png)


![If I use an API licensed with apache 2.0 in my project, what license do I use and what should I be aware of? [closed]](https://cdn.sstatic.net/Sites/softwareengineering/Img/apple-touch-icon@2.png?v=1ef7363febba)


![How to become a self-taught developer while supporting a family [Podcast #164]](https://cdn.hashnode.com/res/hashnode/image/upload/v1741989957776/7e938ad4-f691-4c9e-8c6b-dc26da7767e1.png?#)


.jpg?#)


Docker from 0 to Hero
Docker has grown a lot in popularity in recent years due to the way it simplifies application packaging and deployment. In my view, understanding Docker and its core concepts is essential for software and DevOps engineers alike. In this article we will cover: Docker Intro Docker Images and Containers Docker Networks and Volumes Docker Registries Docker Compose Docker Security Docker Swarm and Kubernetes Docker CI/CD Docker Optimization and Beyond Docker Check out my YouTube Channel! 1. What is Docker? Docker is an open-source platform that allows you to automate your application lifecycle using container technologies. To put it simply, containers are just simple, lightweight, and isolated environments that run your applications. Docker provides an abstraction layer on top of the host operating system, allowing applications to run consistently regardless of differences in the underlying infrastructure. Why use Docker? There are several reasons why Docker has become so adopted in all IT processes. With Docker you can enable your developers to package their applications and all their dependencies into a single element (container) — ensuring consistency and reusability across different environments. This eliminates (or at least tries) the infamous “It works on my machine” problem, which let’s face it — it’s so annoying. Docker provides a lightweight alternative to virtualization. The difference between containers and virtual machines is that containers share the host operating system kernel, resulting in reduced overhead and faster startup times compared virtual machines (VMs include a full guest operating system, meaning they come up with their own kernel, which runs on top of a hypervisor). Docker allows for the easy scaling and deployment of applications across different environments, making it a great solution for cloud-native architectures. Note: Interviewers will always ask you what’s the difference between containers and virtual machines, so make sure you understand and remember it. Docker Key benefits Here are some of the key benefits Docker offers: Consistency and reusability — Ensures your application will run according to plan, independent of the environment it runs in Portability — By keeping your Docker images as small as possible, you can easily share them accross different environments. Efficiency — Being lightweight, Docker containers reduce the overhead when compared to virtual machines. It makes them faster to start and more efficient in terms of resource consumption. Scalability — Scaling up or down application, is something that Docker can do easily. Combining it with Docker Compose, Docker Swarm or Kubernetes, takes scalability to the next level. Isolation — Docker ensures that different applications that run on the same host don’t interfere with each other Version control and rollbacks — By pairing your Docker images and Docker configurations with version control, you can easily have different versions of your Docker images, making rollbacks a piece of cake Getting Started with Docker Now that we have a fundamental understanding of Docker is, and what are the benefits of using Docker, let’s get started with the installation and setup. Installing Docker Installing Docker is simple, as Docker provides installation packages for different operating systems, including macOS, Linux distributions and Windows. Simply download the appropriate package for your system and follow the installation instructions provided by Docker. For the majority of the operating systems, the easiest thing to do is installDocker Desktop. Docker Architecture Overview To effectively work with Docker, you need to first understand the Docker architecture. At a high level, Docker consists of three main components: Docker daemon (dockerd)— The Docker daemon is responsible for building, running, and monitoring containers. Docker client — The Docker client is a command-line tool that allows you to interact with the Docker daemon. It sends commands to the daemon and receives information from it. Docker registry — The Docker registry is a centralized repository for Docker images. It allows you to pull images from the registry and push your own images. Docker’s Core Components In addition to the other architecture components, Docker also relies on others as well: Image — read-only template that contains everything needed to run an application (code, runtime, libraries, and system tools). You can leverage images created by others, or you have the ability to create your own. Container — instance of an image that you can run, start, stop, and delete. They are isolated from each other and the host system, ensuring that applications run in a consistent environment. You can easily create multiple containers from the same image. Registry — centralized place for storing and distributing Docker images. These images can be easily pulled

Docker has grown a lot in popularity in recent years due to the way it simplifies application packaging and deployment. In my view, understanding Docker and its core concepts is essential for software and DevOps engineers alike.
In this article we will cover:
Docker Intro
Docker Images and Containers
Docker Networks and Volumes
Docker Registries
Docker Compose
Docker Security
Docker Swarm and Kubernetes
Docker CI/CD
Docker Optimization and Beyond Docker
1. What is Docker?
Docker is an open-source platform that allows you to automate your application lifecycle using container technologies. To put it simply, containers are just simple, lightweight, and isolated environments that run your applications.
Docker provides an abstraction layer on top of the host operating system, allowing applications to run consistently regardless of differences in the underlying infrastructure.
Why use Docker?
There are several reasons why Docker has become so adopted in all IT processes.
With Docker you can enable your developers to package their applications and all their dependencies into a single element (container) — ensuring consistency and reusability across different environments. This eliminates (or at least tries) the infamous “It works on my machine” problem, which let’s face it — it’s so annoying.
Docker provides a lightweight alternative to virtualization. The difference between containers and virtual machines is that containers share the host operating system kernel, resulting in reduced overhead and faster startup times compared virtual machines (VMs include a full guest operating system, meaning they come up with their own kernel, which runs on top of a hypervisor).
Docker allows for the easy scaling and deployment of applications across different environments, making it a great solution for cloud-native architectures.
Note: Interviewers will always ask you what’s the difference between containers and virtual machines, so make sure you understand and remember it.
Docker Key benefits
Here are some of the key benefits Docker offers:
Consistency and reusability — Ensures your application will run according to plan, independent of the environment it runs in
Portability — By keeping your Docker images as small as possible, you can easily share them accross different environments.
Efficiency — Being lightweight, Docker containers reduce the overhead when compared to virtual machines. It makes them faster to start and more efficient in terms of resource consumption.
Scalability — Scaling up or down application, is something that Docker can do easily. Combining it with Docker Compose, Docker Swarm or Kubernetes, takes scalability to the next level.
Isolation — Docker ensures that different applications that run on the same host don’t interfere with each other
Version control and rollbacks — By pairing your Docker images and Docker configurations with version control, you can easily have different versions of your Docker images, making rollbacks a piece of cake
Getting Started with Docker
Now that we have a fundamental understanding of Docker is, and what are the benefits of using Docker, let’s get started with the installation and setup.
Installing Docker
Installing Docker is simple, as Docker provides installation packages for different operating systems, including macOS, Linux distributions and Windows. Simply download the appropriate package for your system and follow the installation instructions provided by Docker.
For the majority of the operating systems, the easiest thing to do is installDocker Desktop.
Docker Architecture Overview
To effectively work with Docker, you need to first understand the Docker architecture. At a high level, Docker consists of three main components:
Docker daemon (dockerd)— The Docker daemon is responsible for building, running, and monitoring containers.
Docker client — The Docker client is a command-line tool that allows you to interact with the Docker daemon. It sends commands to the daemon and receives information from it.
Docker registry — The Docker registry is a centralized repository for Docker images. It allows you to pull images from the registry and push your own images.
Docker’s Core Components
In addition to the other architecture components, Docker also relies on others as well:
Image — read-only template that contains everything needed to run an application (code, runtime, libraries, and system tools). You can leverage images created by others, or you have the ability to create your own.
Container — instance of an image that you can run, start, stop, and delete. They are isolated from each other and the host system, ensuring that applications run in a consistent environment. You can easily create multiple containers from the same image.
Registry — centralized place for storing and distributing Docker images. These images can be easily pulled on the host system, and based on them, you can create Docker containers. Docker Hub is the default public registry, but you can also set up private registries or use other public registries as well. Don’t worry, we will cover this in detail in another post.
Docker CLI — primary way to interact with Docker. It provides a set of commands that allow you to manage containers, images, networks, and volumes. With the Docker CLI, you can create, start, stop, and remove containers. You can also build, tag, and push images, as well as manage networks and volumes. We will explore some of the most useful commands below.
Dockerfile — file that contains a set of instructions for building a Docker image. It specifies the base image, different configurations that you want to be made, and commands to be executed when the image is built. The Dockerfile allows you to automate the process of creating Docker images, making it easy to reproduce and share accross different environments.
Docker Compose — tool for defining and running multi-container Docker applications. It allows you to define a group of containers as a single service and configure their dependencies and network connections. With Docker Compose, you can easily define complex application architectures and manage their deployment and scaling.
Docker Swarm — native clustering and orchestration solution provided by Docker. It allows you to create and manage a swarm of Docker nodes, enabling high availability and scalability for your applications. With Docker Swarm, you can deploy and scale your applications across multiple Docker hosts, ensuring that they are always available and can handle increased workloads.
These core components work together to provide a powerful and flexible platform for building, deploying, and managing containerized applications with Docker.
Docker Commands
Now that we have covered the basics of Docker, let’s explore a list of Docker commands that will help you work with Docker more effectively.
Basic Docker Commands
Here are some of the basic Docker commands you’ll frequently use:
docker run: Run a command in a new containerdocker build: Builds a Docker imagedocker tag: Tags an imagedocker start: Start one or more stopped containersdocker stop: Stop one or more running containersdocker rm: Remove one or more containersdocker ps: Gets details of all running Docker containersdocker ps -a: Gets details of all your Docker containersdocker cp: Copies entire files or folders between your local filesystem to your containersdocker logs: Gives you in-depth details into your containers
Docker Compose and Swarm commands
We will dive deep into Docker Compose and Swarm in the next part of this article. In the meantime, here are some commonly used Docker Compose and Swarm commands, just as a little teaser of what we will do:
docker-compose up: Create and start containersdocker-compose down: Stop and remove containers, networks, and volumesdocker-compose build: Build or rebuild servicesdocker swarm init: Initialize a swarmdocker swarm join: Join a swarm as a worker or managerdocker service create: Create a new servicedocker node ls: List nodes in a swarm
This part was originally posted on Medium.
2. Docker images and Docker containers
What is a Docker image?
A Docker image is a template that will be used by your containers, in which you install all the packages required to run your applications.
Let’s get back to Docker images. Acting as blueprints for your Docker containers, a Docker image is composed of multiple read-only layers, stacked on top of each other. We will build a Docker image later on, I will show you the layers, so don’t worry.
Each of these layers is an instruction in your Dockerfile, and these layers may contain different information: you could have a layer that specifies the base image from which you are building your image, or you may have another layer that installs some dependencies that are required for your application, or a layer that simply copies some files from your local filesystem to your Docker image.
Regardless of the underlying infrastructure (having Docker installed on different operating systems), you can be 100% sure, that your image will run on it if Docker is installed (small caveat, your image architecture must match the host system’s architecture).
Building these images in layers means that Docker can reuse the layers to speed up the building process for the current image you are using and even reuse these layers across different images that you may be building. That’s why, to speed things up, you should avoid making changes to superior layers, as caching will be broken.
By default, caching is enabled, but this doesn’t mean that you cannot build an image without reusing the cached information. In some cases, you may want to do that, and there is an argument that comes in handy that lets you do so, and that is the --no-cache arg.
What is a Docker container?
A Docker container is an element created from a Docker image that fits the purpose you have set inside that particular image. Because Docker images are just blueprints, they don’t do anything on their own, and they need to be used inside a container to accomplish the task at hand.
Docker containers run in their own, isolated , environments, meaning that they are separated from each other and even the host system. Each of these containers has its filesystems, processes that are running, and network, while they are still sharing the operating system’s kernel. As mentioned in the previous article, this is one of the main differences between containers and virtual machines, so don’t forget to take note.
Containers are more lightweight when compared to their virtual machine counterparts, and they are designed to be ephemeral. You can easily start, stop, and destroy containers and all of their data may be lost if the data is not explicitly stored outside of it (in a Docker volume, or the relevant information may be pushed to different storing solutions, such as Amazon S3, or Azure Blob storage).
Docker containers are flexible and make them an ideal choice for microservices applications because you can scale them together or independently, or directly in container orchestration platforms such as Kubernetes or Docker Swarm.
Working with existing Docker images
As I’ve mentioned before you can easily use existing Docker images and create containers out of them.
I will just show you an easy example of how to do it, but we will talk more about this when we reach the part dedicated to registries. Docker has a neat way of checking if you have an image locally, otherwise it will pull it from the Docker Hub registry.
Pulling an image
To pull an image, we can use the docker pull image_name command. For the sake of this example, let’s pull the hello-world image and create a container from it:
docker pull hello-world
Using default tag: latest
latest: Pulling from library/hello-world
478afc919002: Pull complete
Digest: sha256:53cc4d415d839c98be39331c948609b659ed725170ad2ca8eb36951288f81b75
Status: Downloaded newer image for hello-world:latest
docker.io/library/hello-world:latest
Now, let’s create the container:
docker run hello-world

Hello from Docker!
This message shows that your installation appears to be working correctly.

To generate this message, Docker took the following steps:
 1. The Docker client contacted the Docker daemon.
 2. The Docker daemon pulled the "hello-world" image from the Docker Hub.
    (arm64v8)
 3. The Docker daemon created a new container from that image which runs the
    executable that produces the output you are currently reading.
 4. The Docker daemon streamed that output to the Docker client, which sent it
    to your terminal.

To try something more ambitious, you can run an Ubuntu container with:
 $ docker run -it ubuntu bash

Share images, automate workflows, and more with a free Docker ID:
 https://hub.docker.com/

For more examples and ideas, visit:
 https://docs.docker.com/get-started/
Pushing an image
To push an image to a registry, you can run the docker push image_namecommand. As I’ve mentioned before, we will deep dive into a different part.
Listing your local images
To list your images, you can simply run the docker images command:
docker images
REPOSITORY     TAG       IMAGE ID       CREATED          SIZE
kindest/node       c67167dbf296   3 months ago     980MB
hello-world    latest    ee301c921b8a   16 months ago    9.14kB
Removing a local image
To remove a local image, you can simply run the docker image rm image_nameor docker image rm first_few_letters_of_id
docker image rm ee
Untagged: hello-world:latest
Untagged: hello-world@sha256:53cc4d415d839c98be39331c948609b659ed725170ad2ca8eb36951288f81b75
Deleted: sha256:ee301c921b8aadc002973b2e0c3da17d701dcd994b606769a7e6eaa100b81d44
Deleted: sha256:12660636fe55438cc3ae7424da7ac56e845cdb52493ff9cf949c47a7f57f8b43
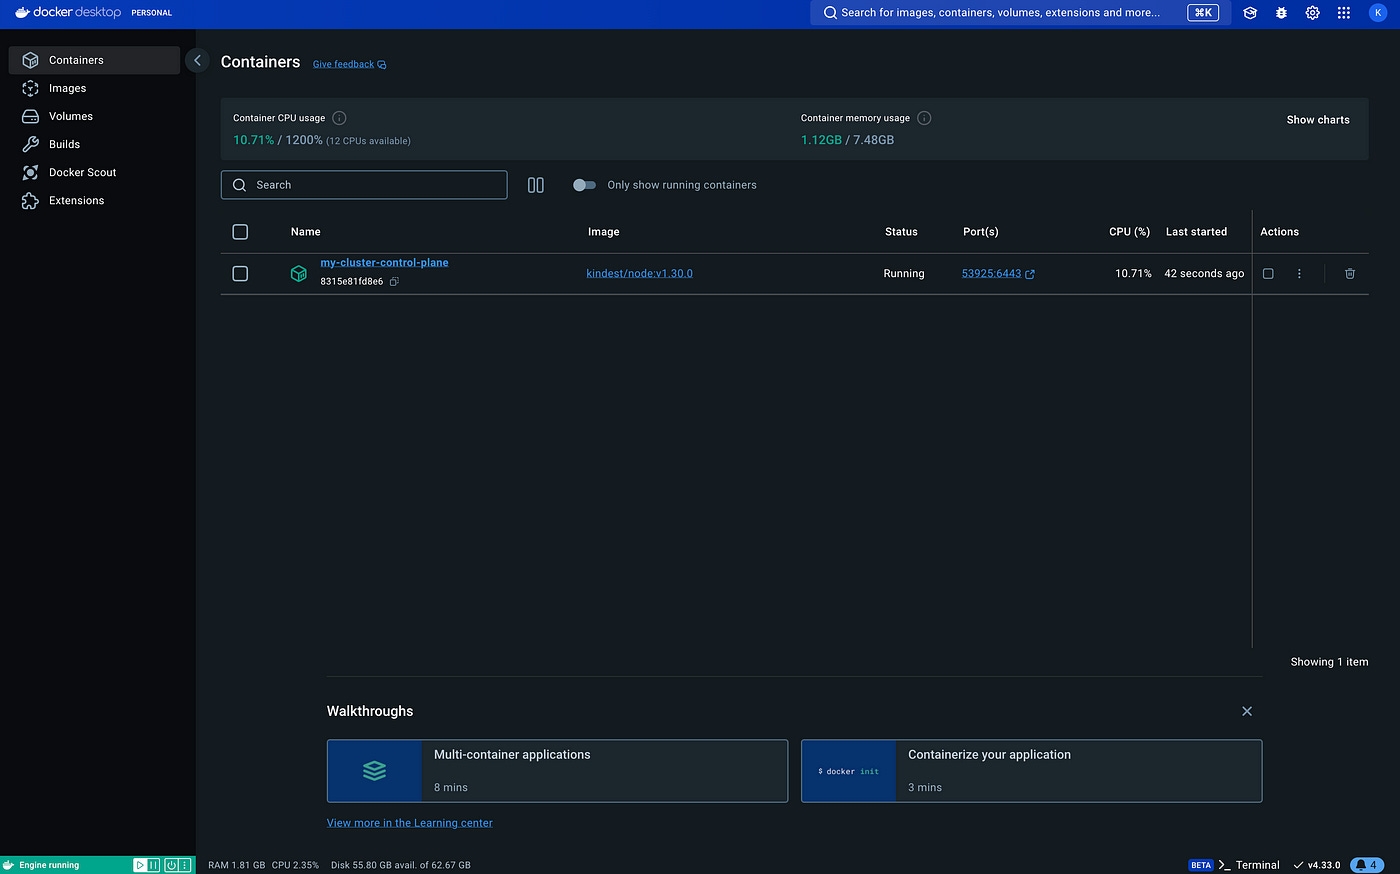
➜ episode2 docker images
REPOSITORY TAG IMAGE ID CREATED SIZE
kindest/node c67167dbf296 3 months ago 980MB
What is a Dockerfile?
A Dockerfile is a special document that contains instructions for building a Docker image. It is essentially a script of commands that Docker uses to automatically create a container image.
The Dockerfile supports the following instructions, and I’ll list them in the order of their importance (from my point of view, of course):
FROM — this is creating a new build stage, starting from a base image. This means that if you have two FROM instructions in the same Dockerfile, you will have two build stages
RUN — executes different commands inside the base image you are using. You can have multiple commands in a single RUN instruction, by using “&&”
CMD — the default command the docker container will run
ENTRYPOINT — specifies the default executable
EXPOSE — ports your app is listening on
ADD — adds files from the host system, URLs, and can also add files and extract them
COPY — adds files from the host system only
ARG — build-time variable that can be used in other instructions
ENV — sets env variables inside the docker container
WORKDIR — sets the working directory for any other commands that may run after it
VOLUME — creates a mount point with the specified path
SHELL — sets the shell
USER — sets the user
HEALTHCHECK — defines a command to test the health of the container
STOPSIGNAL — sets the system call signal for exiting a container
ONBUILD — this will set an instruction for the image when it is used as a base image for another one
LABEL — adds metadata to the image in a key-value format
MAINTAINER — deprecated in favor of LABEL, was used to specify the maintainer of the image
Note 1: You will be asked in interviews what is the difference between ADD and COPY. Keep in mind that COPY can be used only for copying files from the host filesystem, while ADD can also get files from a URL or unarchive files.
Note 2 : You will get another question in interviews that refers to the difference between CMD and ENTRYPOINT. CMD is used for providing default arguments for the container’s executable, while ENTRYPOINT defines the executable itself. If you set CMD, and not set ENTRYPOINT, what happens is CMD acts as the ENTRYPOINT.
Dockerfile tutorial
Nothing goes better in a tutorial than a real-life example.
If you want to watch a video instead, I have you covered:
To give you some chills from your agile process, let’s suppose you receive the following ticket:
Title : Create a Docker image that standardizes our team’s development process
As a : DevOps Engineer
I want : To build a standard development environment for my team
So that : We can ensure that everyone develops their code with the same versions
Description : Our image should have the following:
start from an Alpine image
latest open-source version of Terraform installed
OpenTofu 1.8.1
Python 3.12 and pip
kubectl 1.28
Ansible 2.15
Golang 1.21
Acceptance criteria:
A Dockerfile is created that builds the image with all the tools specified and their versions
The image is built successfully and tested to ensure all tools function properly
Documentation on how to use the image is provided
Ok, now that we’ve received the ticket, let’s start building the Dockerfile that solves it.
We will start with a specific version of Alpine, and you may wonder why we are not using the “latest” keyword. This happens because, in a new version, we may face some dependency issues or unexpected changes that may break your image build. It is a best practice to avoid using “latest” for anything that you are building because, in this way, you ensure consistency.
FROM alpine:3.20
So, in the above example, I’m specifying the base image as Alpine:3.20.
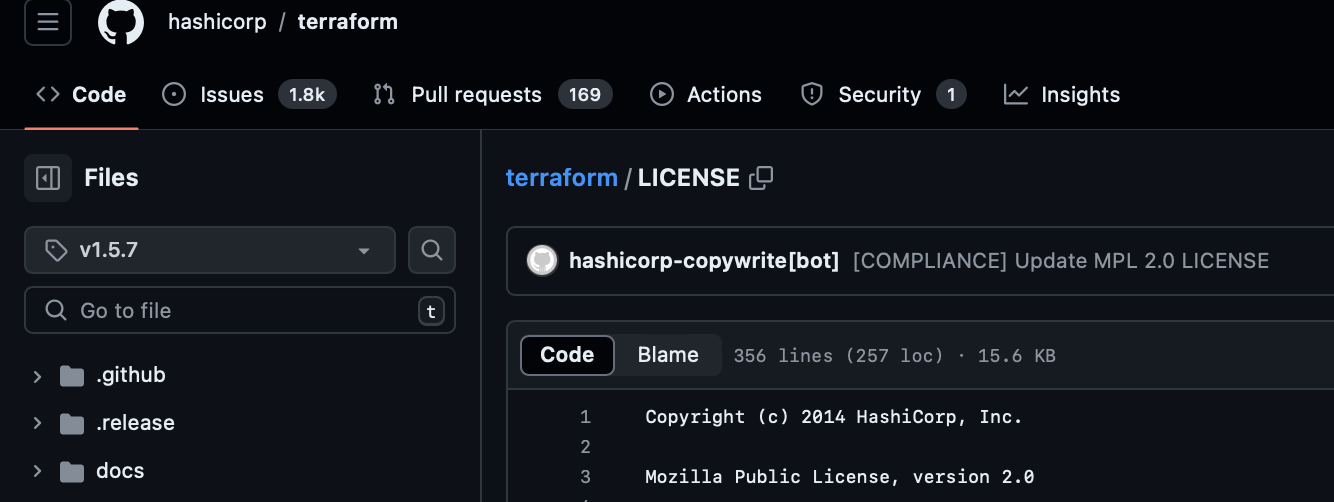
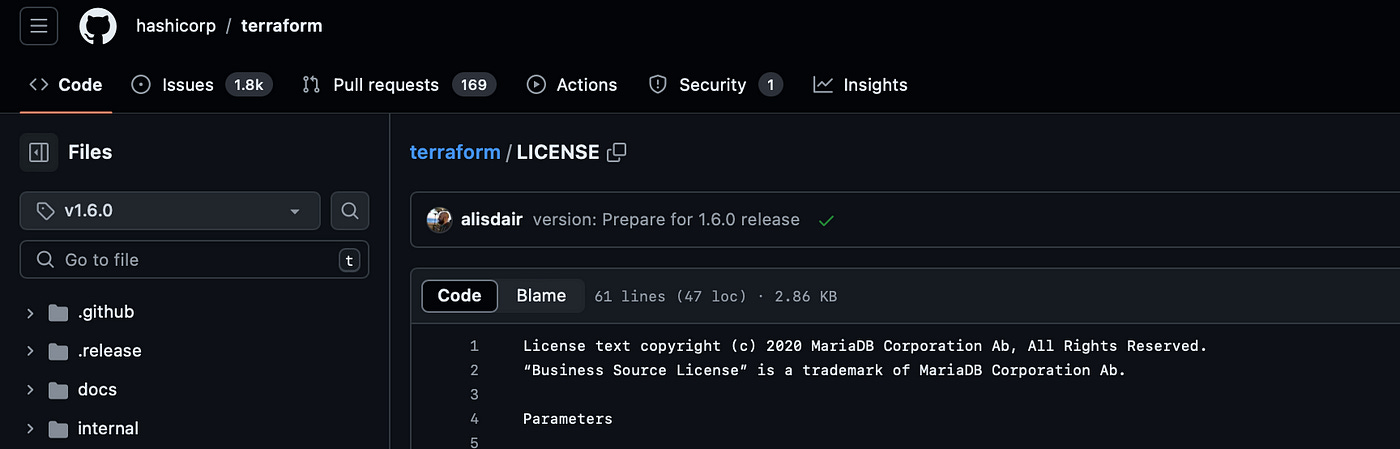
Now, we haven’t receive exact instructions about what Terraform version to use, but we know that we have to use the latest open-source version. After some research on their repository, we have found out that the latest open-source version is 1.5.7:
Now, we are ready to define our environment with all the versions we want to use. You may wonder why we are defining them inside an ENV block. Well, that’s because we want to be easily able to update the versions when this is required in the future.
Also, I have defined the pipx bin directory to something in our path. This will be required to easily install Ansible.
ENV TERRAFORM_VERSION=1.5.7 \
    OPENTOFU_VERSION=1.8.1 \
    PYTHON_VERSION=3.12.0 \
    KUBECTL_VERSION=1.28.0 \
    ANSIBLE_VERSION=2.15.0 \
    GOLANG_VERSION=1.21.0 \
    PIPX_BIN_DIR=/usr/local/bin
Next, let’s install some of the dependencies and some of the helpers you may require for a successful development environment:
RUN apk add --no-cache \
    curl \
    bash \
    git \
    wget \
    unzip \
    make \
    build-base \
    py3-pip \
    pipx \
    openssh-client \
    gnupg \
    libc6-compat
Now, let’s add the instructions that install Terraform:
RUN wget -O terraform.zip https://releases.hashicorp.com/terraform/${TERRAFORM_VERSION}/terraform_${TERRAFORM_VERSION}_linux_amd64.zip && \
    unzip terraform.zip && \
    mv terraform /usr/local/bin/ && \
    rm terraform.zip
We are first downloading the terraform archive, then we are unzipping it, next, we are moving the executable in our path, and in the end, we are removing the archive.
We will do the same process for OpenTofu:
RUN wget -O tofu.zip https://github.com/opentofu/opentofu/releases/download/v${OPENTOFU_VERSION}/tofu_${OPENTOFU_VERSION}_linux_amd64.zip && \
    unzip tofu.zip && \
    mv tofu /usr/local/bin/ && \
    rm tofu.zip
Next, let’s install kubectl:
RUN curl -LO "https://dl.k8s.io/release/v$KUBECTL_VERSION/bin/linux/amd64/kubectl" && \
    chmod +x kubectl && \
    mv kubectl /usr/local/bin/
This will download the kubectl binary, make it executable, and then move it to the path.
Now, let’s install Ansible:
RUN pipx install ansible-core==${ANSIBLE_VERSION}
We are finally ready to install the last tool, golang:
RUN wget https://golang.org/dl/go$GOLANG_VERSION.linux-amd64.tar.gz && \
    tar -C /usr/local -xzf go$GOLANG_VERSION.linux-amd64.tar.gz && \
    rm go$GOLANG_VERSION.linux-amd64.tar.gz && \
    ln -s /usr/local/go/bin/go /usr/local/bin/go && \
    ln -s /usr/local/go/bin/gofmt /usr/local/bin/gofmt
In the same way, we are downloading the archive, unarchiving it, but now we are creating some symlinks to ensure go is in our PATH.
Let’s also set a workdir. When we will run our container, this will be our starting directory:
WORKDIR /workspace
We should also add the command we want our Dockerfile to run:
CMD ["bash"]
In the end, your Dockerfile should look like this:
FROM alpine:3.20

ENV TERRAFORM_VERSION=1.5.7 \
    OPENTOFU_VERSION=1.8.1 \
    PYTHON_VERSION=3.12.0 \
    KUBECTL_VERSION=1.28.0 \
    ANSIBLE_VERSION=2.15.0 \
    GOLANG_VERSION=1.21.0 \
    PIPX_BIN_DIR=/usr/local/bin

RUN apk add --no-cache \
    curl \
    bash \
    git \
    wget \
    unzip \
    make \
    build-base \
    py3-pip \
    pipx \
    openssh-client \
    gnupg \
    libc6-compat

RUN wget -O terraform.zip https://releases.hashicorp.com/terraform/${TERRAFORM_VERSION}/terraform_${TERRAFORM_VERSION}_linux_amd64.zip && \
    unzip terraform.zip && \
    mv terraform /usr/local/bin/ && \
    rm terraform.zip

RUN wget -O tofu.zip https://github.com/opentofu/opentofu/releases/download/v${OPENTOFU_VERSION}/tofu_${OPENTOFU_VERSION}_linux_amd64.zip && \
    unzip tofu.zip && \
    mv tofu /usr/local/bin/ && \
    rm tofu.zip

RUN curl -LO "https://dl.k8s.io/release/v$KUBECTL_VERSION/bin/linux/amd64/kubectl" && \
    chmod +x kubectl && \
    mv kubectl /usr/local/bin/

RUN pipx install ansible-core==${ANSIBLE_VERSION}

RUN wget https://golang.org/dl/go$GOLANG_VERSION.linux-amd64.tar.gz && \
    tar -C /usr/local -xzf go$GOLANG_VERSION.linux-amd64.tar.gz && \
    rm go$GOLANG_VERSION.linux-amd64.tar.gz && \
    ln -s /usr/local/go/bin/go /usr/local/bin/go && \
    ln -s /usr/local/go/bin/gofmt /usr/local/bin/gofmt

WORKDIR /workspace

CMD ["bash"]
Now, let’s go to the directory that contains our Dockerfile and build the image:
docker build -t dev_image:1.0.0 .
[+] Building 38.2s (8/11)                                                                                                                          docker:desktop-linux
[+] Building 48.1s (12/12) FINISHED                                                                                                                docker:desktop-linux
 => [internal] load build definition from Dockerfile                                                                                                               0.0s
 => => transferring dockerfile: 1.46kB                                                                                                                             0.0s
 => [internal] load metadata for docker.io/library/alpine:3.20                                                                                                     0.5s
 => [internal] load .dockerignore                                                                                                                                  0.0s
 => => transferring context: 2B                                                                                                                                    0.0s
 => CACHED [1/8] FROM docker.io/library/alpine:3.20@sha256:0a4eaa0eecf5f8c050e5bba433f58c052be7587ee8af3e8b3910ef9ab5fbe9f5                                        0.0s
 => [2/8] RUN apk add --no-cache     curl     bash     git     wget     unzip     make     build-base     py3-pip     pipx     openssh-client     gnupg     libc  17.3s
 => [3/8] RUN wget -O terraform.zip https://releases.hashicorp.com/terraform/1.5.7/terraform_1.5.7_linux_amd64.zip &&     unzip terraform.zip &&     mv terraform  2.7s
 => [4/8] RUN wget -O tofu.zip https://github.com/opentofu/opentofu/releases/download/v1.8.1/tofu_1.8.1_linux_amd64.zip &&     unzip tofu.zip &&     mv tofu /usr  4.1s
 => [5/8] RUN curl -LO "https://dl.k8s.io/release/v1.28.0/bin/linux/amd64/kubectl" &&     chmod +x kubectl &&     mv kubectl /usr/local/bin/                       5.8s
 => [6/8] RUN pipx install ansible-core==2.15.0                                                                                                                    7.8s
 => [7/8] RUN wget https://golang.org/dl/go1.21.0.linux-amd64.tar.gz &&     tar -C /usr/local -xzf go1.21.0.linux-amd64.tar.gz &&     rm go1.21.0.linux-amd64.tar  9.2s
 => [8/8] WORKDIR /workspace                                                                                                                                       0.0s
 => exporting to image                                                                                                                                             0.5s
 => => exporting layers                                                                                                                                            0.5s
 => => writing image sha256:23fe925c0eb2e0931bc86f592373bcd13916e6dbbb4ce74b18fff846fb8f2f4d                                                                       0.0s
 => => naming to docker.io/library/dev_image:1.0.0                                                                                                                 0.0s

What's next:
    View a summary of image vulnerabilities and recommendations → docker scout quickview
The “-t” flag of the docker build command, lets us specify the image :.
Let’s see our newly created image:
docker images
REPOSITORY     TAG       IMAGE ID       CREATED         SIZE
dev_image      1.0.0     23fe925c0eb2   7 minutes ago   783MB
Now, let’s create a container from our image and check all the image versions to see if we meet the acceptance criteria we have in our ticket:
docker run -ti dev_image:1.0.0
062c8343eef7:/workspace#
These two options combined (“-ti”), allow you to run a container interactively with a terminal attached. This is especially useful for running a shell inside the container, so you can execute commands directly inside the container, as we would like to do with this.
Let’s check out our tools versions:
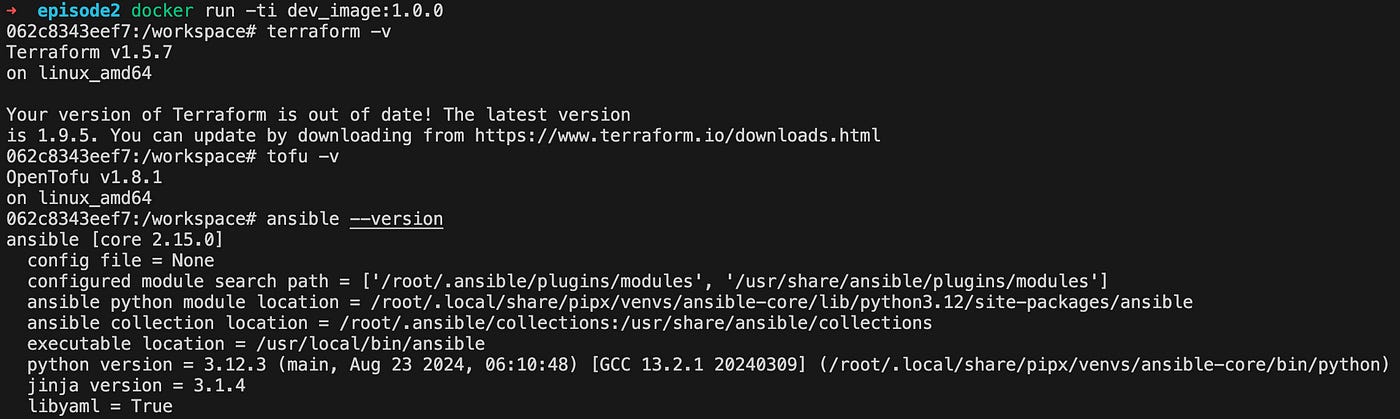
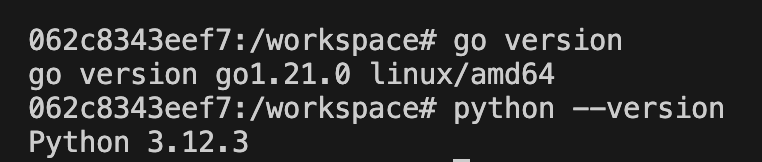
Now, we have met two out of three things related to our acceptance criteria, and I guess that the documentation can be easily written from all the details provided above, so we can say that this ticket can be moved into review