


![Sonos Abandons Streaming Device That Aimed to Rival Apple TV [Report]](https://www.iclarified.com/images/news/96703/96703/96703-640.jpg)
![HomePod With Display Delayed to Sync With iOS 19 Redesign [Kuo]](https://www.iclarified.com/images/news/96702/96702/96702-640.jpg)
![iPhone 17 Air to Measure 9.5mm Thick Including Camera Bar [Rumor]](https://www.iclarified.com/images/news/96699/96699/96699-640.jpg)


-xl-(1)-xl-xl-xl.jpg)


_Andrii_Yalanskyi_Alamy.jpg?#)


![[The AI Show Episode 139]: The Government Knows AGI Is Coming, Superintelligence Strategy, OpenAI’s $20,000 Per Month Agents & Top 100 Gen AI Apps](https://www.marketingaiinstitute.com/hubfs/ep%20139%20cover-2.png)


![[The AI Show Episode 138]: Introducing GPT-4.5, Claude 3.7 Sonnet, Alexa+, Deep Research Now in ChatGPT Plus & How AI Is Disrupting Writing](https://www.marketingaiinstitute.com/hubfs/ep%20138%20cover.png)


.png?width=1920&height=1920&fit=bounds&quality=80&format=jpg&auto=webp#)
-Rainbow-Six-Siege-X---Official-Gameplay-Trailer-00-01-00.png?width=1920&height=1920&fit=bounds&quality=80&format=jpg&auto=webp#)


.jpg?width=1920&height=1920&fit=bounds&quality=80&format=jpg&auto=webp#)

Mastering Hadoop, Part 2: Getting Hands-On — Setting Up and Scaling Hadoop
Understanding Hadoop’s core components before installation and scaling The post Mastering Hadoop, Part 2: Getting Hands-On — Setting Up and Scaling Hadoop appeared first on Towards Data Science.

Now that we’ve explored Hadoop’s role and relevance, it’s time to show you how it works under the hood and how you can start working with it. To start, we are breaking down Hadoop’s core components — HDFS for storage, MapReduce for processing, YARN for resource management, and more. Then, we’ll guide you through installing Hadoop (both locally and in the cloud) and introduce some essential commands to help you navigate and operate your first Hadoop environment.
Which components are part of the Hadoop architecture?
Hadoop’s architecture is designed to be resilient and error-free, relying on several core components that work together. These components divide large datasets into smaller blocks, making them easier to process and distribute across a cluster of servers. This distributed approach enables efficient data processing—far more scalable than a centralized ‘supercomputer.’
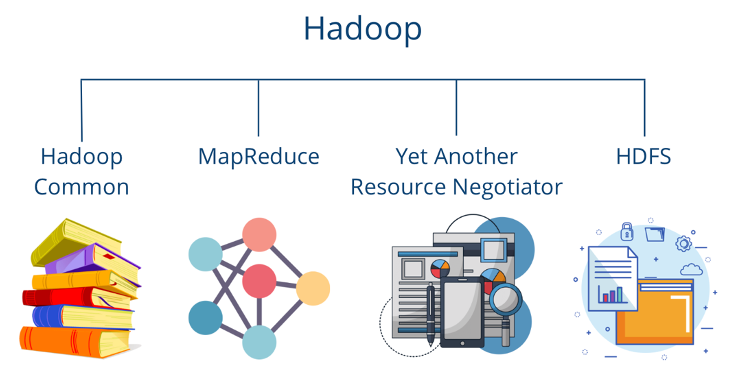
The basic components of Hadoop are:
- Hadoop Common comprises basic libraries and functionalities that are required by the other modules.
- The Hadoop Distributed File System (HDFS) ensures that data is stored on different servers and enables a particularly large bandwidth.
- Hadoop YARN takes care of resource distribution within the system and redistributes the load when individual computers reach their limits.
- MapReduce is a programming model designed to make the processing of large amounts of data particularly efficient.
In 2020, Hadoop Ozone, which is used as an alternative to HDFS, was added to this basic architecture. It comprises a distributed object storage system that was specially designed for Big Data workloads to better handle modern data requirements, especially in the cloud environment.
HDFS (Hadoop Distributed File System)
Let’s dive into HDFS, the core storage system of Hadoop, designed specifically to meet the demands of big Data Processing. The basic principle is that files are not stored as a whole on a central server, but are divided into blocks of 128MB or 256MB in size and then distributed across different nodes in a computer cluster.
To ensure data integrity, each block is replicated three times across different servers. If one server fails, the system can still recover from the remaining copies. This replication makes it easy to fall back on another node in the event of a failure.
According to its documentation, Hadoop pursues the following goals with the use of HDFS:
- Fast recovery from hardware failures by falling back on working components.
- Provision of stream data processing.
- Big data framework with the ability to process large data sets.
- Standardized processes with the ability to easily migrate to new hardware or software.
Apache Hadoop works according to the so-called master-slave principle. In this cluster, there is one node that takes on the role of the master. It distributes the blocks from the data set to various slave nodes and remembers which partitions it has stored on which computers. Only the references to the blocks, i.e. the metadata, are stored on the master node. If a master fails, there is a secondary name node that can take over.
The master within the Apache Hadoop Distributed File System is called a NameNode. The slave nodes, in turn, are the so-called DataNodes. The task of the DataNodes is to store the actual data blocks and regularly report the status to the NameNode that they are still alive. If a DataNode fails, the data blocks are replicated by other nodes to ensure sufficient fault tolerance.
The client saves files that are stored on the various DataNodes. In our example, these are located on racks 1 and 2. As a rule, there is only one DataNode per machine in a rack. Its primary task is to manage the data blocks in memory.
The NameNode, in turn, is responsible for remembering which data blocks are stored in which DataNode so that it can retrieve them on request. It also manages the files and can open, close, and, if necessary, rename them.
Finally, the DataNodes carry out the actual read and write processes of the client. The client receives the required information from the DataNodes when a query is made. They also ensure the replication of data so that the system can be operated in a fault-tolerant manner.
MapReduce
MapReduce is a programming model that supports the parallel processing of large amounts of data. It was originally developed by Google and can be divided into two phases:
- Map: In the map phase, a process is defined that can transform the input data into key-value pairs. Several mappers can then be set up to process a large amount of data simultaneously to enable faster processing.
- Reduce: The Reduce phase starts after all mappers have finished and aggregates all values that have the same key. The aggregation can involve various functions, such as the sum or the determination of the maximum value. Between the end of the Map phase and the start of the Reduce phase, the data is shuffled and sorted according to the keys.
A classic application for the MapReduce mechanism is word counting in documents, such as the seven Harry Potter volumes in our example. The task is to count how often the words “Harry” and “Potter” occur. To do this, in the map phase, each word is split into a key-value pair with the word as the key and the number one as the value, as the word has occurred once.
The positive aspect of this is that this task can run in parallel and independently of each other, so that, for example, a mapper can run for each band or even for each page individually. This means that the task is parallelized and can be implemented much faster. The scaling depends only on the available computing resources and can be increased as required if the appropriate hardware is available. The output of the map phase could look like this, for example:
[(„Harry“, 1), („Potter“, 1), („Potter“, 1), („Harry“, 1), („Harry”, 1)]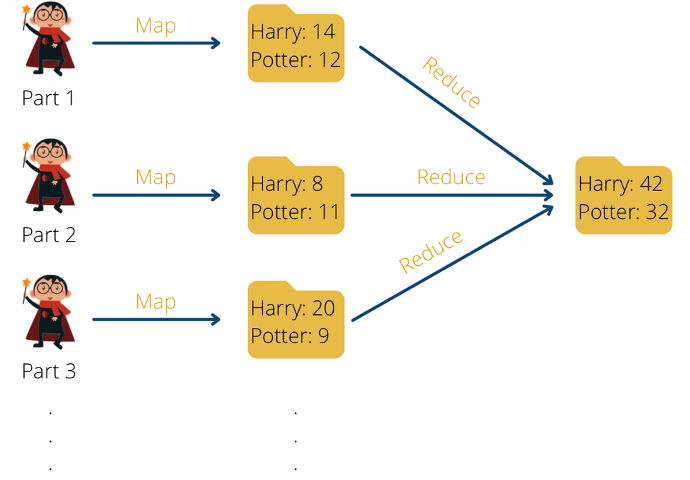
Once all mappers have finished their work, the reduce phase can begin. For the word count example, all key-value pairs with the keys “Harry” and “Potter” should be grouped and counted.
The grouping produces the following result:
[(„Harry“, [1,1,1]), („Potter“, [1,1])]The grouped result is then aggregated. As the words are to be counted in our example, the grouped values are added together:
[(„Harry“, 3), („Potter“, 2)]The advantage of this processing is that the task can be parallelized and at the same time only minimal file movement takes place. This means that even large volumes can be processed efficiently.
Although many systems continue to use the MapReduce program, as used in the original Hadoop structure, more efficient frameworks, such as Apache Spark, have also been developed in the meantime. We will go into this in more detail later in the article.
YARN (Yet Another Resource Negotiator)
YARN (Yet Another Resource Negotiator) manages the hardware resources within the cluster. It separates resource management from data processing, which allows multiple applications (such as MapReduce, Spark, and Flink) to run efficiently on the same cluster. It focuses on key functions such as:
- Management of performance and memory resources, such as CPU or SSD storage space.
- Distribution of free resources to running processes, for example, MapReduce, Spark, or Flink.
- Optimization and parallelization of job execution.
Similar to HDFS, YARN also follows a master-slave principle. The Resource Manager acts as the master and centrally monitors all resources in the entire cluster. It also allocates the available resources to the individual applications. The various node managers serve as slaves and are installed on each machine. They are responsible for the containers in which the applications run and monitor their resource consumption, such as memory space or CPU performance. These figures are fed back to the Resource Manager at regular intervals so that it can maintain an overview.
At a high level, a request to YARN looks like this: the client calls the Resource Manager and requests the execution of an application. This then searches for available resources in the cluster and, if possible, starts a new instance of the so-called Application Master, which initiates and monitors the execution of the application. This in turn requests the available resources from the node manager and starts the corresponding containers. The calculation can now run in parallel in the containers and is monitored by the Application Master. After successful processing, YARN releases the resources used for new jobs.
Hadoop common
Hadoop Common can be thought of as the foundation of the complete Hadoop ecosystem on which the main components can be built. It contains basic libraries, tools, and configuration files that can be used by all Hadoop components. The main components include:
- Common libraries and utilities: Hadoop Common provides a set of Java libraries, APIs, and utilities needed to run the cluster. This includes, for example, mechanisms for communication between the nodes in the cluster or support for different serialization formats, such as Avro. Interfaces required for file management in HDFS or other file systems are also included.
- Configuration management: Hadoop is based on a large number of XML-based configuration files, which define the main system parameters that are essential for operation. One central aspect is the network parameters required to control the machines in the cluster. In addition, the permitted storage locations for HDFs are defined here or the maximum resource sizes, such as the usable storage space, are determined.
- Platform independence: Hadoop was originally developed specifically for Linux environments. However, it can also be extended to other operating systems with the help of Hadoop Common. This includes native code support for additional environments, such as macOS or Windows.
- Tools for I/O (input/output): A big data framework processes huge volumes of data that need to be stored and processed efficiently. The necessary building blocks for various file systems, such as TextFiles or Parquet, are therefore stored in Hadoop Common. It also contains the functionalities for the supported compression methods, which ensure that storage space is saved and processing time is optimized.
Thanks to this uniform and central code base, Hadoop Common provides improved modularity within the framework and ensures that all components can work together seamlessly.
Hadoop Ozone
Hadoop Ozone is a distributed object storage system that was introduced as an alternative to HDFS and was developed specifically for big data workloads. HDFS was originally designed for large files with many gigabytes or even terabytes. However, it quickly reaches its limits when a large number of small files need to be stored. The main problem is the limitation of the NameNode, which stores metadata in RAM and, therefore, encounters memory problems when billions of small files are kept.
In addition, HDFS is designed for classic Hadoop use within a computing cluster. However, current architectures often use a hybrid approach with storage solutions in the cloud. Hadoop Ozone solves these problems by providing a scalable and flexible storage architecture that is optimized for Kubernetes and hybrid cloud environments.
Unlike HDFS, where a NameNode handles all file metadata, Hadoop Ozone introduces a more flexible architecture that doesn’t rely on a single centralized NameNode, improving scalability. Instead, it uses the following components:
- The Ozone Manager corresponds most closely to the HDFS NameNode, but only manages the bucket and volume metadata. It ensures efficient management of the objects and is also scalable, as not all file metadata has to be kept in RAM.
- The Storage Container Manager (SCM) can best be imagined as the DataNode in HDFS and it has the task of managing and replicating the data in so-called containers. Various replication strategies are supported, such as triple copying or erasure coding to save space.
- The Ozone 3 Gateway has an S3-compatible API so it can be used as a replacement for Amazon S3. This means that applications developed for AWS S3 can be easily connected to Ozone and interact with it without the need for code changes.
This structure gives Hadoop Ozone various advantages over HDFS, which we have briefly summarized in the following table:
Attribute Hadoop Ozone HDFS Storage Structure Object-based (buckets & keys) Block-based (files & blocks) Scalability Millions to billions of small files Problems with many small files NameNode – Dependency No central NameNode & scaling possible NameNode is bottleneck Cloud Integration Supports S3 API, Kubernetes, multi-cloud Strongly tied to the Hadoop Cluster Replication Strategy Classic 3-fold replication or erasure coding Only 3-fold replication Applications Big data, Kubernetes, hybrid cloud, S3 replacement Traditional Hadoop workloads
Hadoop Ozone is a powerful extension of the ecosystem and enables the implementation of hybrid cloud architectures that would not have been possible with HDFS. It is also easy to scale as it is no longer dependent on a central name node. This means that big data applications with many, but small, files, such as those used for sensor measurements, can also be implemented without any problems.
How to start with Hadoop?
Hadoop is a robust and scalable big data framework that powers some of the world’s largest data-driven applications. While it can seem overwhelming for beginners due to its many components, this guide will walk you through the first steps to get started with Hadoop in simple, easy-to-follow stages.
Installation of Hadoop
Before we can start working with Hadoop, we must first install it in our respective environment. In this chapter, we differentiate between several scenarios, depending on whether the framework is installed locally or in the cloud. At the same time, it is generally advisable to work on systems that use Linux or macOS as the operating system, as additional adaptations are required for Windows. In addition, Java should already be available, at least Java 8 or 11, and internal communication via SSH should be possible.
Local Installation of Hadoop
To try out Hadoop on a local computer and familiarize yourself with it, you can perform a single-node installation so that all the necessary components run on the same computer. Before starting the installation, you can check the latest version you want to install at https://hadoop.apache.org/releases.html, in our case this is version 3.4.1. If a different version is required, the following commands can simply be changed so that the version number in the code is adjusted.
We then open a new terminal and execute the following code, which downloads the specified version from the Internet, unpacks the directory, and then changes to the unpacked directory.
wget https://downloads.apache.org/hadoop/common/hadoop-3.4.1/hadoop-3.4.1.tar.gz
tar -xvzf hadoop-3.4.1.tar.gz
cd hadoop-3.4.1
If there are errors in the first line, this is most likely due to a faulty link and the version mentioned may no longer be accessible. A more up-to-date version should be used and the code executed again. The installation directory has a size of about one gigabyte.
The environment variables can then be created and set, which tells the system under which directory Hadoop is stored on the computer. The PATH variable then allows Hadoop commands to be executed from anywhere in the terminal without having to set the full path for the Hadoop installation.
export HADOOP_HOME=~/hadoop-3.4.1
export PATH=$PATH:$HADOOP_HOME/bin
Before we start the system, we can change the basic configuration of Hadoop, for example, to define specific directories for HDFS or specify the replication factor. There are a total of three important configuration files that we can adjust before starting:
core-site.xmlconfigures basic Hadoop settings, such as the connection information for multiple nodes.hdfs-site.xmlcontains special parameters for the HDFS setup, such as the typical directories for data storage or the replication factor, which determines how many replicas of the data are stored.yarn-site.xmlconfigures the YARN component, which is responsible for resource management and job scheduling.
For our local test, we can adjust the HDFS configuration so that the replication factor is set to 1, as we are only working on one server, and replication of the data is, therefore, not useful. To do this, we use a text editor, in our case nano, and open the configuration file for HDFS:
nano $HADOOP_HOME/etc/hadoop/hdfs-site.xmlThe file then opens in the terminal and probably does not yet have any entries. A new XML with the property key can then be added within the configuration area:
    dfs.replication
    1
Various properties can then be set according to this format. The different keys that can be specified in the configuration files, including the permitted values, can be found at https://hadoop.apache.org/docs/current/hadoop-project-dist/. For HDFS, this overview can be seen here.
Now that the configuration has been completed, Hadoop can be started. To do this, HDFS is initialized, which is the first important step after a new installation, and the directory that is to be used as the NameNode is formatted. The next two commands then start HDFS on all nodes that are configured in the cluster and the resource management YARN is started.
hdfs namenode -format
start-dfs.sh
start-yarn.sh
Problems may occur in this step if Java has not yet been installed. However, this can easily be done with the corresponding installation. In addition, when I tried this on macOS, the NameNode and DataNode of HDFS had to be started explicitly:
~/hadoop-3.4.1/bin/hdfs --daemon start namenode
~/hadoop-3.4.1/bin/hdfs --daemon start datanode
For YARN, the same procedure works for the Resource and NodeManager:
~/hadoop-3.4.1/bin/yarn --daemon start resourcemanager
~/hadoop-3.4.1/bin/yarn --daemon start nodemanager
Finally, the running processes can be checked with the jps command to see whether all components have been started correctly.
Hadoop installation in a distributed system
For resilient and productive processes, Hadoop is used in a distributed environment with multiple servers, known as nodes. This ensures greater scalability and availability. A distinction is typically made between the following cluster roles:
- NameNode: This role stores the metadata and manages the file system (HDFS).
- DataNode: This is where the actual data is stored and the calculations take place.
- ResourceManager & NodeManagers: These manage the cluster resources for YARN.
The same commands that were explained in more detail in the last section can then be used on the individual servers. However, communication must also be established between them so that they can coordinate with each other. In general, the following sequence can be followed during installation:
- Set up several Linux-based servers to be used for the cluster.
- Set up SSH access between the servers so that they can communicate with each other and send data.
- Install Hadoop on each server and make the desired configurations.
- Assign roles and define the NameNodes and DataNodes in the cluster.
- Format NameNodes and then start the cluster.
The specific steps and the code to be executed then depend more on the actual implementation.
Hadoop installation in the cloud
Many companies use Hadoop in the cloud to avoid having to operate their own cluster, potentially save costs, and also be able to use modern hardware. The various providers already have predefined programs with which Hadoop can be used in their environments. The most common Hadoop cloud services are:
- AWS EMR (Elastic MapReduce): This program is based on Hadoop and, as the name suggests, also uses MapReduce, which allows users to write their programs in Java that process and store large amounts of data in a distributed manner. The cluster runs on virtual servers in the Amazon Elastic Compute Cloud (EC2) and stores the data in the Amazon Simple Storage Service (S3). The keyword “Elastic” comes from the fact that the system can change dynamically to adapt to the required computing power. Finally, AWS EMR also offers the option of using other Hadoop extensions such as Apache Spark or Apache Presto.
- Google Dataproc: Google’s alternative is called Dataproc and enables a fully managed and scalable Hadoop cluster in the Google Cloud. It is based on BigQuery and uses Google Cloud Storage for data storage. Many companies, such as Vodafone and Twitter are already using this system.
- Azure HDInsight: The Microsoft Azure Cloud offers HDInsight for complete Hadoop use in the cloud and also provides support for a wide range of other open-source programs.
The overall advantage of using the cloud is that no manual installation and maintenance work is required. Several nodes are used automatically and more are added depending on the computing requirements. For the customer, the advantage of automatic scaling is that costs can be controlled and only what is used is paid for.
With an on-premise cluster, on the other hand, the hardware is usually set up in such a way that it is still functional even at peak loads so that the entire hardware is not required for a large part of the time. Finally, the advantage of using the cloud is that it makes it easier to integrate other systems that run with the same provider, for example.
Basic Hadoop commands for beginners
Regardless of the architecture selected, the following commands can be used to perform very general and frequently recurring actions in Hadoop. This covers all areas that are required in an ETL process in Hadoop.
- Upload File to HDFS: To be able to execute an HDFS command, the beginning
hdfs dfsis always required. You use put to define that you want to upload a file from the local directory to HDFS. Thelocal_file.txtdescribes the file to be uploaded. To do this, the command is either executed in the directory of the file or the complete path to the file is added instead of the file name. Finally, use/user/hadoop/to define the directory in HDFS in which the file is to be stored.
hdfs dfs -put local_file.txt /user/hadoop/- List files in HDFS: You can use
-lsto list all files and folders in the HDFS directory /user/hadoop/ and have them displayed as a list in the terminal.
hdfs dfs -put local_file.txt /user/hadoop/- Download file from HDFS: The
-getparameter downloads the file/user/hadoop/file.txtfrom the HDFS directory to the local directory. The dot . indicates that the file is stored in the current local directory in which the command is being executed. If this is not desired, you can define a corresponding local directory instead.
hdfs dfs -get /user/hadoop/file.txt - Delete files in HDFS: Use -rm to delete the file /user/hadoop/file.txt from the HDFS directory. This command also automatically deletes all replications that are distributed across the cluster.
hdfs dfs -rm /user/hadoop/file.txt- Start MapReduce command (process data): MapReduce is the distributed computing model in Hadoop that can be used to process large amounts of data. Using
hadoop jarindicates that a Hadoop job with a “.jar” file is to be executed. The corresponding file containing various MapReduce programs is located in the directory/usr/local/hadoop/share/hadoop/mapreduce/hadoop-mapreduce-examples-*.jar. From these examples, thewordcountjob is to be executed, which counts the words occurring in a text file. The data to be analyzed is located in the HDFS directory/inputand the results are then to be stored in the directoryoutput/.
hadoop jar /usr/local/hadoop/share/hadoop/mapreduce/hadoop-mapreduce-examples-*.jar wordcount input/ output/- Monitor the progress of a job: Despite the distributed computing power, many MapReduce jobs take a certain amount of time to run, depending on the amount of data. Their status can therefore be monitored in the terminal. The resources and running applications can be displayed using YARN. To be able to execute a command in this system, we start with the command yarn, and with the help of application-list we get a list of all active applications. Various information can be read from this list, such as the unique ID of the applications, the user who started them, and the progress in %.
yarn application -list- Display logs of a running job: To be able to delve deeper into a running process and identify potential problems at an early stage, we can read out the logs. The logs command is used for this, with which the logs of a specific application can be called up. The unique application ID is utilized to define this application. To do this, the APP_ID must be replaced by the actual ID in the following command, and the greater than and less than signs must be removed.
yarn logs -applicationId With the help of these commands, data can already be saved in HDFS, and MapReduce jobs can also be created. These are the central actions for filling the cluster with data and processing it.
Debugging & logging in Hadoop
For the cluster to be sustainable in the long term and to be able to read out errors, it is important to master basic debugging and logging commands. As Hadoop is a distributed system, errors can occur in a wide variety of components and nodes. It is therefore essential that you are familiar with the corresponding commands to quickly find and switch off errors.
Detailed log files for the various components are stored in the $HADOOP_HOME/logs directory. The log files for the various servers and components can then be found in their subdirectories. The most important ones are:
- NameNode-Logs contains information about the HDFS metadata and possible connection problems:
cat $HADOOP_HOME/logs/hadoop-hadoop-namenode-.log - DataNode logs show problems with the storage of data blocks:
cat $HADOOP_HOME/logs/hadoop-hadoop-datanode-.log - YARN ResourceManager logs reveal possible resource problems or errors in job scheduling:
cat $HADOOP_HOME/logs/yarn-hadoop-resourcemanager-.log - NodeManager logs help with debugging executed jobs and their logic:
cat $HADOOP_HOME/logs/yarn-hadoop-nodemanager-.log With the help of these logs, specific problems in the processes can be identified and possible solutions can be derived from them. However, if there are problems in the entire cluster and you want to check the overall status across individual servers, it makes sense to carry out a detailed cluster analysis with the following command:
hdfs dfsadmin -reportThis includes the number of active and failed DataNodes, as well as the available and occupied storage capacities. The replication status of the HDFS files is also displayed here and additional runtime information about the cluster is provided. An example output could then look something like this:
Configured Capacity: 10 TB
DFS Used: 2 TB
Remaining: 8 TB
Number of DataNodes: 5
DataNodes Available: 4
DataNodes Dead: 1
With these first steps, we have learned how to set up a Hadoop in different environments, store and manage data in HDFS, execute MapReduce jobs, and read the logs to detect and fix errors. This will enable you to start your first project in Hadoop and gain experience with big data frameworks.
In this part, we covered the core components of Hadoop, including HDFS, YARN, and MapReduce. We also walked through the installation process, from setting up Hadoop in a local or distributed environment to configuring key files such as core-site.xml and hdfs-site.xml. Understanding these components is crucial for efficiently storing and processing large datasets across clusters.
If this basic setup is not enough for your use case and you want to learn how you can extend your Hadoop cluster to make it more adaptable and scalable, then our next part is just right for you. We will dive deeper into the large Hadoop ecosystem including tools like Apache Spark, HBase, Hive, and many more that can make your cluster more scalable and adaptable. Stay tuned!
The post Mastering Hadoop, Part 2: Getting Hands-On — Setting Up and Scaling Hadoop appeared first on Towards Data Science.