


![Mobile Legends: Bang Bang [MLBB] Free Redeem Codes April 2025](https://www.talkandroid.com/wp-content/uploads/2024/07/Screenshot_20240704-093036_Mobile-Legends-Bang-Bang.jpg)


![Apple Releases iOS 18.5 Beta 3 and iPadOS 18.5 Beta 3 [Download]](https://www.iclarified.com/images/news/97076/97076/97076-640.jpg)
![Apple Seeds visionOS 2.5 Beta 3 to Developers [Download]](https://www.iclarified.com/images/news/97077/97077/97077-640.jpg)
![Apple Seeds tvOS 18.5 Beta 3 to Developers [Download]](https://www.iclarified.com/images/news/97078/97078/97078-640.jpg)
![Apple Seeds watchOS 11.5 Beta 3 to Developers [Download]](https://www.iclarified.com/images/news/97079/97079/97079-640.jpg)


![Lenovo shows off its next 8.8-inch Legion Tab with vague AI promises [Gallery]](https://i0.wp.com/9to5google.com/wp-content/uploads/sites/4/2025/04/lenovo-legion-tab-y700-2025-1.jpg?resize=1200%2C628&quality=82&strip=all&ssl=1)


_Tanapong_Sungkaew_via_Alamy.jpg?width=1280&auto=webp&quality=80&disable=upscale#)


![[The AI Show Episode 144]: ChatGPT’s New Memory, Shopify CEO’s Leaked “AI First” Memo, Google Cloud Next Releases, o3 and o4-mini Coming Soon & Llama 4’s Rocky Launch](https://www.marketingaiinstitute.com/hubfs/ep%20144%20cover.png)


![BPMN-procesmodellering [closed]](https://i.sstatic.net/l7l8q49F.png)
![how to represent in-house ai in deployment diagram [closed]](https://cdn.sstatic.net/Sites/softwareengineering/Img/apple-touch-icon@2.png?v=1ef7363febba)


![From fast food worker to cybersecurity engineer with Tae'lur Alexis [Podcast #169]](https://cdn.hashnode.com/res/hashnode/image/upload/v1745242807605/8a6cf71c-144f-4c91-9532-62d7c92c0f65.png?#)


A no-BS guide for developers to implement SSO
One of the first things enterprise customers look for in your product is Single Sign-On (SSO) support. It's a critical component of their security and access controls. You might be solving the perfect problem for them, but if you don’t support SSO, you risk losing those ideal customers. Let’s not let that happen. Here’s the basic idea behind how SSO works: Your application talks to the customer’s identity provider (IdP). The IdP authenticates the user. The IdP sends back the user details. Your application logs in the user. We’ll use Scalekit to bridge the flow between your application and the identity provider, making SSO orchestration easier. Here's what the flow looks like: Start by signing up for Scalekit (free), then grab your API credentials and store them in your environment variables. This allows Scalekit to recognize your app and kick off the SSO flow. SCALEKIT_ENVIRONMENT_URL='' SCALEKIT_CLIENT_ID='' SCALEKIT_CLIENT_SECRET='' Now let's cut to the chase! Your app should redirect enterprise users to their company's identity provider to authenticate. Scalekit's SDK helps you generate the correct Authorization URL. import { ScalekitClient } from '@scalekit-sdk/node'; const scalekit = new ScalekitClient( , , , ); const options = {}; options['loginHint'] = 'user@example.com'; const authorizationURL = scalekit.getAuthorizationUrl(redirectUrl, options); This returns: https:///authorize? client_id=& redirect_uri=https://yourapp.com/auth/callback& login_hint= Let’s unpack what's in there beyond the environment variables. A customer’s identity provider such as Okta or Entra ID requires customer’s IT administrator to configure your application. Since we are in development, let’s use a simulated identity provider to build the SSO flow. Yes, Scalekit has built one precisely just for this! To trigger it, the example enterprise user should have a http://example.com or example.org domain in their email address. This means during development, you could use these email addresses to trigger the SSO flow and test it. Notice the Redirect URI? This is the destination Scalekit will remember to send you the user details after successful authentication. You should go ahead and register the endpoint in the Scalekit Dashboard. Handling the Callback Once the user inputs their email and finishes authentication, you'll need to handle the response at your redirect_uri endpoint. // Handle oauth redirect_url, fetch code and error_description from request params const { code, error, error_description, idp_initiated_login, relay_state, } = req.query; if (error) { // Do not let the user sign in } const result = await scalekit.authenticateWithCode(code, redirectUri); const userEmail = result.user.email; // e.g., bob@example.org // Next: Create a session for this user and log them in Your application receives a code that should be exchanged to get the user profile details in the case of successful verification. In other cases, your get a error — your application should not allow user sign in. Curious about the idp_initiated_login parameter? Enterprise users can log into your application from the identity provider’s app catalog instead of your sign in screen. Learn how to handle that flow in a different guide. And.. that is it! Enterprise users come to your app, enter their organization’s email address and get redirected to their organization’s identity provider, verify and finally log into your app successfully. Bye, see you in the next post!
One of the first things enterprise customers look for in your product is Single Sign-On (SSO) support. It's a critical component of their security and access controls. You might be solving the perfect problem for them, but if you don’t support SSO, you risk losing those ideal customers.
Let’s not let that happen.
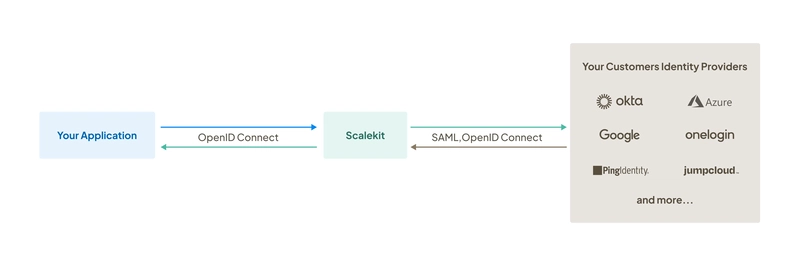
Here’s the basic idea behind how SSO works:
- Your application talks to the customer’s identity provider (IdP).
- The IdP authenticates the user.
- The IdP sends back the user details.
- Your application logs in the user.
We’ll use Scalekit to bridge the flow between your application and the identity provider, making SSO orchestration easier.
Here's what the flow looks like:
Start by signing up for Scalekit (free), then grab your API credentials and store them in your environment variables. This allows Scalekit to recognize your app and kick off the SSO flow.
SCALEKIT_ENVIRONMENT_URL=''
SCALEKIT_CLIENT_ID=''
SCALEKIT_CLIENT_SECRET=''
Now let's cut to the chase!
Your app should redirect enterprise users to their company's identity provider to authenticate. Scalekit's SDK helps you generate the correct Authorization URL.
import { ScalekitClient } from '@scalekit-sdk/node';

const scalekit = new ScalekitClient(
  ,
  ,
  ,
);
const options = {};
options['loginHint'] = 'user@example.com';
const authorizationURL = scalekit.getAuthorizationUrl(redirectUrl, options);
This returns:
https:///authorize?
  client_id=&
  redirect_uri=https://yourapp.com/auth/callback&
  login_hint=
Let’s unpack what's in there beyond the environment variables.
- A customer’s identity provider such as Okta or Entra ID requires customer’s IT administrator to configure your application. Since we are in development, let’s use a simulated identity provider to build the SSO flow. Yes, Scalekit has built one precisely just for this!
- To trigger it, the example enterprise user should have a
http://example.comorexample.orgdomain in their email address. This means during development, you could use these email addresses to trigger the SSO flow and test it. - Notice the Redirect URI? This is the destination Scalekit will remember to send you the user details after successful authentication. You should go ahead and register the endpoint in the Scalekit Dashboard.
Handling the Callback
Once the user inputs their email and finishes authentication, you'll need to handle the response at your redirect_uri endpoint.
// Handle oauth redirect_url, fetch code and error_description from request params
const {
  code,
  error,
  error_description,
  idp_initiated_login,
  relay_state,
} = req.query;
if (error) {
  // Do not let the user sign in
}
const result = await scalekit.authenticateWithCode(code, redirectUri);
const userEmail = result.user.email;
// e.g., bob@example.org
// Next: Create a session for this user and log them in
- Your application receives a
codethat should be exchanged to get the user profile details in the case of successful verification. - In other cases, your get a
error— your application should not allow user sign in.
Curious about the idp_initiated_login parameter?
Enterprise users can log into your application from the identity provider’s app catalog instead of your sign in screen. Learn how to handle that flow in a different guide.
And.. that is it! Enterprise users come to your app, enter their organization’s email address and get redirected to their organization’s identity provider, verify and finally log into your app successfully.
Bye, see you in the next post!