


![New Powerbeats Pro 2 Wireless Earbuds On Sale for $199.95 [Lowest Price Ever]](https://www.iclarified.com/images/news/97217/97217/97217-640.jpg)
![Under-Display Face ID Coming to iPhone 18 Pro and Pro Max [Rumor]](https://www.iclarified.com/images/news/97215/97215/97215-640.jpg)

![Alleged iPhone 17-19 Roadmap Leaked: Foldables and Spring Launches Ahead [Kuo]](https://www.iclarified.com/images/news/97214/97214/97214-640.jpg)


_Inge_Johnsson-Alamy.jpg?width=1280&auto=webp&quality=80&disable=upscale#)


![[The AI Show Episode 145]: OpenAI Releases o3 and o4-mini, AI Is Causing “Quiet Layoffs,” Executive Order on Youth AI Education & GPT-4o’s Controversial Update](https://www.marketingaiinstitute.com/hubfs/ep%20145%20cover.png)


![Re-designing a Git/development workflow with best practices [closed]](https://i.postimg.cc/tRvBYcrt/branching-example.jpg)


IssueOps: Automate CI/CD (and more!) with GitHub Issues and Actions
A look into building IssueOps workflows on GitHub to do everything from CI/CD to handling approvals and more. The post IssueOps: Automate CI/CD (and more!) with GitHub Issues and Actions appeared first on The GitHub Blog.

Software development is filled with repetitive tasks—managing issues, handling approvals, triggering CI/CD workflows, and more. But what if you could automate these types of tasks directly within GitHub Issues? That’s the promise of IssueOps, a methodology that turns GitHub Issues into a command center for automation.
Whether you’re a solo developer or part of an engineering team, IssueOps helps you streamline operations without ever leaving your repository.
In this article, I’ll explore the concept of IssueOps using state-machine terminology and strategies to help you work more efficiently on GitHub. After all, who doesn’t love automation?
What is IssueOps?
IssueOps is the practice of using GitHub Issues, GitHub Actions, and pull requests (PR) as an interface for automating workflows. Instead of switching between tools or manually triggering actions, you can use issue comments, labels, and state changes to kick off CI/CD pipelines, assign tasks, and even deploy applications.
Much like the various other *Ops paradigms (ChatOps, ClickOps, and so on), IssueOps is a collection of tools, workflows, and concepts that, when applied to GitHub Issues, can automate mundane, repetitive tasks. The flexibility and power of issues, along with their relationship to pull requests, create a near limitless number of possibilities, such as managing approvals and deployments. All of this can really help to simplify your workflows on GitHub. I’m speaking from personal experience here.
It’s important to note that IssueOps isn’t just a DevOps thing! Where DevOps offers a methodology to bring developers and operations into closer alignment, IssueOps is a workflow automation practice centered around GitHub Issues. IssueOps lets you run anything from complex CI/CD pipelines to a bed and breakfast reservation system. If you can interact with it via an API, there’s a good chance you can build it with IssueOps!
So, why use IssueOps?
There are lots of benefits to utilizing IssueOps. Here’s how it’s useful in practice:
- It’s event driven, so you can automate the boring stuff: IssueOps lets you automate workflows directly from GitHub Issues and pull requests, turning everyday interactions—from kicking off a CI/CD pipeline and managing approvals to updating project boards—into powerful triggers for GitHub Actions.
-
It’s customizable, so you can tailor workflows to your needs: No two teams work the same way, and IssueOps is flexible enough to adapt. Whether you’re automating bug triage or triggering deployments, you can customize workflows based on event type and data provided.
-
It’s transparent, so you can keep a record: All actions taken on an issue are logged in its timeline, creating an easy-to-follow record of what happened and when.
-
It’s immutable, so you can audit whenever you need: Because IssueOps uses GitHub Issues and pull requests as a source of truth, every action leaves a record. No more chasing approvals in Slack or manually triggering workflows: IssueOps keeps everything structured, automated, and auditable right inside GitHub.
Defining IssueOps workflows and how they’re like finite-state machines
Most IssueOps workflows follow the same basic pattern:
- A user opens an issue and provides information about a request
- The issue is validated to ensure it contains the required information
- The issue is submitted for processing
- Approval is requested from an authorized user or team
- The request is processed and the issue is closed
Suppose you’re an administrator of an organization and want to reduce the overhead of managing team members. In this instance, you could use IssueOps to build an automated membership request and approval process. Within a workflow like this, you’d have several core steps:
- A user creates a request to be added to a team
- The request is validated
- The request is submitted for approval
- An administrator approves or denies this request
- The request is processed
- If approved, the user is added to the team
- If denied, the user is not added to the team
- The user is notified of the outcome
When designing your own IssueOps workflows, it can be very helpful to think of them as a finite-state machine: a model for how objects move through a series of states in response to external events. Depending on certain rules defined within the state machine, a number of different actions can take place in response to state changes. If this is a little too complex, you can also think of it like a flow chart.
To apply this comparison to IssueOps, an issue is the object that is processed by a state machine. It changes state in response to events. As the object changes state, certain actions may be performed as part of a transition, provided any required conditions (guards) are met. Once an end state is reached, the issue can be closed.
This breaks down into a few key concepts:
- State: A point in an object’s lifecycle that satisfies certain condition(s).
- Event: An external occurrence that triggers a state change.
- Transition: A link between two states that, when traversed by an object, will cause certain action(s) to be performed.
- Action: An atomic task that is performed when a transition is taken.
- Guard: A condition that is evaluated when a trigger event occurs. A transition is taken only if all associated guard condition(s) are met.
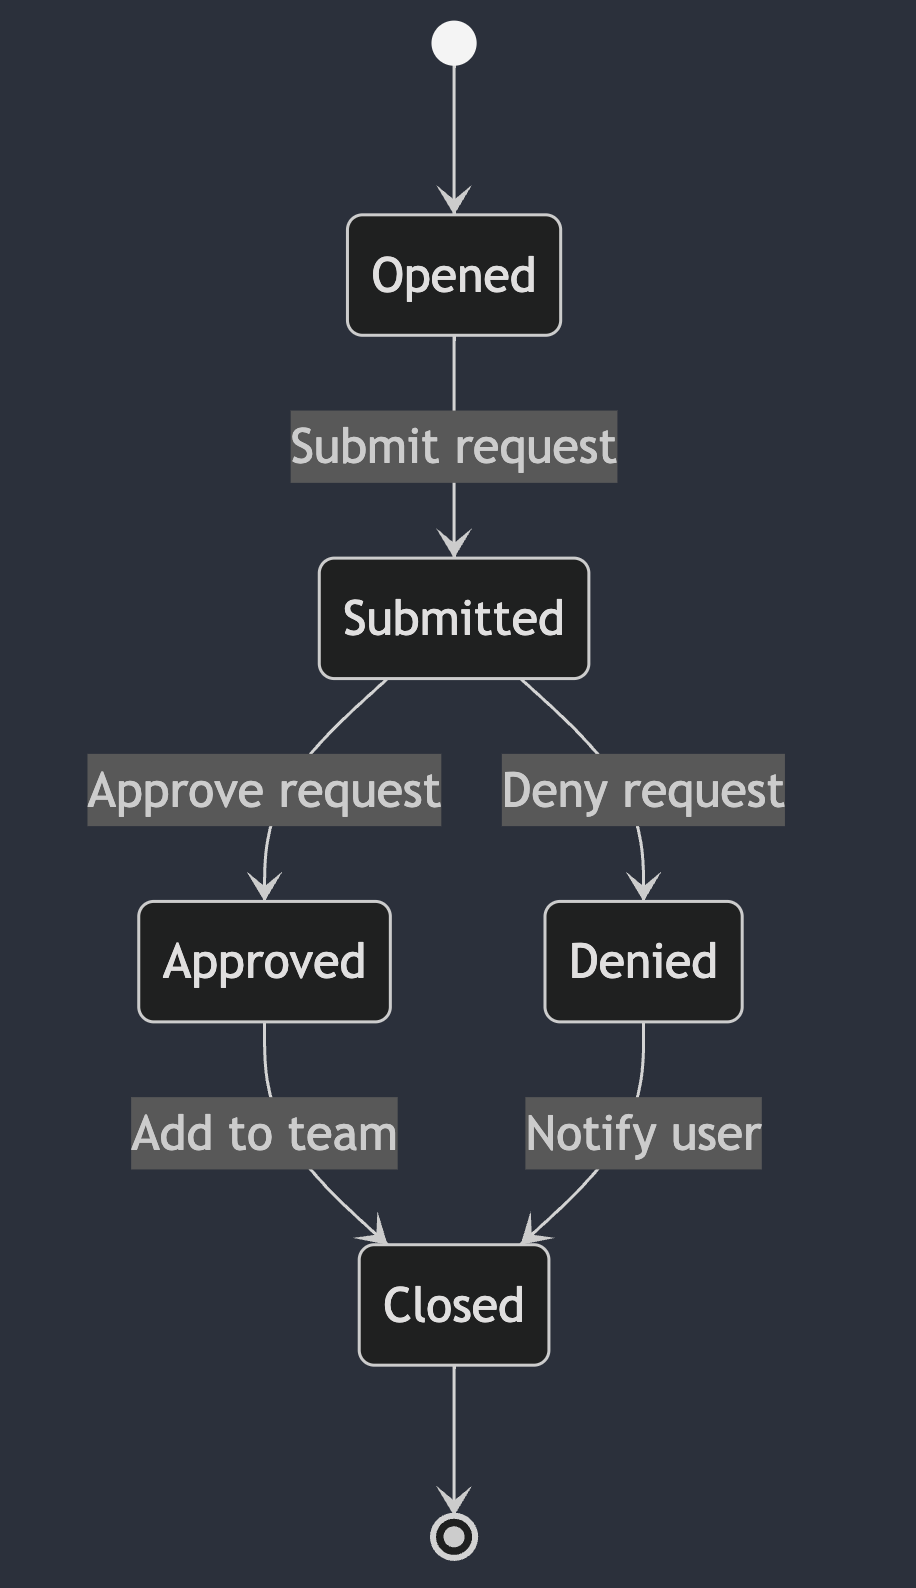
Here’s a simple state diagram for the example I discussed above.
Now, let’s dive into the state machine in more detail!
Key concepts behind state machines
The benefit of breaking your workflow down into these components is that you can look for edge cases, enforce conditions, and create a robust, reliable result.
States
Within a state machine, a state defines the current status of an object. As the object transitions through the state machine, it will change states in response to external events. When building IssueOps workflows, common states for issues include opened, submitted, approved, denied, and closed.
These should suffice as the core states to consider when building our workflows in our team membership example above.
Events
In a state machine, an event can be any form of interaction with the object and its current state. When building your own IssueOps, you should consider events from both the user and GitHub points of view.
In our team membership request example, there are several events that can trigger a change in state. The request can be created, submitted, approved, denied, or processed.
In this example, a user interacting with an issue—such as adding labels, commenting, or updating milestones—can also change its state. In GitHub Actions, there are many events that can trigger your workflows (see events that trigger workflows).
Here are a few interactions, or events, that would affect our example IssueOps workflow when it comes to managing team members:
| Request | Event | State |
|---|---|---|
| Request is created | issues |
opened |
| Request is approved | issue_comment |
created |
| Request is denied | issue_comment |
created |
As you can see, the same GitHub workflow trigger can apply to multiple events in our state machine. Because of this, validation is key. Within your workflows, you should check both the type of event and the information provided by the user. In this case, we can conditionally trigger different workflow steps based on the content of the issue_comment event.
jobs:
  approve:
    name: Process Approval
    runs-on: ubuntu-latest

    if: ${{ startsWith(github.event.comment.body, '.approve') }}

    # ...

  deny:
    name: Process Denial
    runs-on: ubuntu-latest

    if: ${{ startsWith(github.event.comment.body, '.deny') }}

    # ...
Transitions
A transition is simply the change from one state to another. In our example, for instance, a transition occurs when someone opens an issue. When a request meets certain conditions, or guards, the change in state can take place. When the transition occurs, some actions or processing may take place, as well.
With our example workflow, you can think of the transitions themselves as the lines connecting different nodes in the state diagram. Or the lines connecting boxes in a flow chart.
Guards
Guards are conditions that must be verified before an event can trigger a transition to a different state. In our case, we know the following guards must be in place:
- A request should not transition to an Approved state unless an administrator comments
.approveon the issue. - A request should not transition to a Denied state unless an administrator comments
.denyon the issue.
What about after the request is approved and the user is added to the team? This is referred to as an unguarded transition. There are no conditions that must be met, so the transition happens immediately!
Actions
Lastly, actions are specific tasks that are performed during a transition. They may affect the object itself, but this is not a requirement in our state machine. In our example, the following actions may take place at different times:
- Administrators are notified that a request has been submitted
- The user is added to the requested team
- The user is notified of the outcome
A real-world example: Building a team membership workflow with IssueOps
Now that all of the explanation is out of the way, let’s dive into building our example! For reference, we’ll focus on the GitHub Actions workflows involved in building this automation. There are some additional repository and permissions settings involved that are discussed in more detail in these IssueOps docs.
Step 1: Issue form template
GitHub issue forms let you create standardized, formatted issues based on a set of form fields. Combined with the issue-ops/parser action, you can get reliable, machine-readable JSON from issue body Markdown. For our example, we are going to create a simple form that accepts a single input: the team where we want to add the user.
name: Team Membership Request
description: Submit a new membership request
title: New Team Membership Request
labels:
  - team-membership
body:
  - type: input
    id: team
    attributes:
      label: Team Name
      description: The team name you would like to join
      placeholder: my-team
    validations:
      required: true
When issues are created using this form, they will be parsed into JSON, which can then be passed to the rest of the IssueOps workflow.
{
  "team": "my-team"
}
Step 2: Issue validation
With a machine-readable issue body, we can run additional validation checks to ensure the information provided follows any rules we might have in place. For example, we can’t automatically add a user to a team if the team doesn’t exist yet! That is where the issue-ops/validator action comes into play. Using an issue form template and a custom validation script, we can confirm the existence of the team ahead of time.
module.exports = async (field) => {
  const { Octokit } = require('@octokit/rest')
  const core = require('@actions/core')

  const github = new Octokit({
    auth: core.getInput('github-token', { required: true })
  })

  try {
    // Check if the team exists
    core.info(`Checking if team '${field}' exists`)

    await github.rest.teams.getByName({
      org: process.env.GITHUB_REPOSITORY_OWNER ?? '',
      team_slug: field
    })

    core.info(`Team '${field}' exists`)
    return 'success'
  } catch (error) {
    if (error.status === 404) {
      // If the team does not exist, return an error message
      core.error(`Team '${field}' does not exist`)
      return `Team '${field}' does not exist`
    } else {
      // Otherwise, something else went wrong...
      throw error
    }
  }
}
When included in our IssueOps workflow, this adds any validation error(s) to the comment on the issue.
Step 3: Issue workflows
The main “entrypoint” of this workflow occurs when a user creates or edits their team membership request issue. This workflow should focus heavily on validating any user inputs! For example, what should happen if the user inputs a team that does not exist?
In our state machine, this workflow is responsible for handling everything up to the opened state. Any time an issue is created, edited, or updated, it will re-run validation to ensure the request is ready to be processed. In this case, an additional guard condition is introduced. Before the request can be submitted, the user must comment with .submit after validation has passed.
name: Process Issue Open/Edit

on:
  issues:
    types:
      - opened
      - edited
      - reopened

permissions:
  contents: read
  id-token: write
  issues: write

jobs:
  validate:
    name: Validate Request
    runs-on: ubuntu-latest

    # This job should only be run on issues with the `team-membership` label.
    if: ${{ contains(github.event.issue.labels.*.name, 'team-membership') }}

    steps:
      # This is required to ensure the issue form template and any validation
      # scripts are included in the workspace.
      - name: Checkout
        id: checkout
        uses: actions/checkout@v4

      # Since this workflow includes custom validation scripts, we need to
      # install Node.js and any dependencies.
      - name: Setup Node.js
        id: setup-node
        uses: actions/setup-node@v4

      # Install dependencies from `package.json`.
      - name: Install Dependencies
        id: install
        run: npm install

      # GitHub App authentication is required if you want to interact with any
      # resources outside the scope of the repository this workflow runs in.
      - name: Get GitHub App Token
        id: token
        uses: actions/create-github-app-token@v1
        with:
          app-id: ${{ vars.ISSUEOPS_APP_ID }}
          private-key: ${{ secrets.ISSUEOPS_APP_PRIVATE_KEY }}
          owner: ${{ github.repository_owner }}

      # Remove any labels and start fresh. This is important because the
      # issue may have been closed and reopened.
      - name: Remove Labels
        id: remove-label
        uses: issue-ops/labeler@v2
        with:
          action: remove
          github_token: ${{ steps.token.outputs.token }}
          labels: |
            validated
            approved
            denied
          issue_number: ${{ github.event.issue.number }}
          repository: ${{ github.repository }}

      # Parse the issue body into machine-readable JSON, so that it can be
      # processed by the rest of the workflow.
      - name: Parse Issue Body
        id: parse
        uses: issue-ops/parser@v4
        with:
          body: ${{ github.event.issue.body }}
          issue-form-template: team-membership.yml
          workspace: ${{ github.workspace }}

      # Validate early and often! Validation should be run any time an issue is
      # interacted with, to ensure that any changes to the issue body are valid.
      - name: Validate Request
        id: validate
        uses: issue-ops/validator@v3
        with:
          add-comment: true
          github-token: ${{ steps.token.outputs.token }}
          issue-form-template: team-membership.yml
          issue-number: ${{ github.event.issue.number }}
          parsed-issue-body: ${{ steps.parse.outputs.json }}
          workspace: ${{ github.workspace }}

      # If validation passes, add the validated label to the issue.
      - if: ${{ steps.validate.outputs.result == 'success' }}
        name: Add Validated Label
        id: add-label
        uses: issue-ops/labeler@v2
        with:
          action: add
          github_token: ${{ steps.token.outputs.token }}
          labels: |
            validated
          issue_number: ${{ github.event.issue.number }}
          repository: ${{ github.repository }}

      # The `issue-ops/validator` action will automatically notify the user that
      # the request was validated. However, you can optionally add instruction
      # on what to do next.
      - if: ${{ steps.validate.outputs.result == 'success' }}
        name: Notify User (Success)
        id: notify-success
        uses: peter-evans/create-or-update-comment@v4
        with:
          issue-number: ${{ github.event.issue.number }}
          body: |
            Hello! Your request has been validated successfully!

            Please comment with `.submit` to submit this request.
Step 4: Issue comment workflows
Once the issue is created, any further processing is triggered using issue comments—and this can be done with one workflow. However, to make things a bit easier to follow, we’ll break this into a few separate workflows.
Submit workflow
The first workflow handles the user submitting the request. The main task it performs is validating the issue body against the form template to ensure it hasn’t been modified.
name: Process Submit Comment

on:
  issue_comment:
    types:
      - created

permissions:
  contents: read
  id-token: write
  issues: write

jobs:
  submit:
    name: Submit Request
    runs-on: ubuntu-latest

    # This job should only be run when the following conditions are true:
    #
    # - A user comments `.submit` on the issue.
    # - The issue has the `team-membership` label.
    # - The issue has the `validated` label.
    # - The issue does not have the `approved` or `denied` labels.
    # - The issue is open.
    if: |
      startsWith(github.event.comment.body, '.submit') &&
      contains(github.event.issue.labels.*.name, 'team-membership') == true &&
      contains(github.event.issue.labels.*.name, 'approved') == false &&
      contains(github.event.issue.labels.*.name, 'denied') == false &&
      github.event.issue.state == 'open'

    steps:
      # First, we are going to re-run validation. This is important because
      # the issue body may have changed since the last time it was validated.

      # This is required to ensure the issue form template and any validation
      # scripts are included in the workspace.
      - name: Checkout
        id: checkout
        uses: actions/checkout@v4

      # Since this workflow includes custom validation scripts, we need to
      # install Node.js and any dependencies.
      - name: Setup Node.js
        id: setup-node
        uses: actions/setup-node@v4

      # Install dependencies from `package.json`.
      - name: Install Dependencies
        id: install
        run: npm install

      # GitHub App authentication is required if you want to interact with any
      # resources outside the scope of the repository this workflow runs in.
      - name: Get GitHub App Token
        id: token
        uses: actions/create-github-app-token@v1
        with:
          app-id: ${{ vars.ISSUEOPS_APP_ID }}
          private-key: ${{ secrets.ISSUEOPS_APP_PRIVATE_KEY }}
          owner: ${{ github.repository_owner }}

      # Remove the validated label. This will be re-added if validation passes.
      - name: Remove Validated Label
        id: remove-label
        uses: issue-ops/labeler@v2
        with:
          action: remove
          github_token: ${{ steps.token.outputs.token }}
          labels: |
            validated
          issue_number: ${{ github.event.issue.number }}
          repository: ${{ github.repository }}

      # Parse the issue body into machine-readable JSON, so that it can be
      # processed by the rest of the workflow.
      - name: Parse Issue Body
        id: parse
        uses: issue-ops/parser@v4
        with:
          body: ${{ github.event.issue.body }}
          issue-form-template: team-membership.yml
          workspace: ${{ github.workspace }}

      # Validate early and often! Validation should be run any time an issue is
      # interacted with, to ensure that any changes to the issue body are valid.
      - name: Validate Request
        id: validate
        uses: issue-ops/validator@v3
        with:
          add-comment: false # Don't add another validation comment.
          github-token: ${{ steps.token.outputs.token }}
          issue-form-template: team-membership.yml
          issue-number: ${{ github.event.issue.number }}
          parsed-issue-body: ${{ steps.parse.outputs.json }}
          workspace: ${{ github.workspace }}

      # If validation passed, add the validated and submitted labels to the issue.
      - if: ${{ steps.validate.outputs.result == 'success' }}
        name: Add Validated Label
        id: add-label
        uses: issue-ops/labeler@v2
        with:
          action: add
          github_token: ${{ steps.token.outputs.token }}
          labels: |
            validated
            submitted
          issue_number: ${{ github.event.issue.number }}
          repository: ${{ github.repository }}

      # If validation succeeded, alert the administrator team so they can
      # approve or deny the request.
      - if: ${{ steps.validate.outputs.result == 'success' }}
        name: Notify Admin (Success)
        id: notify-success
        uses: peter-evans/create-or-update-comment@v4
        with:
          issue-number: ${{ github.event.issue.number }}
          body: |