


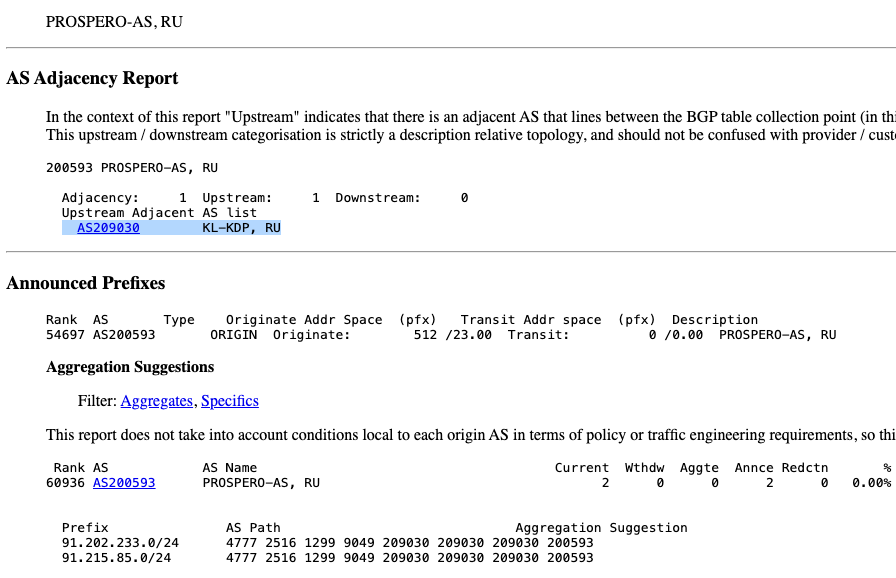
![Apple Officially Announces Return of 'Ted Lasso' for Fourth Season [Video]](https://www.iclarified.com/images/news/96710/96710/96710-640.jpg)
![Apple Plans Live Translation Feature for AirPods in iOS 19 [Report]](https://www.iclarified.com/images/news/96712/96712/96712-640.jpg)
![Apple Shares Official Trailer for 'F1' Starring Brad Pitt [Video]](https://www.iclarified.com/images/news/96714/96714/96714-640.jpg)


![[Update: Fix] Chromecast (2nd gen) and Audio can’t Cast in ‘Untrusted’ outage](https://i0.wp.com/9to5google.com/wp-content/uploads/sites/4/2019/08/chromecast_audio_1.jpg?resize=1200%2C628&quality=82&strip=all&ssl=1)


_Tanapong_Sungkaew_Alamy.jpg?#)

_JIRAROJ_PRADITCHAROENKUL_Alamy.jpg?#)


![[The AI Show Episode 139]: The Government Knows AGI Is Coming, Superintelligence Strategy, OpenAI’s $20,000 Per Month Agents & Top 100 Gen AI Apps](https://www.marketingaiinstitute.com/hubfs/ep%20139%20cover-2.png)


![[The AI Show Episode 138]: Introducing GPT-4.5, Claude 3.7 Sonnet, Alexa+, Deep Research Now in ChatGPT Plus & How AI Is Disrupting Writing](https://www.marketingaiinstitute.com/hubfs/ep%20138%20cover.png)


Deploying a Spring Boot Microservice on Kubernetes: Step-by-Step Guide
In this blog post, we'll walk through deploying a Spring Boot microservice on Kubernetes (K8s) using the provided Kubernetes manifest files. These files define a Deployment and a Service, ensuring that our microservice runs smoothly within the cluster. 1. Understanding the Manifest Files The provided YAML files define: A Deployment that manages the lifecycle of the microservice. A Service that exposes the microservice to the network. Let's go through the deployment process step by step. 2. Setting Up the Kubernetes Cluster Before deploying, ensure that you have a Kubernetes cluster running. You can use: Minikube (for local development) Docker Desktop Kubernetes A managed Kubernetes service (like AWS EKS, Azure AKS, or Google GKE) Check your Kubernetes setup with: kubectl cluster-info If you don't have Kubernetes installed, follow this guide to set it up. 3. Creating the Deployment Deployment YAML Explanation 1️⃣ Metadata Section apiVersion: apps/v1 kind: Deployment metadata: name: accounts-deployment labels: app: accounts Defines a Deployment named accounts-deployment. Uses labels (app: accounts) to identify the microservice. 2️⃣ Spec Section spec: replicas: 1 selector: matchLabels: app: accounts Creates one replica (you can increase this for scalability). Selects Pods using the matchLabels condition. 3️⃣ Pod Template (Under template: Section) template: metadata: labels: app: accounts Specifies the labels inside the Pod template. 4️⃣ Container Definition spec: containers: - name: accounts image: eazybytes/accounts:s12 ports: - containerPort: 8080 Defines a container named accounts. Uses the Docker image eazybytes/accounts:s12. Exposes port 8080 for incoming traffic. 5️⃣ Environment Variables (From ConfigMap) env: - name: SPRING_APPLICATION_NAME valueFrom: configMapKeyRef: name: eazybank-configmap key: ACCOUNTS_APPLICATION_NAME - name: SPRING_PROFILES_ACTIVE valueFrom: configMapKeyRef: name: eazybank-configmap key: SPRING_PROFILES_ACTIVE - name: SPRING_CONFIG_IMPORT valueFrom: configMapKeyRef: name: eazybank-configmap key: SPRING_CONFIG_IMPORT - name: EUREKA_CLIENT_SERVICEURL_DEFAULTZONE valueFrom: configMapKeyRef: name: eazybank-configmap key: EUREKA_CLIENT_SERVICEURL_DEFAULTZONE Pulls environment variables from a ConfigMap (eazybank-configmap). These variables configure Spring Boot profiles, Eureka client URL, and application name dynamically. Deploying the Application Run the following command to create the Deployment: kubectl apply -f deployment.yaml Verify the deployment: kubectl get deployments kubectl get pods If the Pod is running, you should see an output similar to: NAME READY STATUS RESTARTS AGE accounts-deployment 1/1 Running 0 10s 4. Exposing the Service Service YAML Explanation apiVersion: v1 kind: Service metadata: name: accounts spec: selector: app: accounts type: LoadBalancer ports: - protocol: TCP port: 8080 targetPort: 8080 Creates a Service named accounts. Selects Pods with the label app: accounts. Uses LoadBalancer to expose the service externally. Maps port 8080 on the Service to port 8080 in the container. Deploying the Service Run the following command: kubectl apply -f service.yaml Check the service: kubectl get services If successful, you'll see an output like: NAME TYPE CLUSTER-IP EXTERNAL-IP PORT(S) AGE accounts LoadBalancer 10.100.200.100 8080:30000/TCP 10s If you're running Minikube, use minikube service accounts --url to get the external URL. 5. Accessing the Application Once the LoadBalancer is ready, you can access the service using: http://:8080 For Minikube users, use: minikube service accounts --url To check logs from the running Pod: kubectl logs -f 6. Scaling the Application You can scale the Deployment to handle more traffic: kubectl scale deployment accounts-deployment --replicas=3 Verify the new replica count: kubectl get pods 7. Cleaning Up To delete the deployment and service: kubectl delete -f deployment.yaml kubectl delete -f service.yaml Conclusion In this guide, we: ✅ Created a Deployment for a Spring Boot microservice. ✅ Defined a Service to expose the microservice. ✅ Used a Confi

In this blog post, we'll walk through deploying a Spring Boot microservice on Kubernetes (K8s) using the provided Kubernetes manifest files. These files define a Deployment and a Service, ensuring that our microservice runs smoothly within the cluster.
1. Understanding the Manifest Files
The provided YAML files define:
- A Deployment that manages the lifecycle of the microservice.
- A Service that exposes the microservice to the network.
Let's go through the deployment process step by step.
2. Setting Up the Kubernetes Cluster
Before deploying, ensure that you have a Kubernetes cluster running. You can use:
- Minikube (for local development)
- Docker Desktop Kubernetes
- A managed Kubernetes service (like AWS EKS, Azure AKS, or Google GKE)
Check your Kubernetes setup with:
kubectl cluster-info
If you don't have Kubernetes installed, follow this guide to set it up.
3. Creating the Deployment
Deployment YAML Explanation
1️⃣ Metadata Section
apiVersion: apps/v1
kind: Deployment
metadata:
  name: accounts-deployment
  labels:
    app: accounts
- Defines a Deployment named
accounts-deployment. - Uses labels (
app: accounts) to identify the microservice.
2️⃣ Spec Section
spec:
  replicas: 1
  selector:
    matchLabels:
      app: accounts
- Creates one replica (you can increase this for scalability).
- Selects Pods using the matchLabels condition.
3️⃣ Pod Template (Under template: Section)
    template:
      metadata:
        labels:
          app: accounts
- Specifies the labels inside the Pod template.
4️⃣ Container Definition
    spec:
      containers:
      - name: accounts
        image: eazybytes/accounts:s12
        ports:
        - containerPort: 8080
- Defines a container named
accounts. - Uses the Docker image
eazybytes/accounts:s12. - Exposes port 8080 for incoming traffic.
5️⃣ Environment Variables (From ConfigMap)
        env:
        - name: SPRING_APPLICATION_NAME
          valueFrom:
            configMapKeyRef:
              name: eazybank-configmap
              key: ACCOUNTS_APPLICATION_NAME
        - name: SPRING_PROFILES_ACTIVE
          valueFrom:
            configMapKeyRef:
              name: eazybank-configmap
              key: SPRING_PROFILES_ACTIVE
        - name: SPRING_CONFIG_IMPORT
          valueFrom:
            configMapKeyRef:
              name: eazybank-configmap
              key: SPRING_CONFIG_IMPORT
        - name: EUREKA_CLIENT_SERVICEURL_DEFAULTZONE
          valueFrom:
            configMapKeyRef:
              name: eazybank-configmap
              key: EUREKA_CLIENT_SERVICEURL_DEFAULTZONE
- Pulls environment variables from a ConfigMap (
eazybank-configmap). - These variables configure Spring Boot profiles, Eureka client URL, and application name dynamically.
Deploying the Application
Run the following command to create the Deployment:
kubectl apply -f deployment.yaml
Verify the deployment:
kubectl get deployments
kubectl get pods
If the Pod is running, you should see an output similar to:
NAME                   READY   STATUS    RESTARTS   AGE
accounts-deployment    1/1     Running   0          10s
4. Exposing the Service
Service YAML Explanation
apiVersion: v1
kind: Service
metadata:
  name: accounts
spec:
  selector:
    app: accounts
  type: LoadBalancer
  ports:
    - protocol: TCP
      port: 8080
      targetPort: 8080
- Creates a Service named
accounts. - Selects Pods with the label
app: accounts. - Uses LoadBalancer to expose the service externally.
- Maps port 8080 on the Service to port 8080 in the container.
Deploying the Service
Run the following command:
kubectl apply -f service.yaml
Check the service:
kubectl get services
If successful, you'll see an output like:
NAME       TYPE           CLUSTER-IP       EXTERNAL-IP   PORT(S)          AGE
accounts   LoadBalancer   10.100.200.100        8080:30000/TCP   10s
- If you're running Minikube, use
minikube service accounts --urlto get the external URL.
5. Accessing the Application
Once the LoadBalancer is ready, you can access the service using:
http://:8080
For Minikube users, use:
minikube service accounts --url
To check logs from the running Pod:
kubectl logs -f
6. Scaling the Application
You can scale the Deployment to handle more traffic:
kubectl scale deployment accounts-deployment --replicas=3
Verify the new replica count:
kubectl get pods
7. Cleaning Up
To delete the deployment and service:
kubectl delete -f deployment.yaml
kubectl delete -f service.yaml
Conclusion
In this guide, we:
✅ Created a Deployment for a Spring Boot microservice.
✅ Defined a Service to expose the microservice.
✅ Used a ConfigMap to manage environment variables.
✅ Scaled the application dynamically.
Now your microservice is running on Kubernetes!