


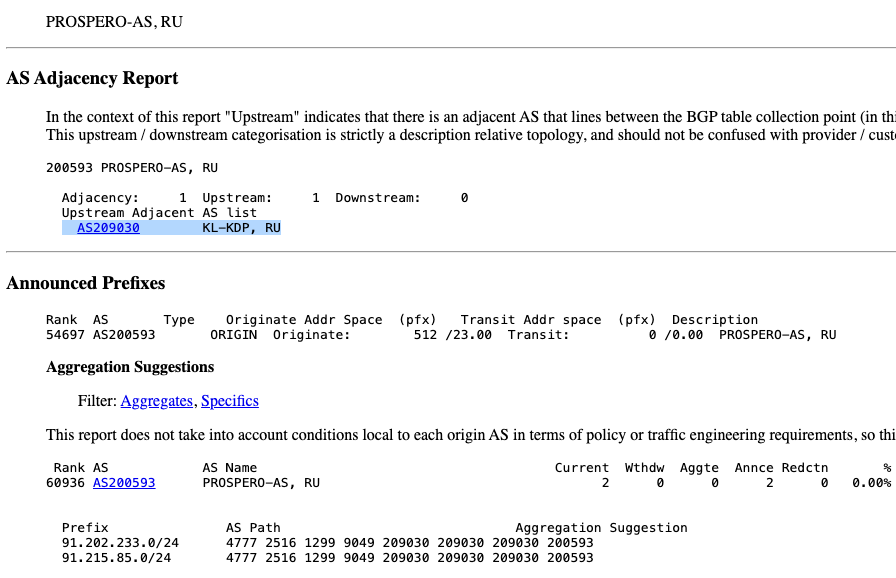
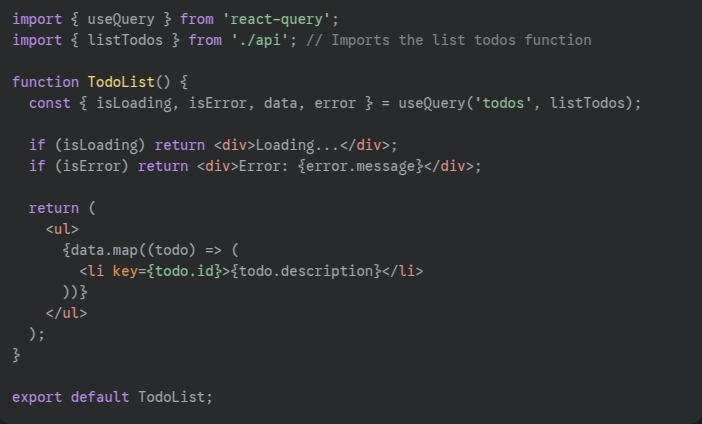
![Apple Officially Announces Return of 'Ted Lasso' for Fourth Season [Video]](https://www.iclarified.com/images/news/96710/96710/96710-640.jpg)
![Apple Plans Live Translation Feature for AirPods in iOS 19 [Report]](https://www.iclarified.com/images/news/96712/96712/96712-640.jpg)
![Apple Shares Official Trailer for 'F1' Starring Brad Pitt [Video]](https://www.iclarified.com/images/news/96714/96714/96714-640.jpg)


_Tanapong_Sungkaew_Alamy.jpg?#)

_JIRAROJ_PRADITCHAROENKUL_Alamy.jpg?#)


![[The AI Show Episode 139]: The Government Knows AGI Is Coming, Superintelligence Strategy, OpenAI’s $20,000 Per Month Agents & Top 100 Gen AI Apps](https://www.marketingaiinstitute.com/hubfs/ep%20139%20cover-2.png)


![[The AI Show Episode 138]: Introducing GPT-4.5, Claude 3.7 Sonnet, Alexa+, Deep Research Now in ChatGPT Plus & How AI Is Disrupting Writing](https://www.marketingaiinstitute.com/hubfs/ep%20138%20cover.png)


How to Design an Eye Using 3D CAD Software
How to Design an Eye Using 3D CAD Software Designing an eye in SelfCAD is an essential skill for 3D artists looking to create realistic characters, sculptures, or animated models. The process involves shaping the eyeball, adding depth and detail to the iris, and refining the overall structure to achieve a lifelike appearance. With SelfCAD’s user-friendly 3D tools, such as the Sphere, Sculpting, and Color features, even beginners can craft a detailed eye model with ease. This article will provide a step-by-step guide on how to design an eye in SelfCAD, covering essential techniques to bring your 3D creations to life To access the interactive tutorial to this article, check out; https://www.selfcad.com/tutorials/1a3g2dp6p23293q5a3013g3m5973p63646y2 Once you've launched the editor; From the 3D Shapes category on the toolbar choose sphere; Set rotation x to 90 Tick the checkmark to finalize sphere Click to activate polygon selection; click on the gear icon to open the advanced selection tools; Set tolerance to 1, click on highlighted region to select it Click to activate face selection; set loop selection to true, click on highlighted face to select loop from the object. Click ‘x’ to close selection settings panel, click delete button to delete selected objects From the right panel choose materials; Set settings to textures, texture category to custom, click add image button to load new image, click load image from tutorial button to add image, click eye.png button to apply texture Click solid button to set rendering mode Set settings to uv, uv generate mode to unwrapping Click generate uv button to generate uv, click select and split parts button to select parts to split, click on highlighted regions to select it Click split selected parts button to split selected parts, click select and split parts button to select parts to split, click on highlighted regions to select it Click split selected parts button to split selected parts, click select and split parts button to select parts to split, click on highlighted regions to select it Click split selected parts button to split selected parts, click select and split parts button to select parts to split, click on highlighted regions to select it Click split selected parts button to split selected parts, drag highlighted gizmo to highlighted point to move profile Drag highlighted gizmo to highlighted point to move profile Drag highlighted gizmo to highlighted point to move profile Drag highlighted gizmo to highlighted point to move profile Set transformation to rotate, drag highlighted gizmo to highlighted point to rotate profile Set transformation to scale; drag highlighted gizmo to highlighted point to scale profile Drag highlighted gizmo to highlighted point to scale profile Tick the checkmark to finalize materials From the 3D Shapes category on the toolbar choose sphere; set radius to 40, position y to 10, , position z to 13, rotation x to 90. Tick the checkmark to finalize sphere Click solid+wireframe button to set rendering mode; Click to activate polygon selection; click on highlighted region to select it Click to activate face selection Click on the gear icon to open advanced selection tools; set loop selection to true, click on highlighted face to select loop from the object. Click ‘x’ to close selection settings panel From the utilities category on the toolbar choose split From the right panel choose materials; Set settings to textures; texture category to custom, click add image button to load new image, click load image from tutorial button to add image, click eye1.jpeg button to apply texture Click solid button to set rendering mode; Set settings to uv, mapping to face uv Tick the checkmark to finalize materials From the edit menu on the top toolbar choose union, click smooth button to enable smooth rendering As you continue honing your design skills, remember that SelfCAD offers a wealth of resources to support your learning journey. To deepen your understanding and explore more advanced features, consider checking out the interactive tutorials (https://www.selfcad.com/tutorials) available on the SelfCAD website. The tutorials page provides a treasure trove of guides, tips, and tricks that cater to designers of all levels. More structured learning experience can also be accessed at the SelfCAD Academy (https://www.selfcad.com/academy/curriculum/), https://www.youtube.com/@3dmodeling101, and 3D Modeling 101 series (https://www.youtube.com/playlist?list=PL74nFNT8yS9DcE1UlUUdiR1wFGv9DDfTB). This comprehensive resource offers in-depth courses taught by industry experts, allowing you to master the intricacies of SelfCAD at your own pace.
How to Design an Eye Using 3D CAD Software
Designing an eye in SelfCAD is an essential skill for 3D artists looking to create realistic characters, sculptures, or animated models. The process involves shaping the eyeball, adding depth and detail to the iris, and refining the overall structure to achieve a lifelike appearance. With SelfCAD’s user-friendly 3D tools, such as the Sphere, Sculpting, and Color features, even beginners can craft a detailed eye model with ease. This article will provide a step-by-step guide on how to design an eye in SelfCAD, covering essential techniques to bring your 3D creations to life
To access the interactive tutorial to this article, check out; https://www.selfcad.com/tutorials/1a3g2dp6p23293q5a3013g3m5973p63646y2
Once you've launched the editor;
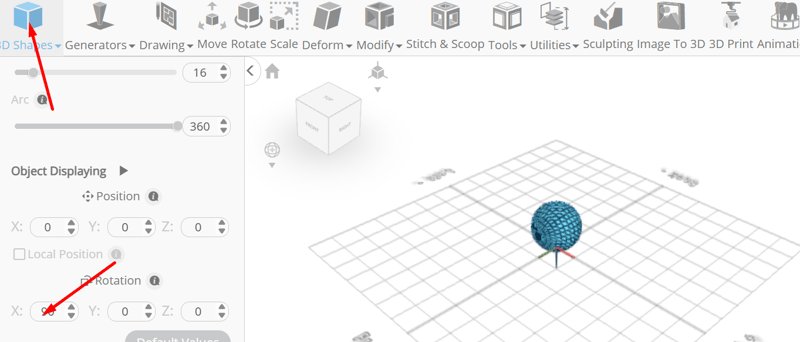
From the 3D Shapes category on the toolbar choose sphere; Set rotation x to 90
Tick the checkmark to finalize sphere
Click to activate polygon selection; click on the gear icon to open the advanced selection tools; Set tolerance to 1, click on highlighted region to select it
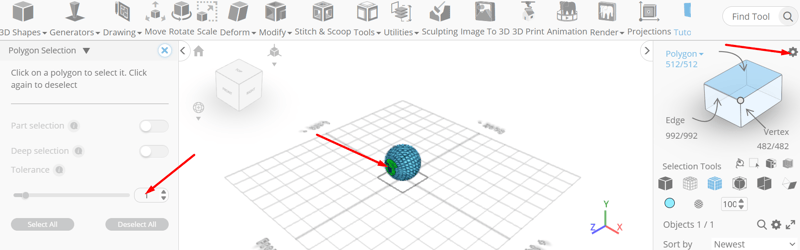
Click to activate face selection; set loop selection to true, click on highlighted face to select loop from the object.
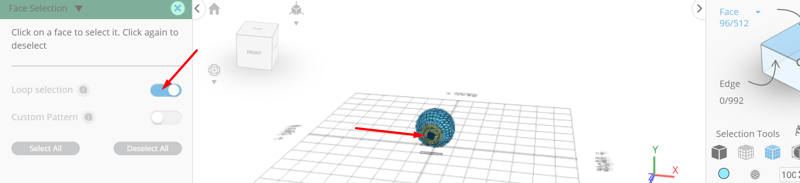
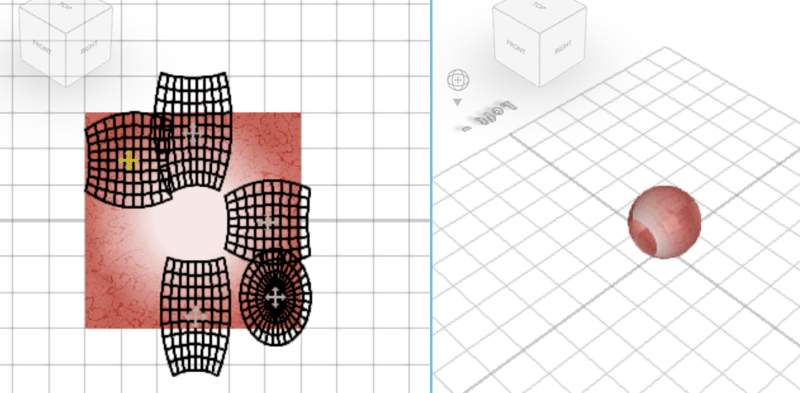
Click ‘x’ to close selection settings panel, click delete button to delete selected objects
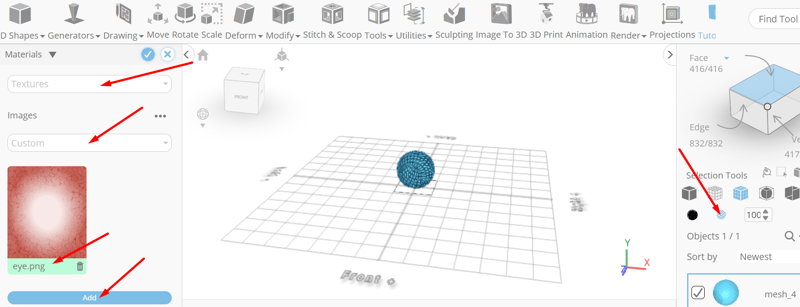
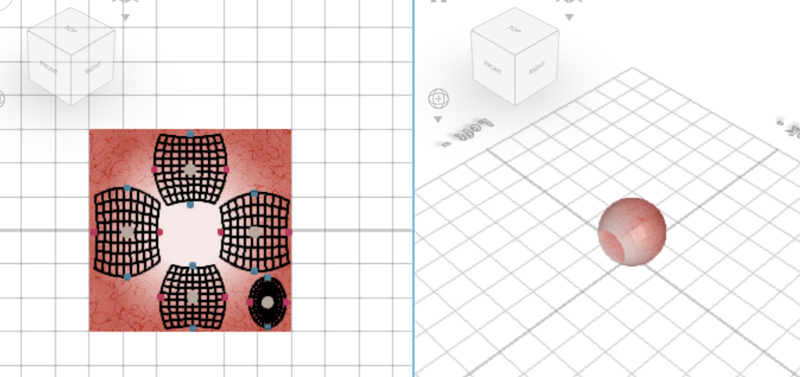
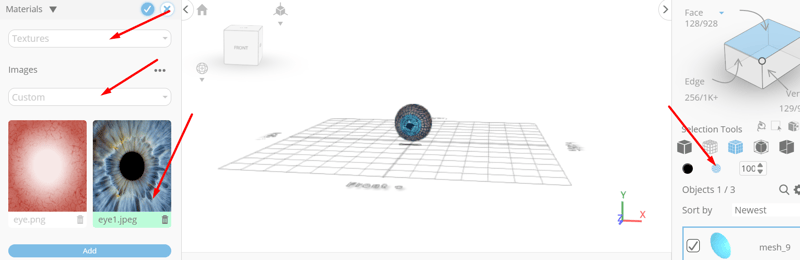
From the right panel choose materials; Set settings to textures, texture category to custom, click add image button to load new image, click load image from tutorial button to add image, click eye.png button to apply texture
Click solid button to set rendering mode
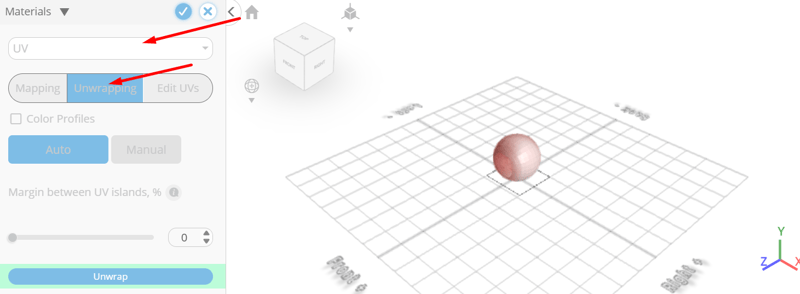
Set settings to uv, uv generate mode to unwrapping
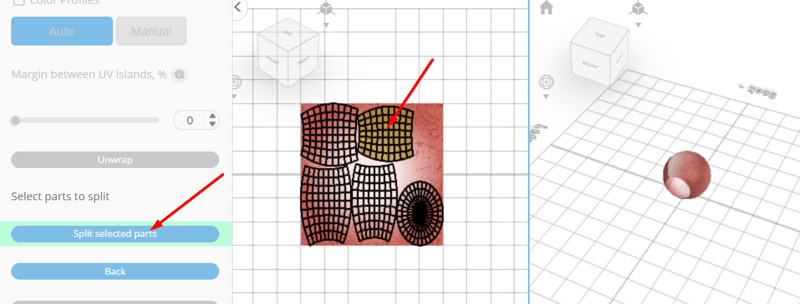
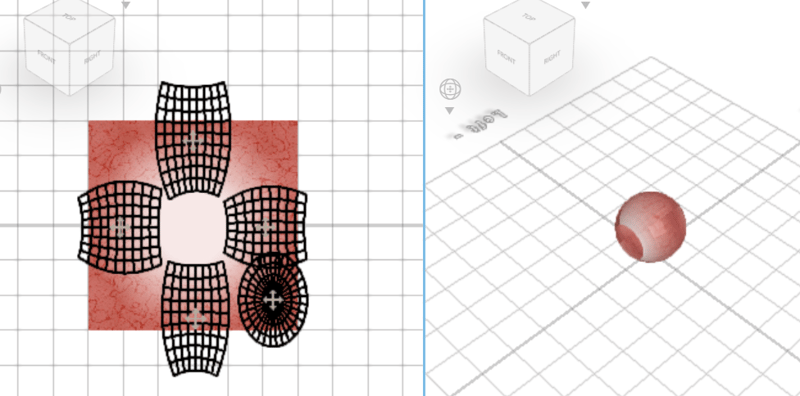
Click generate uv button to generate uv, click select and split parts button to select parts to split, click on highlighted regions to select it
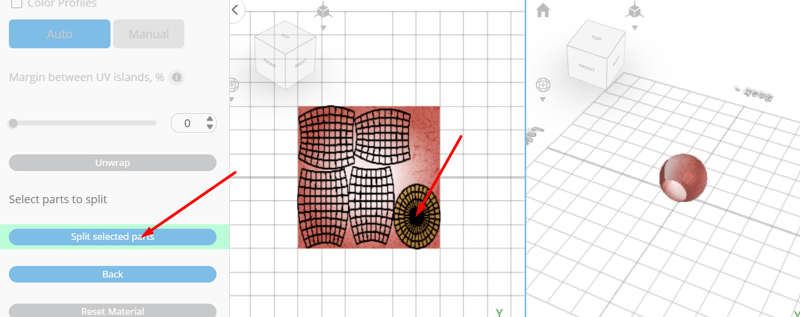
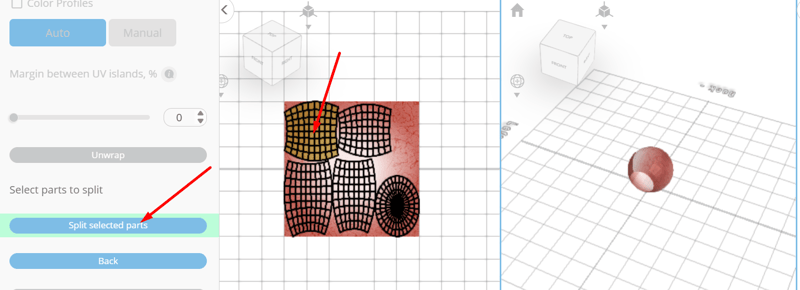
Click split selected parts button to split selected parts, click select and split parts button to select parts to split, click on highlighted regions to select it
Click split selected parts button to split selected parts, click select and split parts button to select parts to split, click on highlighted regions to select it
Click split selected parts button to split selected parts, click select and split parts button to select parts to split, click on highlighted regions to select it

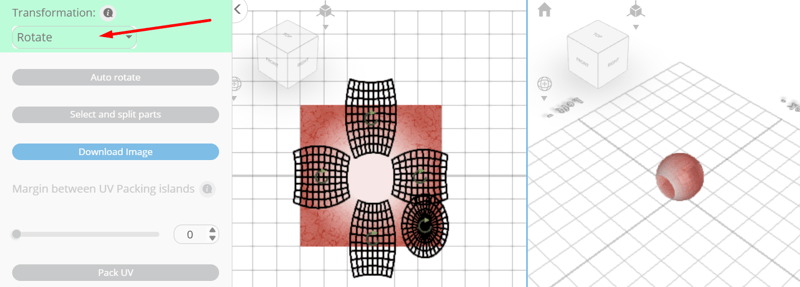
Click split selected parts button to split selected parts, drag highlighted gizmo to highlighted point to move profile
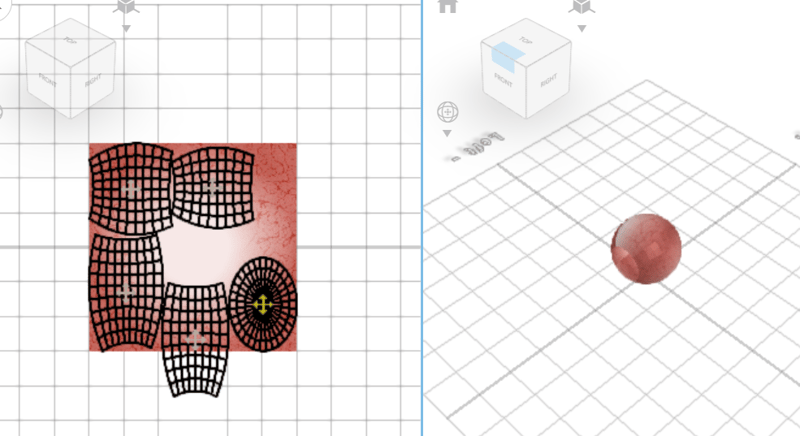
Drag highlighted gizmo to highlighted point to move profile
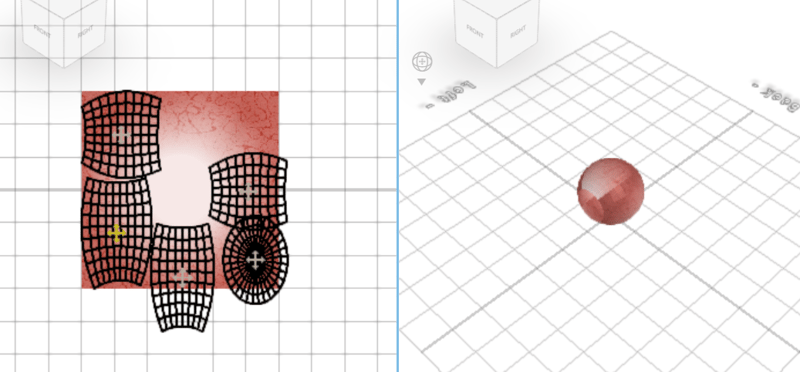
Drag highlighted gizmo to highlighted point to move profile
Drag highlighted gizmo to highlighted point to move profile
Set transformation to rotate, drag highlighted gizmo to highlighted point to rotate profile
Set transformation to scale; drag highlighted gizmo to highlighted point to scale profile
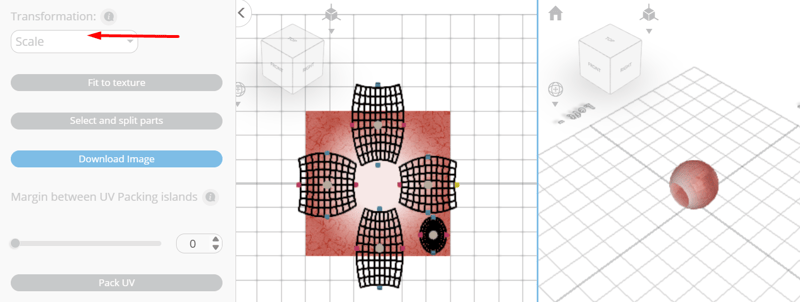
Drag highlighted gizmo to highlighted point to scale profile
Tick the checkmark to finalize materials
From the 3D Shapes category on the toolbar choose sphere; set radius to 40, position y to 10, , position z to 13, rotation x to 90.
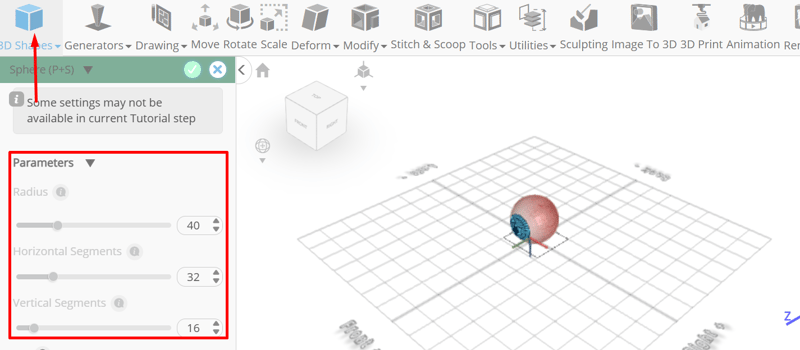
Tick the checkmark to finalize sphere
Click solid+wireframe button to set rendering mode; Click to activate polygon selection; click on highlighted region to select it
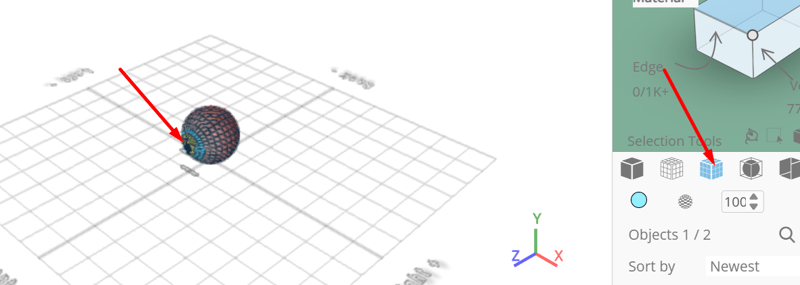
Click to activate face selection
Click on the gear icon to open advanced selection tools; set loop selection to true, click on highlighted face to select loop from the object.

Click ‘x’ to close selection settings panel
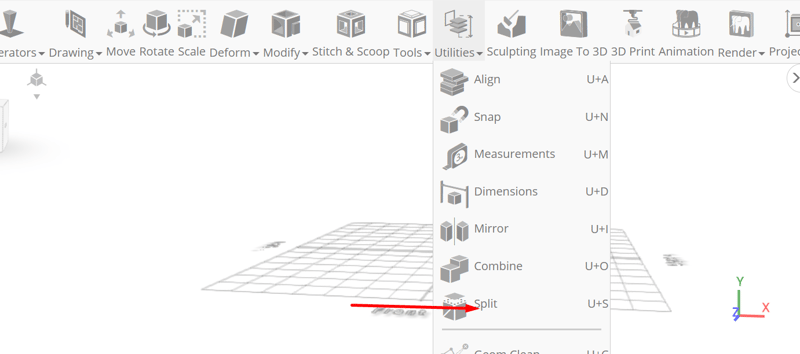
From the utilities category on the toolbar choose split
From the right panel choose materials; Set settings to textures; texture category to custom, click add image button to load new image, click load image from tutorial button to add image, click eye1.jpeg button to apply texture
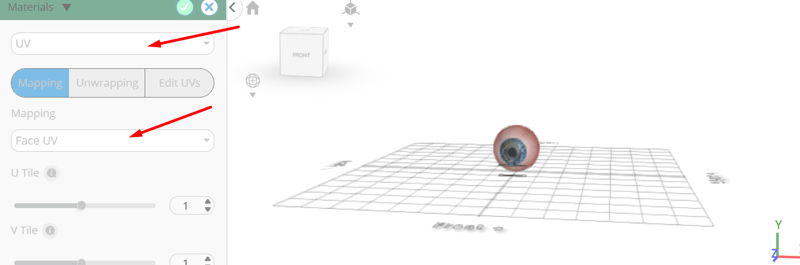
Click solid button to set rendering mode; Set settings to uv, mapping to face uv
Tick the checkmark to finalize materials
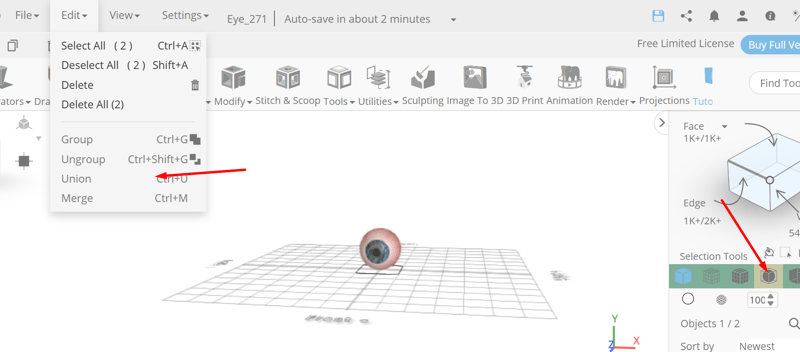
From the edit menu on the top toolbar choose union, click smooth button to enable smooth rendering
As you continue honing your design skills, remember that SelfCAD offers a wealth of resources to support your learning journey. To deepen your understanding and explore more advanced features, consider checking out the interactive tutorials (https://www.selfcad.com/tutorials) available on the SelfCAD website. The tutorials page provides a treasure trove of guides, tips, and tricks that cater to designers of all levels.
More structured learning experience can also be accessed at the SelfCAD Academy (https://www.selfcad.com/academy/curriculum/), https://www.youtube.com/@3dmodeling101, and 3D Modeling 101 series (https://www.youtube.com/playlist?list=PL74nFNT8yS9DcE1UlUUdiR1wFGv9DDfTB). This comprehensive resource offers in-depth courses taught by industry experts, allowing you to master the intricacies of SelfCAD at your own pace.