


![Mobile Legends: Bang Bang [MLBB] Free Redeem Codes April 2025](https://www.talkandroid.com/wp-content/uploads/2024/07/Screenshot_20240704-093036_Mobile-Legends-Bang-Bang.jpg)


![Apple Releases iOS 18.5 Beta 3 and iPadOS 18.5 Beta 3 [Download]](https://www.iclarified.com/images/news/97076/97076/97076-640.jpg)
![Apple Seeds visionOS 2.5 Beta 3 to Developers [Download]](https://www.iclarified.com/images/news/97077/97077/97077-640.jpg)
![Apple Seeds tvOS 18.5 Beta 3 to Developers [Download]](https://www.iclarified.com/images/news/97078/97078/97078-640.jpg)
![Apple Seeds watchOS 11.5 Beta 3 to Developers [Download]](https://www.iclarified.com/images/news/97079/97079/97079-640.jpg)


![[The AI Show Episode 144]: ChatGPT’s New Memory, Shopify CEO’s Leaked “AI First” Memo, Google Cloud Next Releases, o3 and o4-mini Coming Soon & Llama 4’s Rocky Launch](https://www.marketingaiinstitute.com/hubfs/ep%20144%20cover.png)


![BPMN-procesmodellering [closed]](https://i.sstatic.net/l7l8q49F.png)


![From fast food worker to cybersecurity engineer with Tae'lur Alexis [Podcast #169]](https://cdn.hashnode.com/res/hashnode/image/upload/v1745242807605/8a6cf71c-144f-4c91-9532-62d7c92c0f65.png?#)


.jpg?#)
.jpg?#)
.jpg?#)


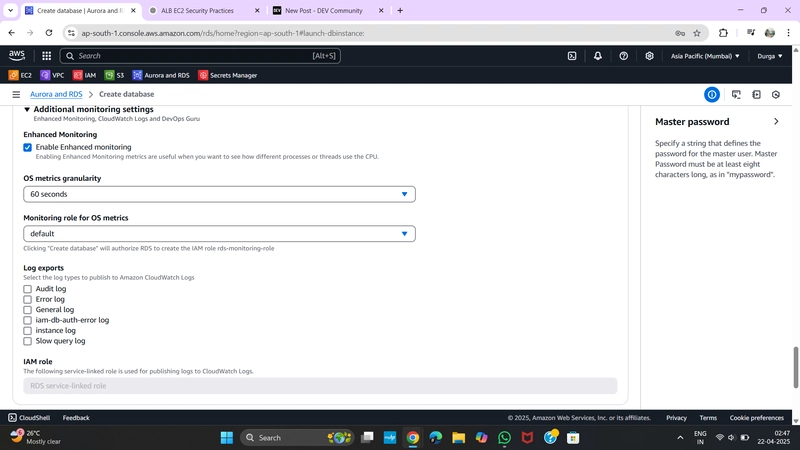
Set Up an Amazon RDS Database
Amazon Relational Database Service (RDS) allows you to easily set up, operate, and scale a relational database in the cloud. In this guide, we will walk you through setting up an Amazon RDS MySQL database instance. 1. Go to the RDS Console Open the AWS Management Console. In the search bar, type RDS and select RDS from the dropdown. 2. Click “Create Database” Once you’re in the RDS dashboard, click on the “Create database” button. 3. Choose Database Creation Method In this step, you will choose how you want to create the database. Select “Standard Create” for full control over your configuration. 4. Choose Engine You’ll now need to choose the database engine. For this guide, select MySQL. You can also choose from other engines such as PostgreSQL, MariaDB, or Oracle. 5. Specify DB Details Enter the following information: DB Instance Identifier: This is the name of your database instance (e.g., mydbinstance). Master Username: The username for your admin account (e.g., admin). Master Password: Set a password for your admin user. Confirm Password: Re-enter the password to confirm. If you don’t want to manually set a password, you can choose to auto-generate a password. 6. Choose DB Instance Size In this section, you’ll choose the instance type that fits your needs. If you are using the AWS Free Tier, select the db.t3.micro class (1 vCPU, 1 GiB RAM). For production environments or larger applications, you may want to select larger instance sizes. 7. Storage Settings For most cases, the default storage settings will be sufficient. However, if you need more storage, you can modify the allocated storage or enable storage autoscaling to automatically adjust the storage based on your usage. 8. Connectivity In this step, configure your network settings: VPC: Choose the Virtual Private Cloud (VPC) where your database will reside. Public Access: Set this to Yes if you want to access the database from outside the VPC (i.e., from your local machine or other networks). VPC Security Group: Select an existing security group or create a new one to allow access to your RDS instance. Ensure port 3306 (for MySQL) is allowed. 9. Database Authentication The default authentication method is Password authentication. You can leave this as is or enable IAM database authentication for enhanced security. 10. Additional Settings (Optional) In this step, you can: Set an initial DB name (this will create a database within your RDS instance). Enable automatic backups, monitoring, and other features based on your requirements. 11. Click "Create Database"
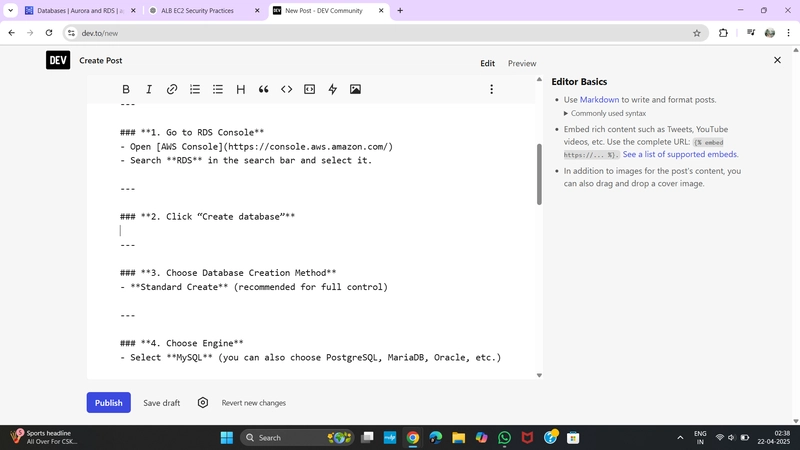
Amazon Relational Database Service (RDS) allows you to easily set up, operate, and scale a relational database in the cloud. In this guide, we will walk you through setting up an Amazon RDS MySQL database instance.
1. Go to the RDS Console
- Open the AWS Management Console.
- In the search bar, type RDS and select RDS from the dropdown.
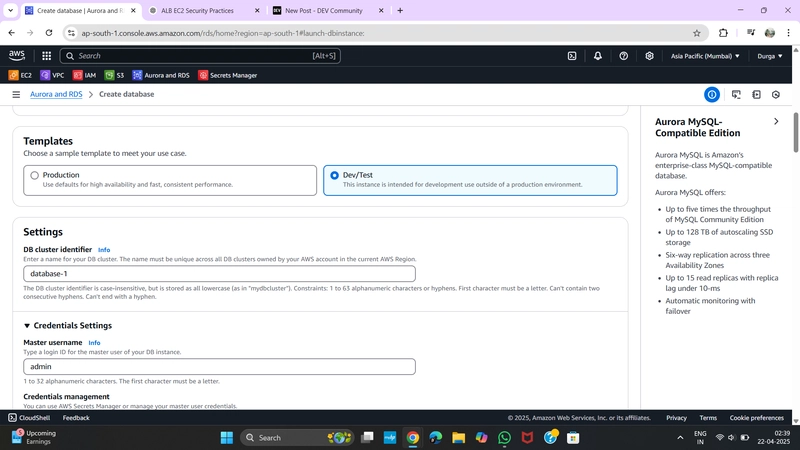
2. Click “Create Database”
Once you’re in the RDS dashboard, click on the “Create database” button.
3. Choose Database Creation Method
In this step, you will choose how you want to create the database. Select “Standard Create” for full control over your configuration.
4. Choose Engine
You’ll now need to choose the database engine. For this guide, select MySQL. You can also choose from other engines such as PostgreSQL, MariaDB, or Oracle.

5. Specify DB Details
Enter the following information:
-
DB Instance Identifier: This is the name of your database instance (e.g.,
mydbinstance). -
Master Username: The username for your admin account (e.g.,
admin). - Master Password: Set a password for your admin user.
- Confirm Password: Re-enter the password to confirm.
If you don’t want to manually set a password, you can choose to auto-generate a password.
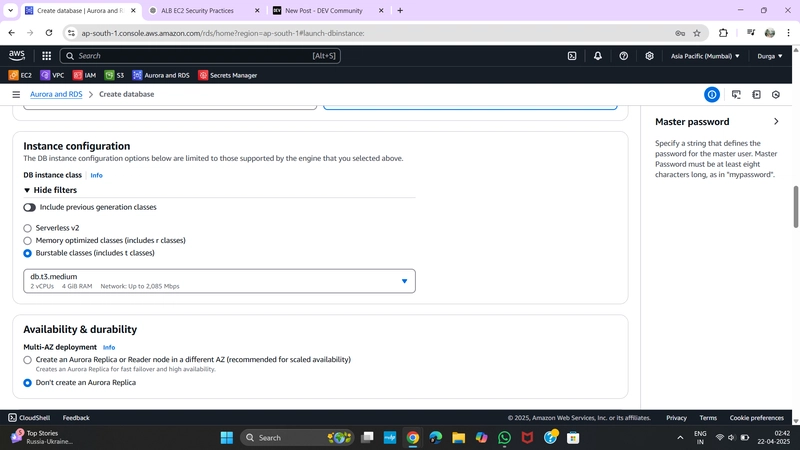
6. Choose DB Instance Size
In this section, you’ll choose the instance type that fits your needs. If you are using the AWS Free Tier, select the db.t3.micro class (1 vCPU, 1 GiB RAM).
For production environments or larger applications, you may want to select larger instance sizes.
7. Storage Settings
For most cases, the default storage settings will be sufficient. However, if you need more storage, you can modify the allocated storage or enable storage autoscaling to automatically adjust the storage based on your usage.
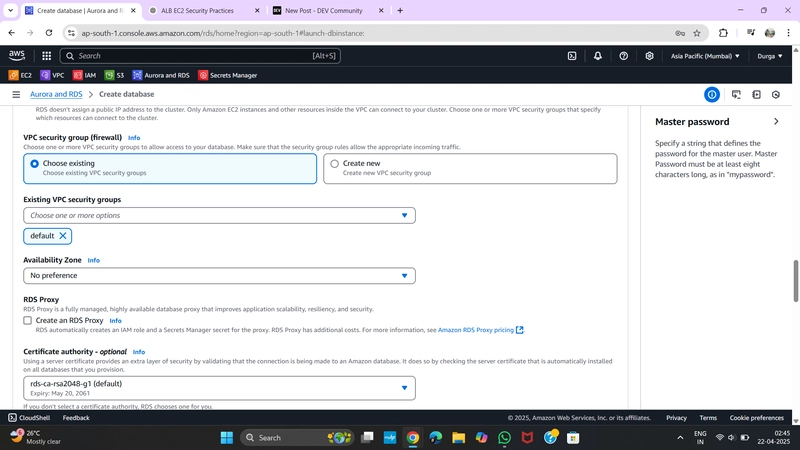
8. Connectivity
In this step, configure your network settings:
- VPC: Choose the Virtual Private Cloud (VPC) where your database will reside.
- Public Access: Set this to Yes if you want to access the database from outside the VPC (i.e., from your local machine or other networks).
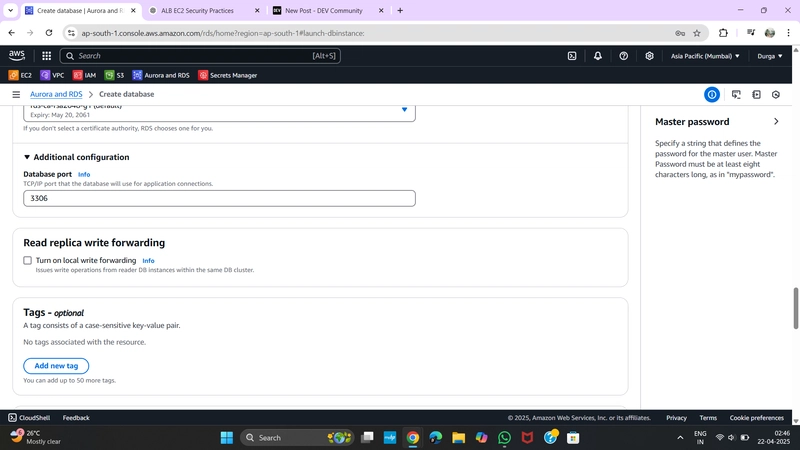
- VPC Security Group: Select an existing security group or create a new one to allow access to your RDS instance. Ensure port 3306 (for MySQL) is allowed.
9. Database Authentication
The default authentication method is Password authentication. You can leave this as is or enable IAM database authentication for enhanced security.
10. Additional Settings (Optional)
In this step, you can:
- Set an initial DB name (this will create a database within your RDS instance).
- Enable automatic backups, monitoring, and other features based on your requirements.