


![Apple Watch Series 10 Back On Sale for $299! [Lowest Price Ever]](https://www.iclarified.com/images/news/96657/96657/96657-640.jpg)
![Apple Slips to Fifth in China's Smartphone Market with 9% Decline [Report]](https://www.iclarified.com/images/news/97065/97065/97065-640.jpg)
![EU Postpones Apple App Store Fines Amid Tariff Negotiations [Report]](https://www.iclarified.com/images/news/97068/97068/97068-640.jpg)


![What’s new in Android’s April 2025 Google System Updates [U: 4/18]](https://i0.wp.com/9to5google.com/wp-content/uploads/sites/4/2025/01/google-play-services-3.jpg?resize=1200%2C628&quality=82&strip=all&ssl=1)


_Andreas_Prott_Alamy.jpg?width=1280&auto=webp&quality=80&disable=upscale#)


![[The AI Show Episode 144]: ChatGPT’s New Memory, Shopify CEO’s Leaked “AI First” Memo, Google Cloud Next Releases, o3 and o4-mini Coming Soon & Llama 4’s Rocky Launch](https://www.marketingaiinstitute.com/hubfs/ep%20144%20cover.png)


How to port Zephy to STM32?
Porting Zephyr RTOS to an STM32 microcontroller involves setting up the development environment, configuring the board support package (BSP), and building/flashing a sample application. Below is a step-by-step guide: 1. Prerequisites Hardware: STM32 development board (e.g., STM32F4 Discovery, Nucleo-144). Software: Zephyr SDK (Toolchain for ARM Cortex-M). Python 3.8+ (for west tool). Git (to fetch Zephyr source). STM32CubeProgrammer (for flashing). 2. Install Zephyr Development Environment A. Install Dependencies (Linux/macOS/WSL) bash # Install Python and pip sudo apt update && sudo apt install -y git cmake ninja-build gperf \ python3 python3-pip # Install west (Zephyr meta-tool) pip3 install west # Install Zephyr SDK (ARM toolchain) wget https://github.com/zephyrproject-rtos/sdk-ng/releases/download/v0.16.0/zephyr-sdk-0.16.0_linux-x86_64.tar.gz tar xvf zephyr-sdk-0.16.0_linux-x86_64.tar.gz cd zephyr-sdk-0.16.0 ./setup.sh B. Fetch Zephyr Source bash west init ~/zephyrproject cd ~/zephyrproject west update C. Set Environment Variables bash export ZEPHYR_BASE=~/zephyrproject/zephyr source $ZEPHYR_BASE/zephyr-env.sh 3. Check STM32 Board Support Zephyr supports many STM32 boards out-of-the-box. Check compatibility: bash ls $ZEPHYR_BASE/boards/arm | grep stm32 Example supported boards: nucleo_f401re (STM32F4) nucleo_h743zi (STM32H7) stm32f4_disco (STM32F4 Discovery) 4. Build and Flash a Sample Application A. Build "Hello World" for STM32 bash west build -p auto -b nucleo_f401re $ZEPHYR_BASE/samples/hello_world -p auto: Auto-detects available cores. -b nucleo_f401re: Specifies the board. B. Flash the Binary Option 1: Using OpenOCD (via ST-Link) bash west flash Requires ST-Link debugger (built into Nucleo boards). Option 2: Manual Flashing (STM32CubeProgrammer) Locate the .hex or .bin file: bash ls build/zephyr/zephyr.hex Flash using STM32CubeProgrammer GUI or CLI: bash STM32_Programmer_CLI -c port=SWD -w build/zephyr/zephyr.hex 0x08000000 5. Customizing for a New STM32 Board If your board isn’t officially supported, follow these steps: A. Create a Custom Board Directory bash cd $ZEPHYR_BASE/boards/arm mkdir my_stm32_board cd my_stm32_board B. Required Files board.cmake (Specifies CPU/flash settings): cmake set(CPU_TYPE cortex-m4) # e.g., M4 for STM32F4 set(FLASH_SIZE 512K) set(RAM_SIZE 128K) Kconfig.board (Board-specific options): config BOARD_MY_STM32_BOARD bool "My Custom STM32 Board" depends on SOC_STM32F401XE .dts (Device Tree for peripherals): dts / { model = "My STM32 Board"; compatible = "st,stm32f401"; chosen { zephyr,console = &usart2; }; }; _defconfig (Default Zephyr config): CONFIG_SERIAL=y CONFIG_UART_INTERRUPT_DRIVEN=y C. Build and Test bash west build -b my_stm32_board samples/hello_world west flash 6. Debugging A. Serial Output (UART) Connect to the STM32’s UART (e.g., /dev/ttyACM0): bash picocom -b 115200 /dev/ttyACM0 Should show: *** Booting Zephyr OS build v3.4.0 *** Hello World! my_stm32_board B. GDB Debugging bash west build -b nucleo_f401re -- -DCMAKE_EXPORT_COMPILE_COMMANDS=ON arm-none-eabi-gdb build/zephyr/zephyr.elf (gdb) target remote :3333 # Connect to OpenOCD (gdb) monitor reset halt (gdb) continue 7. Adding Peripheral Drivers To enable I2C, SPI, or GPIO: Edit prj.conf: CONFIG_I2C=y CONFIG_SPI=y CONFIG_GPIO=y Use Zephyr’s Device Tree (DTS) to map pins: dts &i2c1 { status = "okay"; sda-pin = ; scl-pin = ; }; 8. Troubleshooting Next Steps ✔ Explore Zephyr’s sensor drivers (e.g., BME280 over I2C). ✔ Implement multi-threading with Zephyr’s kernel API. ✔ Integrate RTOS features (message queues, timers). For advanced use, refer to: Zephyr STM32 Documentation Zephyr Device Tree Guide
Porting Zephyr RTOS to an STM32 microcontroller involves setting up the development environment, configuring the board support package (BSP), and building/flashing a sample application. Below is a step-by-step guide:
1. Prerequisites
Hardware:
STM32 development board (e.g., STM32F4 Discovery, Nucleo-144).
Software:
- Zephyr SDK (Toolchain for ARM Cortex-M).
- Python 3.8+ (for west tool).
- Git (to fetch Zephyr source).
- STM32CubeProgrammer (for flashing).
2. Install Zephyr Development Environment
A. Install Dependencies (Linux/macOS/WSL)
bash

# Install Python and pip
sudo apt update && sudo apt install -y git cmake ninja-build gperf \
  python3 python3-pip

# Install west (Zephyr meta-tool)
pip3 install west

# Install Zephyr SDK (ARM toolchain)
wget https://github.com/zephyrproject-rtos/sdk-ng/releases/download/v0.16.0/zephyr-sdk-0.16.0_linux-x86_64.tar.gz
tar xvf zephyr-sdk-0.16.0_linux-x86_64.tar.gz
cd zephyr-sdk-0.16.0
./setup.sh
B. Fetch Zephyr Source
bash

west init ~/zephyrproject
cd ~/zephyrproject
west update
C. Set Environment Variables
bash

export ZEPHYR_BASE=~/zephyrproject/zephyr
source $ZEPHYR_BASE/zephyr-env.sh
3. Check STM32 Board Support
Zephyr supports many STM32 boards out-of-the-box. Check compatibility:
bash

ls $ZEPHYR_BASE/boards/arm | grep stm32
Example supported boards:
4. Build and Flash a Sample Application
A. Build "Hello World" for STM32
bash

west build -p auto -b nucleo_f401re $ZEPHYR_BASE/samples/hello_world
- -p auto: Auto-detects available cores.
- -b nucleo_f401re: Specifies the board.
B. Flash the Binary
Option 1: Using OpenOCD (via ST-Link)
bash

west flash
Requires ST-Link debugger (built into Nucleo boards).
Option 2: Manual Flashing (STM32CubeProgrammer)
- Locate the .hex or .bin file:
bash

ls build/zephyr/zephyr.hex
- Flash using STM32CubeProgrammer GUI or CLI:
bash

STM32_Programmer_CLI -c port=SWD -w build/zephyr/zephyr.hex 0x08000000
5. Customizing for a New STM32 Board
If your board isn’t officially supported, follow these steps:
A. Create a Custom Board Directory
bash

cd $ZEPHYR_BASE/boards/arm
mkdir my_stm32_board
cd my_stm32_board
B. Required Files
- board.cmake (Specifies CPU/flash settings):
cmake

set(CPU_TYPE cortex-m4)  # e.g., M4 for STM32F4
set(FLASH_SIZE 512K)
set(RAM_SIZE 128K)
- Kconfig.board (Board-specific options):
config BOARD_MY_STM32_BOARD
    bool "My Custom STM32 Board"
    depends on SOC_STM32F401XE
- .dts (Device Tree for peripherals):
dts

/ {
    model = "My STM32 Board";
    compatible = "st,stm32f401";

    chosen {
        zephyr,console = &usart2;
    };
};
- _defconfig (Default Zephyr config):
CONFIG_SERIAL=y
CONFIG_UART_INTERRUPT_DRIVEN=y
C. Build and Test
bash

west build -b my_stm32_board samples/hello_world
west flash
6. Debugging
A. Serial Output (UART)
Connect to the STM32’s UART (e.g., /dev/ttyACM0):
bash

picocom -b 115200 /dev/ttyACM0
Should show:
*** Booting Zephyr OS build v3.4.0 ***
Hello World! my_stm32_board
B. GDB Debugging
bash

west build -b nucleo_f401re -- -DCMAKE_EXPORT_COMPILE_COMMANDS=ON
arm-none-eabi-gdb build/zephyr/zephyr.elf
(gdb) target remote :3333  # Connect to OpenOCD
(gdb) monitor reset halt
(gdb) continue
7. Adding Peripheral Drivers
To enable I2C, SPI, or GPIO:
- Edit prj.conf:
CONFIG_I2C=y
CONFIG_SPI=y
CONFIG_GPIO=y
- Use Zephyr’s Device Tree (DTS) to map pins:
dts

&i2c1 {
    status = "okay";
    sda-pin = <&gpiob 7>;
    scl-pin = <&gpiob 6>;
};
8. Troubleshooting
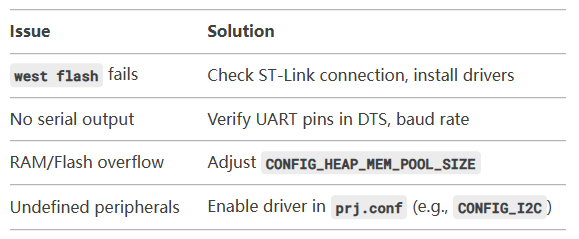
- Next Steps ✔ Explore Zephyr’s sensor drivers (e.g., BME280 over I2C). ✔ Implement multi-threading with Zephyr’s kernel API. ✔ Integrate RTOS features (message queues, timers).
For advanced use, refer to:
- Zephyr STM32 Documentation
- Zephyr Device Tree Guide