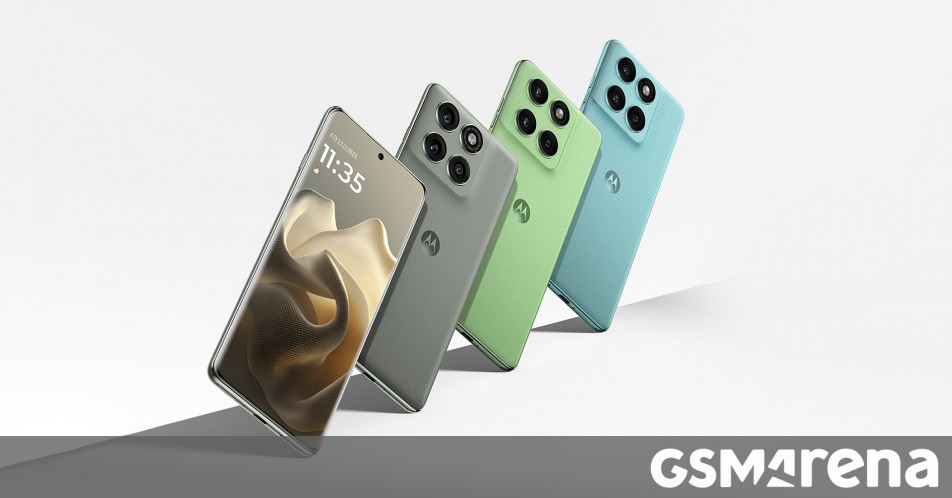
_Aleksey_Funtap_Alamy.jpg?width=1280&auto=webp&quality=80&disable=upscale#)


![Apple Shares New Mother's Day Ad: 'A Gift for Mom' [Video]](https://www.iclarified.com/images/news/97267/97267/97267-640.jpg)
![Apple Developing New Chips for Smart Glasses, Macs, AI Servers [Report]](https://www.iclarified.com/images/news/97269/97269/97269-640.jpg)
![Apple Shares Official Trailer for 'Stick' Starring Owen Wilson [Video]](https://www.iclarified.com/images/news/97264/97264/97264-640.jpg)


 Evolved as a Predominant Framework for Ransomware Attacks.webp?#)

_Sergey_Tarasov_Alamy.jpg?width=1280&auto=webp&quality=80&disable=upscale#)


![[The AI Show Episode 146]: Rise of “AI-First” Companies, AI Job Disruption, GPT-4o Update Gets Rolled Back, How Big Consulting Firms Use AI, and Meta AI App](https://www.marketingaiinstitute.com/hubfs/ep%20146%20cover.png)


-Mafia-The-Old-Country---The-Initiation-Trailer-00-00-54.png?width=1920&height=1920&fit=bounds&quality=70&format=jpg&auto=webp#)


How To Complete Interstellar Enigma In Revenge Of The Savage Planet
Are you eager to complete Interstellar Enigma in Revenge of the Savage Planet? This particular quest chain is one of the most convoluted in the entire campaign, though it also leads to fascinating areas. Our guide has all the information that you need, but be forewarned that there are a few spoilers ahead.How to complete Interstellar Enigma in Revenge of the Savage Planet - Shrine Trials guideInterstellar Enigma appears as a mission in your journal just a few hours into the campaign. A mysterious individual contacts you and says that there are strange readings and frequencies in the area. These locations won't be marked on your map automatically. In fact, the quest itself can't be tracked at the start, so you might just stumble upon these hidden areas while thoroughly exploring regions. Interstellar Enigma: Mission mechanics and ShrinesThe Revenge of the Savage Planet Interstellar Enigma mission has a rather peculiar gameplay mechanic. The quest can't be tracked and locations won't readily appear, but there are a few tidbits to remember:If you're just scanning the environment while free-roaming, you might see specific areas with a question mark. These tend to be the Shrine locations related to the quest itself.You need all sorts of tools and gadgets to complete the challenges in each location.Upon completing a Shrine trial, you'll be able to pick up an artifact--i.e. a fragment of the Pentaforce.Once you've obtained your first artifact, you can research it back in your hub. Doing so marks the locations of the other Shrines. Shrine of Timing locationPlanet: Stellaris PrimeRegion: Nu FloridaLocation: The Shrine is directly west of your hub in Nu Florida. Climb up the tall rock formation and use the Stomp Booster ability to destroy the cracked ground below. Shrine of Timing: Time's Up trialYour goal in this particular Revenge of the Savage Planet Shrine is to shoot the terminals, all while taking note of the correct timing/speed.Room 1 (pictured above): There are five terminals here, but each one has a timer with a different speed. You'll want to shoot them quickly in the following order: First: Far-right terminalSecond: Second terminal from the rightThird: Second terminal from the leftFourth: The terminal in the middleFifth: Far-left terminalRoom 2: There are two terminals along the central shaft, as well as one more at the top. The idea is to shoot these targets as you climb to the top with your grapple. Then, at the top of the shaft, you need to destroy the floor using your Stomp Booster.Room 3: There are three terminals: Start by breaking the floors on both elevated sections with your Stomp Booster.Shoot the terminal on the left while standing on the ramp.Quickly run to the right-hand side and shoot the terminal there.Drop down the opening and shoot the third terminal at the bottom. Shrine of Pressure locationPlanet: Stellaris PrimeRegion: Cliffs of AbaddoonLocation: This segment of the Revenge of the Savage Planet Interstellar Enigma quest takes you back to the area where you fought the Hognork. At the edge of the plateau, you should see a metallic pillar. Use your Magnetic Fork to grab and throw it at the blue-colored wall. Then, switch to the Remote Drone Controller so you can have Eko pass through the barrier and activate the terminal. Shrine of Pressure: Under Pressure trialThis Revenge of the Savage Planet Shrine involves placing blocks on pressure plates. This opens the doorway to the next areas.Room 1: Destroy the blue goo and pick up the block. Place it on the pedestal so you can move on to the next room.Room 2: Pick up the Bombegranate from the plant and blow up the cracked ground. This gives you access to a small section where you can infuse your Goo Ingestor with lava. The lava burns through the cobwebs, allowing you to pick up the two blocks that you can place on the pedestal.Room 3: The third section might seem a bit complex: Upon entering the room, look to your right and destroy the goo wall.Stand on the plate in this small area. Then, control Eko and bring the drone to the corridor on the opposite side.Have Eko interact with the terminal to spawn the first block. Place this on the pressure plate that you were standing on.Go to the corridor on the opposite side and head down. Use your Proton Whip on the goo, then use your Magnetic Fork on the metallic pillar.Head back to the main area, then toss the projectile at the metallic ceiling to destroy it. This causes the second cube to fall down.Place both cubes on the pedestal to reach the room with the Pentaforce artifact. Shrine of Grind locationPlanet: XephyrRegion: Cactus ValleyLocation: Make your way south of the fast travel point in this zone and you should see a cliffside area with metallic rock chunks jutting out. Use your whip's rail grind to cross the gap, then bring out your Magnetic Fork. Lift the nearby metallic projectile, then toss it at the wall to destroy it. Shrine of Grind: Balancing Act trialThis


Are you eager to complete Interstellar Enigma in Revenge of the Savage Planet? This particular quest chain is one of the most convoluted in the entire campaign, though it also leads to fascinating areas. Our guide has all the information that you need, but be forewarned that there are a few spoilers ahead.
How to complete Interstellar Enigma in Revenge of the Savage Planet - Shrine Trials guide
Interstellar Enigma appears as a mission in your journal just a few hours into the campaign. A mysterious individual contacts you and says that there are strange readings and frequencies in the area. These locations won't be marked on your map automatically. In fact, the quest itself can't be tracked at the start, so you might just stumble upon these hidden areas while thoroughly exploring regions.
Interstellar Enigma: Mission mechanics and Shrines

The Revenge of the Savage Planet Interstellar Enigma mission has a rather peculiar gameplay mechanic. The quest can't be tracked and locations won't readily appear, but there are a few tidbits to remember:
- If you're just scanning the environment while free-roaming, you might see specific areas with a question mark. These tend to be the Shrine locations related to the quest itself.
- You need all sorts of tools and gadgets to complete the challenges in each location.
- Upon completing a Shrine trial, you'll be able to pick up an artifact--i.e. a fragment of the Pentaforce.
- Once you've obtained your first artifact, you can research it back in your hub. Doing so marks the locations of the other Shrines.
Shrine of Timing location

- Planet: Stellaris Prime
- Region: Nu Florida
- Location: The Shrine is directly west of your hub in Nu Florida. Climb up the tall rock formation and use the Stomp Booster ability to destroy the cracked ground below.
Shrine of Timing: Time's Up trial

Your goal in this particular Revenge of the Savage Planet Shrine is to shoot the terminals, all while taking note of the correct timing/speed.
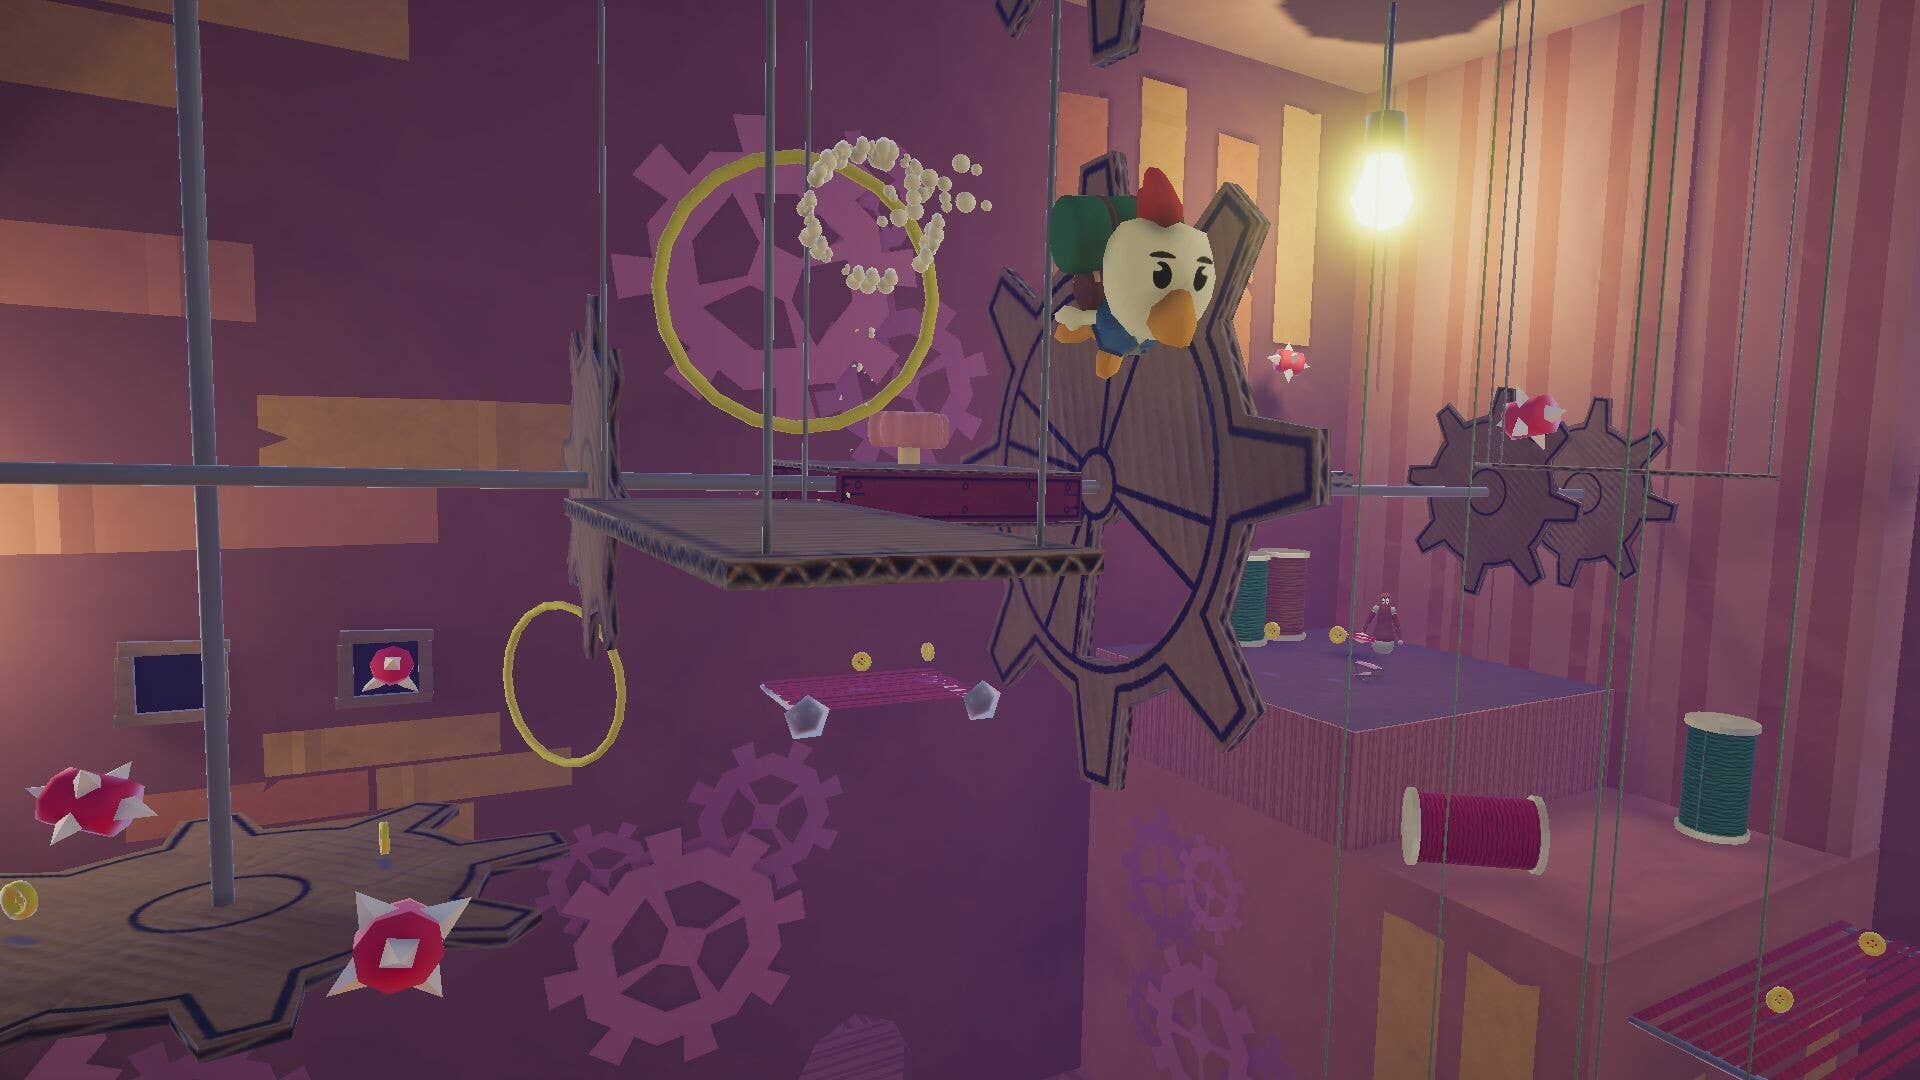
- Room 1 (pictured above): There are five terminals here, but each one has a timer with a different speed. You'll want to shoot them quickly in the following order:
- First: Far-right terminal
- Second: Second terminal from the right
- Third: Second terminal from the left
- Fourth: The terminal in the middle
- Fifth: Far-left terminal
- Room 2: There are two terminals along the central shaft, as well as one more at the top. The idea is to shoot these targets as you climb to the top with your grapple. Then, at the top of the shaft, you need to destroy the floor using your Stomp Booster.
- Room 3: There are three terminals:
- Start by breaking the floors on both elevated sections with your Stomp Booster.
- Shoot the terminal on the left while standing on the ramp.
- Quickly run to the right-hand side and shoot the terminal there.
- Drop down the opening and shoot the third terminal at the bottom.
Shrine of Pressure location

- Planet: Stellaris Prime
- Region: Cliffs of Abaddoon
- Location: This segment of the Revenge of the Savage Planet Interstellar Enigma quest takes you back to the area where you fought the Hognork. At the edge of the plateau, you should see a metallic pillar. Use your Magnetic Fork to grab and throw it at the blue-colored wall. Then, switch to the Remote Drone Controller so you can have Eko pass through the barrier and activate the terminal.
Shrine of Pressure: Under Pressure trial

This Revenge of the Savage Planet Shrine involves placing blocks on pressure plates. This opens the doorway to the next areas.
- Room 1: Destroy the blue goo and pick up the block. Place it on the pedestal so you can move on to the next room.
- Room 2: Pick up the Bombegranate from the plant and blow up the cracked ground. This gives you access to a small section where you can infuse your Goo Ingestor with lava. The lava burns through the cobwebs, allowing you to pick up the two blocks that you can place on the pedestal.
- Room 3: The third section might seem a bit complex:
- Upon entering the room, look to your right and destroy the goo wall.
- Stand on the plate in this small area. Then, control Eko and bring the drone to the corridor on the opposite side.
- Have Eko interact with the terminal to spawn the first block. Place this on the pressure plate that you were standing on.
- Go to the corridor on the opposite side and head down. Use your Proton Whip on the goo, then use your Magnetic Fork on the metallic pillar.
- Head back to the main area, then toss the projectile at the metallic ceiling to destroy it. This causes the second cube to fall down.
- Place both cubes on the pedestal to reach the room with the Pentaforce artifact.
Shrine of Grind location

- Planet: Xephyr
- Region: Cactus Valley
- Location: Make your way south of the fast travel point in this zone and you should see a cliffside area with metallic rock chunks jutting out. Use your whip's rail grind to cross the gap, then bring out your Magnetic Fork. Lift the nearby metallic projectile, then toss it at the wall to destroy it.
Shrine of Grind: Balancing Act trial

This portion of the Revenge of the Savage Planet Interstellar Enigma quest might be one of the easiest. It simply involves using the your whip to grind across the rails, while shooting any purple terminals that you spot.
- Room 1 and room 2: Both rooms shouldn't present much of a challenge at all. Just ride the rail and blast the target/s at the end.
- Room 3: The third room might seem a bit perplexing at first, as there are several rails winding around the chamber. There are half a dozen targets here, so just shoot them as you're moving around.
Shrine of Combat location

- Planet: Zenithian Rifts
- Region: Bilodeau's Floating Isles
- Location: This part might take a while since you need to gain access to the teleporter:
- Use the Goo Ingestor to funnel in Ferro Goo.
- Spray it on surfaces to electrify the three bulbous plants.
- Two of the bulbs are at the pond/surface where all the Simian Puffers are.
- The third requires you to dive using the Franx Underwater Scooter. Follow the neon signs to reach the other side, which also has the teleporter.
Shrine of Combat: Battle Royale trial

The Shrine of Combat has only one room, but it's a fairly large chamber. Once you're inside, several mechanized hybrid creatures will spawn. These include cybernetic versions of the Raccocco, Beetle, Crusher, and Brainard. These alien lifeforms also have unique attacks, such as rapid-fire lasers and disorienting gas. Needless to say, this fight can be very tough, so make sure you have combat, health, and avoidance-related upgrades.
Shrine of Challenge location

- Planet: Quasadron IX
- Region: Summit
- Location: Unlike the other Revenge of the Savage Planet Shrines that you might stumble upon while exploring, this one is actually part of the main campaign:
- Progress through the story until you complete That Has My Name On It--i.e. obtain all tools and gadgets.
- The last upgrade that you acquire is the Remote Drone Controller upgrade for Eko, which is in the Summit region. There's also a teleporter nearby, but it's deactivated.
- The mysterious robot will contact you again. This leads to another mission called Fine, I'll Do It. Your goal here is to examine three areas where you guide Eko through cramped spaces while avoiding lasers.
- Once Eko has activated the three terminals, you should gain access to the teleporter in the Summit.
Shrine of Challenge: Unnatural Selection trial and Cyber Wardrill boss fight

This final Shrine will truly test your mettle:
- Room 1: The first room itself only requires you to toss a Blight Bomb at the screen before shooting it--i.e. it kind of implies the mechanics for the next parts.
- Room 2: Several cybernetic hybrid creatures will spawn. These include Beetles and Babutts. They have a green shield that can only be removed via a Blight Bomb explosion.
- Room 3: Get ready for a hectic boss fight against the Cyber Wardrill:
- The Cyber Wardrill has various abilities that deal a lot of damage. These include bull rushes and aerial stomps.
- When the Cyber Wardrill glows green, you have to damage it with a Blight Bomb.
- When the Cyber Wardrill glows orange, you have to damage it with a Bombegranate.
- Other alien creatures will also appear once the boss' health is low just to annoy you.
- If your character perishes during this battle, then you have to restart from the Shrine's first room.
That does it for our guide on how to complete Interstellar Enigma in Revenge of the Savage Planet. Once you've gathered the five Pentaforce artifacts, you can finish the "All Pentaforce Pieces" research back at your hub to receive the "It's Alive!" achievement.
What happens next? Well, we're going to talk about this in our fifth planet location guide.
If you need help exploring this strange star system, you can head over to our Revenge of the Savage Planet guides hub.

.jpg?#)
