


![Mike Rockwell is Overhauling Siri's Leadership Team [Report]](https://www.iclarified.com/images/news/97096/97096/97096-640.jpg)
![Instagram Releases 'Edits' Video Creation App [Download]](https://www.iclarified.com/images/news/97097/97097/97097-640.jpg)
![Hands-On With 'iPhone 17 Air' Dummy Reveals 'Scary Thin' Design [Video]](https://www.iclarified.com/images/news/97100/97100/97100-640.jpg)
![Inside Netflix's Rebuild of the Amsterdam Apple Store for 'iHostage' [Video]](https://www.iclarified.com/images/news/97095/97095/97095-640.jpg)


![What iPhone 17 model are you most excited to see? [Poll]](https://9to5mac.com/wp-content/uploads/sites/6/2025/04/iphone-17-pro-sky-blue.jpg?quality=82&strip=all&w=290&h=145&crop=1)


_Weyo_alamy.png?width=1280&auto=webp&quality=80&disable=upscale#)


![[The AI Show Episode 144]: ChatGPT’s New Memory, Shopify CEO’s Leaked “AI First” Memo, Google Cloud Next Releases, o3 and o4-mini Coming Soon & Llama 4’s Rocky Launch](https://www.marketingaiinstitute.com/hubfs/ep%20144%20cover.png)


![BPMN-procesmodellering [closed]](https://i.sstatic.net/l7l8q49F.png)


-All-will-be-revealed-00-35-05.png?width=1920&height=1920&fit=bounds&quality=70&format=jpg&auto=webp#)


Azure Applied Skills: Creating and configuring network security groups
In this article series, I will be walking though the process of configuring secure access to workloads using Azure virtual networking. In this exercise, we will put in place the virtual networks and subnets. This exercise builds on top of what we did previously here We will be walking through this exercise We require the network traffic in the app-vnet to be tightly controlled with these requirements: Frontend Subnet: Hosts internet-facing web servers. Assign them to an Application Security Group (ASG) for simplified management via their network interfaces. Backend Subnet: Contains database servers accessed by the frontend. Attach a Network Security Group (NSG) to control access from the web servers. Testing Setup: Deploy VM1 in the frontend and VM2 in the backend using the provided ARM template for Ubuntu servers. Tasks: Create a network security group. Create network security group rules. Associate a network security group to a subnet. Create and use application security groups in network security group rules. Exercise 02: Create and configure network security groups This exercise requires the previous one to be done Open the azure portal and click the button on the top right to launch the CLI. It will ask you to choose between bash or Powershell. select Powershell. Select no storage, your subscription, then apply Enter this command: $RGName = "your-rg" New-AzResourceGroupDeployment -ResourceGroupName $RGName -TemplateUri https://raw.githubusercontent.com/MicrosoftLearning/Configure-secure-access-to-workloads-with-Azure-virtual-networking-services/main/Instructions/Labs/azuredeploy.json This will start up two virtual machines; vm1 and vm2 . Verify both are running in the virtual machines portal In the portal, search for and select Application Security groups Select create and configure the security group as follows: subscription: Select your subscription Resource Group: Your resource group (same as the ones the vms) name: app-frontend-asg Region: East US Select review + create then create When the deployment is done, Search for and select VM1 In the Networking blade, select Application security groups and then select Add application security groups. Then select Select app-frontend-asg and select Add application security groups Select app-frontend-asg then select Add Create and Associate the Network Security Group The purpose of Network security groups (NSGs) is to secure network traffic in a virtual network. In the portal, search for and select Network security group Select+Create` Enter these configurations: Subscription: your subscription Resource group: your resource group Name: app-vnet-nsg Region: East US Select Review + create and then select Create. Associate the NSG with the app-vnet backend subnet NSGs can be associated with subnets and/or individual network interfaces attached to Azure virtual machines Navigate to the app-vnet-nsg resource. In the Settings blade select Subnets. Select + Associate Select app-vnet and then the Backend subnet. Select OK. Create Network Security Group rules An NSG uses security rules to filter inbound and outbound network traffic. In the app-vnet-nsg resource, In the Settings blade, select Inbound security rules. Select + Add Select this configuration: Source: Any Source port ranges: * Destination: Application Security group Destination application security group: app-frontend-asg Service: SSH Action: Allow Priority: 100 Name: AllowSSH Click add ### Conclusion By completing this exercise, you've successfully configured secure access between frontend and backend workloads in Azure using Network Security Groups (NSGs) and Application Security Groups (ASGs). You’ve: Deployed virtual machines across separate subnets for frontend and backend workloads. Created and assigned an ASG to the frontend VM to simplify rule management. Created an NSG, associated it with the backend subnet, and defined custom security rules to control access. Allowed SSH access from the frontend ASG to the backend subnet—enabling controlled, secure communication between tiers. This setup ensures that only explicitly defined network traffic—such as SSH from the frontend—is permitted, creating a strong security boundary within your virtual network. In the next exercise, you'll build on this foundation by implementing more advanced network features and controls.
In this article series, I will be walking though the process of configuring secure access to workloads using Azure virtual networking. In this exercise, we will put in place the virtual networks and subnets. This exercise builds on top of what we did previously here
We will be walking through this exercise
We require the network traffic in the app-vnet to be tightly controlled with these requirements:
- Frontend Subnet: Hosts internet-facing web servers. Assign them to an Application Security Group (ASG) for simplified management via their network interfaces.
- Backend Subnet: Contains database servers accessed by the frontend. Attach a Network Security Group (NSG) to control access from the web servers.
- Testing Setup: Deploy VM1 in the frontend and VM2 in the backend using the provided ARM template for Ubuntu servers.
Tasks:
- Create a network security group.
- Create network security group rules.
- Associate a network security group to a subnet.
- Create and use application security groups in network security group rules.
Exercise 02: Create and configure network security groups
- This exercise requires the previous one to be done
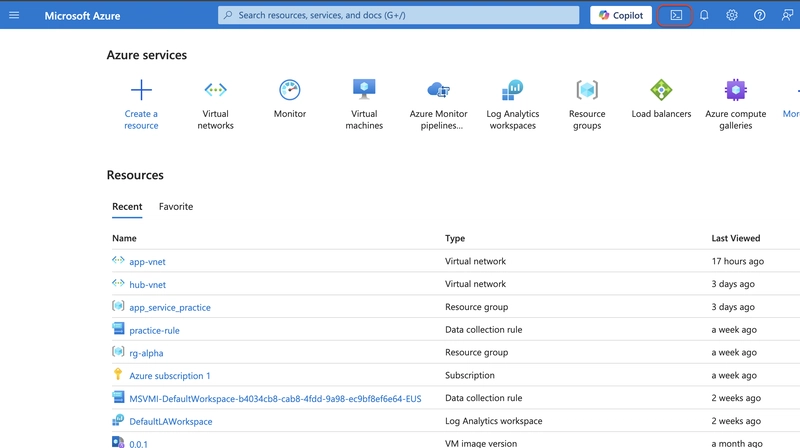
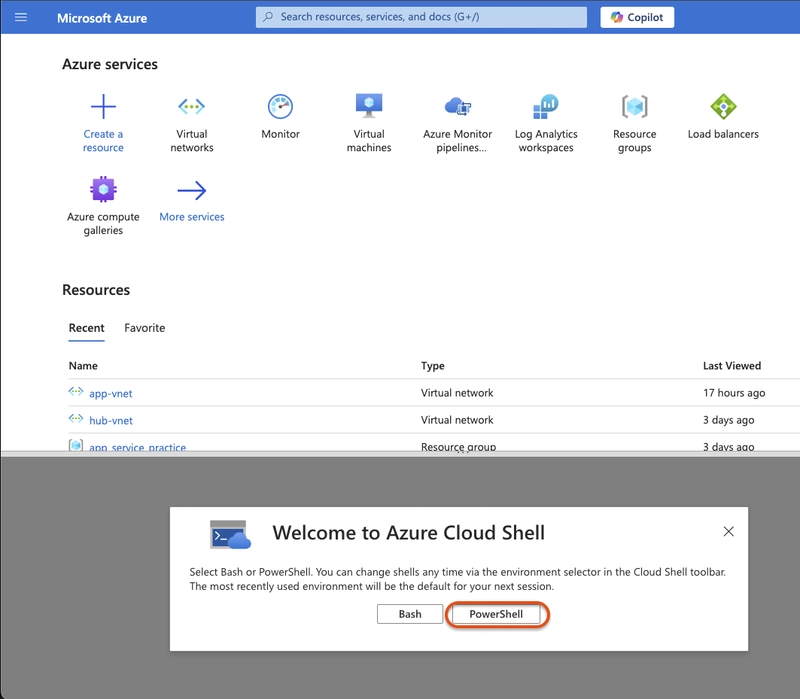
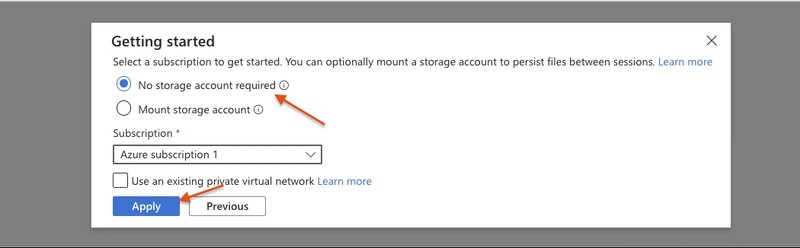
- Open the azure portal and click the button on the top right to launch the CLI. It will ask you to choose between bash or Powershell. select Powershell.
- Select no storage, your subscription, then apply
Enter this command:
   $RGName = "your-rg"

   New-AzResourceGroupDeployment -ResourceGroupName $RGName -TemplateUri https://raw.githubusercontent.com/MicrosoftLearning/Configure-secure-access-to-workloads-with-Azure-virtual-networking-services/main/Instructions/Labs/azuredeploy.json
This will start up two virtual machines; vm1 and vm2 . Verify both are running in the virtual machines portal
In the portal, search for and select Application Security groups

-
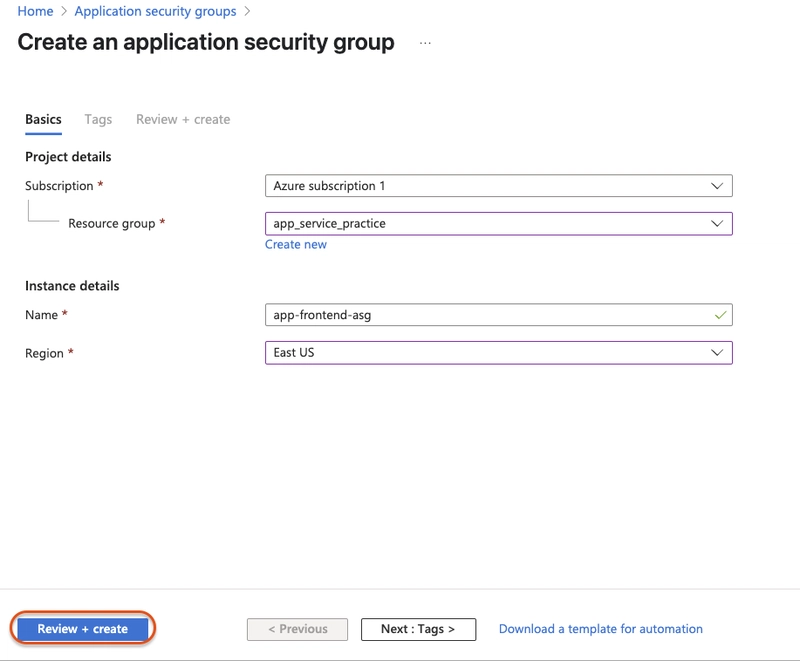
Select create and configure the security group as follows:
- subscription: Select your subscription
- Resource Group: Your resource group (same as the ones the vms)
- name:
app-frontend-asg - Region:
East US
Select review + create then create
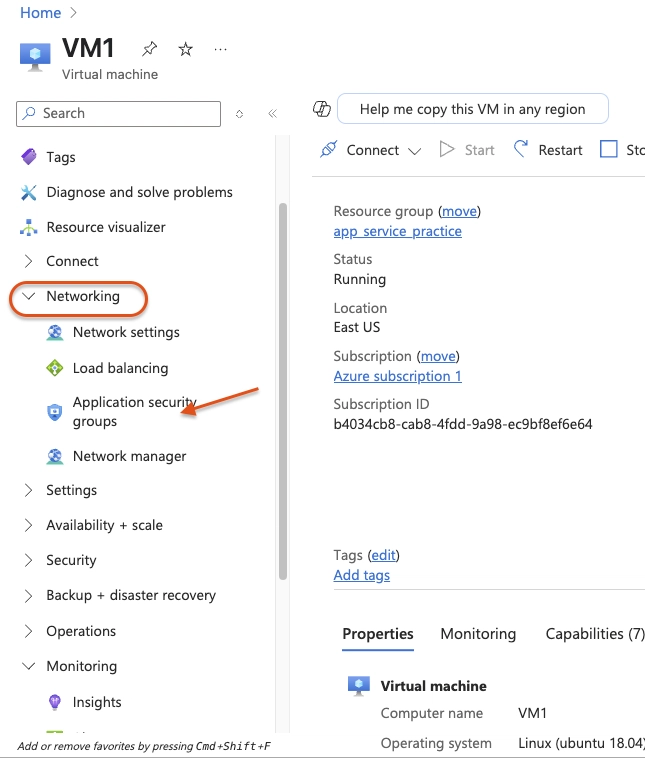
When the deployment is done, Search for and select
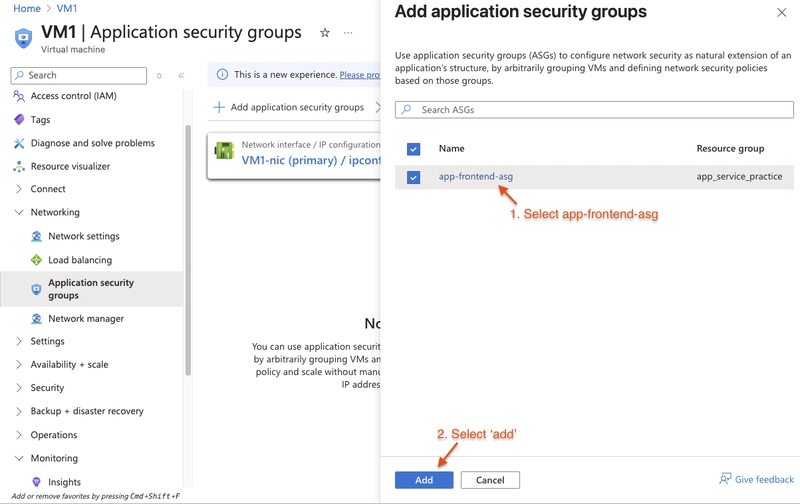
VM1In the Networking blade, select Application security groups and then select Add application security groups. Then select
Select app-frontend-asg and select Add application security groups
Select
app-frontend-asgthen selectAdd
Create and Associate the Network Security Group
The purpose of Network security groups (NSGs) is to secure network traffic in a virtual network.
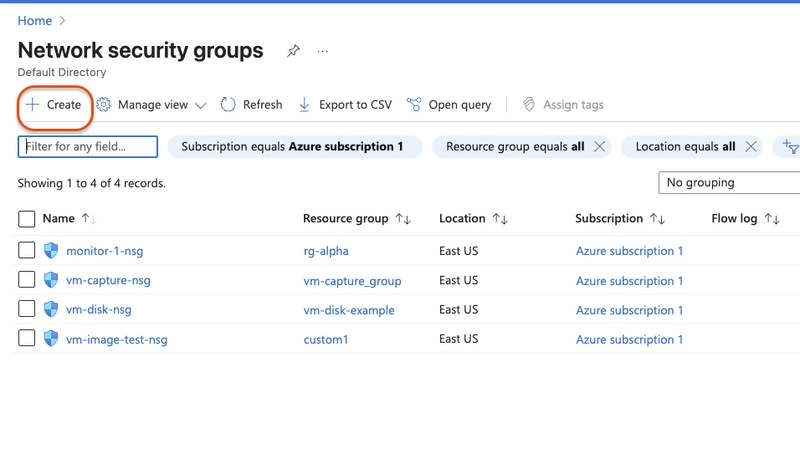
In the portal, search for and select
Network security group Select+Create`
-
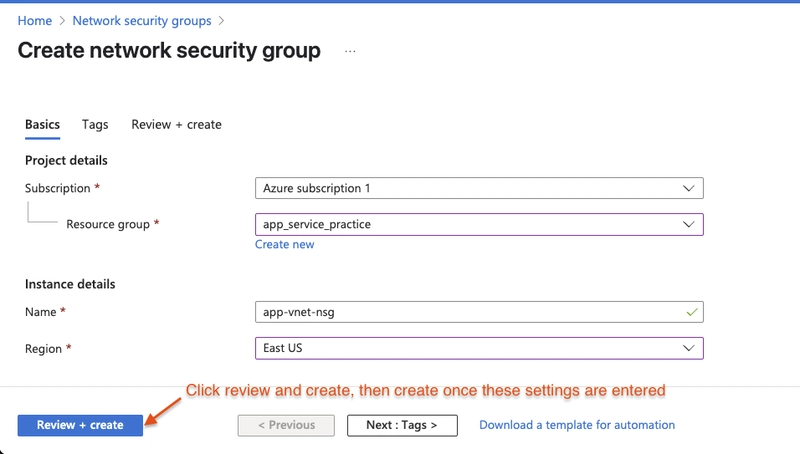
Enter these configurations:
- Subscription: your subscription
- Resource group: your resource group
- Name:
app-vnet-nsg - Region: East US
Select Review + create and then select Create.
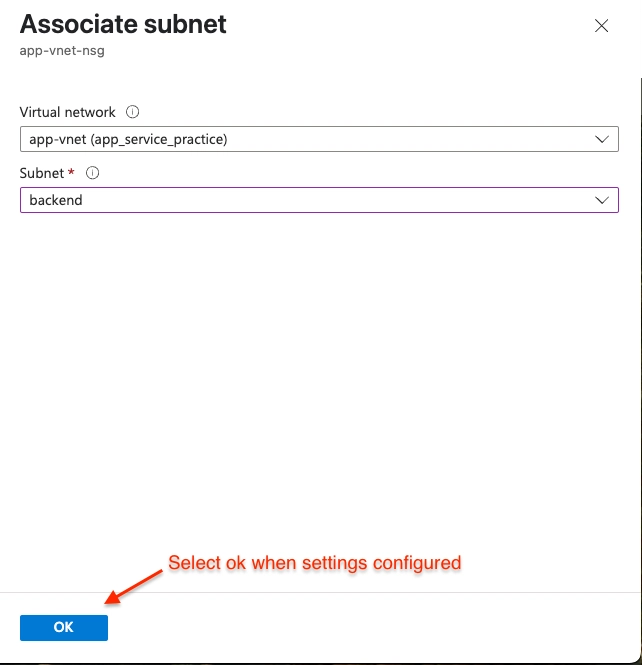
Associate the NSG with the app-vnet backend subnet
NSGs can be associated with subnets and/or individual network interfaces attached to Azure virtual machines
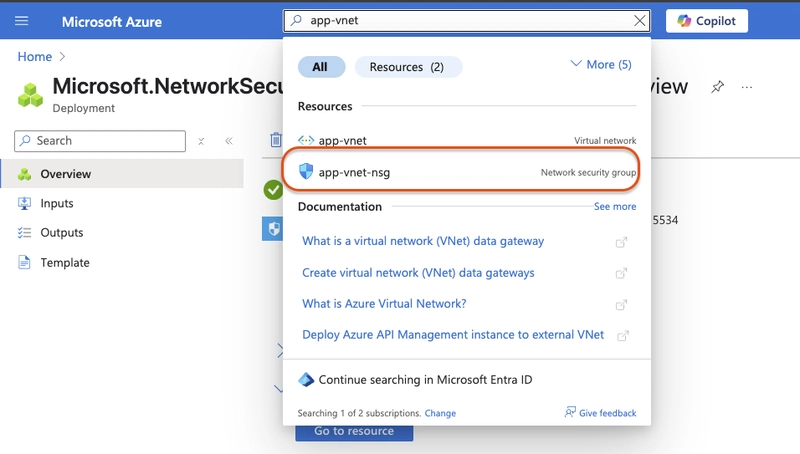
Navigate to the app-vnet-nsg resource.
In the Settings blade select Subnets.
Select + Associate
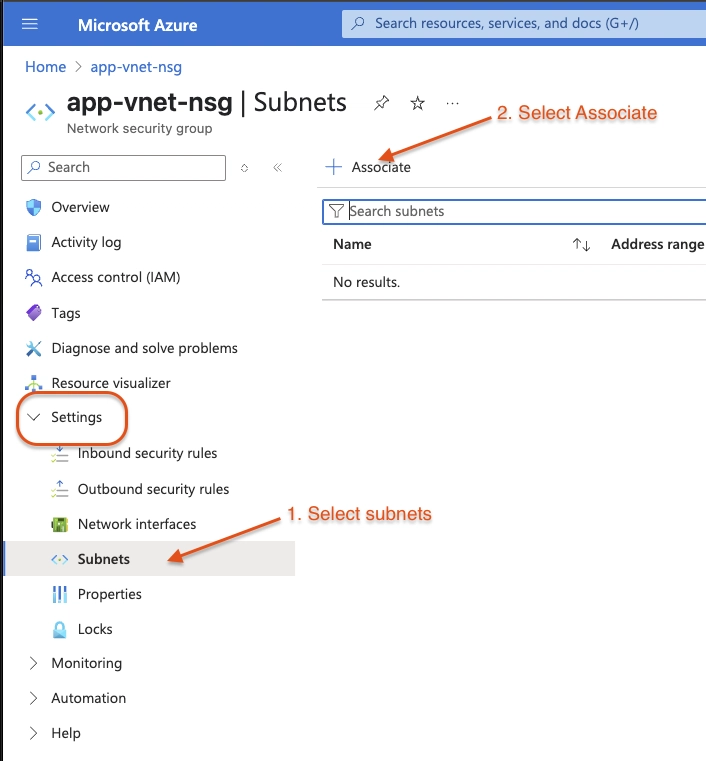
Select app-vnet and then the Backend subnet. Select OK.
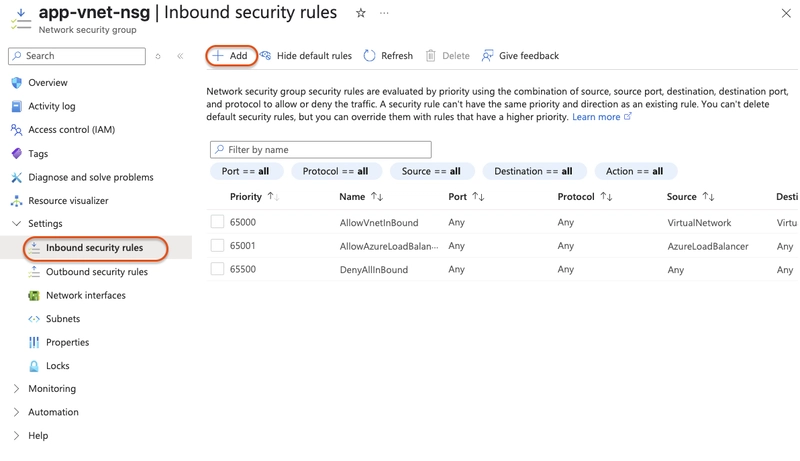
Create Network Security Group rules
An NSG uses security rules to filter inbound and outbound network traffic.
- In the
app-vnet-nsgresource, In the Settings blade, select Inbound security rules. Select + Add
-
Select this configuration:
- Source: Any
- Source port ranges: *
- Destination:
Application Security group - Destination application security group:
app-frontend-asg - Service:
SSH - Action:
Allow - Priority:
100 - Name:
AllowSSH
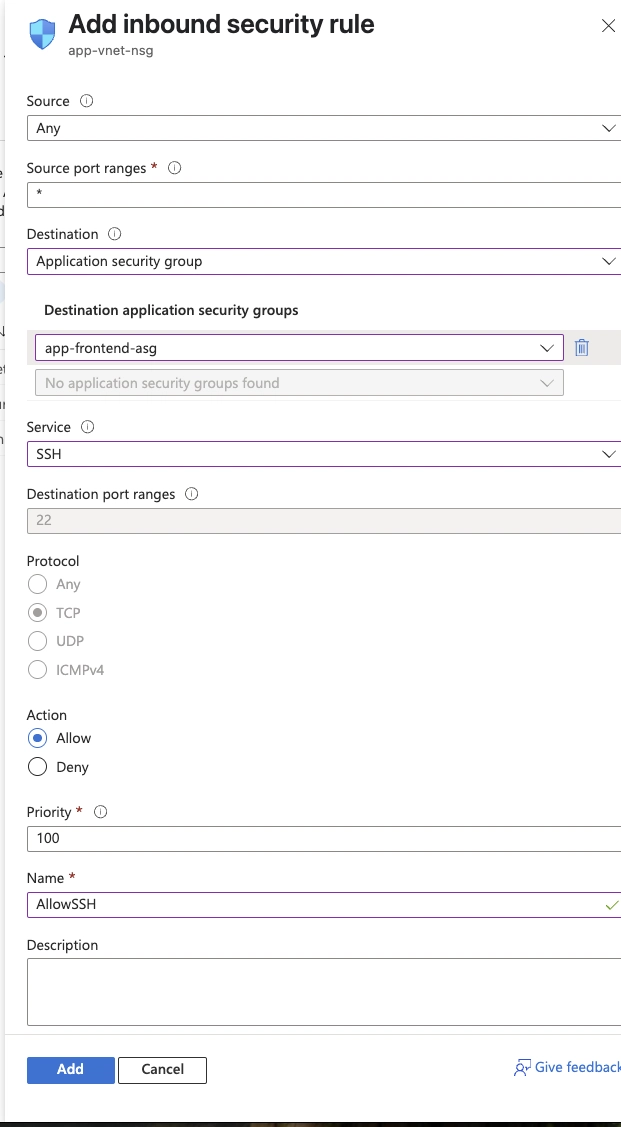
- Click add
### Conclusion
By completing this exercise, you've successfully configured secure access between frontend and backend workloads in Azure using Network Security Groups (NSGs) and Application Security Groups (ASGs). You’ve:
Deployed virtual machines across separate subnets for frontend and backend workloads.
Created and assigned an ASG to the frontend VM to simplify rule management.
Created an NSG, associated it with the backend subnet, and defined custom security rules to control access.
Allowed SSH access from the frontend ASG to the backend subnet—enabling controlled, secure communication between tiers.
This setup ensures that only explicitly defined network traffic—such as SSH from the frontend—is permitted, creating a strong security boundary within your virtual network. In the next exercise, you'll build on this foundation by implementing more advanced network features and controls.