_NicoElNino_Alamy.png?#)


![Apple C1 vs Qualcomm Modem Performance [Speedtest]](https://www.iclarified.com/images/news/96767/96767/96767-640.jpg)
![Apple Studio Display On Sale for $1249 [Lowest Price Ever]](https://www.iclarified.com/images/news/96770/96770/96770-640.jpg)
![Alleged Case for Rumored iPhone 17 Air Surfaces Online [Image]](https://www.iclarified.com/images/news/96763/96763/96763-640.jpg)


![Galaxy Tab S10 FE leak reveals Samsung’s 10.9-inch and 13.1-inch tablets in full [Gallery]](https://i0.wp.com/9to5google.com/wp-content/uploads/sites/4/2025/03/galaxy-tab-s10-fe-wf-10.jpg?resize=1200%2C628&quality=82&strip=all&ssl=1)


_Kjetil_Kolbjørnsrud_Alamy.jpg?#)


![[The AI Show Episode 139]: The Government Knows AGI Is Coming, Superintelligence Strategy, OpenAI’s $20,000 Per Month Agents & Top 100 Gen AI Apps](https://www.marketingaiinstitute.com/hubfs/ep%20139%20cover-2.png)


![[The AI Show Episode 138]: Introducing GPT-4.5, Claude 3.7 Sonnet, Alexa+, Deep Research Now in ChatGPT Plus & How AI Is Disrupting Writing](https://www.marketingaiinstitute.com/hubfs/ep%20138%20cover.png)


-I-Interviewed-Niantic-about-Selling-Pokémon-GO-to-Scopely-00-14-13.png?width=1920&height=1920&fit=bounds&quality=80&format=jpg&auto=webp#)


.jpg?#)


How to check out a remote branch in Git: A step-by-step guide
Written by Oyinkansola Awosan✏️ Git is a powerful distributed version control system that not only preserves the history of your code but also facilitates collaboration for development teams. Branches are at the heart of Git’s workflow, making it easy to experiment, fix bugs, and develop new features without messing with your main codebase. You can create, delete, compare, merge, rebase, publish, and track changes — all without breaking a sweat. Whether you're working independently or as part of a team, understanding how to use branches effectively will elevate your Git workflow. Let’s dive in. What is a remote branch? A remote branch is a reference to a specific commit that exists on a remote repository, such as GitHub, GitLab, or Bitbucket. Remotes allow developers to collaborate effectively by keeping track of changes made by others and ensuring everyone stays in sync. Remote branches are essential for sharing code, reviewing updates, and maintaining a smooth workflow in team projects. They help developers stay aligned with the latest changes while providing a structured way to contribute without interfering with the main branch. At this point, you might be wondering, how do you switch between branches? We’ll cover checking out a remote branch in detail later in this guide. For now, just know that this process plays a key role in making remote branches such a powerful collaboration tool. How to work with remote branches in Git Before working with remote branches in Git, let’s discuss a few prerequisites: 1. Install Git Make sure that you have Git installed on your local machine. If you are unsure, verify the status with the following command: git -v or Git –version 2. Clone a remote repository Whether you’re working solo or in a collaborative environment, ensure you have a local copy of the remote repository. Run the following command to clone said repository: git clone 3. Basic Git knowledge Familiarity with basic Git commands like pull, status, merge, etc., makes managing remote branches less daunting. Step 1: Listing remote branches in Git Knowing the available remote branches is good practice, especially in a collaborative environment. While this is possible with the graphical user interface (GUI), working in the command line is the best practice — not to mention that it’s faster. This section will cover different ways to view and manage remote branches effectively. Viewing all remote branches If you are going solo or in a collaborative environment and you want to view or list out all the branches that exist on the remote repository, you can use the following command: git branch -r The -r **flag ensures that the list only contains remote branches. Below is an example of what it would return: origin/HEAD → origin/main— The main branch is the default branch origin/develop — A develop branch that exists remotely origin/feature/auth — A feature/auth branch that exists on the remote repository origin/feature/post-ad — A feature/post-ad branch that exists remotely origin/main — A main branch that exists remotely It is important to note that a remote repository can have from one to any number of branches, depending on the project. Listing all local and remote branches To list out all the local and remote branches, use the following command: git branch -a This is an example of what the command will return: Difference between git branch -r and git branch -a The git branch -r command lists out only all the remote branches. git branch -a, on the other hand, also lists out branches but combines both local and remote branches. Viewing remote details Git allows for comprehensive information about a specific remote repository, providing details like the remote repository’s branches, use, and many more. This is achieved using the following command: git remote show origin Your output will be: Let’s discuss some of these elements: Fetch and pull URLs — Define where Git pulls from and pushes to HEAD branch — Shows that the main branch is the default branch of the remote repository Remote branches — Show all the available branches in the remote repository Local branches configured for git pull — Define which local branches are tracking the remote branches Local refs configured for git push — Define which local branches are set up for pushing changes to the remote repository Filtering remote branches Sometimes, there are just too many branches. You might want to filter out the ones of interest so you don’t have to mindlessly wade through the entire list. To filter remote branches, you can use the following command: git branch -r |grep feature This lists out all the remote branches that have feature in them. The output looks like this: Understanding remote branch naming conventions In Gi
Written by Oyinkansola Awosan✏️
Git is a powerful distributed version control system that not only preserves the history of your code but also facilitates collaboration for development teams.
Branches are at the heart of Git’s workflow, making it easy to experiment, fix bugs, and develop new features without messing with your main codebase. You can create, delete, compare, merge, rebase, publish, and track changes — all without breaking a sweat.
Whether you're working independently or as part of a team, understanding how to use branches effectively will elevate your Git workflow. Let’s dive in.
What is a remote branch?
A remote branch is a reference to a specific commit that exists on a remote repository, such as GitHub, GitLab, or Bitbucket. Remotes allow developers to collaborate effectively by keeping track of changes made by others and ensuring everyone stays in sync.
Remote branches are essential for sharing code, reviewing updates, and maintaining a smooth workflow in team projects. They help developers stay aligned with the latest changes while providing a structured way to contribute without interfering with the main branch.
At this point, you might be wondering, how do you switch between branches? We’ll cover checking out a remote branch in detail later in this guide. For now, just know that this process plays a key role in making remote branches such a powerful collaboration tool.
How to work with remote branches in Git
Before working with remote branches in Git, let’s discuss a few prerequisites:
1. Install Git
Make sure that you have Git installed on your local machine. If you are unsure, verify the status with the following command:
git -v or Git –version
2. Clone a remote repository
Whether you’re working solo or in a collaborative environment, ensure you have a local copy of the remote repository. Run the following command to clone said repository:
git clone
3. Basic Git knowledge
Familiarity with basic Git commands like pull, status, merge, etc., makes managing remote branches less daunting.
Step 1: Listing remote branches in Git
Knowing the available remote branches is good practice, especially in a collaborative environment. While this is possible with the graphical user interface (GUI), working in the command line is the best practice — not to mention that it’s faster. This section will cover different ways to view and manage remote branches effectively.
Viewing all remote branches
If you are going solo or in a collaborative environment and you want to view or list out all the branches that exist on the remote repository, you can use the following command:
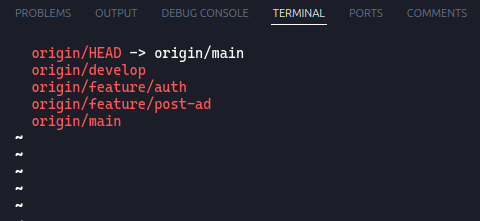
git branch -r
The -r **flag ensures that the list only contains remote branches. Below is an example of what it would return:
-
origin/HEAD → origin/main— The main branch is the default branch -
origin/develop— A develop branch that exists remotely -
origin/feature/auth— A feature/auth branch that exists on the remote repository -
origin/feature/post-ad— A feature/post-ad branch that exists remotely -
origin/main— A main branch that exists remotely
It is important to note that a remote repository can have from one to any number of branches, depending on the project.
Listing all local and remote branches
To list out all the local and remote branches, use the following command:
git branch -a
This is an example of what the command will return: 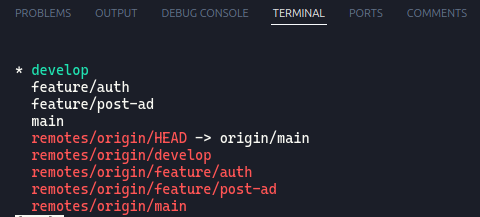
Difference between git branch -r and git branch -a
The git branch -r command lists out only all the remote branches.
git branch -a, on the other hand, also lists out branches but combines both local and remote branches.
Viewing remote details
Git allows for comprehensive information about a specific remote repository, providing details like the remote repository’s branches, use, and many more. This is achieved using the following command:
git remote show origin
Your output will be:  Let’s discuss some of these elements:
-
Fetchand pull URLs — Define where Git pulls from and pushes to -
HEAD branch— Shows that the main branch is the default branch of the remote repository - Remote branches — Show all the available branches in the remote repository
- Local branches configured for
git pull— Define which local branches are tracking the remote branches - Local refs configured for
git push— Define which local branches are set up for pushing changes to the remote repository
Filtering remote branches
Sometimes, there are just too many branches. You might want to filter out the ones of interest so you don’t have to mindlessly wade through the entire list. To filter remote branches, you can use the following command:
git branch -r |grep feature
This lists out all the remote branches that have feature in them. The output looks like this: 
Understanding remote branch naming conventions
In Git, developers have a fair amount of freedom in how they name branches. If the project is collaborative, naming conventions are typically specific to the team.
Still, Git enforces a small set of naming rules that must be abided by when naming branches. The rules are as follows:
- Cannot include a
.at the beginning of the branch path component (e.g.,origin/feature/.new-feature) - Cannot end with
.locksince it is a reserved extension - Cannot have consecutive dots
..(e.g.,origin/feature/new..feature) - No ASCII control characters like space, tilde, caret, or colon
- No question marks, asterisks, or left square brackets anywhere in the branch name
- Cannot contain the sequence of
@{ - It cannot contain a forward-slash character
If you break any of these rules while naming a branch, Git will refuse to create the branch and throw up an error telling you exactly what’s wrong. You can also check if a name is fit for a branch name by running the following command:
git check-ref-format –branch
If the branch name is valid, that command will return the name. If the name violates any of the Git branch naming rules above, it returns an error message.
Step 2: Fetching remote branches in Git
Fetching is how Git downloads all of the changes committed to a remote repository. Fetching also allows you to review them before merging into your local branches.
What is git fetch?
When a remote repository is cloned from a remote server to a local repository, all the remote branches are not mapped to local branches on the local repository by default. This happens no matter how many branches there are inside.
git fetch is a Git command that helps download the changes committed to a remote repo. It allows you to review the changes before you make the decision to merge the revisions into the local branches. This command updates the remote-tracking branches, ensuring that you can work on the most recent version of the remote repository.
Fetching all remote branches from a specific remote repo
Start with the command:
git fetch origin develop
This will generate the following: 
Fetching all branches from all remote repos
Fetching is not exclusive to only one remote repository; there are also cases where there are multiple remote repos. If that’s the case, use this command:
git fetch - - all
Why fetch before checking out?
Fetching before checking out is critical. The process guarantees that you have the latest information on your remote branches. Let’s take, for instance, a case where a features/auth branch is created locally when it already exists remotely. In this case, there is no way local Git will know. This means a duplicate branch is created locally and does not keep track of the remote branch.
If you run git pull, there will be conflicts. To avoid that unnecessary headache, git fetch first, then git checkout -b .
git pull vs. git fetch
Under the hood, we have git pull as a shortcut for git fetch, followed by git merge. So, git fetch downloads all the commits or changes from the remote repository into the local repository. This is Git’s internal database (.git folder) where changes are stored and managed but not placed into the working tree. The working tree shows the current state of your files that are actively edited on your local machine.
For changes to reflect on the working tree, you can then run git merge. You won’t see any visible effect on the working tree without this last command.
Step 3: Git checkout
The git checkout command tells Git which branch should receive new commits and changes. A branch is simply a pointer to a specific commit, and a commit represents a snapshot of your repository at a given point in time.
There are several ways to check out a branch. In this section, we’ll explore different methods for checking out a remote branch and discuss best practices for setting up tracking branches.
Method 1 — Using git checkout -b
Start with the following:
git checkout -b <local branch name> /
Let’s break down these elements:
-
-b— This flag will create a new local branch -
-
remote name>/— This specifies the remote branch you want to track with the local branch you intend to create
Here’s an example:
git checkout -b develop origin/develop
Followed by the output: 
Method 2 — Using checkout /
Unlike in method one, the command git checkout origin/develop does not create a local branch for tracking a specific remote branch. Instead, Git enters a detached HEAD state, meaning any changes you make won’t be associated with a branch and could be lost when switching branches.
If you find yourself in a detached HEAD state but want to create a local branch from it, use:
git checkout -b
This creates a new local branch based on the detached HEAD, ensuring that you can save and push your changes properly: 
Tracking branches: How Git automatically sets up tracking
So, what are tracking branches? They’re local branches that maintain a direct connection to a corresponding remote branch. This setup ensures that when you run git pull or git push, Git knows exactly where to fetch changes from and where to push updates.
How Git sets up tracking relationships
Using the recommended git checkout method tells Git to automatically set up a relationship between a local and remote branch, where the former automatically tracks the latter.
Step 4: Verify the branch
It’s always good practice to confirm that you’re on the intended/correct branch before pushing commits/changes. To verify your current branch, use the git branch command.
This command lists all local branches, but the current branch is highlighted with an asterisk: 
git status works just like the git branch in showing your current branch. This command gives us more details, including the tracking information: 
git branch -vv checks if the branches are correctly tracking their corresponding remote branches. It basically shows us the tracking information for all the local branches: 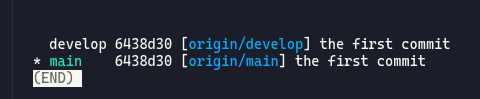
Step 5: Update your local branch
To keep your local working tree up to date, you’ll need to merge your local branch with its remote counterpart. But how does this work in practice?
When you set up a remote branch, Git maintains local copies of all remote branches. These copies reflect the state of the remote branch as of your last git pull or git push. The git pull origin can be used. In context, this might look something like: git pull origin main.
Regularly pulling changes is a best practice — it keeps your local branch in sync with the latest updates from the remote repository and helps prevent merge conflicts down the line.
Common Git problems and solutions
Even though Git is powerful, some things don’t happen automatically — like keeping your local list of remote branches updated. Here are a few common issues and how to fix them.
Outdated branches
Git doesn’t automatically update your local list of remote branches when new branches are added or deleted.
To solve this, run the following command to refresh the list and remove references to deleted branches:
git fetch -prune
The command updates the list and prunes the references to deleted branches, if any.
Deleted remote branch still appearing
In collaborative environments, a remote branch may be deleted, but it could still appear in your local list.
Simply remove stale remote branches with:
bash
Copy code
git remote prune origin
Can’t find a remote branch
If you’re unsure whether a branch exists on the remote repository, check the available remote branches.
To solve this, list all remote branches with:git branch--r.
Best practices for working with remote branches
To ensure a smooth experience when working with Git, particularly with remote branches, here are some best practices to follow:
Fetch and prune regularly
This will ensure that your local repository reflects the latest changes from the remote and removes references to deleted branches.
Always pull before pushing changes
Before adding new commits, it’s good practice to pull the latest changes from the remote. This ensures your local branch is in sync with the remote, reducing the chances of conflicts.
Keep branch names clear and concise
This is especially the case when you are in a collaborative environment. This helps everyone on the team understand the purpose of the branch without extra explanation.
Stick to one feature per branch
One of the most important things about working with Git in a team is having one feature in one branch. It is good practice to ensure that every feature or bug has its remote branch, allowing multiple people to work on multiple features without worrying about overriding each other’s code. Also, this style keeps things organized.
Avoid direct commits to main/master
To ensure the stability of your main or master branch, avoid committing directly to it. Always create a new branch for your changes and open a pull request to merge your feature branch into the main branch. This process helps prevent untested code from introducing bugs into the codebase.
Conclusion
Mastering the process of using git checkout for remote branches is crucial for a smooth and efficient development workflow. By understanding how to check out, track, and update remote branches, you’ll have the tools you need to collaborate effectively, avoid common pitfalls, and streamline your Git practices.
This guide has provided an in-depth look at how to git checkout remote branch, along with key strategies for managing your branches and working in a team. By implementing these best practices, you'll keep your Git workflow organized, minimize merge conflicts, and enhance collaboration within your development environment.
With these Git strategies under your belt, you’re equipped to take your version control skills to the next level. Happy coding!
Get set up with LogRocket's modern error tracking in minutes:
- Visit https://logrocket.com/signup/ to get an app ID.
- Install LogRocket via NPM or script tag.
LogRocket.init()must be called client-side, not server-side.
NPM:
$ npm i --save logrocket

// Code:

import LogRocket from 'logrocket';
LogRocket.init('app/id');
Script Tag:
Add to your HTML:

<script src="https://cdn.lr-ingest.com/LogRocket.min.js"></script>
<script>window.LogRocket && window.LogRocket.init('app/id');</script>
3.(Optional) Install plugins for deeper integrations with your stack:
- Redux middleware
- ngrx middleware
- Vuex plugin


