


![Oakley and Meta Launch Smart Glasses for Athletes With AI, 3K Camera, More [Video]](https://www.iclarified.com/images/news/97665/97665/97665-640.jpg)

![How to Get Your Parents to Buy You a Mac, According to Apple [Video]](https://www.iclarified.com/images/news/97671/97671/97671-640.jpg)


_Paul_Markillie_Alamy.jpg?width=1280&auto=webp&quality=80&disable=upscale#)
_Frank_Peters_Alamy.jpg?width=1280&auto=webp&quality=80&disable=upscale#)


![How to Create Your Own AI Toolkit with Taylor Radey [MAICON 2025 Speaker Series]](https://www.marketingaiinstitute.com/hubfs/MAICON-Speaker_Series-Taylor.png)
![[The AI Show Episode 154]: AI Answers: The Future of AI Agents at Work, Building an AI Roadmap, Choosing the Right Tools, & Responsible AI Use](https://www.marketingaiinstitute.com/hubfs/ep%20154%20cover.png)
![[The AI Show Episode 153]: OpenAI Releases o3-Pro, Disney Sues Midjourney, Altman: “Gentle Singularity” Is Here, AI and Jobs & News Sites Getting Crushed by AI Search](https://www.marketingaiinstitute.com/hubfs/ep%20153%20cover.png)


.png?#)


How to Build Secure SSR Authentication with Supabase, Astro, and Cloudflare Turnstile
In this guide, you'll build a full server-side rendered (SSR) authentication system using Astro, Supabase, and Cloudflare Turnstile to protect against bots. By the end, you'll have a fully functional authentication system with Astro actions, magic li...

In this guide, you'll build a full server-side rendered (SSR) authentication system using Astro, Supabase, and Cloudflare Turnstile to protect against bots.
By the end, you'll have a fully functional authentication system with Astro actions, magic link authentication using Supabase, bot protection via Cloudflare Turnstile, protected routes and middleware, and secure session management.
Table of Contents
Prerequisites
This tutorial assumes you are familiar with:
Web development frameworks
Basic Backend-as-a-Service (BaaS) concepts
Understanding the Technologies
What is Astro?
Astro is a UI-agnostic web framework that renders server-first by default. It can be used with any UI framework, including Astro client components.
What are Astro Actions?
Astro actions allow you to write server-side functions that can be called without explicitly setting up API routes. They provide many useful utilities that simplify the process of running server logic and can be called from both client and server environments.
What is Supabase?
Supabase is an open-source Backend-as-a-Service that builds upon Postgres. It provides key features such as authentication, real-time capabilities, edge functions, storage, and more. Supabase offers both a hosted version for easy scaling and a self-hostable version for full control.
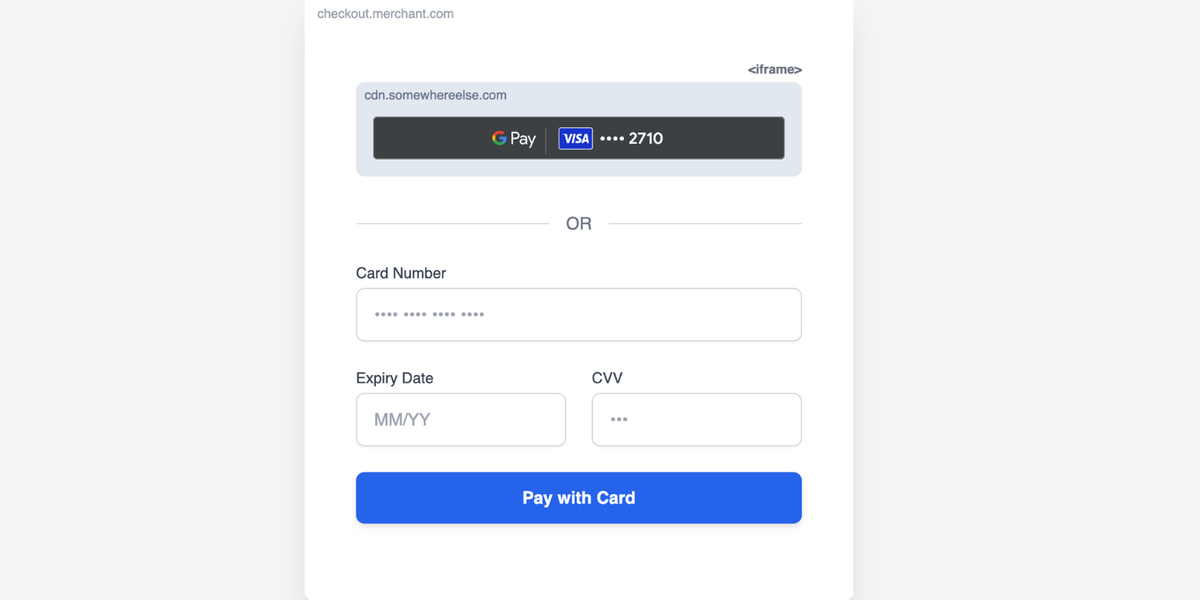
What is Cloudflare Turnstile?
Turnstile is Cloudflare's replacement for CAPTCHAs, which are visual puzzles used to differentiate between genuine users and bots. Unlike traditional CAPTCHAs, which are visually clunky, annoying, and sometimes difficult to solve, Turnstile detects malicious activity without requiring users to solve puzzles, while providing a better user experience.
Understanding SSR Authentication
Server-side rendered (SSR) auth refers to handling authentication on the server using a cookie-based authentication method.
The flow works as follows:
The server creates a session and stores a session ID in a cookie sent to the client
The browser receives the cookie and automatically includes it in future requests
The server uses the cookie to determine if the user is authenticated
Since browsers cannot modify HTTP-only cookies and servers cannot access local storage, SSR authentication requires careful management to prevent security risks such as session hijacking and stale sessions.
SSR vs. SPA Authentication
Single-Page Applications (SPAs), like traditional React apps, handle authentication on the client side because they don't have direct access to a server. SPAs typically use JWTs stored in local storage, cookies, or session storage, sending these tokens in HTTP headers when communicating with servers.
Why Protect Auth Forms?
Authentication protects sensitive resources from unauthorized access, making auth forms primary targets for bots and malicious actors. Taking extra precautions is important for maintaining security.
Part 1: How to Set Up the Backend
Set Up Supabase Backend
First, you'll need a Supabase account. Create a project, then:
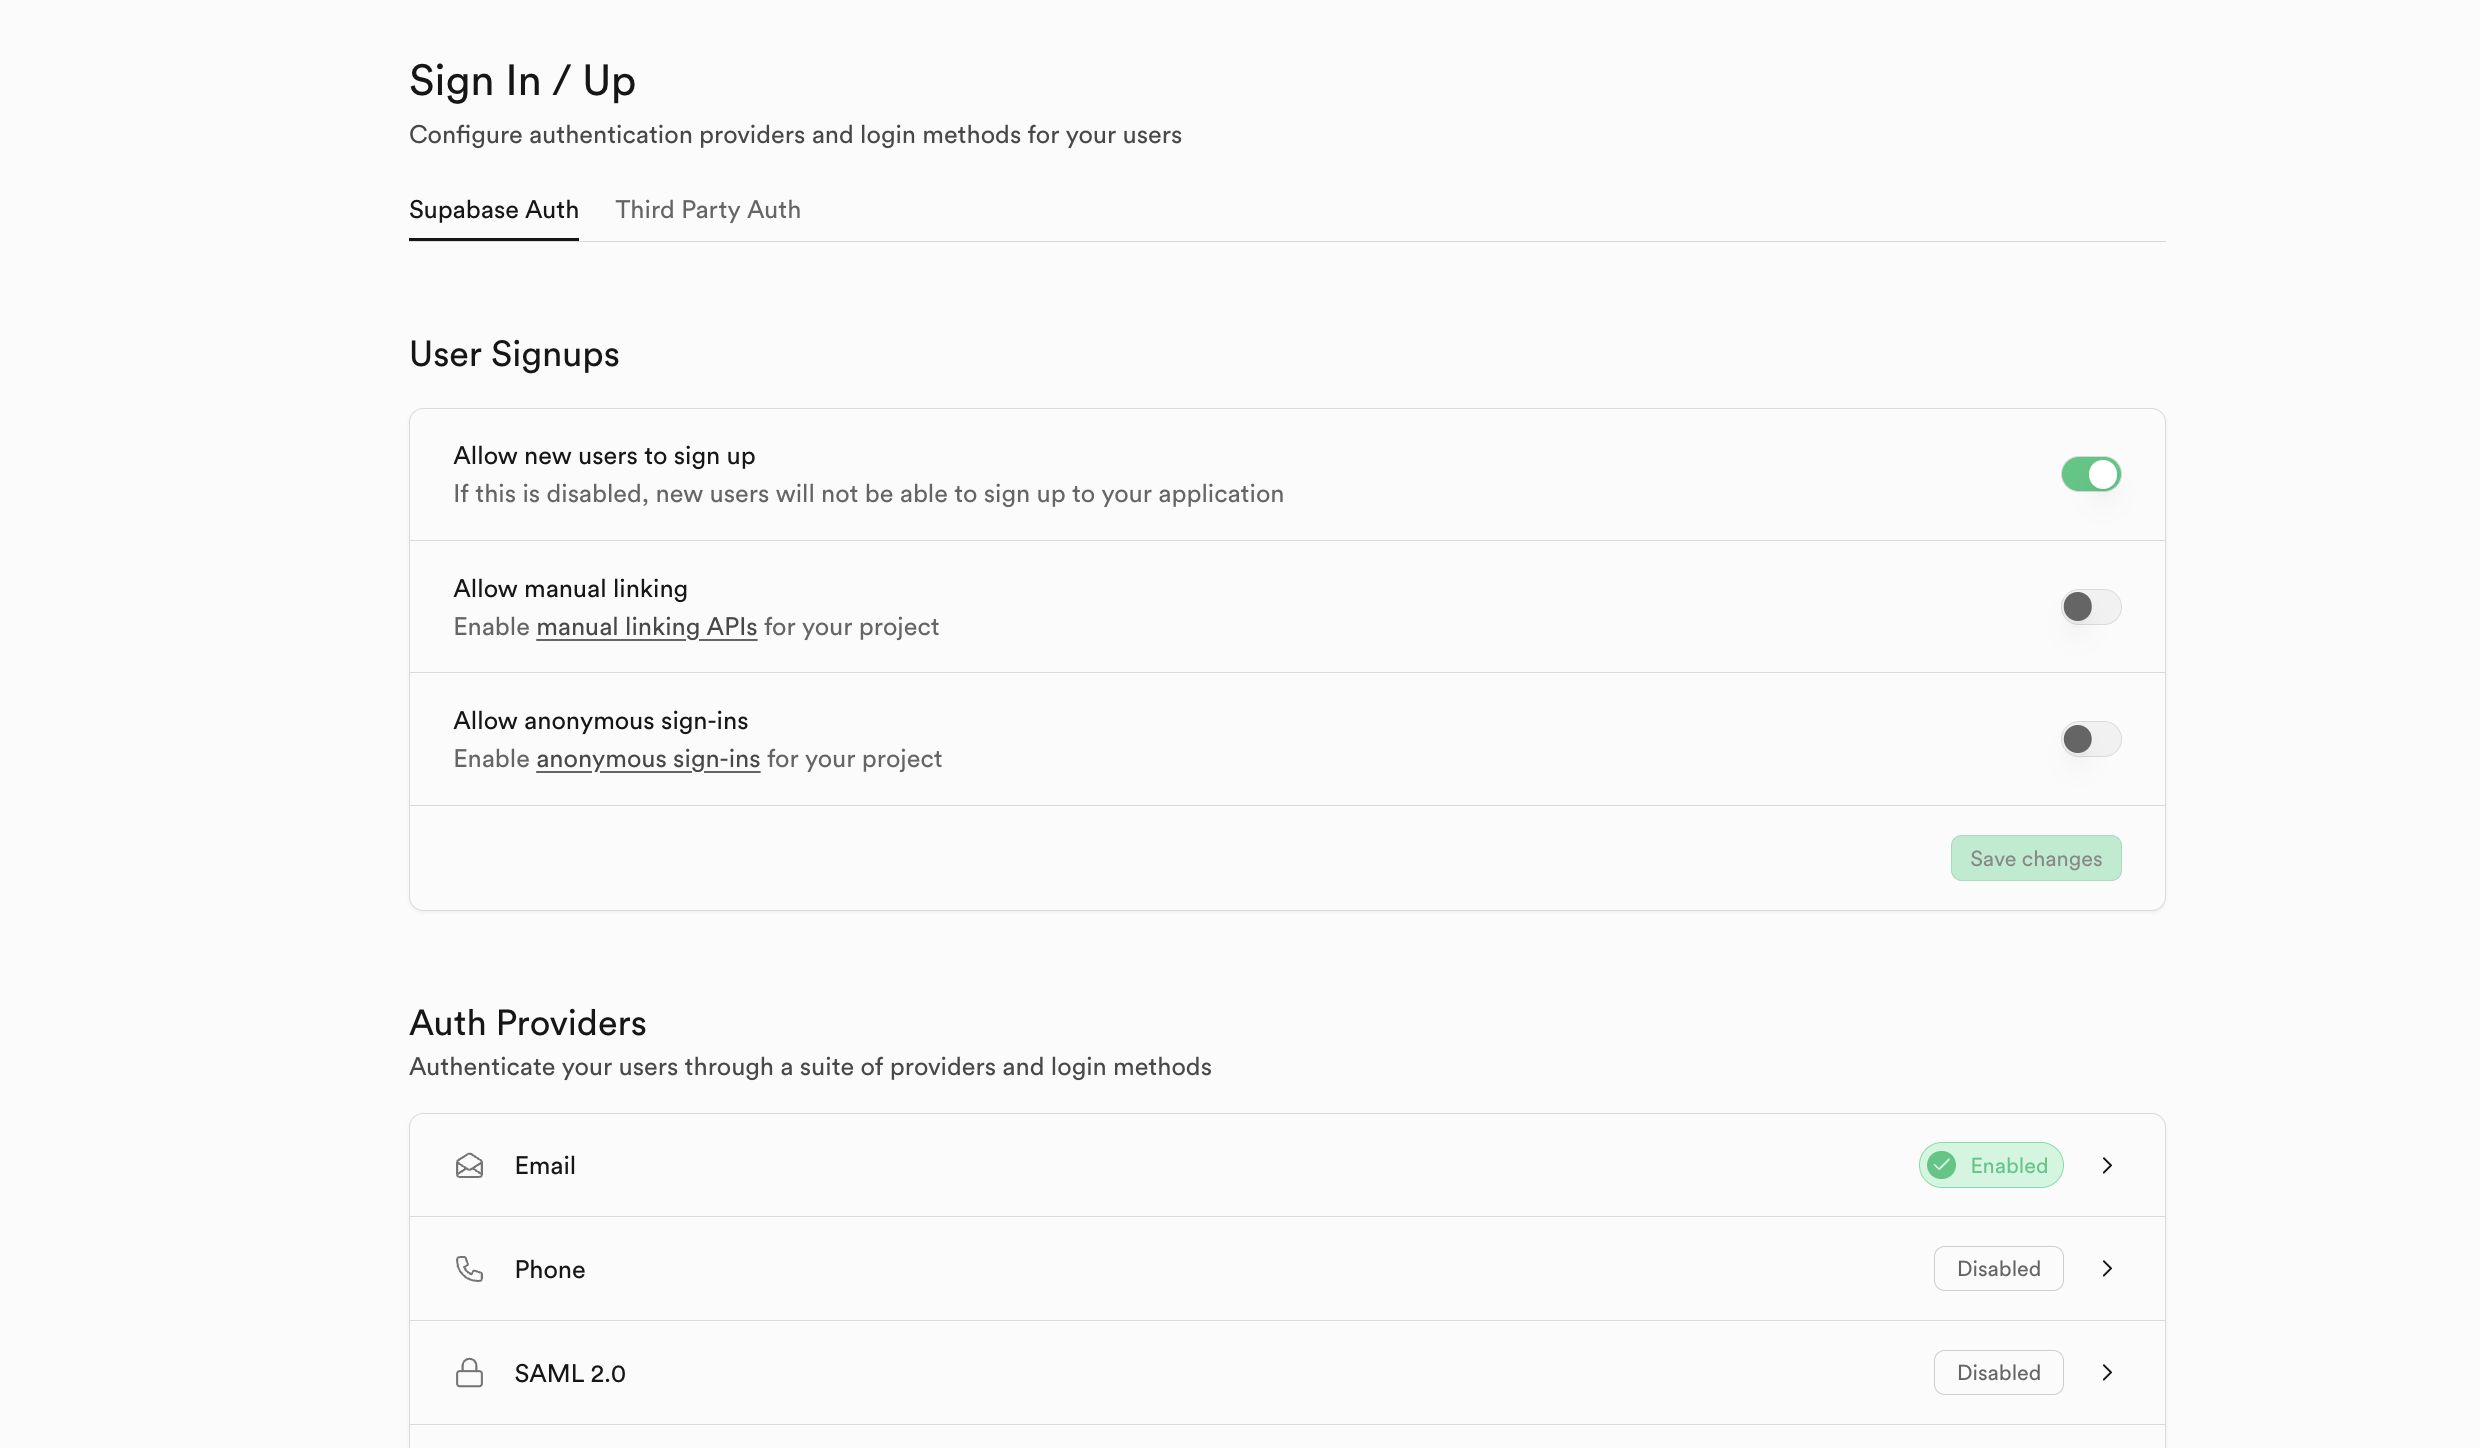
Go to the Authentication tab in the sidebar
Click the Sign In / Up tab under Configuration
Enable user sign-ups
Scroll down to Auth Providers and enable email (disable email confirmation for this tutorial)
Set Up Cloudflare Turnstile
Click the Turnstile tab in the sidebar
Click the "Add widget" button
Name your widget and add "localhost" as the hostname
Leave all other settings as default, and create the widget

After creating the widget, copy the secret key and add it to your Supabase dashboard:
Go back to Supabase Authentication settings
Navigate to the Auth Protection tab under Configuration
Turn on Captcha protection
Choose Cloudflare as the provider
Paste your secret key

Part 2: How to Set Up the Frontend
Create the Astro Project
Next, you will need to create an Astro project. Open your preferred IDE or Text editor’s integrated terminal and run the following command to scaffold an Astro project in a folder named “ssr-auth.” Feel free to use any name you like.
npm create astro@latest ssr-auth
Follow the provided prompts and choose a basic template to start with. When it’s done, change into the folder, then run npm install to install dependencies, followed by npm run dev to start the server, and your site will be available at localhost:4321.
Configure Astro for SSR
Set Astro to run in SSR mode by adding output: "server", to the defineConfig function found in the astro.config.mjs file at the root of the folder.
Next, add an adapter to create a server runtime. For this, use the Node.js adapter by running this command in a terminal: npx astro add node. This will add it and automatically make all relevant changes.
Finally, add Tailwind for styling. Run this command in a terminal window: npx astro add tailwind. Follow the prompts, and it will make any changes necessary.
At this stage, your astro.config.mjs should look like this:
// @ts-check
import { defineConfig } from "astro/config";
import node from "@astrojs/node";
import tailwindcss from "@tailwindcss/vite";

// https://astro.build/config
export default defineConfig({
  output: "server",
  adapter: node({
    mode: "standalone",
  }),
  vite: {
    plugins: [tailwindcss()],
  },
});
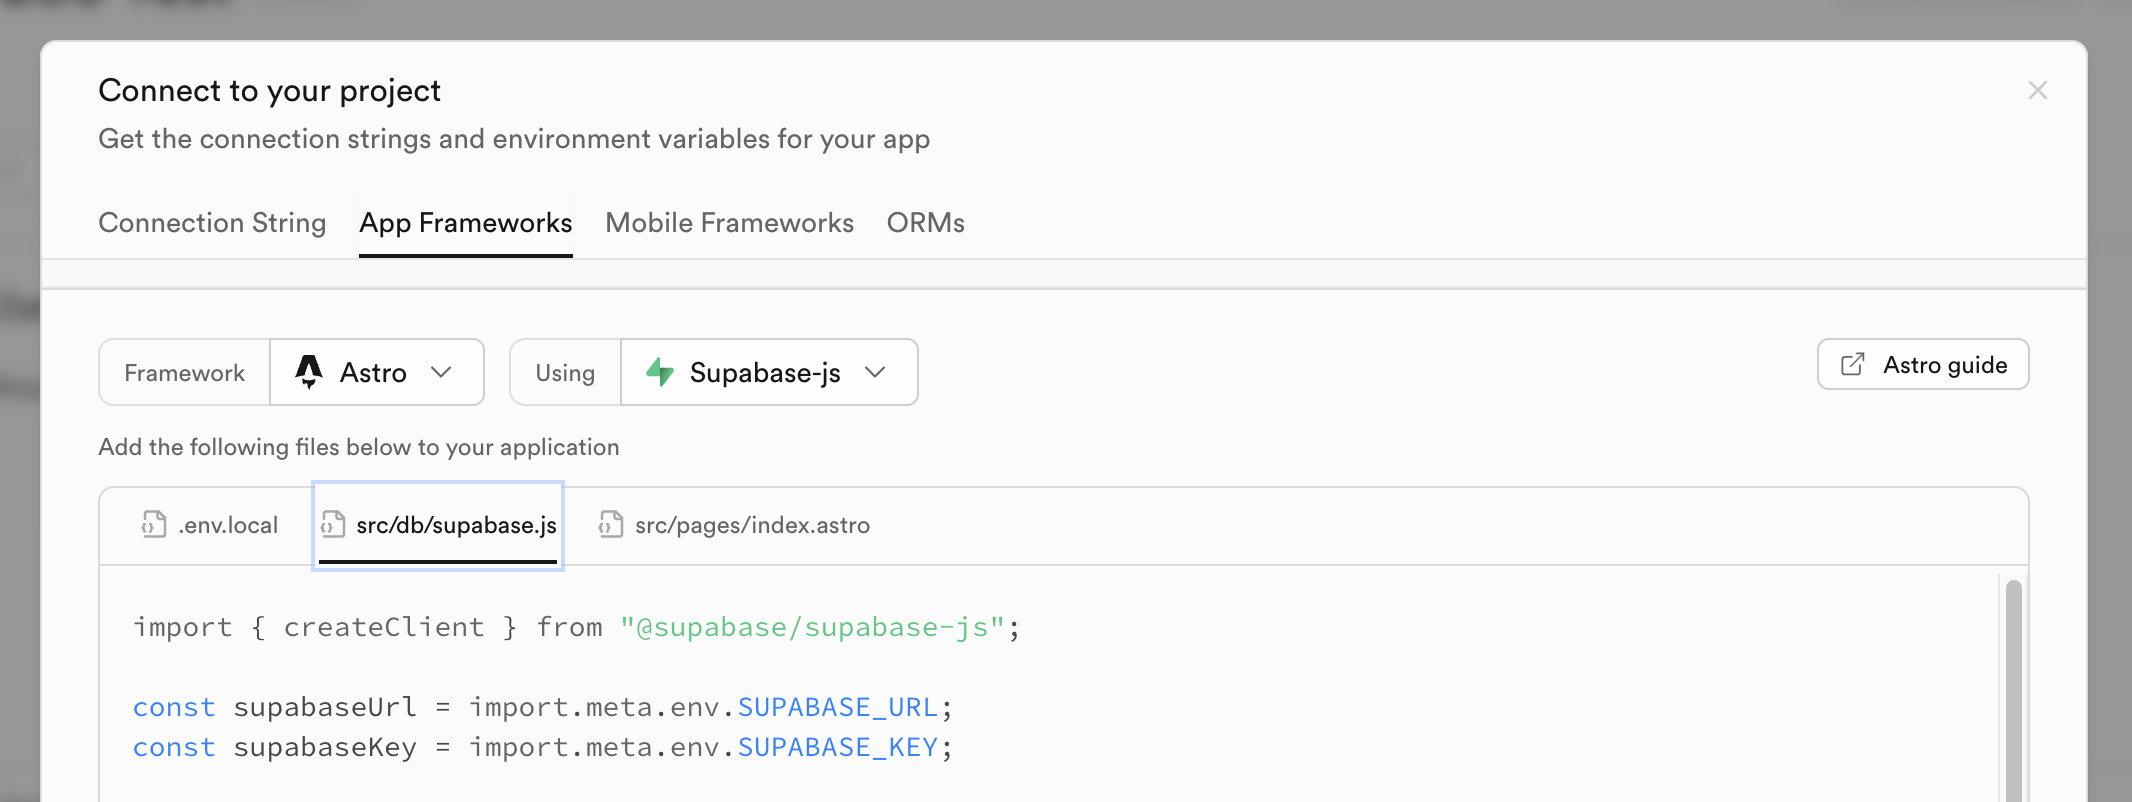
Install Supabase Dependencies
You can do this by running the following command:
npm install @supabase/supabase-js @supabase/ssr
Configure Environment Variables
Create a .env file in the project root and add the following. Remember to replace with your actual credentials:
SUPABASE_URL=
SUPABASE_ANON_KEY=
TURNSTILE_SITE_KEY=
You can get the Supabase values from the dashboard: