.webp?#)


![Apple Releases iOS 18.5 Beta 2 and iPadOS 18.5 Beta 2 [Download]](https://www.iclarified.com/images/news/97007/97007/97007-640.jpg)
![Apple Seeds watchOS 11.5 Beta 2 to Developers [Download]](https://www.iclarified.com/images/news/97008/97008/97008-640.jpg)
![Apple Seeds visionOS 2.5 Beta 2 to Developers [Download]](https://www.iclarified.com/images/news/97010/97010/97010-640.jpg)


![What’s new in Android’s April 2025 Google System Updates [U: 4/14]](https://i0.wp.com/9to5google.com/wp-content/uploads/sites/4/2025/01/google-play-services-3.jpg?resize=1200%2C628&quality=82&strip=all&ssl=1)

![Gemini will come to Wear OS as an app update [APK Insight]](https://i0.wp.com/9to5google.com/wp-content/uploads/sites/4/2023/01/Google-Assistant-Wear-OS-Play-Store.jpg?resize=1200%2C628&quality=82&strip=all&ssl=1)


![[The AI Show Episode 143]: ChatGPT Revenue Surge, New AGI Timelines, Amazon’s AI Agent, Claude for Education, Model Context Protocol & LLMs Pass the Turing Test](https://www.marketingaiinstitute.com/hubfs/ep%20143%20cover.png)


![How to manage common library dependencies to prevent cross-application breakage? [closed]](https://cdn.sstatic.net/Sites/softwareengineering/Img/apple-touch-icon@2.png?v=1ef7363febba)


How to Host a Static Website on Azure Blob Storage
Table of Content Introduction Prerequisites Step-by Step guide Step 1: Create a Storage Account Step 2: Enable Static Website Hosting Step 3: Upload Your Static Files Step 4: Access Your Website Conclusion Introduction It is cost-effective and a scalable solution to host a static website on Azure Blob Storage. It is simple yet a powerful solution. Unlike traditional web hosting, Azure Blob Storage allows you to serve HTML, CSS, JavaScript, and image files directly from a storage container, eliminating the need for a web server. In this post, we will walk you through the steps to deploy a static website on Azure Blob Storage. Prerequisites Before you get started, it is important to ensure you have: • An Azure account (sign up for a free trial account). • A static website ready to deploy (HTML, CSS, JS files). • Azure CLI or Azure Portal access. Step-by-Step Guide Step 1: Create a Storage Account 1.Log in to Azure Portal. 2.Click on "Create a resource" → Storage → Storage account. 3.Fill in the required details: • Subscription: Choose your subscription. • Resource group: Create new or select existing. • Storage account name: Enter a unique name (e.g., mystaticwebsite). • Region: Select the closest region. • Performance: Standard. • Redundancy: LRS (Locally Redundant Storage) is sufficient for testing. 4.Click Review + Create, then Create. Step 2: Enable Static Website Hosting 1.Once the storage account is created, go to it by clicking Go to resource 2.In the left menu, under Data Management, click on Static website. 3.Toggle Enabled to On. 4.Set the following: • Index document name: index.html (default). • Error document path: 404.html or error.html (optional). 5.Click Save. At this point, Azure will provide two URLs: • Primary endpoint: Your website URL (e.g., https://portfoliowebsite83.z13.web.core.windows.net/). • Secondary endpoint: Used for failover (if configured). Step 3: Upload Your Static Files This step provides us with two options Option 1: Using Azure Portal. 1.In the storage account, go to Containers. 2.Under containers, you’ll see a new container named $web, then double click on it. (auto-created when enabling static hosting). 3.Click Upload and select your static files (index.html, CSS, JS, etc.). Option 2: Using Azure CLI Run the following commands to upload files: bash Copy az storage blob upload-batch \ --account-name mystaticwebsite \ --destination '$web' \ --source ./local-website-folder Step 4: Access Your Website After enabling static website hosting, Azure provides a primary endpoint URL (https://portfoliowebsite83.z13.web.core.windows.net/). Open the URL in your browser — your website should now be live! Conclusion Hosting a static website with Azure Blob Storage is a fantastic way to keep things simple, fast, and budget-friendly. Whether you're a developer looking to deploy a quick frontend or someone who just wants a lightweight personal site, Azure's static site hosting has got you covered.
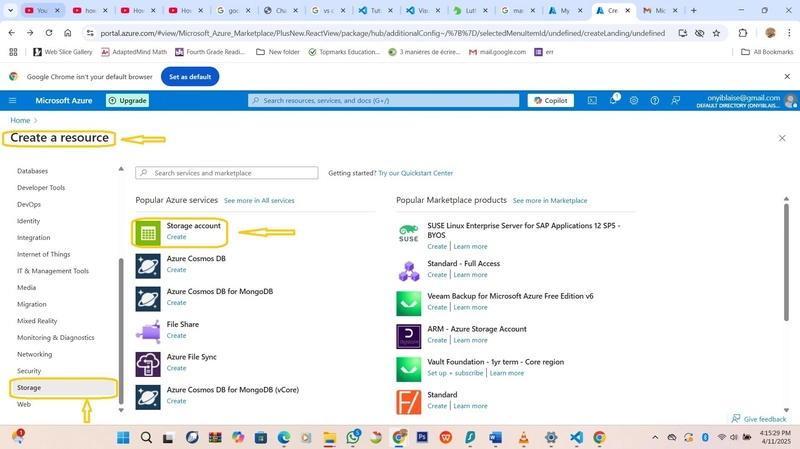
Table of Content
Introduction
Prerequisites
Step-by Step guide
Step 1: Create a Storage Account
Step 2: Enable Static Website Hosting
Step 3: Upload Your Static Files
Step 4: Access Your Website
Conclusion
Introduction
It is cost-effective and a scalable solution to host a static website on Azure Blob Storage. It is simple yet a powerful solution. Unlike traditional web hosting, Azure Blob Storage allows you to serve HTML, CSS, JavaScript, and image files directly from a storage container, eliminating the need for a web server.
In this post, we will walk you through the steps to deploy a static website on Azure Blob Storage.
Prerequisites
Before you get started, it is important to ensure you have:
• An Azure account (sign up for a free trial account).
• A static website ready to deploy (HTML, CSS, JS files).
• Azure CLI or Azure Portal access.
Step-by-Step Guide
Step 1: Create a Storage Account
1.Log in to Azure Portal.
2.Click on "Create a resource" → Storage → Storage account.
3.Fill in the required details:
• Subscription: Choose your subscription.
• Resource group: Create new or select existing.
• Storage account name: Enter a unique name (e.g., mystaticwebsite).
• Region: Select the closest region.
• Performance: Standard.
• Redundancy: LRS (Locally Redundant Storage) is sufficient for testing.
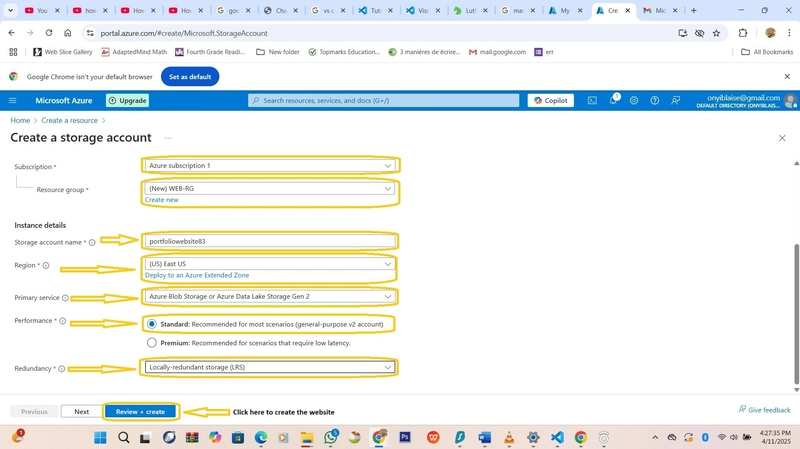
4.Click Review + Create, then Create.
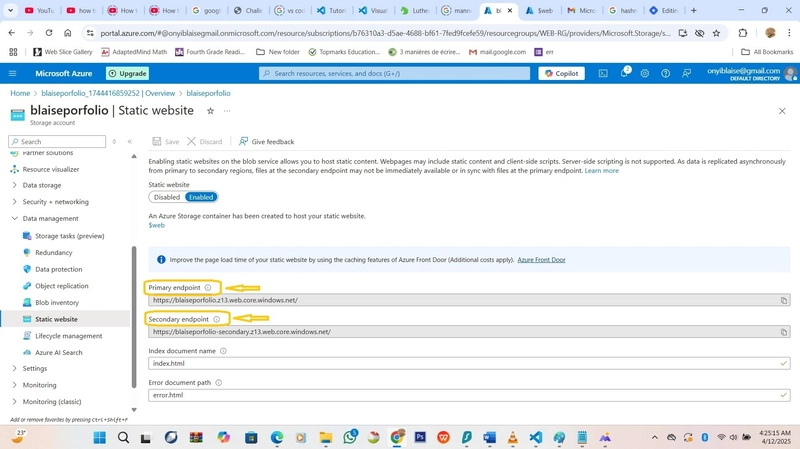
Step 2: Enable Static Website Hosting
1.Once the storage account is created, go to it by clicking Go to resource
2.In the left menu, under Data Management, click on Static website.
3.Toggle Enabled to On.
4.Set the following:
• Index document name: index.html (default).
• Error document path: 404.html or error.html (optional).
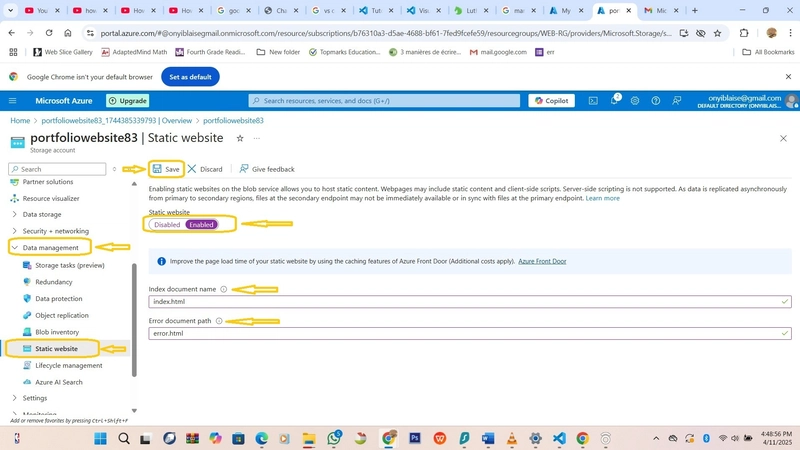
5.Click Save.
At this point, Azure will provide two URLs:
• Primary endpoint: Your website URL (e.g., https://portfoliowebsite83.z13.web.core.windows.net/).
• Secondary endpoint: Used for failover (if configured).
Step 3: Upload Your Static Files
This step provides us with two options
Option 1: Using Azure Portal.
1.In the storage account, go to Containers.
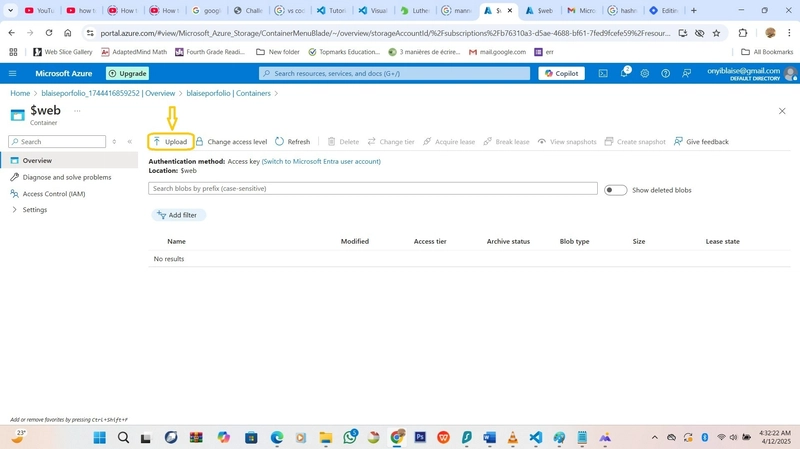
2.Under containers, you’ll see a new container named $web, then double click on it. (auto-created when enabling static hosting).
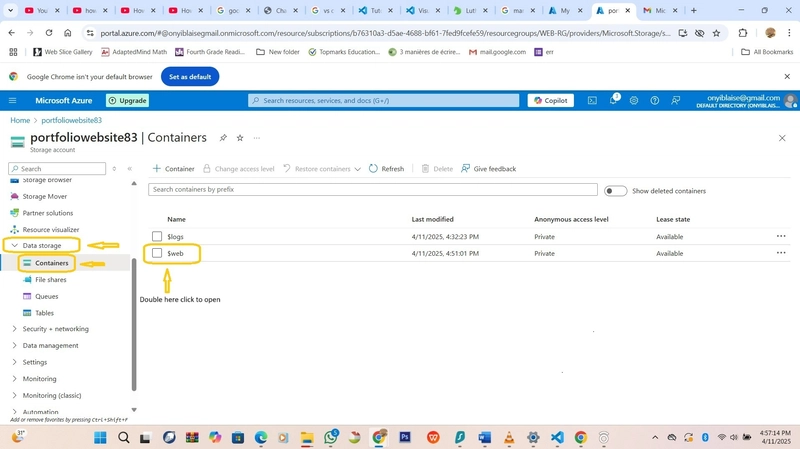
3.Click Upload and select your static files (index.html, CSS, JS, etc.).
Option 2: Using Azure CLI
Run the following commands to upload files:
bash
Copy
az storage blob upload-batch \
--account-name mystaticwebsite \
--destination '$web' \
--source ./local-website-folder
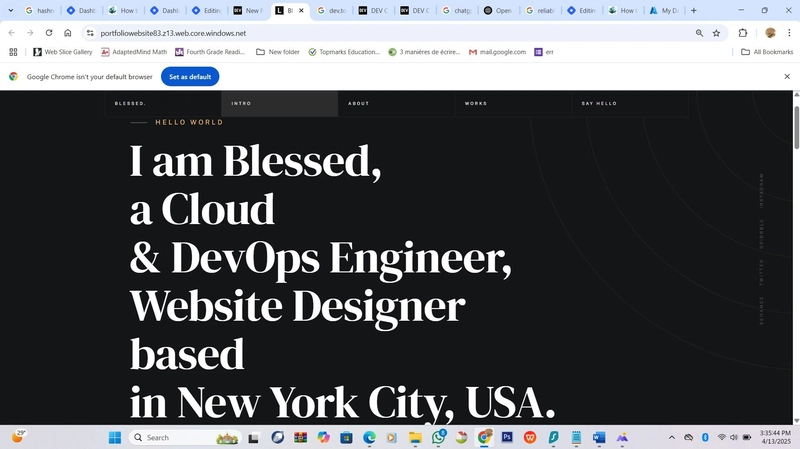
Step 4: Access Your Website
After enabling static website hosting, Azure provides a primary endpoint URL (https://portfoliowebsite83.z13.web.core.windows.net/).
Open the URL in your browser — your website should now be live!
Conclusion
Hosting a static website with Azure Blob Storage is a fantastic way to keep things simple, fast, and budget-friendly. Whether you're a developer looking to deploy a quick frontend or someone who just wants a lightweight personal site, Azure's static site hosting has got you covered.