


![Apple Shares Official Trailer for 'Long Way Home' Starring Ewan McGregor and Charley Boorman [Video]](https://www.iclarified.com/images/news/97069/97069/97069-640.jpg)
![Apple Watch Series 10 Back On Sale for $299! [Lowest Price Ever]](https://www.iclarified.com/images/news/96657/96657/96657-640.jpg)
![Apple Slips to Fifth in China's Smartphone Market with 9% Decline [Report]](https://www.iclarified.com/images/news/97065/97065/97065-640.jpg)
![EU Postpones Apple App Store Fines Amid Tariff Negotiations [Report]](https://www.iclarified.com/images/news/97068/97068/97068-640.jpg)


![What features do you get with Gemini Advanced? [April 2025]](https://i0.wp.com/9to5google.com/wp-content/uploads/sites/4/2024/02/gemini-advanced-cover.jpg?resize=1200%2C628&quality=82&strip=all&ssl=1)


_Andreas_Prott_Alamy.jpg?width=1280&auto=webp&quality=80&disable=upscale#)


![[The AI Show Episode 144]: ChatGPT’s New Memory, Shopify CEO’s Leaked “AI First” Memo, Google Cloud Next Releases, o3 and o4-mini Coming Soon & Llama 4’s Rocky Launch](https://www.marketingaiinstitute.com/hubfs/ep%20144%20cover.png)


![Is this too much for a modular monolith system? [closed]](https://i.sstatic.net/pYL1nsfg.png)


Monitoring and Controlling CPU Temperature on Linux Systems Using Buildroot
Effectively monitoring and managing CPU temperature in embedded systems is crucial to prevent throttling and ensure reliable device performance. The Raspberry Pi 5 features a built-in thermal sensor within its BCM2712 SoC, allowing real-time monitoring of the CPU core temperature. To help manage heat, an active cooler can be used, which typically activates once the CPU reaches a predefined temperature threshold. This article outlines the steps to enable both the thermal sensor and an active cooling system for monitoring and controlling the temperature on a Raspberry Pi 5 board using Buildroot to build the system. Enabling the thermal sensor The thermal sensor on the Raspberry Pi 5 is part of the Adaptive Voltage Scaling (AVS) system, which dynamically adjusts the CPU voltage based on workload and temperature. This mechanism helps reduce both power consumption and heat generation. The sensor is defined in the default Device Tree Source (DTS) file bcm2712.dtsi found in the Raspberry Pi's Linux Kernel repository. The relevant section is shown below: avs_monitor: avs-monitor@7d542000 { compatible = "brcm,bcm2711-avs-monitor", "syscon", "simple-mfd"; reg = ; status = "okay"; thermal: thermal { compatible = "brcm,bcm2711-thermal"; #thermal-sensor-cells = ; }; }; The device drivers required to enable the thermal sensors listed below are typically included in the default Linux kernel configuration for the Raspberry Pi 5. CONFIG_BCM2711_THERMAL=y CONFIG_MFD_SYSCON=y Enabling the active cooler The Raspberry Pi 5 supports an active cooler device that can be connected through a 4-pin a PWM header located on the board’s surface. The cooler is described in the bcm2712-rpi-5-b.dtsi DTS file as following: fan: cooling_fan { status = "okay"; compatible = "pwm-fan"; #cooling-cells = ; cooling-min-state = ; cooling-max-state = ; cooling-levels = ; pwms = ; rpm-regmap = ; rpm-offset = ; }; By default, the cooling_fan entry status is disabled, make sure to enable it. Also, make sure to enable the rp1_pwm1 entry in the same DTS file, as follows: &rp1_pwm1 { status = "okay"; pinctrl-0 = ; pinctrl-names = "default"; }; The cooling device can be managed by the generic pwm-fan driver. The following options should be set in the Linux Kernel configuration to enable the feature: CONFIG_PWM_RP1=y CONFIG_SENSORS_PWM_FAN=m Buildroot configuration In one of my previous posts, I walked through the process of downloading and setting up the Buildroot build system. Assuming that Buildroot 2014-11-1 was installed in /var folder, the image can be built as follows: Assuming Buildroot 2024.11.1 was installed in the /var directory, the image for the Raspberry Pi 5 can be built with the following commands: mkdir output && cd output make O=$PWD -C /var/buildroot-2024.11.1 raspberrypi5_defconfig make After the build process completes, the resulting image can be written to an SD card using the dd command: dd if=output/images/sdcard.img of=/dev/sda status=progress Double-check the target device (/dev/sda) before running dd, as using the wrong device can overwrite critical data. Monitoring the temperature via sysfs Once the Raspberry Pi 5 has booted, the system's temperature can be monitored through the sysfs interface, which exposes thermal sensor data managed by the Kernel's thermal subsystem. The device driver responsible for managing the active cooler dynamically adjusts the fan speed based on the system’s temperature. Once the pwm-fan module is loaded, it automatically regulates the fan according to the thermal zones defined in the device tree. The current fan state can be also monitored via the sysfs interface. The value returned corresponds to the current cooling level, which maps to predefined PWM values in the device tree, according to the current CPU temperature (in Celsius): Cooling State PWM Duty Cycle Current Temperature 0 0 < 50 1 75 50 < current temperature < 60 2 125 60 < current temperature < 67.5 3 175 67.5 < current temperature < 75 4 250 > 75 The active fan can also be controlled from user space by disabling the Kernel module and directly interacting with the PWM sysfs interface. To begin, export PWM channel 3 by writing its index to /sys/class/pwm/pwmchip2/export. Once exported, the fan control interface becomes available at /sys/class/pwm/pwmchip2/pwm3/. The image below demonstrates how to enable the device and run the fan at full speed: Conclusion Effective thermal management is essential in embedded Linux systems like the Raspberry Pi 5 to maintain performance and hardware longevity. By enabling the onboard thermal sensor and configuring the active cooler through Device Tree and Kernel options, you can build a responsive and reliable temperature control system. Using Bui
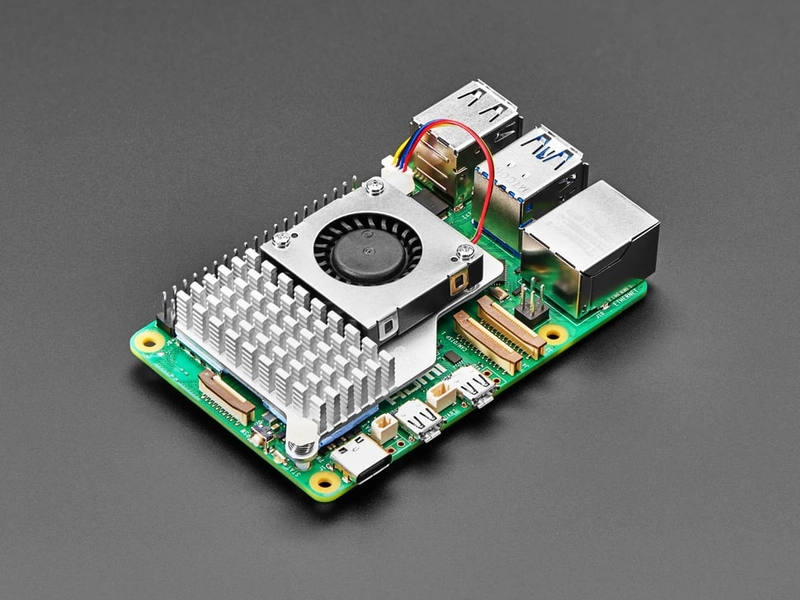
Effectively monitoring and managing CPU temperature in embedded systems is crucial to prevent throttling and ensure reliable device performance. The Raspberry Pi 5 features a built-in thermal sensor within its BCM2712 SoC, allowing real-time monitoring of the CPU core temperature. To help manage heat, an active cooler can be used, which typically activates once the CPU reaches a predefined temperature threshold. This article outlines the steps to enable both the thermal sensor and an active cooling system for monitoring and controlling the temperature on a Raspberry Pi 5 board using Buildroot to build the system.
Enabling the thermal sensor
The thermal sensor on the Raspberry Pi 5 is part of the Adaptive Voltage Scaling (AVS) system, which dynamically adjusts the CPU voltage based on workload and temperature. This mechanism helps reduce both power consumption and heat generation. The sensor is defined in the default Device Tree Source (DTS) file bcm2712.dtsi found in the Raspberry Pi's Linux Kernel repository. The relevant section is shown below:
avs_monitor: avs-monitor@7d542000 {
    compatible = "brcm,bcm2711-avs-monitor",
                    "syscon", "simple-mfd";
    reg = <0x7d542000 0xf00>;
    status = "okay";

    thermal: thermal {
        compatible = "brcm,bcm2711-thermal";
        #thermal-sensor-cells = <0>;
    };
};
The device drivers required to enable the thermal sensors listed below are typically included in the default Linux kernel configuration for the Raspberry Pi 5.
CONFIG_BCM2711_THERMAL=y
CONFIG_MFD_SYSCON=y
Enabling the active cooler
The Raspberry Pi 5 supports an active cooler device that can be connected through a 4-pin a PWM header located on the board’s surface.
The cooler is described in the bcm2712-rpi-5-b.dtsi DTS file as following:
fan: cooling_fan {
    status = "okay";
    compatible = "pwm-fan";
    #cooling-cells = <2>;
    cooling-min-state = <0>;
    cooling-max-state = <3>;
    cooling-levels = <0 75 125 175 250>;
    pwms = <&rp1_pwm1 3 41566 PWM_POLARITY_INVERTED>;
    rpm-regmap = <&rp1_pwm1>;
    rpm-offset = <0x3c>;
};
By default, the cooling_fan entry status is disabled, make sure to enable it. Also, make sure to enable the rp1_pwm1 entry in the same DTS file, as follows:
&rp1_pwm1 {
    status = "okay";
    pinctrl-0 = <&rp1_pwm1_gpio45>;
    pinctrl-names = "default";
};
The cooling device can be managed by the generic pwm-fan driver. The following options should be set in the Linux Kernel configuration to enable the feature:
CONFIG_PWM_RP1=y
CONFIG_SENSORS_PWM_FAN=m
Buildroot configuration
In one of my previous posts, I walked through the process of downloading and setting up the Buildroot build system.
Assuming that Buildroot 2014-11-1 was installed in /var folder, the image can be built as follows:
Assuming Buildroot 2024.11.1 was installed in the /var directory, the image for the Raspberry Pi 5 can be built with the following commands:
mkdir output && cd output
make O=$PWD -C /var/buildroot-2024.11.1 raspberrypi5_defconfig
make
After the build process completes, the resulting image can be written to an SD card using the dd command:
dd if=output/images/sdcard.img of=/dev/sda status=progress
Double-check the target device (
/dev/sda) before runningdd, as using the wrong device can overwrite critical data.
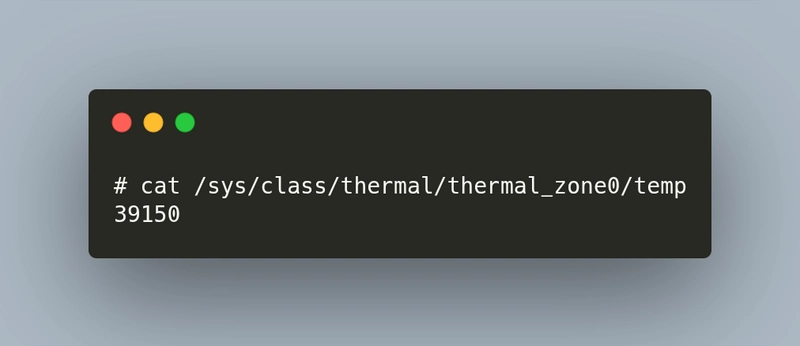
Monitoring the temperature via sysfs
Once the Raspberry Pi 5 has booted, the system's temperature can be monitored through the sysfs interface, which exposes thermal sensor data managed by the Kernel's thermal subsystem.
The device driver responsible for managing the active cooler dynamically adjusts the fan speed based on the system’s temperature. Once the pwm-fan module is loaded, it automatically regulates the fan according to the thermal zones defined in the device tree.
The current fan state can be also monitored via the sysfs interface.
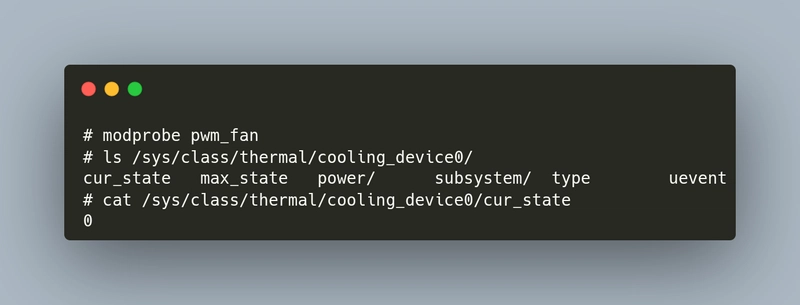
The value returned corresponds to the current cooling level, which maps to predefined PWM values in the device tree, according to the current CPU temperature (in Celsius):
| Cooling State | PWM Duty Cycle | Current Temperature |
|---|---|---|
| 0 | 0 | < 50 |
| 1 | 75 | 50 < current temperature < 60 |
| 2 | 125 | 60 < current temperature < 67.5 |
| 3 | 175 | 67.5 < current temperature < 75 |
| 4 | 250 | > 75 |
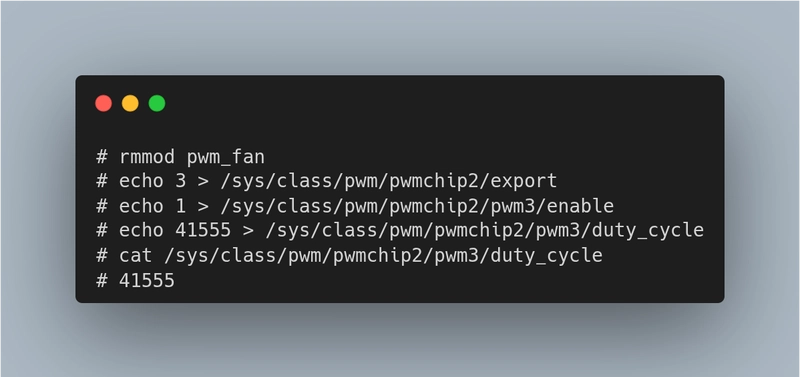
The active fan can also be controlled from user space by disabling the Kernel module and directly interacting with the PWM sysfs interface. To begin, export PWM channel 3 by writing its index to /sys/class/pwm/pwmchip2/export. Once exported, the fan control interface becomes available at /sys/class/pwm/pwmchip2/pwm3/.
The image below demonstrates how to enable the device and run the fan at full speed:
Conclusion
Effective thermal management is essential in embedded Linux systems like the Raspberry Pi 5 to maintain performance and hardware longevity. By enabling the onboard thermal sensor and configuring the active cooler through Device Tree and Kernel options, you can build a responsive and reliable temperature control system.
Using Buildroot, integrating these features into a custom Linux image becomes a streamlined and repeatable process. Whether you choose to rely on automatic thermal zones or prefer manual control via the sysfs interface, you have full flexibility to tailor the cooling behavior to your application’s needs.
For an even more automated solution, check out this project, which reads the current temperature and dynamically adjusts the fan speed. If you’d like help integrating it into your Buildroot setup, feel free to reach out.