


![Apple C1 vs Qualcomm Modem Performance [Speedtest]](https://www.iclarified.com/images/news/96767/96767/96767-640.jpg)
![Apple Studio Display On Sale for $1249 [Lowest Price Ever]](https://www.iclarified.com/images/news/96770/96770/96770-640.jpg)


![[Fixed] Chromecast (2nd gen) and Audio can’t Cast in ‘Untrusted’ outage](https://i0.wp.com/9to5google.com/wp-content/uploads/sites/4/2019/08/chromecast_audio_1.jpg?resize=1200%2C628&quality=82&strip=all&ssl=1)


![[The AI Show Episode 139]: The Government Knows AGI Is Coming, Superintelligence Strategy, OpenAI’s $20,000 Per Month Agents & Top 100 Gen AI Apps](https://www.marketingaiinstitute.com/hubfs/ep%20139%20cover-2.png)


![[The AI Show Episode 138]: Introducing GPT-4.5, Claude 3.7 Sonnet, Alexa+, Deep Research Now in ChatGPT Plus & How AI Is Disrupting Writing](https://www.marketingaiinstitute.com/hubfs/ep%20138%20cover.png)


![Is XMPP a good option for a messaging system in an app? [closed]](https://cdn.sstatic.net/Sites/softwareengineering/Img/apple-touch-icon@2.png?v=1ef7363febba)


Figma to React instantly: Introduction Anima app
Figma design → React/Vue/HTML code instantly Hello people, Welcome to the new blog. Today we will be discussing a cool product that converts figma design into code, and will make code our first app page using the same. Taking some time off because I want to thank this blog sponsor and supporter, Anima: the company behind the AI figma design to code plugin and the AI code editor. Anima Figma plugin converts Figma design to the code of your choice. Developers are React.js, Vue.js or Plain HTML working with shadcn or different UI libraries, one click and your figma design will be converted into code. In this Blog!! (Table of Contents) Installing the Anima figma plugin Designing event registration app page (real-world example) Figma plugin details(AI customisation, Code customisation) Designing -> Developing a Registration app page using the Anima figma plugin using a login form Introduction to Anima Playground (AI Coding Assistant) Implementing Registration Form Search functionalities added using fuse.js (Using open-source package in AI chatbot) Contact Us page (Testing image uploaded feature) Company page generated using AI (Testing AI suggestions) Handling errors in AI coding assistant Download the code repository Running the code repository locally Final results Conclusion Let’s get started !! Installing the Anima figma plugin You need to install the Anima figma plugin in your figma app to convert your designs to code. Quick steps to install the plugin In the figma app, navigate to the bottom fixed navigation tab or simply press CMD + P inside This will open the search bar as shown in the image above Search for the Anima plugin and click to INSTALL it You will need to log in/sign up on the Anima app website and to use the figma plugin. Once done, you can use the Anima plugin directly inside figma. Designing Event Registration Page We will be making a simple Event Registration App page and will convert it into an app using an Anima plugin Here is the figma file URL to our Event Registration Page. Web Page Structure in 4 Points Header: Displays the company brand name, includes navigation links to other pages.. Contains a "Login" button. Body Content: Features an events list with filters (tabs) and a search bar, each event includes the name, description, date, and a "Book Now" button. Clicking this opens a modal with a booking form, A "Get Started" button provides information about the platform. Footer: Showcases the brand name, includes a newsletter subscription form, social media links, and links to other company pages. User Interaction: Smooth navigation and filtering with search and tabs, Booking form modal for seamless event seat reservations, Easy access to company info via footer links. This is a very basic registration app, feel free to make changes according to your preference. Design to Code Using Plugin Follow are the basic steps to convert your design to code Open the Anima plugin using CMD + P Search for the Anima plugin (install it if not present) Authenticate within the plugin (it will redirect to the Anima website) 4. Create the design(feel free to use anima figma designs) Select the Figma frame that you want to convert into code Further select the language, framework, and UI library in the plugin dropdown For the UI library, we have 3 options Ant design, Material UI, Shadcn and 3 options for frameworks React Vue HTML Options for styling are Tailwind CSS, and for language, we have 2 options, JavaScript and typescript. Moving further, to using the playground for further development of our event registration page Introduction to Anima Dev Playground The playground app by Anima runs the code repository in the browser to customise further using an AI chatbot. In the figma plugin, once the frame is selected and code is generated by Anima AI, click on Open in Playground to redirect to the Anima AI dev playground. You can use an Anima browser-based code editor called Playground that provides an AI chatbot to make changes in the code while typing in plain english, the same way we did with the figma plugin AI customisation chatbot. The following tasks can be accomplished using Playground Customise code into Fledge apps using AI chatbot Preview the code changes in real-time Browser-based code editor with integrated AI chatbot Download the code repository Push the code repository to github Save the code repository under your account on Anima or on your codebase Anima Dev Playground is scheduled to go live on February 10th, and for that day we can’t wait to see your opinions/feedback and reactions. Prompts Iterations in Anima Playground Anima not only provides a figma plugin but it takes a step further with a browser-based AI assistant code editor, we will call it Dev Playground for this blog section (or probably in future. D
Figma design → React/Vue/HTML code instantly
Hello people,
Welcome to the new blog. Today we will be discussing a cool product that converts figma design into code, and will make code our first app page using the same.
Taking some time off because I want to thank this blog sponsor and supporter, Anima: the company behind the AI figma design to code plugin and the AI code editor.
Anima Figma plugin converts Figma design to the code of your choice. Developers are React.js, Vue.js or Plain HTML working with shadcn or different UI libraries, one click and your figma design will be converted into code.
In this Blog!! (Table of Contents)
- Installing the Anima figma plugin
- Designing event registration app page (real-world example)
- Figma plugin details(AI customisation, Code customisation)
- Designing -> Developing a Registration app page using the Anima figma plugin using a login form
- Introduction to Anima Playground (AI Coding Assistant)
- Implementing Registration Form
- Search functionalities added using fuse.js (Using open-source package in AI chatbot)
- Contact Us page (Testing image uploaded feature)
- Company page generated using AI (Testing AI suggestions)
- Handling errors in AI coding assistant
- Download the code repository
- Running the code repository locally
- Final results
- Conclusion
Let’s get started !!
Installing the Anima figma plugin
You need to install the Anima figma plugin in your figma app to convert your designs to code.
Quick steps to install the plugin
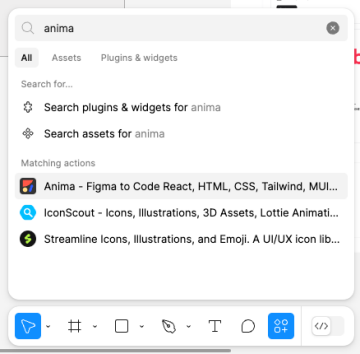
- In the figma app, navigate to the bottom fixed navigation tab or simply press CMD + P inside
- This will open the search bar as shown in the image above
- Search for the Anima plugin and click to INSTALL it
- You will need to log in/sign up on the Anima app website and to use the figma plugin.
Once done, you can use the Anima plugin directly inside figma.
Designing Event Registration Page
We will be making a simple Event Registration App page and will convert it into an app using an Anima plugin
Here is the figma file URL to our Event Registration Page.
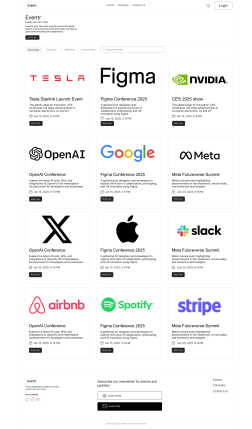
Web Page Structure in 4 Points
Header: Displays the company brand name, includes navigation links to other pages.. Contains a "Login" button.
Body Content: Features an events list with filters (tabs) and a search bar, each event includes the name, description, date, and a "Book Now" button. Clicking this opens a modal with a booking form, A "Get Started" button provides information about the platform.
Footer: Showcases the brand name, includes a newsletter subscription form, social media links, and links to other company pages.
User Interaction: Smooth navigation and filtering with search and tabs, Booking form modal for seamless event seat reservations, Easy access to company info via footer links.
This is a very basic registration app, feel free to make changes according to your preference.
Design to Code Using Plugin
Follow are the basic steps to convert your design to code
Open the Anima plugin using CMD + P
Search for the Anima plugin (install it if not present)
Authenticate within the plugin (it will redirect to the Anima website) 4. Create the design(feel free to use anima figma designs)
Select the Figma frame that you want to convert into code
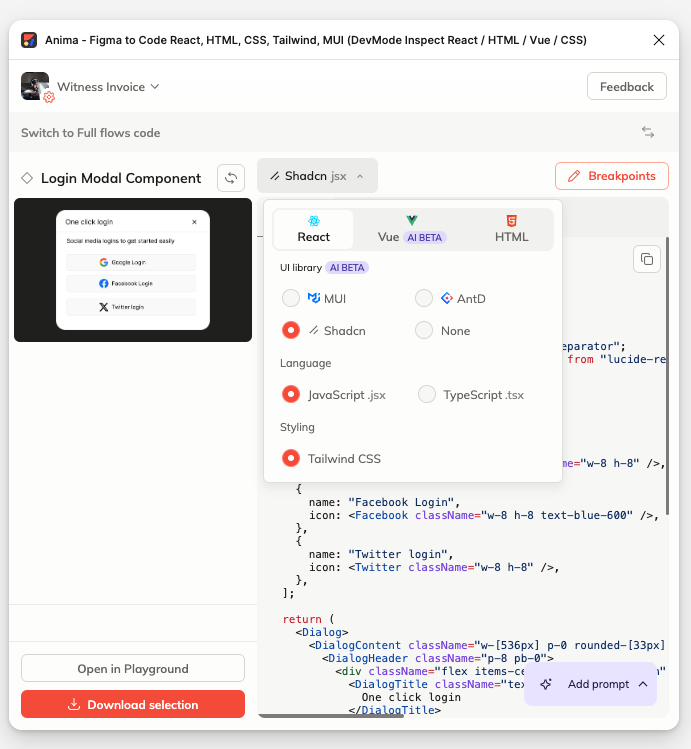
Further select the language, framework, and UI library in the plugin dropdown
For the UI library, we have 3 options
- Ant design,
- Material UI,
- Shadcn
and 3 options for frameworks
- React
- Vue
- HTML
Options for styling are Tailwind CSS, and for language, we have 2 options, JavaScript and typescript.
Moving further, to using the playground for further development of our event registration page
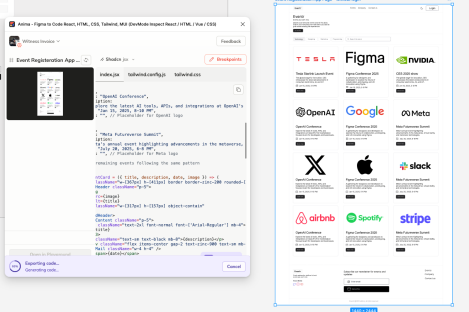
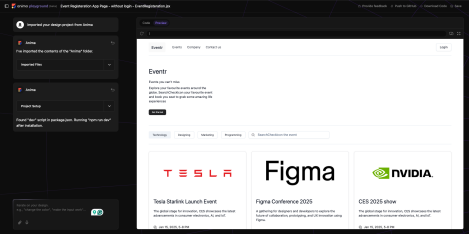
Introduction to Anima Dev Playground
The playground app by Anima runs the code repository in the browser to customise further using an AI chatbot.
In the figma plugin, once the frame is selected and code is generated by Anima AI, click on Open in Playground to redirect to the Anima AI dev playground.
You can use an Anima browser-based code editor called Playground that provides an AI chatbot to make changes in the code while typing in plain english, the same way we did with the figma plugin AI customisation chatbot.
The following tasks can be accomplished using Playground
- Customise code into Fledge apps using AI chatbot
- Preview the code changes in real-time
- Browser-based code editor with integrated AI chatbot
- Download the code repository
- Push the code repository to github
- Save the code repository under your account on Anima or on your codebase
Anima Dev Playground is scheduled to go live on February 10th, and for that day we can’t wait to see your opinions/feedback and reactions.
Prompts Iterations in Anima Playground
Anima not only provides a figma plugin but it takes a step further with a browser-based AI assistant code editor, we will call it Dev Playground for this blog section (or probably in future.
Dev Playground is the AI coding assistant that runs on a browser whose job is to take prompts and generate code and apps in real-time.
Following are the steps we will follow, or simply instruct our dev playground in the same order as mentioned
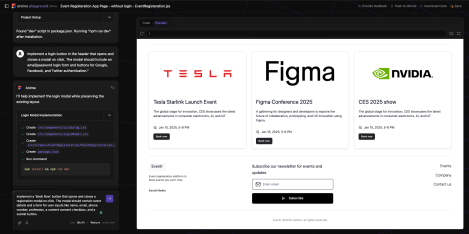
- Implement a login button in the header that opens and closes a modal on click. The modal should include an email/password login form and buttons for Google, Facebook, and Twitter authentication.
Implement a 'Book Now' button that opens and closes a registration modal on click. The modal should contain event details and a form for user inputs like name, email, phone number, profession, a content consent checkbox, and a submit button.
Complete that search input functionality by adding a search feature on the events list
Complete the newsletter subscribe form as well by adding toast when the user adds an email, and click the subscribe button
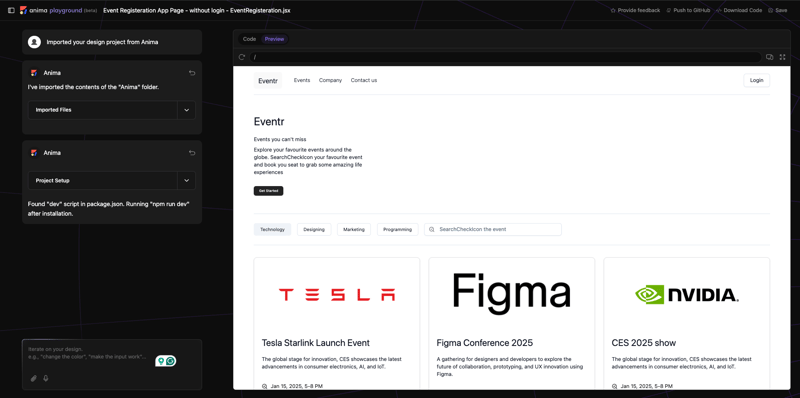
3 core features the Anima playground provides
- The top navbar contains the Download, Save and Push code to github feature
- Playground provides a preview and code tab to see the results and code repository
- The playground left-side section (as shown in the image above) will take AI instructions via prompts and show previous chats and steps.
Moving ahead with further customization of the event registration page by adding a registration form, login modal, newsletter subscribe feature and search functionality.
Implementing the Registration Form
The following images depict the use case of the playground AI chatbot along with prompts to implement the registration form.
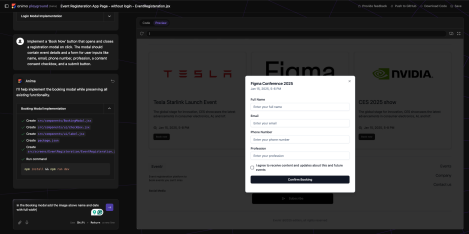
Lastly, we instruct AI to complete the registration form by taking email validation, consent checkbox confirmation and so on, and render a toast as well when a user submits the form.
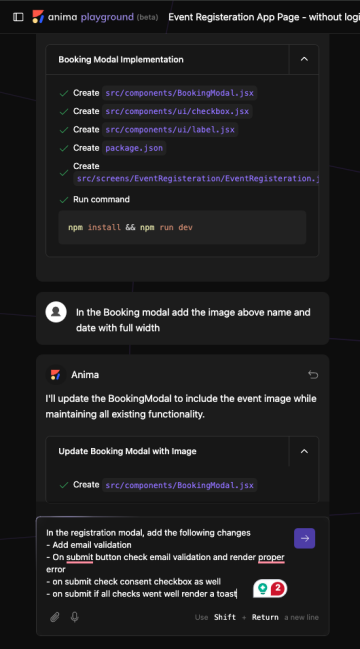
Prompt to add registration modal along with registration form and handle the form submission with some toast. You can go further with AI assistant to make your app closer to full-fledged apps.
Complete the search functionality in the search input and show the searched result below
Anima figma plugin and AI coding assistant playground help to create basic figma design into code and develop full-stack apps using AI chatbot making life much easier for design developers.
Creating Search Functionality using AI
Next, we will move to add basic search functionality using AI prompts by following the same process we did for the login and registration form, with only a difference this time we will instruct using other open-source libraries such as fuse.js to add search.
Prompt: Add basic search functionality on the tabs using the fuse.js npm package. Try to decouple the code and methods in a separate file.
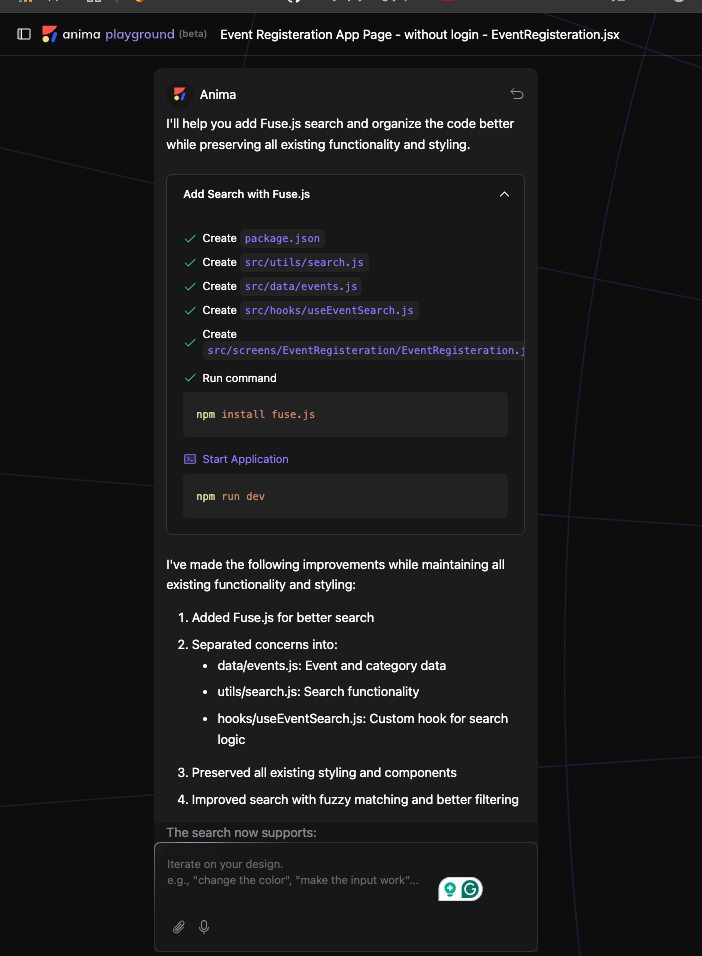
Since we have instructed the AI to decouple the code as well, it will certainly act as shown in the video below
As you can see, we have instructed the AI to handle decouple as well, and as expected, the playground installed the fuse.js package, then created the “utils” directory adding the fuse.js search method and importing the same to complete the search functionality.
All these tasks are completed instantly within minutes