_Sergey_Tarasov_Alamy.jpg?width=1280&auto=webp&quality=80&disable=upscale#)


![Apple Shares Official Trailer for 'Stick' Starring Owen Wilson [Video]](https://www.iclarified.com/images/news/97264/97264/97264-640.jpg)


![Beats Studio Pro Wireless Headphones Now Just $169.95 - Save 51%! [Deal]](https://www.iclarified.com/images/news/97258/97258/97258-640.jpg)


 Evolved as a Predominant Framework for Ransomware Attacks.webp?#)


![[The AI Show Episode 146]: Rise of “AI-First” Companies, AI Job Disruption, GPT-4o Update Gets Rolled Back, How Big Consulting Firms Use AI, and Meta AI App](https://www.marketingaiinstitute.com/hubfs/ep%20146%20cover.png)


-Mafia-The-Old-Country---The-Initiation-Trailer-00-00-54.png?width=1920&height=1920&fit=bounds&quality=70&format=jpg&auto=webp#)


-Nintendo-Switch-2---Reveal-Trailer-00-01-52.png?width=1920&height=1920&fit=bounds&quality=70&format=jpg&auto=webp#)


How to Design a UFO Using 3D CAD Software
How to Design a UFO Using 3D CAD Software Designing a UFO model requires a systematic understanding of 3D modeling principles, geometric manipulation, and software-specific tools. SelfCAD, a browser-based 3D modeling platform, offers an accessible yet powerful environment for constructing detailed and precise models. With its integrated toolset including 3D sketch, shape generators and transformation functions, SelfCAD allows users to prototype complex objects like UFOs with efficiency and accuracy. This article provides a comprehensive guide to designing a UFO using SelfCAD. It outlines the core stages of the modeling process, including 3D sketching, symmetry adjustments and detailing. Through this structured approach, readers will gain practical knowledge of SelfCAD’s modeling workflow while also learning how to apply design thinking to conceptualize and execute a believable extraterrestrial vehicle model. To access the interactive tutorial to this article, check out; https://www.selfcad.com/tutorials/255y94q1y2t35h1i2d2gx25so4x3v1a5g12n Once you’ve launched the editor; From the drawing category on the toolbar choose 3D sketch; From the plane list select left/right, From the tool panel choose arc 2, Click on highlighted point to draw arc Click on highlighted point to draw arc From the tool panel choose line; Click on highlighted point to draw edge Click on highlighted point to draw edge From the tool panel choose arc 2; Click on highlighted point to draw arc Click on highlighted point to draw arc Click on highlighted point to draw arc From the tool panel choose line; Click on highlighted point to draw edge Click on highlighted point to draw edge Click on highlighted point to draw edge Click ‘x’ to close 3D sketch panel From the tools category on the toolbar choose revolve; Set segments to 128 Click to finalize revolve Click isolate button to isolate selected objects Click to activate edge selection; Click on highlighted region to select it From the tools category on the toolbar choose fill polygons Click to finalize fill polygons Click to activate polygon selection; Click on highlighted region to select it From the modify category on the toolbar choose inset; Set inset amount to 30 Tick the checkmark to finalize inset Click on highlighted region to deselect it Click to activate edge selection; Click on highlighted region to select it From the modify category on the toolbar choose fillet; Set level to 5 Tick the checkmark to finalize fillet From the 3D Shapes category on the toolbar choose sphere; Set radius to 30, vertical segments to 32, position y to 310, position z to 240. Tick the checkmark to finalize sphere From the tools category on the toolbar choose copy offsets; Set operation to pivot, amount of copies to 6, Click copy button to create copies. Click ‘x’ to close copy offsets panel Click on revolved mesh 1 to select it. Click stitch & scoop on the toolbar; From the tool panel choose union. Tick the checkmark to finalize union As you continue honing your design skills, remember that SelfCAD offers a wealth of resources to support your learning journey. To deepen your understanding and explore more advanced features, consider checking out the interactive tutorials (https://www.selfcad.com/tutorials) available on the SelfCAD website. The tutorials page provides a treasure trove of guides, tips, and tricks that cater to designers of all levels. More structured learning experience can also be accessed at the SelfCAD Academy (https://www.selfcad.com/academy/curriculum/), https://www.youtube.com/@3dmodeling101, and 3D Modeling 101 series (https://www.youtube.com/playlist?list=PL74nFNT8yS9DcE1UlUUdiR1wFGv9DDfTB). This comprehensive resource offers in-depth courses taught by industry experts, allowing you to master the intricacies of SelfCAD at your own pace

How to Design a UFO Using 3D CAD Software
Designing a UFO model requires a systematic understanding of 3D modeling principles, geometric manipulation, and software-specific tools. SelfCAD, a browser-based 3D modeling platform, offers an accessible yet powerful environment for constructing detailed and precise models. With its integrated toolset including 3D sketch, shape generators and transformation functions, SelfCAD allows users to prototype complex objects like UFOs with efficiency and accuracy.
This article provides a comprehensive guide to designing a UFO using SelfCAD. It outlines the core stages of the modeling process, including 3D sketching, symmetry adjustments and detailing. Through this structured approach, readers will gain practical knowledge of SelfCAD’s modeling workflow while also learning how to apply design thinking to conceptualize and execute a believable extraterrestrial vehicle model.
To access the interactive tutorial to this article, check out; https://www.selfcad.com/tutorials/255y94q1y2t35h1i2d2gx25so4x3v1a5g12n
Once you’ve launched the editor;
From the drawing category on the toolbar choose 3D sketch; From the plane list select left/right, From the tool panel choose arc 2, Click on highlighted point to draw arc
Click on highlighted point to draw arc

From the tool panel choose line; Click on highlighted point to draw edge

Click on highlighted point to draw edge
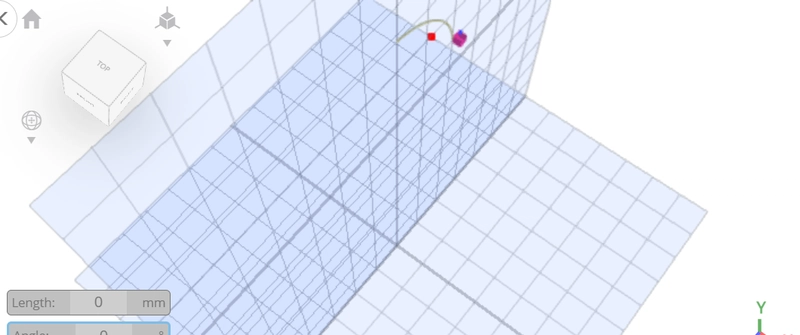
From the tool panel choose arc 2; Click on highlighted point to draw arc

Click on highlighted point to draw arc

Click on highlighted point to draw arc

From the tool panel choose line; Click on highlighted point to draw edge
Click on highlighted point to draw edge

Click on highlighted point to draw edge

Click ‘x’ to close 3D sketch panel
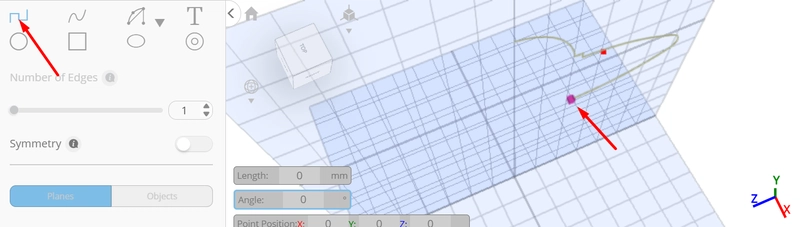
From the tools category on the toolbar choose revolve; Set segments to 128

Click to finalize revolve
Click isolate button to isolate selected objects
Click to activate edge selection; Click on highlighted region to select it

From the tools category on the toolbar choose fill polygons

Click to finalize fill polygons
Click to activate polygon selection; Click on highlighted region to select it

From the modify category on the toolbar choose inset; Set inset amount to 30

Tick the checkmark to finalize inset
Click on highlighted region to deselect it
Click to activate edge selection; Click on highlighted region to select it

From the modify category on the toolbar choose fillet; Set level to 5

Tick the checkmark to finalize fillet
From the 3D Shapes category on the toolbar choose sphere; Set radius to 30, vertical segments to 32, position y to 310, position z to 240.

Tick the checkmark to finalize sphere
From the tools category on the toolbar choose copy offsets; Set operation to pivot, amount of copies to 6, Click copy button to create copies.

Click ‘x’ to close copy offsets panel
Click on revolved mesh 1 to select it.
Click stitch & scoop on the toolbar; From the tool panel choose union.

Tick the checkmark to finalize union
As you continue honing your design skills, remember that SelfCAD offers a wealth of resources to support your learning journey. To deepen your understanding and explore more advanced features, consider checking out the interactive tutorials (https://www.selfcad.com/tutorials) available on the SelfCAD website. The tutorials page provides a treasure trove of guides, tips, and tricks that cater to designers of all levels.
More structured learning experience can also be accessed at the SelfCAD Academy (https://www.selfcad.com/academy/curriculum/), https://www.youtube.com/@3dmodeling101, and 3D Modeling 101 series (https://www.youtube.com/playlist?list=PL74nFNT8yS9DcE1UlUUdiR1wFGv9DDfTB). This comprehensive resource offers in-depth courses taught by industry experts, allowing you to master the intricacies of SelfCAD at your own pace