


![Beats Studio Pro Wireless Headphones Now Just $169.95 - Save 51%! [Deal]](https://www.iclarified.com/images/news/97258/97258/97258-640.jpg)


![[The AI Show Episode 146]: Rise of “AI-First” Companies, AI Job Disruption, GPT-4o Update Gets Rolled Back, How Big Consulting Firms Use AI, and Meta AI App](https://www.marketingaiinstitute.com/hubfs/ep%20146%20cover.png)


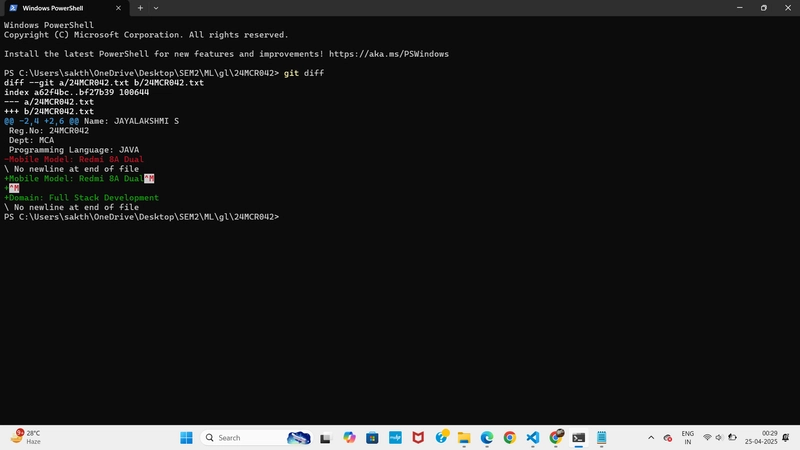
MCP filesystem: Server disconnected
If you’re excited about using your Claude Desktop app with the new Model Context Protocol (MCP) but keep running into frustrating configuration errors, you’re not alone. This is especially common if you’re a Node Version Manager (nvm) user. The Problem You followed the “Quickstart guide: For Claude Desktop User,” carefully copied the JSON configuration into your own claude_desktop_config.json file, but it keeps failing repeatedly. You’ll likely see this specific error alert: “MCP filesystem: Server disconnected” After some investigation, I discovered the root cause from a comment in the project’s GitHub repository (see Sources section below): The MCP Server Commands environment cannot directly access Node.js executables installed via nvm unless they are properly configured. The Solution: Create a Wrapper Script This elegant solution creates a wrapper script that ensures the correct Node.js environment is used: Step 1: Find your Node.js path First, determine your nvm-installed Node.js path: which node This will return something like: /Users/username/.nvm/versions/node/v16.x.x/bin/node Step 2: Create a wrapper script Create a new file at /usr/local/bin/npx-for-claude with the following content: ##!/usr/bin/env bash export PATH="/Users/YOUR-USERNAME/.nvm/versions/node/YOUR-NODE-VERSION/bin:$PATH" exec npx "$@" Make sure to replace: YOUR-USERNAME with your actual username YOUR-NODE-VERSION with your actual Node.js version (e.g., v16.20.0) Step 3: Make the wrapper script executable chmod +x /usr/local/bin/npx-for-claude Step 4: Configure Claude Desktop Edit your claude_desktop_config.json file to use the wrapper script: { "mcpServers": { "filesystem": { "command": "npx-for-claude", "args": [ "-y", "@modelcontextprotocol/server-filesystem", "/Users/username/path/to/allowed/directory" ] } } } Final Step Restart your Claude Desktop app, and it should start working with the new configuration! Why This Works This solution works because: The wrapper script sets up the correct PATH environment that includes your nvm-installed Node.js binaries It then executes the npx command with all the arguments passed to it The wrapper script essentially bridges the gap between Claude Desktop’s execution environment and your nvm setup, allowing you to use the standard configuration pattern recommended in the documentation. Source This solution was inspired by some comments in the ModelContextProtocol GitHub repository: Issue #64 I have also added this solution as a comment on this GitHub issue: comment

If you’re excited about using your Claude Desktop app with the new Model Context Protocol (MCP) but keep running into frustrating configuration errors, you’re not alone. This is especially common if you’re a Node Version Manager (nvm) user.
The Problem
You followed the “Quickstart guide: For Claude Desktop User,” carefully copied the JSON configuration into your own claude_desktop_config.json file, but it keeps failing repeatedly.
You’ll likely see this specific error alert: “MCP filesystem: Server disconnected”
After some investigation, I discovered the root cause from a comment in the project’s GitHub repository (see Sources section below):
The MCP Server Commands environment cannot directly access Node.js executables installed via nvm unless they are properly configured.
The Solution: Create a Wrapper Script
This elegant solution creates a wrapper script that ensures the correct Node.js environment is used:
Step 1: Find your Node.js path
First, determine your nvm-installed Node.js path:
which node
This will return something like: /Users/username/.nvm/versions/node/v16.x.x/bin/node
Step 2: Create a wrapper script
Create a new file at /usr/local/bin/npx-for-claude with the following content:
##!/usr/bin/env bash

export PATH="/Users/YOUR-USERNAME/.nvm/versions/node/YOUR-NODE-VERSION/bin:$PATH"
exec npx "$@"
Make sure to replace:
-
YOUR-USERNAMEwith your actual username -
YOUR-NODE-VERSIONwith your actual Node.js version (e.g., v16.20.0)
Step 3: Make the wrapper script executable
chmod +x /usr/local/bin/npx-for-claude
Step 4: Configure Claude Desktop
Edit your claude_desktop_config.json file to use the wrapper script:
{
    "mcpServers": {
        "filesystem": {
            "command": "npx-for-claude",
            "args": [
                "-y",
                "@modelcontextprotocol/server-filesystem",
                "/Users/username/path/to/allowed/directory"
            ]
        }
    }
}
Final Step
Restart your Claude Desktop app, and it should start working with the new configuration!
Why This Works
This solution works because:
- The wrapper script sets up the correct PATH environment that includes your nvm-installed Node.js binaries
- It then executes the
npxcommand with all the arguments passed to it
The wrapper script essentially bridges the gap between Claude Desktop’s execution environment and your nvm setup, allowing you to use the standard configuration pattern recommended in the documentation.
Source
This solution was inspired by some comments in the ModelContextProtocol GitHub repository: Issue #64
I have also added this solution as a comment on this GitHub issue: comment