


![M4 MacBook Air Drops to New All-Time Low of $912 [Deal]](https://www.iclarified.com/images/news/97108/97108/97108-640.jpg)
![New iPhone 17 Dummy Models Surface in Black and White [Images]](https://www.iclarified.com/images/news/97106/97106/97106-640.jpg)


_Olekcii_Mach_Alamy.jpg?width=1280&auto=webp&quality=80&disable=upscale#)


![[The AI Show Episode 144]: ChatGPT’s New Memory, Shopify CEO’s Leaked “AI First” Memo, Google Cloud Next Releases, o3 and o4-mini Coming Soon & Llama 4’s Rocky Launch](https://www.marketingaiinstitute.com/hubfs/ep%20144%20cover.png)


EC2 Auto Scaling and Load Balancing on AWS: Step-by-Step Guide
What is auto scaling? Auto Scaling is a service offered by Amazon Web Services (AWS) that automatically adjusts the number of instances according to the user's application demand. With auto-scaling, high availability can be achieved for an application without incurring high costs. Auto-scaling's elastic feature lets users scale up and down application resources based on predefined criteria like the desired capacity, the minimum capacity, and the maximum capacity. This ultimately helps applications manage user traffic coming to them without disturbing the overall working of the application. What Is Load Balancing? A Load Balancer as the name suggests balances the load coming to an application component. In cloud platforms like Amazon Web Services (AWS), it distributes the incoming network traffic to different multiple servers. The main goal of a load balancer is to improve the availability, scalability, and reliability of applications by fairly distributing network traffic and preventing any one server from becoming overloaded. Therefore, this will improve overall application performance. The load balancer is attached to an application in such a way that it faces firstly the network traffic so that it can be able to distribute it efficiently. Prerequisites AWS account with appropriate permissions Basic understanding of EC2 instances An existing Amazon Machine Image (AMI) or willingness to create one Section 1: Creating the VPC Step 1: Accessing the VPC Dashboard Log into AWS and navigate to the VPC Dashboard by selecting Services ➔ VPC. On the left-hand menu, click Create VPC. Step 2: Configure the VPC On the Create VPC page, select the VPC and more option. Under VPC settings: Name tag auto-generation: Enter a name for your VPC (e.g., hasanWebApp). IPv4 CIDR Block: Enter 10.0.0.0/16. IPv6 CIDR Block: Leave this option as defalult No IPv6 CIDR block. Tenancy: Select Default unless dedicated hardware is needed. Step 3: Configure Subnets Next, you will configure three public subnets, each in a different availability zone for high availability. Number of Availability Zones (AZs): Choose 3 to ensure high availability. Number of Public Subnets: Enter 3. Customize Subnet CIDR Blocks: Public subnet CIDR block in us-east-1a: 10.0.10.0/24 Public subnet CIDR block in us-east-1b: 10.0.20.0/24 Public subnet CIDR block in us-east-1c: 10.0.30.0/24 NAT gateways ($): Choose None VPC endpoints: Choose None Step 4: Configure Additional Resources Route Table and Internet Gateway AWS automatically creates an Internet Gateway and route tables when you use VPC and More. The wizard not only generates the required route table and Internet Gateway for your VPC but also sets up the necessary routes for internet-bound traffic. This ensures that instances on the public subnet can communicate with the internet. Section 2: Deploying an EC2 Instance With the VPC setup complete, it's time to launch EC2 instances into one of the public subnets. These instances will serve as web servers for hosting your applications, allowing you to test connectivity and functionality within your newly created VPC. Step 1: Launch an EC2 Instance To launch an EC2 instance, follow these steps: Name and Tags: Assign a meaningful name to your instance (e.g., HasanWebAppServer). Application and OS Images (Amazon Machine Image): Choose the Amazon Linux 2023 AMI. Instance Type: Select t2.micro, which is free-tier eligible and suitable for testing and small applications. Key pair (login): Key pair is required to securely access your instance via SSH. Choose an existing key pair or create a new one. Step 2: Configure Network Settings VPC: Select the VPC you created in the VPC section (e.g., HasanWebApp-vpc). Subnet: Choose HasanWebApp-subnet-public1-us-east-1a (e.g., 10.0.10.0/24). Auto-assign Public IP: Ensure that this option is enabled. This automatically assigns a public IP to the instance. Firewall (security groups): Create or Choose a existing Security Group. Under the Network Settings section, select Create security group. Security group name - required: Enter a name for your Security group (e.g., HasanWebAppServer-sg). Inbound Rules: Allow SSH (Port 22): Enables SSH access to your instance. Select Source type ➔ Anywhere. For you can access 0.0.0.0/0 to allow from anywhere. Allow HTTP (Port 80): Permits web traffic to your server. Select Source type ➔ Anywhere. To Set to 0.0.0.0/0 to allow access from the internet. Outbound Rules: By default, the security group allows all outbound traffic. No changes are necessary unless specific outbound restrictions are required. Step 3: User Data Configuration Add the following User Data script under Advanced Details. This script will automatically install and start the Apache web server when the instanc

What is auto scaling?
Auto Scaling is a service offered by Amazon Web Services (AWS) that automatically adjusts the number of instances according to the user's application demand. With auto-scaling, high availability can be achieved for an application without incurring high costs.
Auto-scaling's elastic feature lets users scale up and down application resources based on predefined criteria like the desired capacity, the minimum capacity, and the maximum capacity. This ultimately helps applications manage user traffic coming to them without disturbing the overall working of the application.
What Is Load Balancing?
A Load Balancer as the name suggests balances the load coming to an application component. In cloud platforms like Amazon Web Services (AWS), it distributes the incoming network traffic to different multiple servers. The main goal of a load balancer is to improve the availability, scalability, and reliability of applications by fairly distributing network traffic and preventing any one server from becoming overloaded. Therefore, this will improve overall application performance.
The load balancer is attached to an application in such a way that it faces firstly the network traffic so that it can be able to distribute it efficiently.
Prerequisites
- AWS account with appropriate permissions
- Basic understanding of EC2 instances
- An existing Amazon Machine Image (AMI) or willingness to create one
Section 1: Creating the VPC
Step 1: Accessing the VPC Dashboard
- Log into AWS and navigate to the VPC Dashboard by selecting Services ➔ VPC.
- On the left-hand menu, click Create VPC.
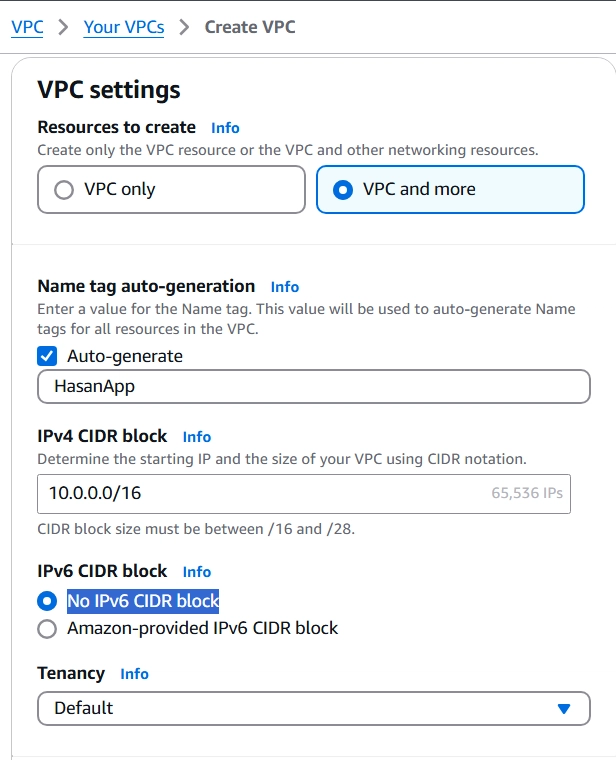
Step 2: Configure the VPC
- On the Create VPC page, select the VPC and more option.
- Under VPC settings:
-
Name tag auto-generation: Enter a name for your VPC (e.g.,
hasanWebApp). -
IPv4 CIDR Block: Enter
10.0.0.0/16. - IPv6 CIDR Block: Leave this option as defalult No IPv6 CIDR block.
- Tenancy: Select Default unless dedicated hardware is needed.
-
Name tag auto-generation: Enter a name for your VPC (e.g.,
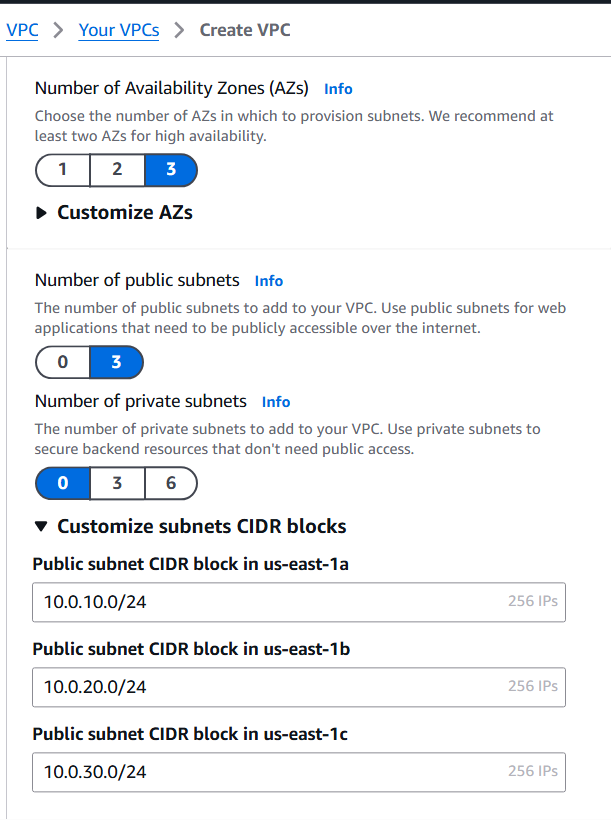
Step 3: Configure Subnets
Next, you will configure three public subnets, each in a different availability zone for high availability.
-
Number of Availability Zones (AZs): Choose
3to ensure high availability. -
Number of Public Subnets: Enter
3. -
Customize Subnet CIDR Blocks:
- Public subnet CIDR block in us-east-1a: 10.0.10.0/24
- Public subnet CIDR block in us-east-1b: 10.0.20.0/24
- Public subnet CIDR block in us-east-1c: 10.0.30.0/24
- NAT gateways ($): Choose None
- VPC endpoints: Choose None
Step 4: Configure Additional Resources
Route Table and Internet Gateway
AWS automatically creates an Internet Gateway and route tables when you use VPC and More. The wizard not only generates the required route table and Internet Gateway for your VPC but also sets up the necessary routes for internet-bound traffic. This ensures that instances on the public subnet can communicate with the internet.
Section 2: Deploying an EC2 Instance
With the VPC setup complete, it's time to launch EC2 instances into one of the public subnets. These instances will serve as web servers for hosting your applications, allowing you to test connectivity and functionality within your newly created VPC.
Step 1: Launch an EC2 Instance
To launch an EC2 instance, follow these steps:
-
Name and Tags: Assign a meaningful name to your instance (e.g.,
HasanWebAppServer). -
Application and OS Images (Amazon Machine Image): Choose the
Amazon Linux 2023 AMI. -
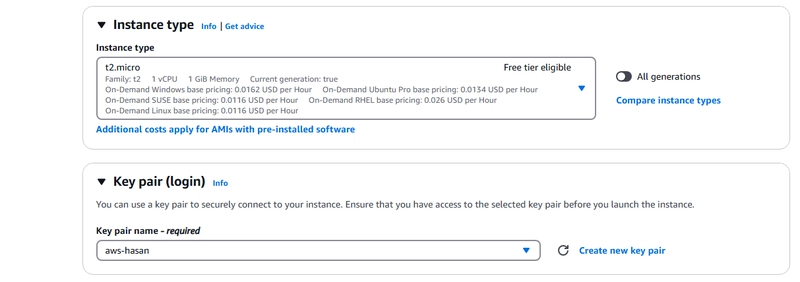
Instance Type: Select
t2.micro, which is free-tier eligible and suitable for testing and small applications. - Key pair (login): Key pair is required to securely access your instance via SSH. Choose an existing key pair or create a new one.

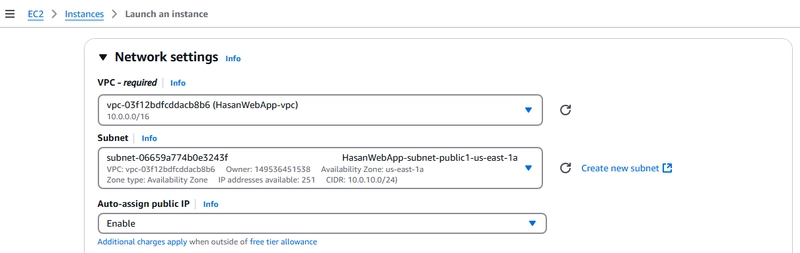
Step 2: Configure Network Settings
-
VPC: Select the VPC you created in the VPC section (e.g.,
HasanWebApp-vpc). -
Subnet: Choose HasanWebApp-subnet-public1-us-east-1a (e.g.,
10.0.10.0/24). - Auto-assign Public IP: Ensure that this option is enabled. This automatically assigns a public IP to the instance.
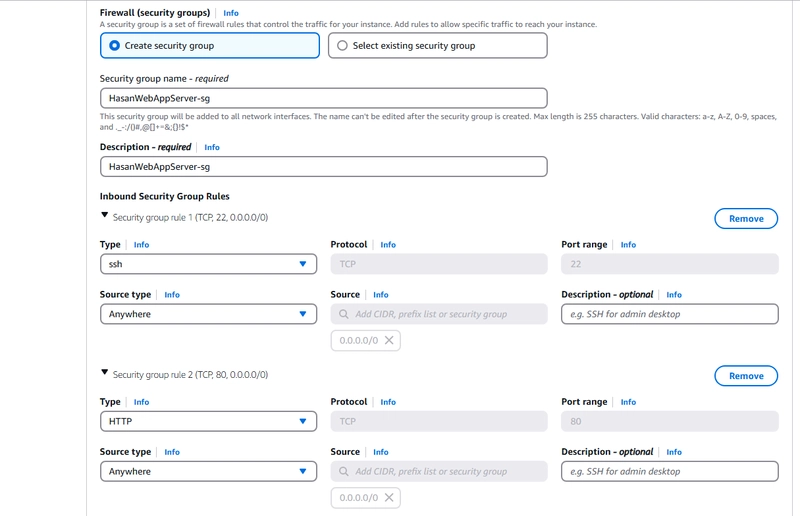
- Firewall (security groups): Create or Choose a existing Security Group.
Under the Network Settings section, select Create security group.
Security group name - required: Enter a name for your Security group (e.g.,
HasanWebAppServer-sg).-
Inbound Rules:
-
Allow SSH (Port 22): Enables SSH access to your instance. Select Source type ➔ Anywhere. For you can access
0.0.0.0/0to allow from anywhere. -
Allow HTTP (Port 80): Permits web traffic to your server. Select Source type ➔ Anywhere. To Set to
0.0.0.0/0to allow access from the internet.
-
Allow SSH (Port 22): Enables SSH access to your instance. Select Source type ➔ Anywhere. For you can access
Outbound Rules: By default, the security group allows all outbound traffic. No changes are necessary unless specific outbound restrictions are required.
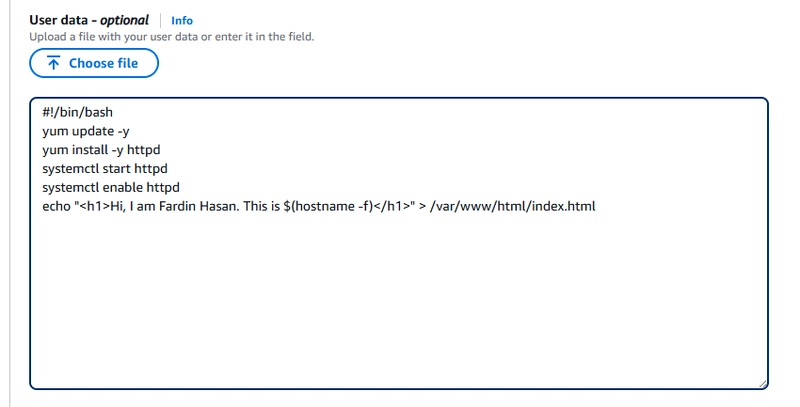
Step 3: User Data Configuration
Add the following User Data script under Advanced Details. This script will automatically install and start the Apache web server when the instance launches:
#!/bin/bash
yum update -y
yum install -y httpd
systemctl start httpd
systemctl enable httpd
echo "Hi, I am Kamrul Hasan. This is $(hostname -f)
" > /var/www/html/index.html
Step 4: Launch the Instance:
After configuring the above settings, click Launch Instance.
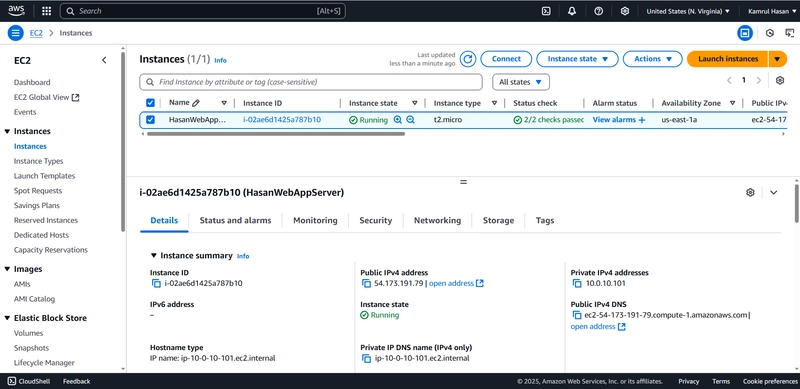
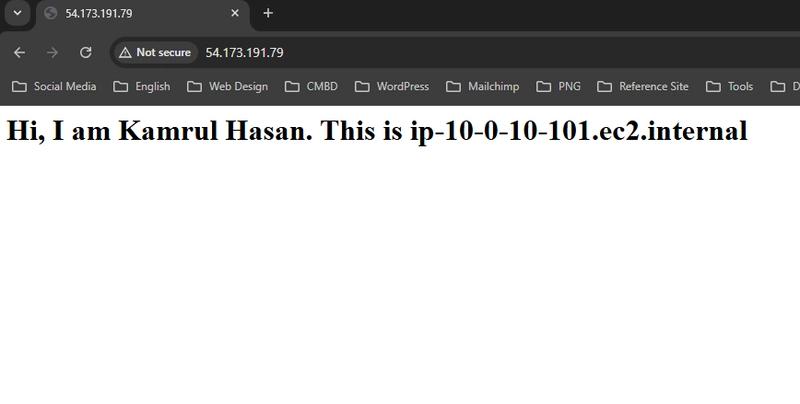
Step 5: Testing the EC2 Instance
- Open a web browser and navigate to the instance's public IP. You should see the message:
Hi, I am Kamrul Hasan. This is ip-10-0-10-101.ec2.internaldisplayed on the webpage, confirming that Apache is running and serving the HTML file created using the User Data script.
Section 3: Creating an AMI from Your Running EC2 Instance and Launch Template usig AMI
Creating an AMI from Your Running EC2 Instance
1. Go to EC2 Dashboard: Navigate to Instances and select your running instance.
-
1.1. Actions: Click on Actions > Image and templates > Create Image.
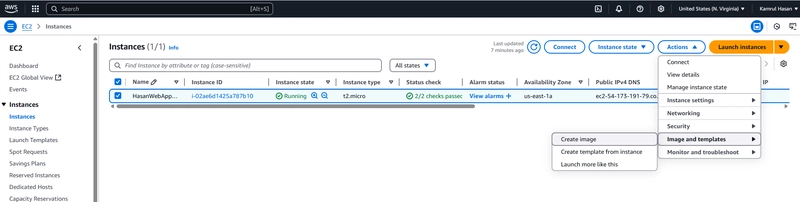
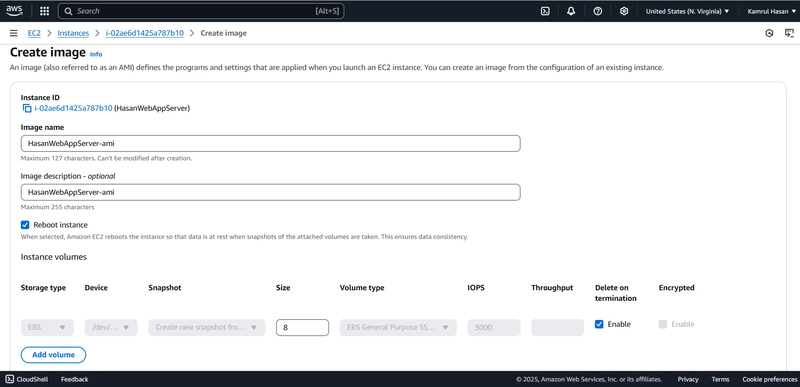
- 1.2. Image Name: Provide a name for your AMI (e.g., HasanWebAppServer-ami).
- 1.3. Instance Volumes: Review the instance storage configuration.
- 1.4. Create Image: Click Create Image to start the process.
Creating a Launch Template
2. Go to EC2 Dashboard Navigate to Launch Templates and click Create Launch Template.
-
2.1 Launch Template Name: Enter a name (e.g.,
HasanWebAppServer-lt).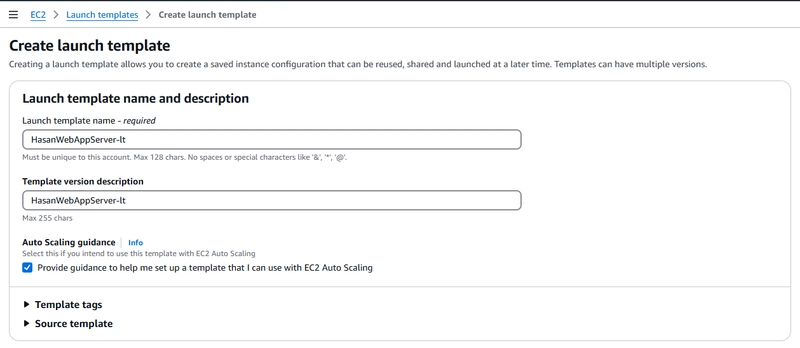
-
2.2 AMI ID: Go to My AMIs and enter the AMI ID you created earlier (
HasanWebAppServer-ami).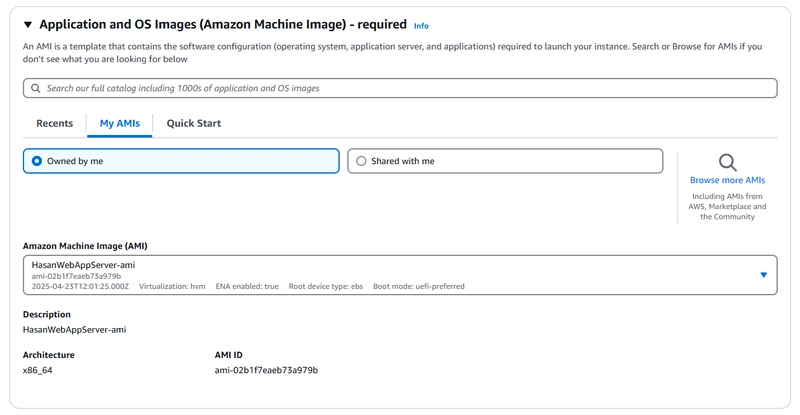
-
2.3 Instance Type: Select an instance type (e.g.,
t2.micro). -
2.4 Key Pair: Choose your existing key pair for SSH access (
aws-hasan).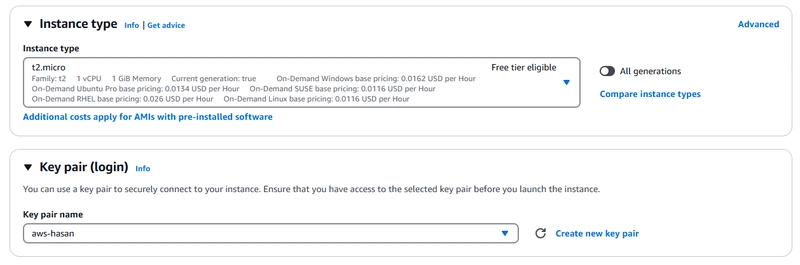
-
2.5 Security Groups: Attach the security group created earlier for your EC2 instances (
HasanWebAppServer-sg).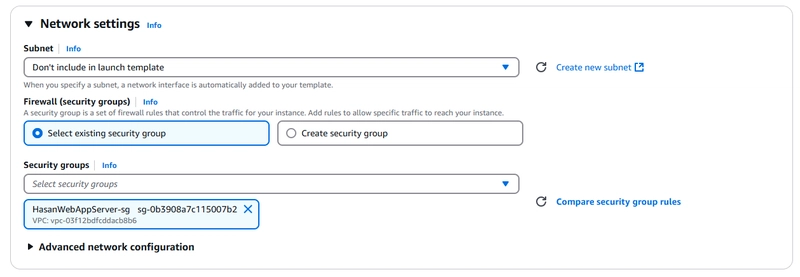
- 2.6 Auto-assign Public IP: Under Advanced Network Configurations, enable public IP assignment.

-
2.7 User Data: Add the user data for the instances that will be created by the auto scaling group. In this demo we are adding the same user data as our existing webserver.
- 2.8 Create Template: Click Create Launch Template. This template will serve as the blueprint for launching instances in your Auto Scaling Group.
Section 4: Setting Up Auto Scaling and Load Balancing
Setting Up Auto Scaling
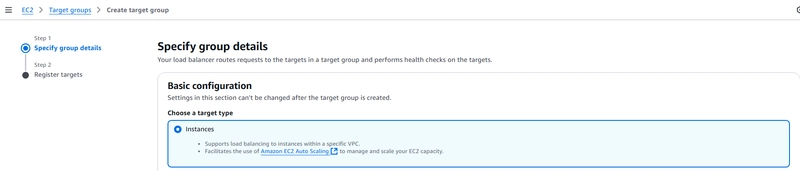
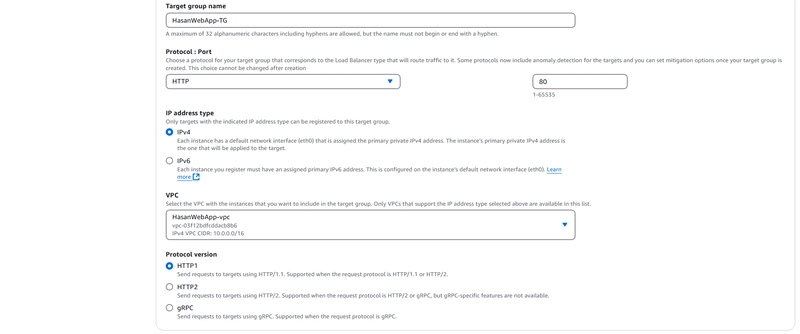
Step 1: Create a New Target Group
The ALB uses a Target Group to route traffic to specific EC2 instances. Let’s set one up:
- Choose a target type: Select Instances
-
Target Group Name: Enter a name for the target group (e.g.,
HasanWebApp-TG). -
Protocol : Port: Choose
HTTP. -
Port: Enter
80(for HTTP traffic). -
VPC: Choose the same VPC (
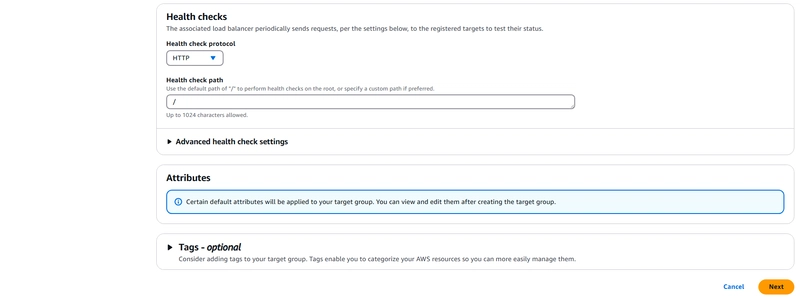
HasanWebApp-vpc). - Health Checks: Leave the default settings. The ALB will regularly check the health of your instances to ensure that only healthy instances receive traffic.
- Click Next and proceed to add Register targets.
Step 2: Register Targets
- Register Existing Instances: Manually register your existing HasanWebAppServer EC2 instance. The Auto Scaling Group (ASG) will handle this automatically in the future. Click Next to proceed to registering targets and creating the Target Group.
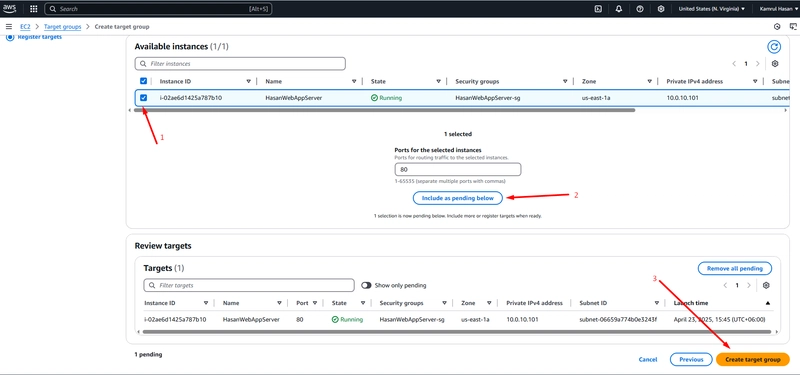
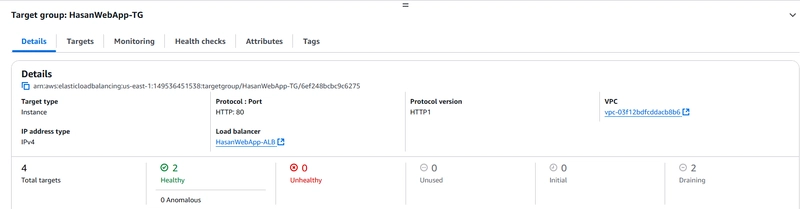
Step 3: Review and Create
- Review your Target Group configuration.
- Click Create Target Group to finalize the setup.
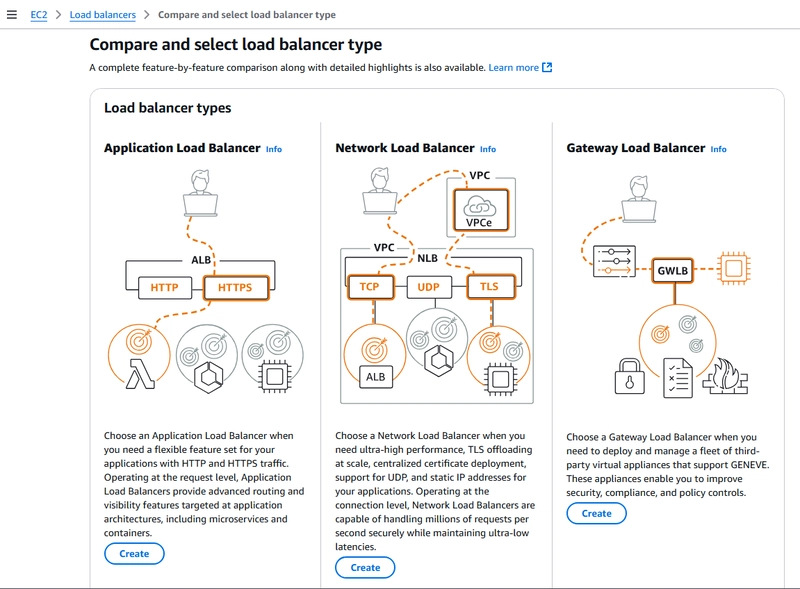
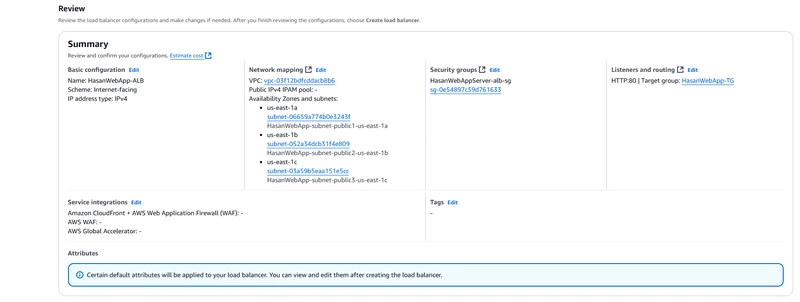
Setting Up an Application Load Balancer (ALB)
An ALB is essential for distributing traffic across multiple instances, ensuring that no single instance becomes overwhelmed. Here’s how to set it up:
Step 1: Create a New Load Balancer
Click on Create Load Balancer and select Application Load Balancer.
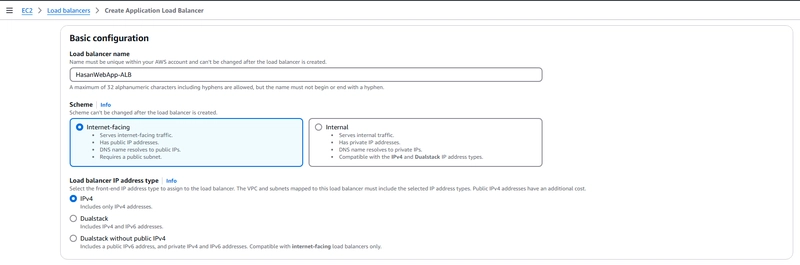
Step 2: Configure Load Balancer Settings
-
Name: Enter a name for your load balancer (e.g.,
HasanWebApp-ALB). - Scheme: Choose Internet-facing to make the ALB accessible over the internet.
-
IP Address Type: Select
IPv4. -
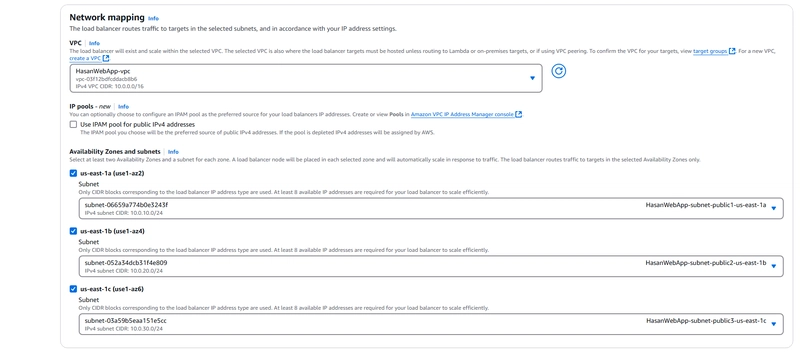
VPC: Choose the VPC you created earlier (e.g.,
HasanWebApp-vpc). -
Availability Zones: Select the availability zones and subnets where your EC2 instances are deployed (in this case, the three public subnets you created:
us-east-1a (use1-az2),us-east-1b (use1-az4), andus-east-1c (use1-az6).
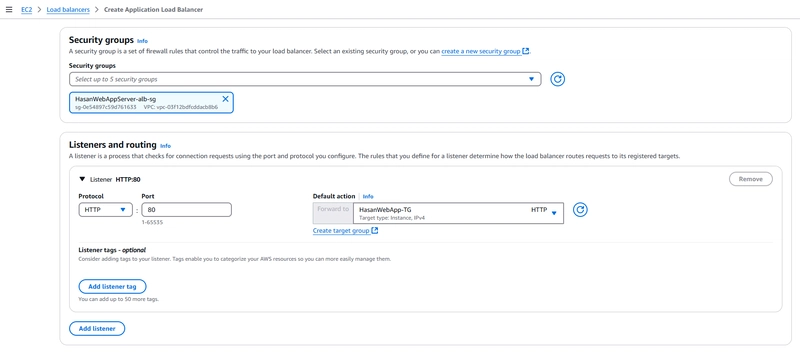
Step 3: Configure Security Groups
Select or create a security group for your ALB.
To click create a new security group and following steps:
-
Security group name: Enter a name for your Security group (e.g.,
HasanWebAppServer-alb-sg). -
VPC: Choose the VPC you created earlier (e.g.,
HasanWebApp-vpc). -
Inbound Rules:
-
Allow HTTP (Port 80): Permits web traffic to your server. Select Source type ➔ Anywhere. To Set to
0.0.0.0/0to allow access from the internet.
-
Allow HTTP (Port 80): Permits web traffic to your server. Select Source type ➔ Anywhere. To Set to
- Outbound Rules: By default, the security group allows all outbound traffic. No changes are necessary unless specific outbound restrictions are required.
Step 4: Listeners and routing
-
Protocol: Choose
HTTP. -
Port: Enter
80(for HTTP traffic). -
Default action: Choose the existing Target group (e.g.,
HasanWebApp-TG)
Section 5: Configuring Auto Scaling Groups (ASG)
Step 1: Navigate to Auto Scaling
In the AWS Management Console, go to EC2 Dashboard, and on the left-hand menu, under Auto Scaling, click on Auto Scaling Groups.
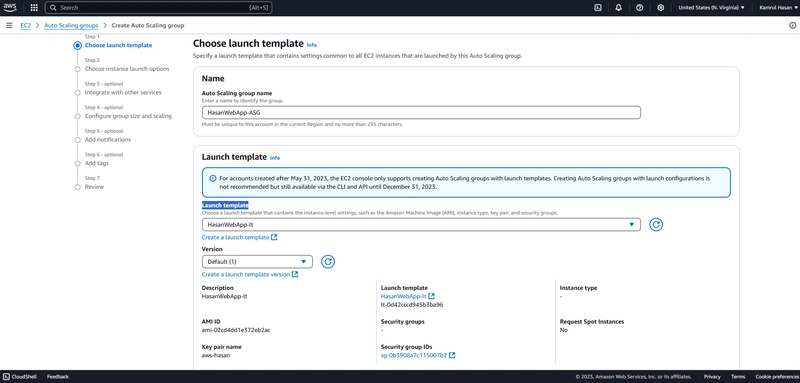
Step 2: Create Auto Scaling Group
Click on Create Auto Scaling Group.
Step 3: Configure Auto Scaling Group Settings
-
Auto Scaling Group Name: Enter a name for the group (e.g.,
HasanWebApp-ASG). -
Launch template: Attach the Launch template that created earlier for your Launch Templates.
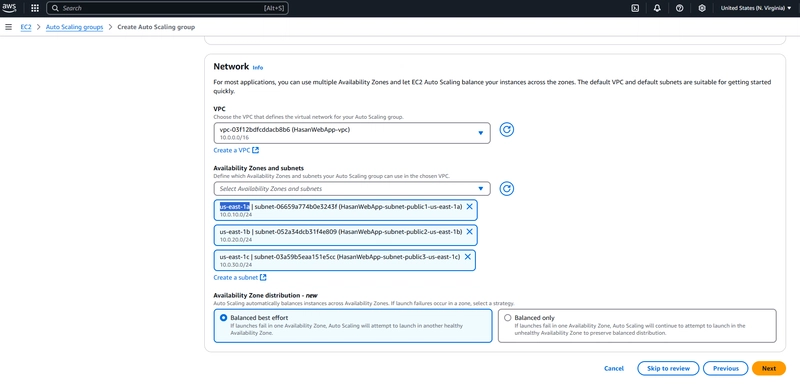
Step 4: Configure Network Settings
- VPC: Select your VPC (HasanWebApp-vpc).
-
Subnets: Choose the three public subnets you created (
us-east-1a,us-east-1b, andus-east-1c).
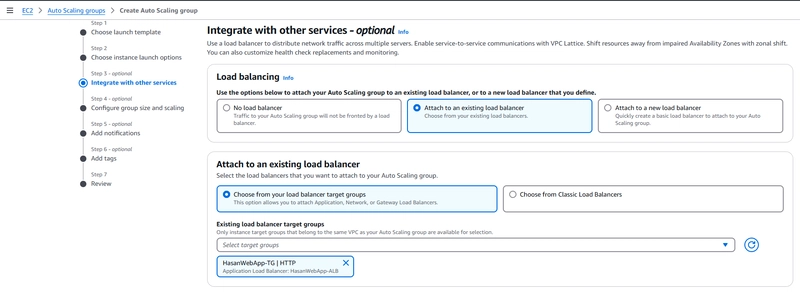
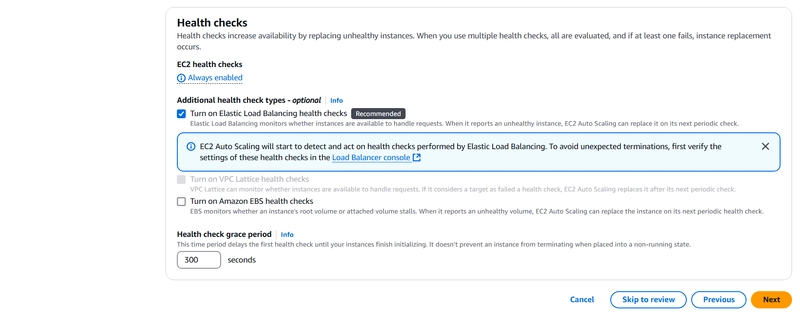
Step 5: Attach the Load Balancer
- Select Attach to an existing load balancer.
- Select Choose from your load balancer target groups
- Choose the Application Load Balancer created earlier (HasanWebApp-TG).
- Turn on Elastic Load Balancing health checks.
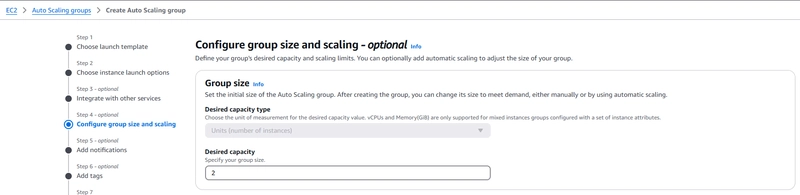
Step 6: Configure Instance Numbers
-
Desired Capacity: Set to
2(this means there will always be at least 1 instances running). -
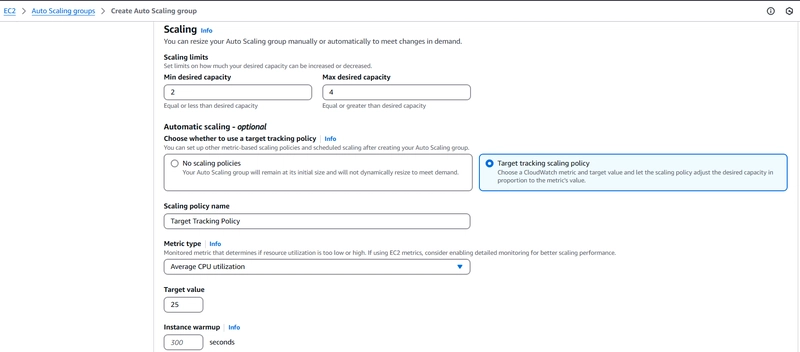
Minimum Capacity: Set to
2(this means the ASG will never terminate the last running instance). -
Maximum Capacity: Set to
4(this allows Auto Scaling to scale up to 4 instances if needed).
Step 7: Configure Scaling Policies
Now we’ll configure the scaling policies that will trigger instance creation or termination based on CPU utilization.
- Policy Type: Choose Target tracking scaling policy.
- Metric type: Average CPU utilization
-
Target Value: Enter 25% (this means new instances will be launched when average CPU utilization exceeds 25%, and instances will be terminated when it's below 25%). Leave any other setting at default and continue.
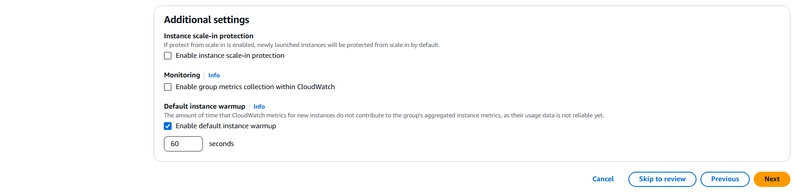
- Under Additional settings Enable default instance warmup of 60s click Next to continue.
Step 8: Review and Create
Review the configuration, then click Create Auto Scaling Group.
The ASG will now automatically adjust the number of instances based on CPU utilization and distribute traffic across them using the ALB. We can evaluate this by testing the auto scaling using CPU stress.
Section 6: Testing Auto Scaling
To verify that your Auto Scaling setup is functioning correctly, you can simulate high traffic or load on the instances to trigger the creation of new instances.
Step 1: Connect to an EC2 Instance
SSH into Your EC2 Instance using EC2 Connect or the AWS CLI with the following command:
ssh -i /path/to/your-key.pem ec2-user@
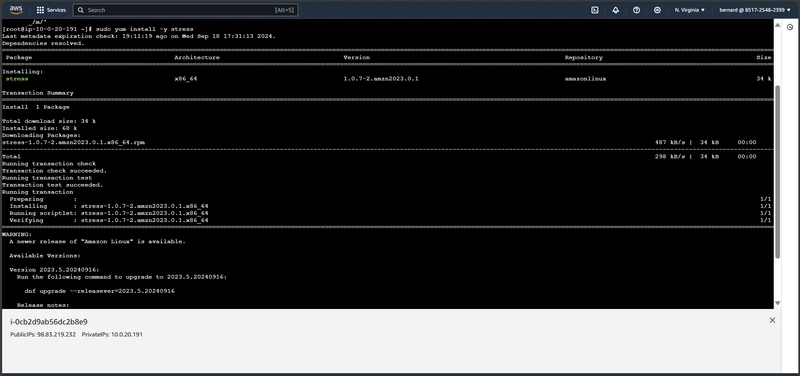
Step 2: Install the Stress Tool
Install the stress tool to simulate high CPU load:
sudo yum install -y stress
Step 3: Simulate High CPU Load
Run the stress command to simulate high CPU load for a set period (e.g., 100 seconds):
stress -c 1 -i 1 -m 1 --vm-bytes 128M -t 100s
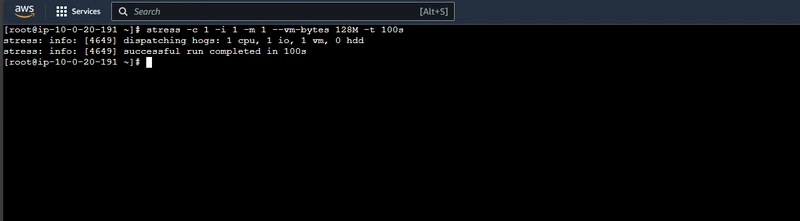
This command generates CPU load on one core (since t2.micro has just 1 vCPU) for 100 seconds. As a result, the CPU utilization should exceed the 25% threshold set in the Auto Scaling Group (ASG), triggering the ASG to launch new instances to handle the increased load.
Step 4: Verify Auto Scaling
In this section, we will verify that Auto Scaling is functioning as expected by simulating a CPU load, monitoring the Auto Scaling Group (ASG) activity, and checking the Load Balancer's traffic distribution across instances.
1. Monitor Auto Scaling Group Activity
Once you've triggered a high CPU load using the stress tool, Auto Scaling should kick in when the CPU utilization exceeds the threshold of 25%. You can monitor the ASG activity to confirm that new instances are being launched.
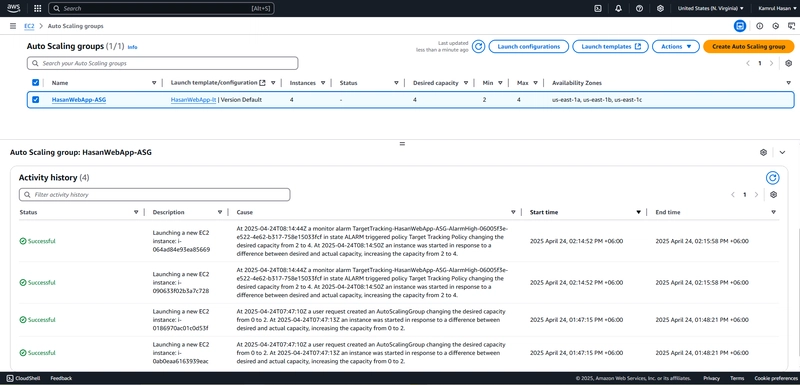
This activity confirms that Auto Scaling is working as intended, scaling the number of instances up in response to increased CPU usage.
2. Monitor Instance CPU Usage
Next, we can validate the specific CPU spike caused by the stress tool. The CPU usage of the instance will show a spike above 25%, which is what triggered the Auto Scaling.
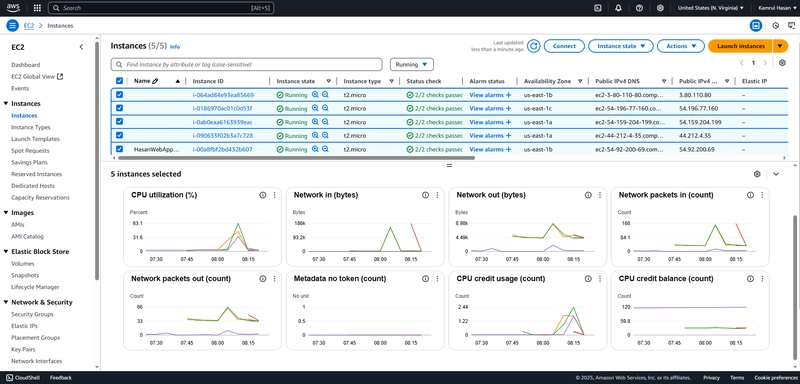
This shows that the instance was overloaded, which triggered the ASG to create additional instances.
3. Verify Load Balancer Traffic Distribution
Open a Web Browser and navigate to the DNS name of your Application Load Balancer (ALB).
Refresh the page multiple times and observe the IP addresses assigned to the different EC2 instances.
You should see the IP address change between two or more instances, confirming that the Load Balancer is properly distributing traffic across multiple servers in the target group.
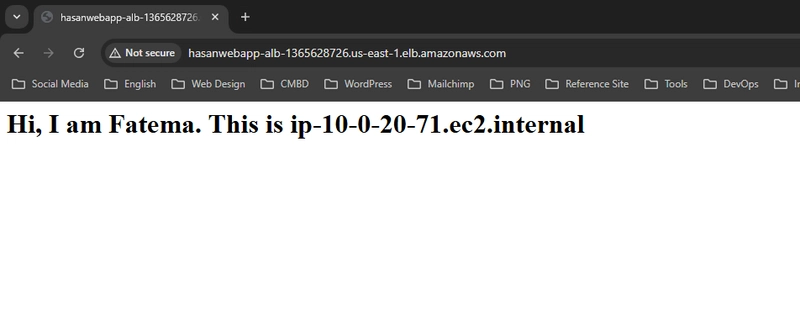
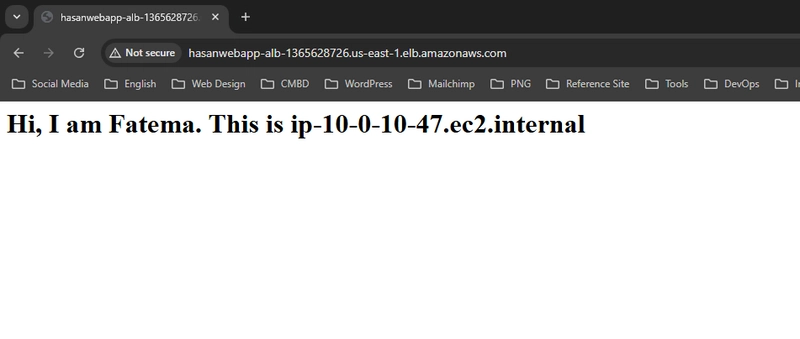
This demonstrates that the Load Balancer is effectively balancing incoming requests across the instances, ensuring high availability.
4. Terminate Instances and Verify Auto Scaling
To further test the ASG's functionality, you can terminate or stop all running instances and observe how the ASG automatically replaces them to maintain the desired number of instances.
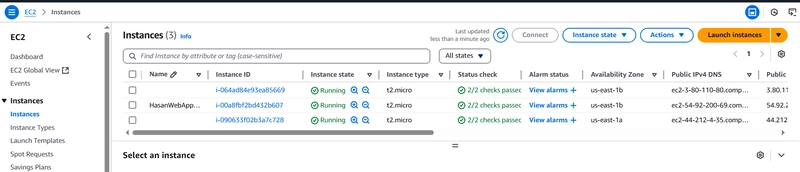
This confirms that the ASG is functioning correctly by ensuring that there is always at least one instance running, even if instances are terminated or fail.