


![Apple C1 vs Qualcomm Modem Performance [Speedtest]](https://www.iclarified.com/images/news/96767/96767/96767-640.jpg)
![Apple Studio Display On Sale for $1249 [Lowest Price Ever]](https://www.iclarified.com/images/news/96770/96770/96770-640.jpg)
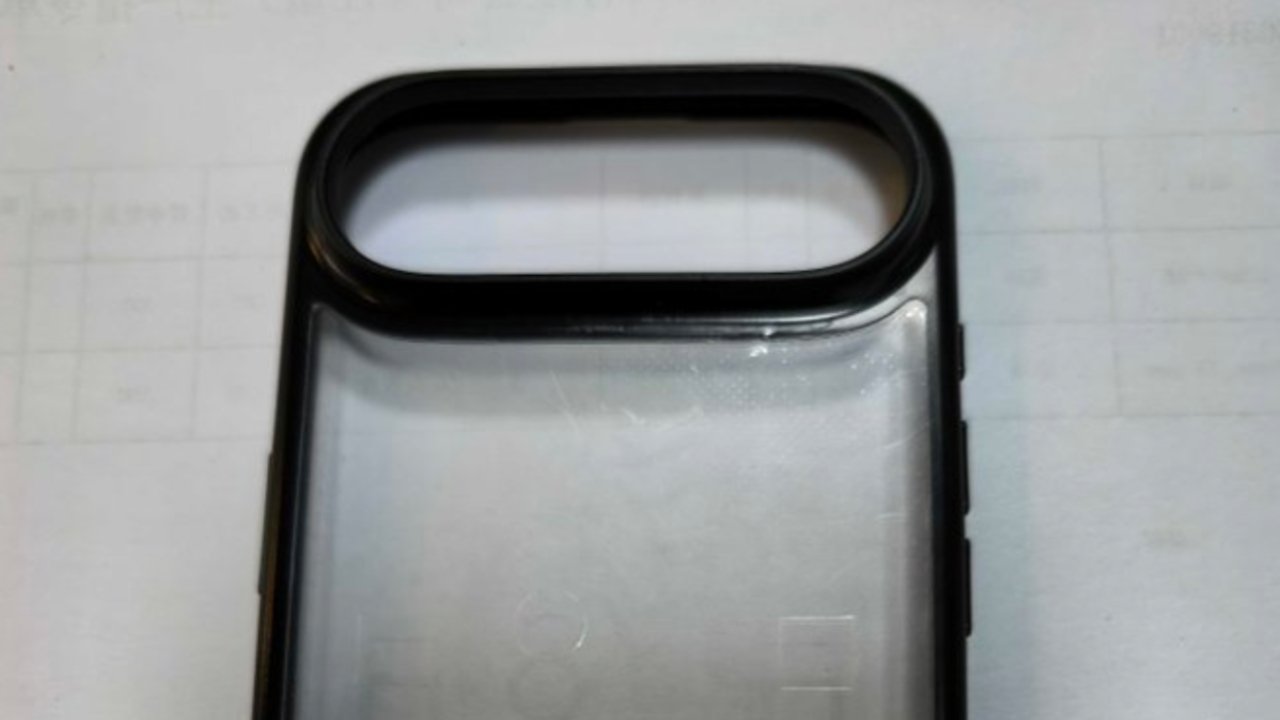
![Alleged Case for Rumored iPhone 17 Air Surfaces Online [Image]](https://www.iclarified.com/images/news/96763/96763/96763-640.jpg)


_Kjetil_Kolbjørnsrud_Alamy.jpg?#)


![[The AI Show Episode 139]: The Government Knows AGI Is Coming, Superintelligence Strategy, OpenAI’s $20,000 Per Month Agents & Top 100 Gen AI Apps](https://www.marketingaiinstitute.com/hubfs/ep%20139%20cover-2.png)


![[The AI Show Episode 138]: Introducing GPT-4.5, Claude 3.7 Sonnet, Alexa+, Deep Research Now in ChatGPT Plus & How AI Is Disrupting Writing](https://www.marketingaiinstitute.com/hubfs/ep%20138%20cover.png)


-I-Interviewed-Niantic-about-Selling-Pokémon-GO-to-Scopely-00-14-13.png?width=1920&height=1920&fit=bounds&quality=80&format=jpg&auto=webp#)


.jpg?width=1920&height=1920&fit=bounds&quality=80&format=jpg&auto=webp#)


Exercise 04: Configure Network Routing
Scenario In this exercise, my goal was to ensure that the outbound application traffic from the app-vnet subnets is routed through the Azure Firewall, allowing the firewall’s security policies to be enforced. This required creating a route table, associating it with the frontend and backend subnets, and setting up a route to filter all outbound IP traffic through the firewall using its private IP address. Skilling Tasks ✅ Create and configure a route table. ✅ Link a route table to a subnet. ✅ Create routes to ensure traffic flows through the firewall. Exercise Instructions Step 1: Record the Private IP Address of the Firewall To begin, I needed to identify the private IP address of the firewall, which would be used in the route table to route traffic through the firewall. 1️⃣ Navigate to Azure Firewall: In the Azure portal, I searched for Firewall and selected app-vnet-firewall. 2️⃣ Record Private IP: On the Overview page of app-vnet-firewall, I recorded the Private IP address of the firewall, which would be used in the next step for configuring the route table. Step 2: Create the Route Table Next, I created a route table to manage how outbound traffic from the subnets would be routed through the firewall. 1️⃣ Navigate to Route Tables: In the search box at the top of the portal, I typed Route tables and selected it from the search results. 2️⃣ Create a New Route Table: On the Route table page, I clicked + Create and filled in the configuration details for the route table: Property Value Subscription My subscription Resource group RG1 Region East US Name app-vnet-firewall-rt After completing the configuration, I clicked Review + Create and then Create. 3️⃣ Wait for the Deployment: I waited for the route table to be deployed. Once the deployment was complete, I clicked Go to resource. Step 3: Associate the Route Table with the Subnets Once the route table was created, I needed to associate it with the frontend and backend subnets to ensure the correct routing of outbound traffic. 1️⃣ Select Route Table: In the Azure portal, I navigated to app-vnet-firewall-rt and clicked on it to open the route table's settings. 2️⃣ Associate the Route Table with the Frontend Subnet: In the Settings blade, I selected Subnets and clicked + Associate. I configured the association to the frontend subnet as follows: Property Value Virtual network app-vnet (RG1) Subnet frontend I then clicked OK to apply the changes. 3️⃣ Associate the Route Table with the Backend Subnet: I repeated the same process to associate the route table with the backend subnet: Property Value Virtual network app-vnet (RG1) Subnet backend After selecting OK, the route table was successfully associated with both subnets. Step 4: Create the Route in the Route Table With the route table and subnet associations in place, the next step was to create the specific route that would direct all outbound traffic from both subnets through the firewall. 1️⃣ Navigate to Routes: In the app-vnet-firewall-rt route table settings, I selected Routes and clicked + Add to create a new route. 2️⃣ Configure the Route: I configured the route with the following settings: Property Value Route name outbound-firewall Destination type IP addresses Destination IP addresses/CIDR range 0.0.0.0/0 Next hop type Virtual appliance Next hop address (Private IP of app-vnet-firewall) After configuring the route, I clicked Add to create the route. Step 5: Verification Finally, I verified that the route table was properly configured and the routes were correctly applied to the subnets. 1️⃣ Check Route Table Association: I navigated to the Route Tables section and ensured that the route table app-vnet-firewall-rt was associated with both the frontend and backend subnets. 2️⃣ Verify Route Creation: In the Routes section of the route table, I confirmed that the outbound-firewall route had been successfully created and associated with the subnets. Key Takeaways 1️⃣ Azure Route Tables Azure automatically creates a route table for each subnet within a virtual network. However, custom route tables allow you to define how traffic should be routed across your network, giving you fine-grained control over network traffic flow. 2️⃣ Network Virtual Appliances (NVAs) Azure allows you to use Network Virtual Appliances (NVAs), such as Azure Firewall, to inspect and control network traffic. By defining custom routes in the route table, I could ensure that all outbound traffic from the app-vnet subnets was routed through the Azure Firewall. 3️⃣ Custom Routes and Traffic Management Custom routes enable you to override default Azure system routes and define specific traffic flows. In this exercise, I created a custom route that directed all outbound traffic through the
Scenario
In this exercise, my goal was to ensure that the outbound application traffic from the app-vnet subnets is routed through the Azure Firewall, allowing the firewall’s security policies to be enforced. This required creating a route table, associating it with the frontend and backend subnets, and setting up a route to filter all outbound IP traffic through the firewall using its private IP address.
Skilling Tasks
- ✅ Create and configure a route table.
- ✅ Link a route table to a subnet.
- ✅ Create routes to ensure traffic flows through the firewall.
Exercise Instructions
Step 1: Record the Private IP Address of the Firewall
To begin, I needed to identify the private IP address of the firewall, which would be used in the route table to route traffic through the firewall.
1️⃣ Navigate to Azure Firewall:
- In the Azure portal, I searched for Firewall and selected app-vnet-firewall.
2️⃣ Record Private IP:
- On the Overview page of app-vnet-firewall, I recorded the Private IP address of the firewall, which would be used in the next step for configuring the route table.
Step 2: Create the Route Table
Next, I created a route table to manage how outbound traffic from the subnets would be routed through the firewall.
1️⃣ Navigate to Route Tables:
- In the search box at the top of the portal, I typed Route tables and selected it from the search results.
2️⃣ Create a New Route Table:
- On the Route table page, I clicked + Create and filled in the configuration details for the route table:
| Property | Value |
|---|---|
| Subscription | My subscription |
| Resource group | RG1 |
| Region | East US |
| Name | app-vnet-firewall-rt |
- After completing the configuration, I clicked Review + Create and then Create.
3️⃣ Wait for the Deployment:
- I waited for the route table to be deployed. Once the deployment was complete, I clicked Go to resource.
Step 3: Associate the Route Table with the Subnets
Once the route table was created, I needed to associate it with the frontend and backend subnets to ensure the correct routing of outbound traffic.
1️⃣ Select Route Table:
- In the Azure portal, I navigated to app-vnet-firewall-rt and clicked on it to open the route table's settings.
2️⃣ Associate the Route Table with the Frontend Subnet:
- In the Settings blade, I selected Subnets and clicked + Associate.
- I configured the association to the frontend subnet as follows:
| Property | Value |
|---|---|
| Virtual network | app-vnet (RG1) |
| Subnet | frontend |
- I then clicked OK to apply the changes.
3️⃣ Associate the Route Table with the Backend Subnet:
- I repeated the same process to associate the route table with the backend subnet:
| Property | Value |
|---|---|
| Virtual network | app-vnet (RG1) |
| Subnet | backend |
- After selecting OK, the route table was successfully associated with both subnets.
Step 4: Create the Route in the Route Table
With the route table and subnet associations in place, the next step was to create the specific route that would direct all outbound traffic from both subnets through the firewall.
1️⃣ Navigate to Routes:
- In the app-vnet-firewall-rt route table settings, I selected Routes and clicked + Add to create a new route.
2️⃣ Configure the Route:
- I configured the route with the following settings:
| Property | Value |
|---|---|
| Route name | outbound-firewall |
| Destination type | IP addresses |
| Destination IP addresses/CIDR range | 0.0.0.0/0 |
| Next hop type | Virtual appliance |
| Next hop address | (Private IP of app-vnet-firewall) |
- After configuring the route, I clicked Add to create the route.
Step 5: Verification
Finally, I verified that the route table was properly configured and the routes were correctly applied to the subnets.
1️⃣ Check Route Table Association:
- I navigated to the Route Tables section and ensured that the route table app-vnet-firewall-rt was associated with both the frontend and backend subnets.
2️⃣ Verify Route Creation:
- In the Routes section of the route table, I confirmed that the outbound-firewall route had been successfully created and associated with the subnets.
Key Takeaways
1️⃣ Azure Route Tables
Azure automatically creates a route table for each subnet within a virtual network. However, custom route tables allow you to define how traffic should be routed across your network, giving you fine-grained control over network traffic flow.
2️⃣ Network Virtual Appliances (NVAs)
Azure allows you to use Network Virtual Appliances (NVAs), such as Azure Firewall, to inspect and control network traffic. By defining custom routes in the route table, I could ensure that all outbound traffic from the app-vnet subnets was routed through the Azure Firewall.
3️⃣ Custom Routes and Traffic Management
Custom routes enable you to override default Azure system routes and define specific traffic flows. In this exercise, I created a custom route that directed all outbound traffic through the firewall, allowing for improved security and traffic filtering.
Conclusion
In this exercise, I successfully created a route table in Azure and configured it to route all outbound traffic through the Azure Firewall for enhanced security. By associating the route table with the frontend and backend subnets, I ensured that the firewall’s policies were enforced on all traffic leaving the virtual network.