


![Apple Releases tvOS 18.4.1 for Apple TV [Download]](https://www.iclarified.com/images/news/97047/97047/97047-640.jpg)
![Apple Releases macOS Sequoia 15.4.1 [Download]](https://www.iclarified.com/images/news/97049/97049/97049-640.jpg)


![[Update: Optional] Google rolling out auto-restart security feature to Android](https://i0.wp.com/9to5google.com/wp-content/uploads/sites/4/2025/01/google-play-services-2.jpg?resize=1200%2C628&quality=82&strip=all&ssl=1)


![Global security vulnerability database gets 11 more months of funding [u]](https://photos5.appleinsider.com/gallery/63338-131616-62453-129471-61060-125967-51013-100774-49862-97722-Malware-Image-xl-xl-xl-(1)-xl-xl.jpg)


.webp?#)


![[The AI Show Episode 144]: ChatGPT’s New Memory, Shopify CEO’s Leaked “AI First” Memo, Google Cloud Next Releases, o3 and o4-mini Coming Soon & Llama 4’s Rocky Launch](https://www.marketingaiinstitute.com/hubfs/ep%20144%20cover.png)


.png?width=1920&height=1920&fit=bounds&quality=70&format=jpg&auto=webp#)


How to Link a Custom Domain to GitHub Pages
GitHub Pages is a fantastic hosting service offered by GitHub, allowing users to create and host static websites directly from their repositories. While GitHub provides a default domain for your GitHub Pages site, linking a custom domain to your GitHub Pages repository can give your website a more professional and personalized touch. In this article, we will guide you through linking a custom domain to your GitHub Pages site, from start to finish. Step 1: Choose and Purchase a Custom Domain The first step in linking a custom domain to GitHub Pages is selecting and purchasing a domain name. Various domain registrars like GoDaddy, Namecheap, or Google Domains offer domain registration services. Choose a domain name that reflects your website's purpose and is easy to remember. For this guide, we will use the placeholder yourdomain.com. Step 2: Configure DNS Settings Once you have purchased your custom domain, you need to configure the DNS settings to point to GitHub Pages. The process may vary slightly depending on your domain registrar, but the overall steps remain similar. Here's a more detailed guide to help you through the process: Log in to your domain registrar's website and navigate to the DNS management section. This section is typically labeled as "DNS Management," "DNS Settings," or "Domain Management." Locate the DNS settings for your domain. You should see a table or list of DNS records associated with your domain. Add a new record by selecting the option to create a new record. The exact wording or button may differ based on your registrar's interface. Create a CNAME record. In the "Host" or "Name" field, enter the desired subdomain you want to link to GitHub Pages. For example, if you want to link the subdomain www.yourdomain.com, enter www in the host field. In the "Value," "Points to," or "Destination" field, enter your GitHub Pages repository's URL, which follows the format username.github.io. Replace "username" with your actual GitHub username. Save the CNAME record. The specific button to save or add the record may vary depending on your domain registrar. It is typically labeled as "Save," "Add Record," or "Submit." Here's an example of how the CNAME record might look in the DNS settings: Host: www Value: username.github.io (Optional) If you want to link your root domain (yourdomain.com) directly to GitHub Pages, you'll need to configure an A record as well. Look for an option to add a new A record and follow these steps: Leave the "Host" or "Name" field blank or enter the @ symbol In the "Value" or "Points to" field, enter one of GitHub's static IP addresses: 185.199.108.153, 185.199.109.153, 185.199.110.153, or 185.199.111.153 Save the A record Here's an example of how the A record might look in the DNS settings: Host: @ Value: 185.199.108.153 Note: The @ symbol represents the root domain itself (yourdomain.com). Save the changes to the DNS settings. This typically involves clicking a "Save" or "Apply" button Step 3: Add CNAME File to Your GitHub Pages Repository Another way to link your custom domain to your GitHub Pages site is by adding a CNAME file directly in your repository. This method is useful if you prefer managing the custom domain configuration within your repository itself. Follow these steps: In your GitHub Pages repository, create a new file named CNAME. Make sure the filename is in uppercase. Open the CNAME file and enter your custom domain (yourdomain.com) in plain text. Save the CNAME file. Commit the changes to your repository, including the newly created CNAME file. GitHub Pages will automatically recognize the CNAME file and associate your custom domain with the repository. Please note that using the CNAME file method will only work if you have already configured the DNS settings for your custom domain as described in earlier steps. Note: Remember to allow some time for the changes to propagate globally. It may take up to 24 to 48 hours for the DNS changes to take full effect. Step 4: Add Custom Domain in GitHub Pages Settings Note: A CNAME file in your repository file does not automatically add or remove a custom domain. Instead, you must configure the custom domain through your repository settings or through the API. For more information, see Managing a custom domain for your GitHub Pages site and the Pages API reference documentation. To add your custom domain in the GitHub Pages settings for your repository, follow these simple steps: Open your GitHub repository and go to the "Settings" tab. Scroll down to the "GitHub Pages" section. In the "Custom domain" field, enter your custom domain (e.g., yourdomain.com). Click "Save" to apply the changes. GitHub will validate the custom domain and configure the necessary settings. Once the configuration is complete, your custom domain will be associated with your GitHub Pages site. For more detailed information and troubleshooting t
GitHub Pages is a fantastic hosting service offered by GitHub, allowing users to create and host static websites directly from their repositories. While GitHub provides a default domain for your GitHub Pages site, linking a custom domain to your GitHub Pages repository can give your website a more professional and personalized touch. In this article, we will guide you through linking a custom domain to your GitHub Pages site, from start to finish.
Step 1: Choose and Purchase a Custom Domain
The first step in linking a custom domain to GitHub Pages is selecting and purchasing a domain name. Various domain registrars like GoDaddy, Namecheap, or Google Domains offer domain registration services. Choose a domain name that reflects your website's purpose and is easy to remember. For this guide, we will use the placeholder yourdomain.com.
Step 2: Configure DNS Settings
Once you have purchased your custom domain, you need to configure the DNS settings to point to GitHub Pages. The process may vary slightly depending on your domain registrar, but the overall steps remain similar. Here's a more detailed guide to help you through the process:
Log in to your domain registrar's website and navigate to the DNS management section. This section is typically labeled as "DNS Management," "DNS Settings," or "Domain Management."
Locate the DNS settings for your domain. You should see a table or list of DNS records associated with your domain.
Add a new record by selecting the option to create a new record. The exact wording or button may differ based on your registrar's interface.
Create a
CNAMErecord. In the "Host" or "Name" field, enter the desired subdomain you want to link to GitHub Pages. For example, if you want to link the subdomainwww.yourdomain.com, enterwwwin the host field.In the "Value," "Points to," or "Destination" field, enter your GitHub Pages repository's URL, which follows the format
username.github.io. Replace "username" with your actual GitHub username.-
Save the
CNAMErecord. The specific button to save or add the record may vary depending on your domain registrar. It is typically labeled as "Save," "Add Record," or "Submit."Here's an example of how the
CNAMErecord might look in the DNS
settings:Host: www
Value: username.github.io
-
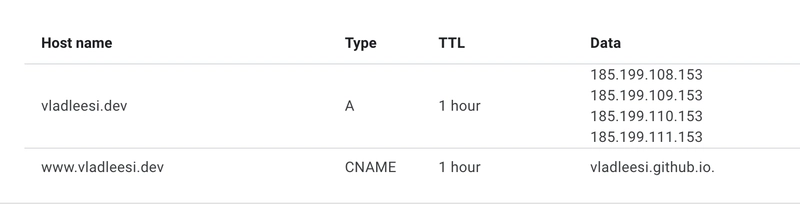
(Optional) If you want to link your root domain (
yourdomain.com) directly to GitHub Pages, you'll need to configure an A record as well. Look for an option to add a new A record and follow these steps:- Leave the "Host" or "Name" field blank or enter the
@symbol - In the "Value" or "Points to" field, enter one of GitHub's static IP addresses:
185.199.108.153,185.199.109.153,185.199.110.153, or185.199.111.153 - Save the A record
Here's an example of how the A record might look in the DNS settings:
Host: @
Value: 185.199.108.153Note: The
@symbol represents the root domain itself
(yourdomain.com). - Leave the "Host" or "Name" field blank or enter the
Save the changes to the DNS settings. This typically involves clicking a "Save" or "Apply" button
Step 3: Add CNAME File to Your GitHub Pages Repository
Another way to link your custom domain to your GitHub Pages site is by adding a CNAME file directly in your repository. This method is useful if you prefer managing the custom domain configuration within your repository itself. Follow these steps:
In your GitHub Pages repository, create a new file named
CNAME. Make sure the filename is in uppercase.Open the
CNAMEfile and enter your custom domain (yourdomain.com) in plain text.Save the
CNAMEfile.Commit the changes to your repository, including the newly created
CNAMEfile.
GitHub Pages will automatically recognize the CNAME file and associate your custom domain with the repository.
Please note that using the CNAME file method will only work if you have already configured the DNS settings for your custom domain as described in earlier steps.
Note: Remember to allow some time for the changes to propagate globally. It may take up to 24 to 48 hours for the DNS changes to take full effect.
Step 4: Add Custom Domain in GitHub Pages Settings
Note: A CNAME file in your repository file does not automatically add or remove a custom domain. Instead, you must configure the custom domain through your repository settings or through the API. For more information, see Managing a custom domain for your GitHub Pages site and the Pages API reference documentation.
To add your custom domain in the GitHub Pages settings for your repository, follow these simple steps:
Open your GitHub repository and go to the "Settings" tab.
Scroll down to the "GitHub Pages" section.
In the "Custom domain" field, enter your custom domain (e.g.,
yourdomain.com).Click "Save" to apply the changes.
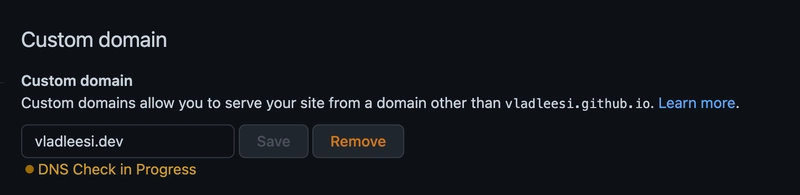
GitHub will validate the custom domain and configure the necessary settings. Once the configuration is complete, your custom domain will be associated with your GitHub Pages site.
For more detailed information and troubleshooting tips, refer to the official GitHub documentation:
Congratulations! You have successfully linked your custom domain (yourdomain.com) to your GitHub Pages site using the CNAME file within your repository.