


![Apple C1 vs Qualcomm Modem Performance [Speedtest]](https://www.iclarified.com/images/news/96767/96767/96767-640.jpg)
![Apple Studio Display On Sale for $1249 [Lowest Price Ever]](https://www.iclarified.com/images/news/96770/96770/96770-640.jpg)


![[Fixed] Chromecast (2nd gen) and Audio can’t Cast in ‘Untrusted’ outage](https://i0.wp.com/9to5google.com/wp-content/uploads/sites/4/2019/08/chromecast_audio_1.jpg?resize=1200%2C628&quality=82&strip=all&ssl=1)


![[The AI Show Episode 139]: The Government Knows AGI Is Coming, Superintelligence Strategy, OpenAI’s $20,000 Per Month Agents & Top 100 Gen AI Apps](https://www.marketingaiinstitute.com/hubfs/ep%20139%20cover-2.png)


![[The AI Show Episode 138]: Introducing GPT-4.5, Claude 3.7 Sonnet, Alexa+, Deep Research Now in ChatGPT Plus & How AI Is Disrupting Writing](https://www.marketingaiinstitute.com/hubfs/ep%20138%20cover.png)


![Is XMPP a good option for a messaging system in an app? [closed]](https://cdn.sstatic.net/Sites/softwareengineering/Img/apple-touch-icon@2.png?v=1ef7363febba)


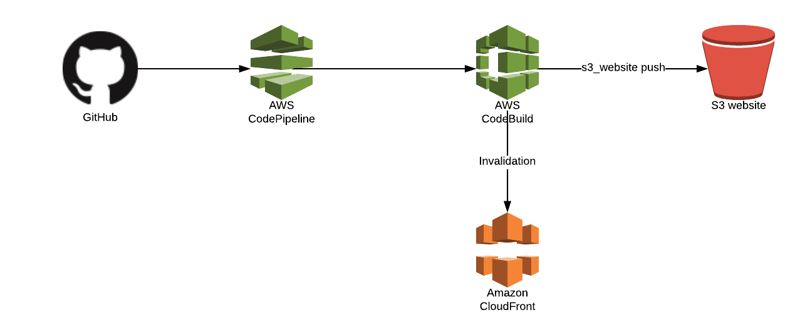
Caching S3 Signed URL Images in the Browser Using the Cache API
You have images served via signed URLs from Amazon S3, and you want to reduce network costs by caching these images in the browser using the Cache API, specifically with methods like Cache.add() or Cache.put(). Signed URLs provide temporary access to private S3 objects and typically include query parameters like signatures and expiration times, which may change even for the same image. This tutorial will guide you through implementing a caching solution that accounts for these challenges, ensuring efficient caching and cost savings. The key idea is to cache images based on their content rather than their potentially changing URLs. We'll use a service worker to intercept image requests, generate a consistent cache key using the image's S3 object path and ETag (a unique identifier for the content), and store the responses in the browser's Cache Storage. We'll also modify how signed URLs are generated on the server to include the ETag, enabling the client to identify the image content reliably. Below is a detailed, step-by-step tutorial to achieve this. Prerequisites Basic knowledge of JavaScript, HTML, and web development. An S3 bucket with images and the ability to generate signed URLs (e.g., via AWS SDK). A web application where images are loaded via tags or similar. Node.js and AWS SDK installed on your server (if you're generating signed URLs server-side). Step 1: Understanding the Problem Signed URLs from S3 typically look like this: https://your-bucket.s3.amazonaws.com/path/to/image.jpg?AWSAccessKeyId=...&Signature=...&Expires=... Challenge: The query parameters (e.g., Signature, Expires) may change each time a signed URL is generated, even for the same image. The Cache API keys entries by the full URL, so a new URL means a cache miss, leading to repeated S3 fetches and increased costs. Goal: Cache the image based on its content, not its transient URL, so that subsequent requests—regardless of URL changes—use the cached version unless the image itself is updated. Solution: Use the S3 object’s ETag (a hash of the content) as part of a custom cache key, combined with the URL path. The ETag changes only when the image content changes, making it ideal for content-based caching. Step 2: Modify Server-Side Signed URL Generation To enable content-based caching, include the image’s ETag in the signed URL as a query parameter. The ETag is a unique identifier provided by S3 for each object version. Here’s how to do it using Node.js and the AWS SDK v3. Server-Side Code (Node.js) Create a function to generate a signed URL with the ETag appended: const { S3Client, HeadObjectCommand, GetObjectCommand } = require("@aws-sdk/client-s3"); const { getSignedUrl } = require("@aws-sdk/s3-request-presigner"); const s3Client = new S3Client({ region: "your-region" }); // Replace with your AWS region async function getSignedUrlWithEtag(bucket, key) { try { // Step 1: Get the ETag of the object const headCommand = new HeadObjectCommand({ Bucket: bucket, Key: key }); const headResponse = await s3Client.send(headCommand); const etag = headResponse.ETag.replace(/"/g, ""); // Remove quotes from ETag (e.g., "abc123" -> abc123) // Step 2: Generate the signed URL const getCommand = new GetObjectCommand({ Bucket: bucket, Key: key }); const signedUrl = await getSignedUrl(s3Client, getCommand, { expiresIn: 3600, // URL valid for 1 hour }); // Step 3: Append the ETag as a query parameter const signedUrlWithEtag = signedUrl + "&etag=" + encodeURIComponent(etag); return signedUrlWithEtag; } catch (error) { console.error("Error generating signed URL:", error); throw error; } } // Example usage (async () => { const url = await getSignedUrlWithEtag("your-bucket", "path/to/image.jpg"); console.log("Signed URL with ETag:", url); })(); Explanation HeadObjectCommand: Retrieves metadata (including the ETag) for the S3 object without downloading it. getSignedUrl: Generates a standard signed URL with an expiration time (e.g., 1 hour). Appending ETag: The ETag is added as &etag= after the signed URL is generated. S3 ignores extra query parameters for GET requests, so this doesn’t affect URL validity. Output: A URL like https://your-bucket.s3.amazonaws.com/path/to/image.jpg?AWSAccessKeyId=...&Signature=...&Expires=...&etag=abc123. Use this URL in your web application (e.g., in tags) to load images. Step 3: Set Up the Client-Side Web Application In your web app, register a service worker to manage caching. The service worker will intercept image requests and use the Cache API. Main JavaScript File (e.g., app.js) Add this code to your main JavaScript file to register the service worker: if ("serviceWorker" in navigator) { window.addEventListener("load", () => { navigator.serviceWorker .register("/service-worker.js") .then((registration
You have images served via signed URLs from Amazon S3, and you want to reduce network costs by caching these images in the browser using the Cache API, specifically with methods like Cache.add() or Cache.put(). Signed URLs provide temporary access to private S3 objects and typically include query parameters like signatures and expiration times, which may change even for the same image. This tutorial will guide you through implementing a caching solution that accounts for these challenges, ensuring efficient caching and cost savings.
The key idea is to cache images based on their content rather than their potentially changing URLs. We'll use a service worker to intercept image requests, generate a consistent cache key using the image's S3 object path and ETag (a unique identifier for the content), and store the responses in the browser's Cache Storage. We'll also modify how signed URLs are generated on the server to include the ETag, enabling the client to identify the image content reliably.
Below is a detailed, step-by-step tutorial to achieve this.
Prerequisites
- Basic knowledge of JavaScript, HTML, and web development.
- An S3 bucket with images and the ability to generate signed URLs (e.g., via AWS SDK).
- A web application where images are loaded via
- Node.js and AWS SDK installed on your server (if you're generating signed URLs server-side).
Step 1: Understanding the Problem
Signed URLs from S3 typically look like this:
https://your-bucket.s3.amazonaws.com/path/to/image.jpg?AWSAccessKeyId=...&Signature=...&Expires=...
-
Challenge: The query parameters (e.g.,
Signature,Expires) may change each time a signed URL is generated, even for the same image. The Cache API keys entries by the full URL, so a new URL means a cache miss, leading to repeated S3 fetches and increased costs. - Goal: Cache the image based on its content, not its transient URL, so that subsequent requests—regardless of URL changes—use the cached version unless the image itself is updated.
- Solution: Use the S3 object’s ETag (a hash of the content) as part of a custom cache key, combined with the URL path. The ETag changes only when the image content changes, making it ideal for content-based caching.
Step 2: Modify Server-Side Signed URL Generation
To enable content-based caching, include the image’s ETag in the signed URL as a query parameter. The ETag is a unique identifier provided by S3 for each object version. Here’s how to do it using Node.js and the AWS SDK v3.
Server-Side Code (Node.js)
Create a function to generate a signed URL with the ETag appended:
const { S3Client, HeadObjectCommand, GetObjectCommand } = require("@aws-sdk/client-s3");
const { getSignedUrl } = require("@aws-sdk/s3-request-presigner");

const s3Client = new S3Client({ region: "your-region" }); // Replace with your AWS region

async function getSignedUrlWithEtag(bucket, key) {
  try {
    // Step 1: Get the ETag of the object
    const headCommand = new HeadObjectCommand({ Bucket: bucket, Key: key });
    const headResponse = await s3Client.send(headCommand);
    const etag = headResponse.ETag.replace(/"/g, ""); // Remove quotes from ETag (e.g., "abc123" -> abc123)

    // Step 2: Generate the signed URL
    const getCommand = new GetObjectCommand({ Bucket: bucket, Key: key });
    const signedUrl = await getSignedUrl(s3Client, getCommand, {
      expiresIn: 3600, // URL valid for 1 hour
    });

    // Step 3: Append the ETag as a query parameter
    const signedUrlWithEtag = signedUrl + "&etag=" + encodeURIComponent(etag);
    return signedUrlWithEtag;
  } catch (error) {
    console.error("Error generating signed URL:", error);
    throw error;
  }
}

// Example usage
(async () => {
  const url = await getSignedUrlWithEtag("your-bucket", "path/to/image.jpg");
  console.log("Signed URL with ETag:", url);
})();
Explanation
-
HeadObjectCommand: Retrieves metadata (including the ETag) for the S3 object without downloading it. -
getSignedUrl: Generates a standard signed URL with an expiration time (e.g., 1 hour). -
Appending ETag: The ETag is added as
&etag=after the signed URL is generated. S3 ignores extra query parameters for GET requests, so this doesn’t affect URL validity. -
Output: A URL like
https://your-bucket.s3.amazonaws.com/path/to/image.jpg?AWSAccessKeyId=...&Signature=...&Expires=...&etag=abc123.
Use this URL in your web application (e.g., in
Step 3: Set Up the Client-Side Web Application
In your web app, register a service worker to manage caching. The service worker will intercept image requests and use the Cache API.
Main JavaScript File (e.g., app.js)
Add this code to your main JavaScript file to register the service worker:
if ("serviceWorker" in navigator) {
  window.addEventListener("load", () => {
    navigator.serviceWorker
      .register("/service-worker.js")
      .then((registration) => {
        console.log("Service Worker registered with scope:", registration.scope);
      })
      .catch((error) => {
        console.error("Service Worker registration failed:", error);
      });
  });
}
HTML Example
Ensure your images use the signed URLs with ETags:
lang="en">
charset="UTF-8">
</span>Caching S3 Images<span class="nt">
src="https://your-bucket.s3.amazonaws.com/path/to/image.jpg?AWSAccessKeyId=...&Signature=...&etag=abc123" alt="Cached Image">