


![Apple M4 Mac Mini on Sale for $499 [Lowest Price Ever]](https://www.iclarified.com/images/news/96788/96788/96788-640.jpg)
![Apple Shares First Look and Premiere Date for 'The Buccaneers' Season Two [Video]](https://www.iclarified.com/images/news/96786/96786/96786-640.jpg)
![Apple to Craft Key Foldable iPhone Components From Liquid Metal [Kuo]](https://www.iclarified.com/images/news/96784/96784/96784-640.jpg)


_Federico_Caputo_Alamy.jpg?#)


![[The AI Show Episode 139]: The Government Knows AGI Is Coming, Superintelligence Strategy, OpenAI’s $20,000 Per Month Agents & Top 100 Gen AI Apps](https://www.marketingaiinstitute.com/hubfs/ep%20139%20cover-2.png)


![[The AI Show Episode 138]: Introducing GPT-4.5, Claude 3.7 Sonnet, Alexa+, Deep Research Now in ChatGPT Plus & How AI Is Disrupting Writing](https://www.marketingaiinstitute.com/hubfs/ep%20138%20cover.png)


![Is Sybase SQL Anywhere 9.0 Web Services a viable backend option for a fiscal Android app in 2025? [closed]](https://cdn.sstatic.net/Sites/softwareengineering/Img/apple-touch-icon@2.png?v=1ef7363febba)


![From hating coding to programming satellites at age 37 with Francesco Ciulla [Podcast #165]](https://cdn.hashnode.com/res/hashnode/image/upload/v1742585568977/09b25b8e-8c92-4f4b-853f-64b7f7915980.png?#)


.jpg?width=1920&height=1920&fit=bounds&quality=80&format=jpg&auto=webp#)


.png?#)


Comprehensive Guide to Creating a SharePoint Leave Request System
INTRODUCTION In today’s fast‐paced work environment, streamlining leave management can boost efficiency and transparency. This guide will show you how to build a dedicated SharePoint site to manage leave requests. In our scenario, the site will have six members: five workers who submit leave requests and one manager responsible for approving or rejecting them. One worker will receive full permissions on the leave request list (allowing, for example, advanced modifications or administrative tasks on that list), while the other four workers are given edit permissions. The manager will process the requests by approving two and rejecting three. Additionally, custom views will allow each member to quickly see the status of their submissions. This guide provides a step-by-step approach to creating a SharePoint site for managing employee leave requests. The solution includes: A Team Site with six members (five workers, one manager). A Leave Request List where workers submit requests. Permissions: One worker has full control over the list, while others can only edit their own requests. Approval Workflow: The manager approves/rejects requests, and all members see their request status. Step 1: Create a SharePoint Team Site Navigate to SharePoint Admin Center: Go to your organization’s SharePoint portal. Click Create site > Team site. Configure Site Details: Name: "Leave Management Site". Add a description (optional). Under Privacy, select "Private". Select the default site language for your site. You can't change this later. Click Next. - Add Members: Add the manager’s email under "Add additional owners". Add five workers’ emails under "Add members". Click Finish. Step 2: Create a Leave Request List Navigate to the New Site: Open the newly created site. - Click + New > List > Blank list. Name the List: Title: "Leave Requests". Click Create. Add Columns: Default "Title" column: Rename to Leave Type (e.g., Vacation, Sick). Start Date: Column type = Date. Follow the same step and the below columns Requester: Column type = Person End Date: Column type = Date. Status: Column type = Choice (Options: Pending, Approved, Rejected). Comments: Column type = Multiple lines of text. Step 3: Configure Permissions Goal: staff 1: Full control over the list. Staff 2-5: Edit only their own items. Manager: Approve/reject requests. Break List Inheritance: - Go to Leave Requests list > Settings (⚙) > List settings. - Under Permissions, click Permissions for this list. - Click Stop Inheriting Permissions. - Remove Default Groups: Select Members and Visitors groups > Remove User Permissions. Assign Custom Permissions: Staff 1 (Full Control): Click Grant Permissions. Enter Staff 1 (Hagital JanGrp1) email or name. Select Full Control > Share. Staff 2-5 (Edit Access): Click Grant Permissions. Enter Staff 2-5 emails. Select Edit > Share. Manager Permissions: The manager is already in the Owners group (Full Control). - Restrict Item Editing: Go to List Settings > Advanced Settings. Under Item-level Permissions: Set Edit access to Only their own. Step 4: Enable Content Approval - Configure Versioning: Go to List Settings > Versioning Settings. Under Content Approval, select Yes. Click OK. Update Status Column: The default Approval Status column will now track requests as Pending/Approved/Rejected. Step 5: Test the Workflow - Staffs Submit Requests: Staff 1 add items via + New. Status defaults to Pending. Staff 2 add items via + New. Status defaults to Pending. Staff 3 add items via + New. Status defaults to Pending. Staff 4 add items via + New. Status defaults to Pending. Staff 5 add items via + New. Status defaults to Pending. Manager Approval/Rejection: Manager navigates to Dashboard. Select a request > Edit. Update Status to Approved or Rejected. Add Comments (optional). Follow the same step to Approve or Reject for other Staffs NOTE : All the approved leave request is visible to all staffs in the department (ie Hagital Grp2 Dashboard) - Hagital Grp3 can see his leave request which was rejected and can also see other staffs leave request which was approved Conclusion I’ve successfully built a SharePoint site for managing leave requests with granular permissions and approval workflows. Key outcomes: Staff 1 manages the list with full control. Staff 2–5 submit and edit their own requests. Manager approves/rejects requests via dashboard. All members view personalized statuses. This solution ensures transparency, accountability, and streamlined communication for leave management.
INTRODUCTION
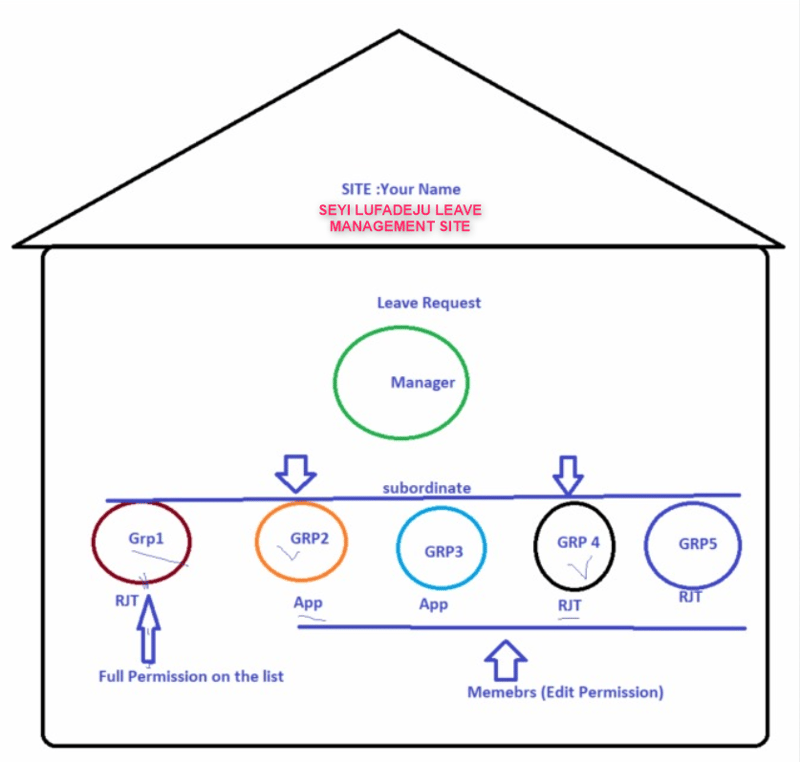
In today’s fast‐paced work environment, streamlining leave management can boost efficiency and transparency. This guide will show you how to build a dedicated SharePoint site to manage leave requests. In our scenario, the site will have six members: five workers who submit leave requests and one manager responsible for approving or rejecting them. One worker will receive full permissions on the leave request list (allowing, for example, advanced modifications or administrative tasks on that list), while the other four workers are given edit permissions. The manager will process the requests by approving two and rejecting three. Additionally, custom views will allow each member to quickly see the status of their submissions.
This guide provides a step-by-step approach to creating a SharePoint site for managing employee leave requests. The solution includes:
- A Team Site with six members (five workers, one manager).
- A Leave Request List where workers submit requests.
- Permissions: One worker has full control over the list, while others can only edit their own requests.
- Approval Workflow: The manager approves/rejects requests, and all members see their request status.
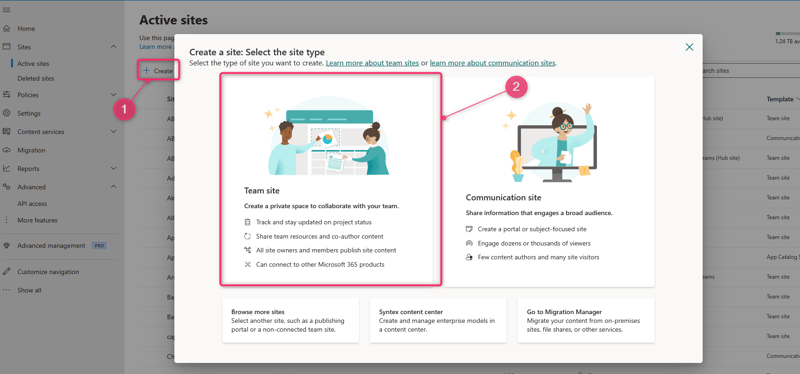
Step 1: Create a SharePoint Team Site
- Navigate to SharePoint Admin Center:
- Go to your organization’s SharePoint portal.
- Click Create site > Team site.
Configure Site Details:
Name: "Leave Management Site".
Add a description (optional).
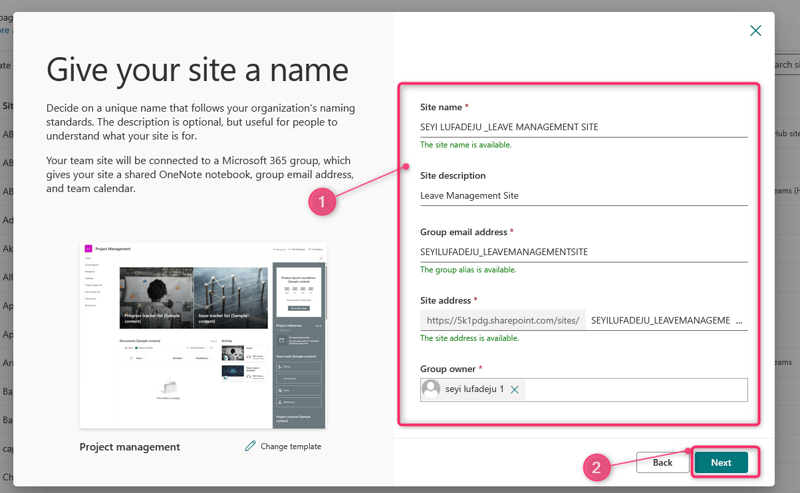
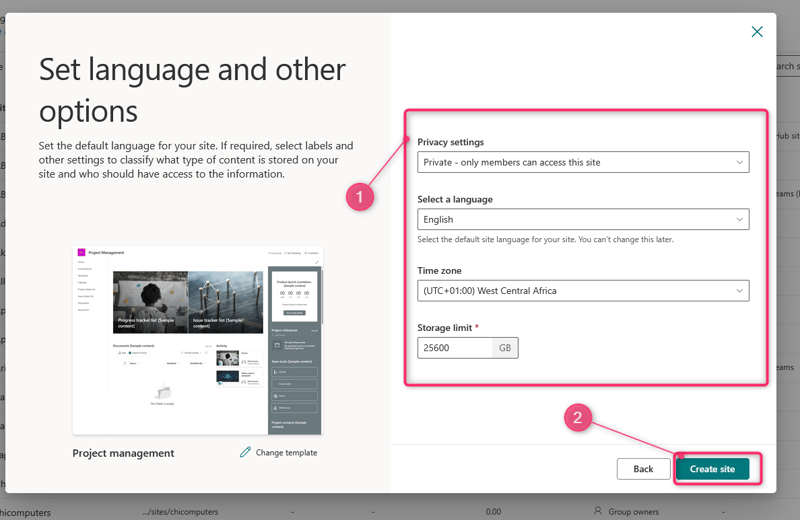
- Under Privacy, select "Private".
- Select the default site language for your site. You can't change this later.
- Click Next.
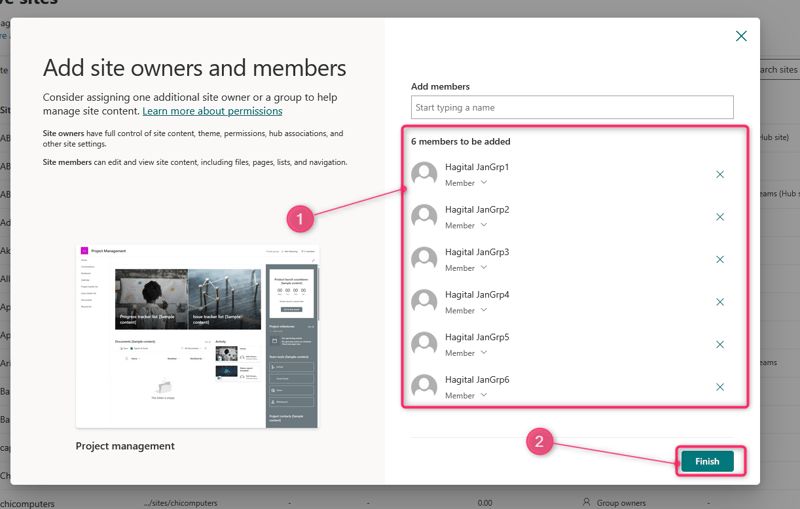
- Add Members:
- Add the manager’s email under "Add additional owners".
- Add five workers’ emails under "Add members".
- Click Finish.
Step 2: Create a Leave Request List
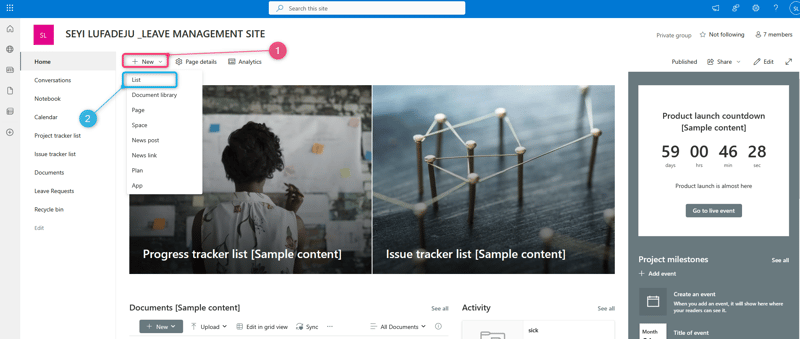
- Navigate to the New Site:
- Open the newly created site.

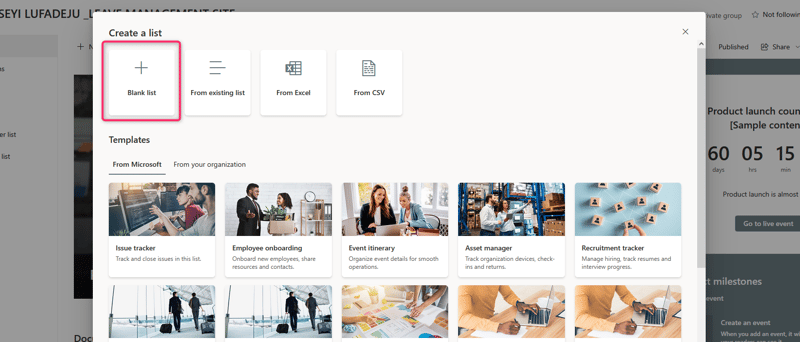
- Click + New > List > Blank list.
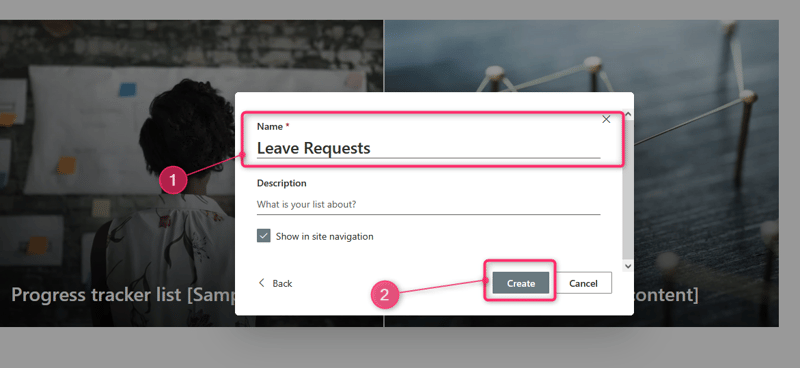
Name the List:
Title: "Leave Requests".
Click Create.
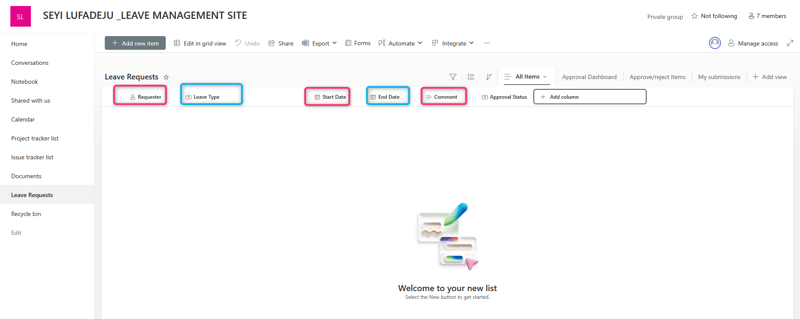
Add Columns:
- Default "Title" column: Rename to Leave Type (e.g., Vacation, Sick).
- Start Date: Column type = Date.
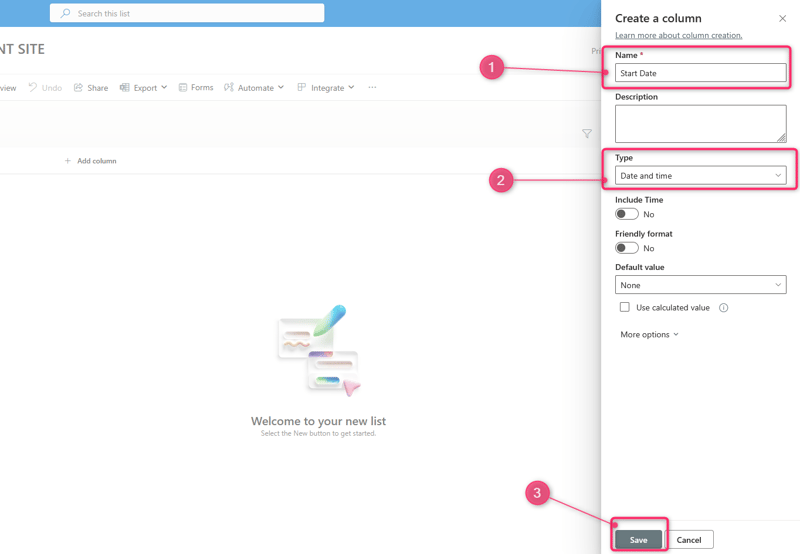
Follow the same step and the below columns
- Requester: Column type = Person
- End Date: Column type = Date.
- Status: Column type = Choice (Options: Pending, Approved, Rejected).
- Comments: Column type = Multiple lines of text.
Step 3: Configure Permissions
Goal:
- staff 1: Full control over the list.
- Staff 2-5: Edit only their own items.
- Manager: Approve/reject requests.
Break List Inheritance:
- Go to Leave Requests list > Settings (⚙) > List settings.
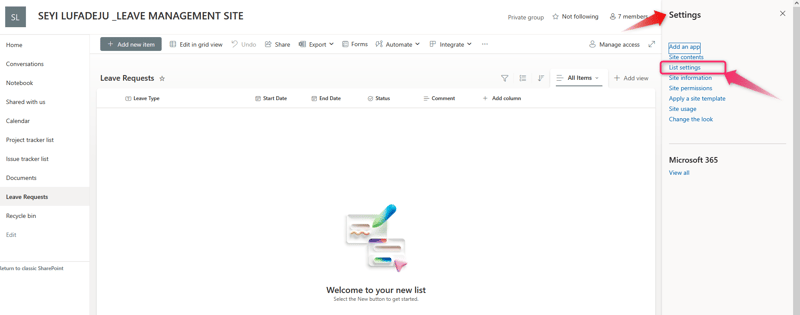
- Under Permissions, click Permissions for this list.
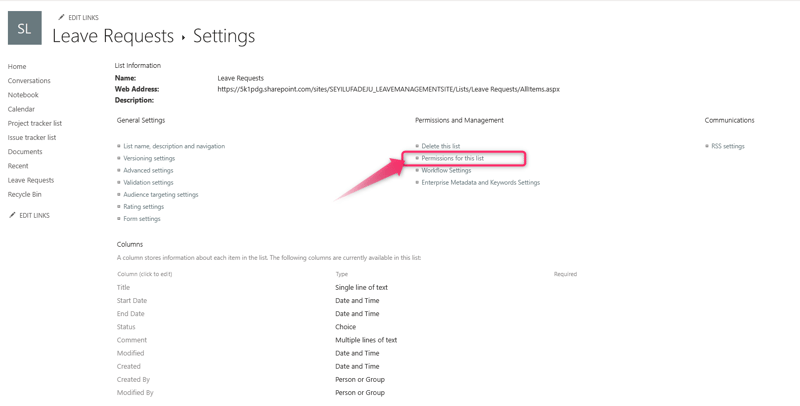
- Click Stop Inheriting Permissions.
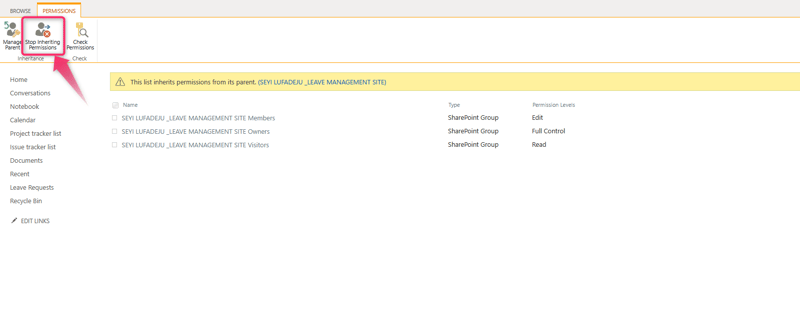
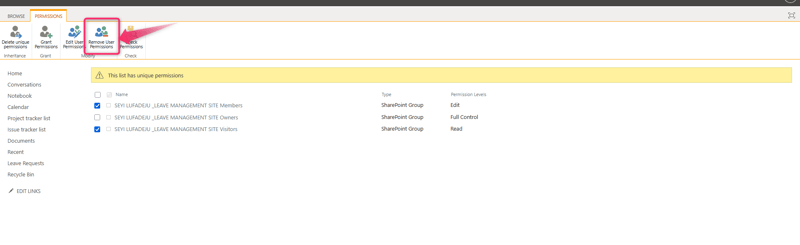
- Remove Default Groups:
Select Members and Visitors groups > Remove User Permissions.
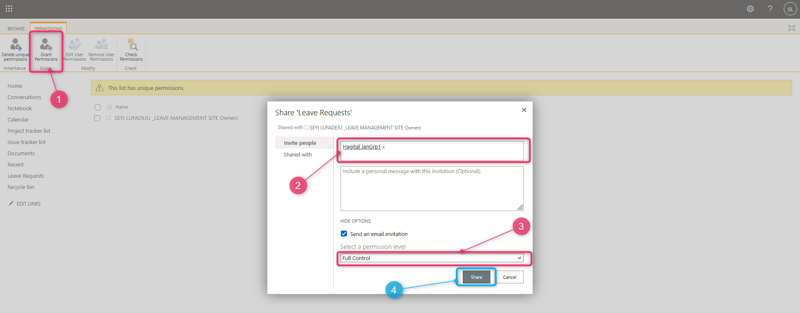
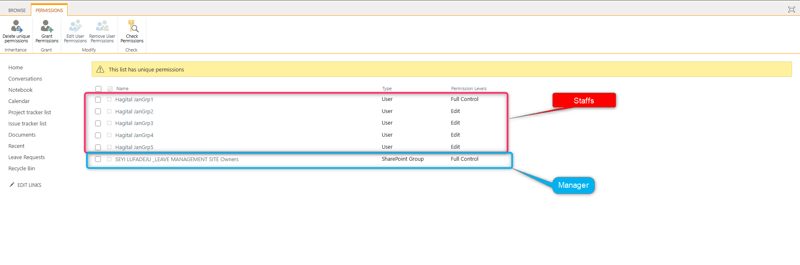
Assign Custom Permissions:
Staff 1 (Full Control):
- Click Grant Permissions.
- Enter Staff 1 (Hagital JanGrp1) email or name.
- Select Full Control > Share.
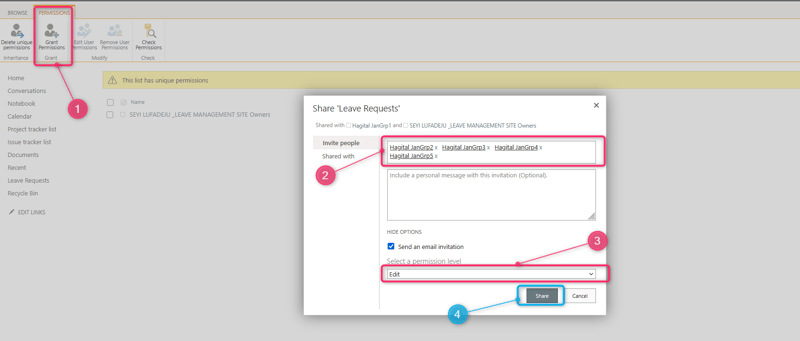
Staff 2-5 (Edit Access):
Click Grant Permissions.
Enter Staff 2-5 emails.
Select Edit > Share.
Manager Permissions:
The manager is already in the Owners group (Full Control).
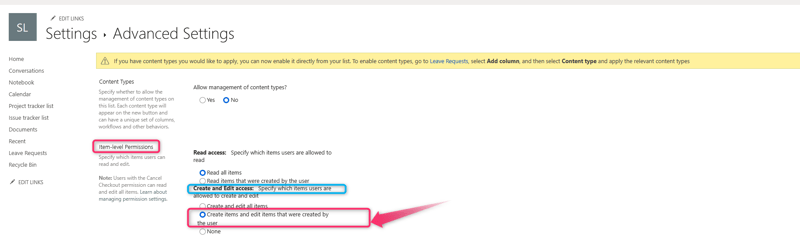
- Restrict Item Editing:
- Go to List Settings > Advanced Settings.
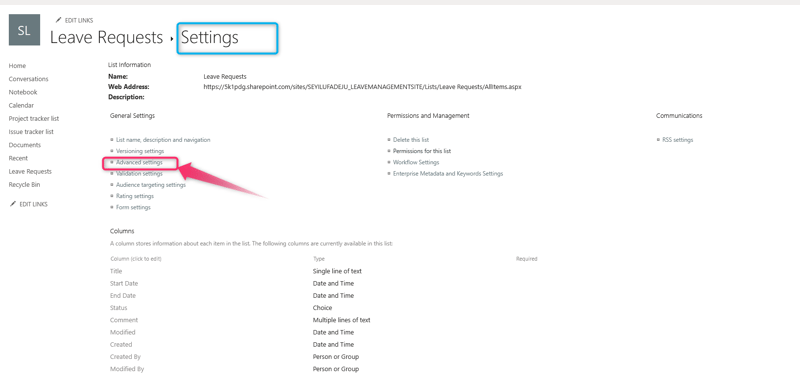
- Under Item-level Permissions:
- Set Edit access to Only their own.
Step 4: Enable Content Approval
- Configure Versioning:
Go to List Settings > Versioning Settings.
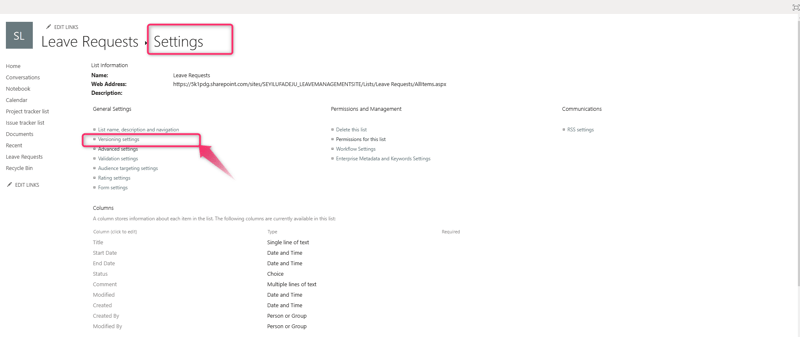
Under Content Approval, select Yes.
Click OK.
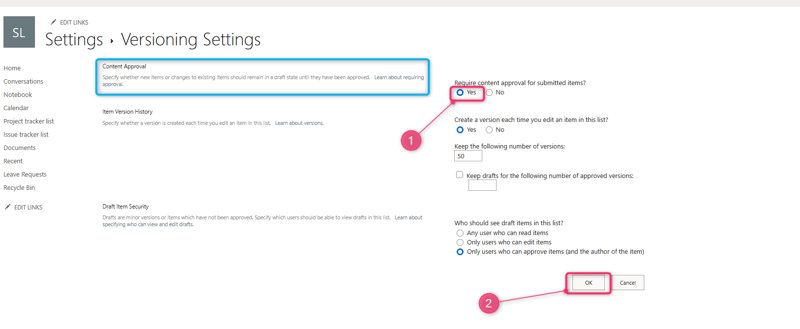
Update Status Column:
The default Approval Status column will now track requests as Pending/Approved/Rejected.
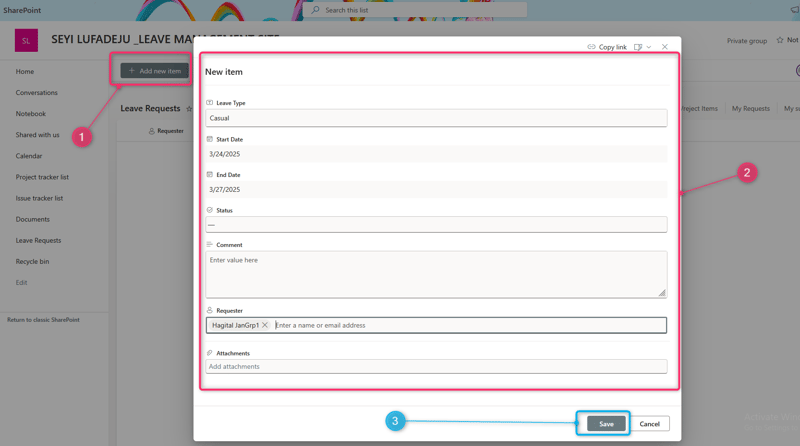
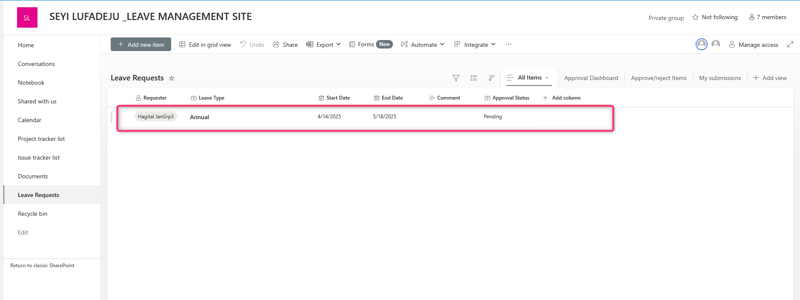
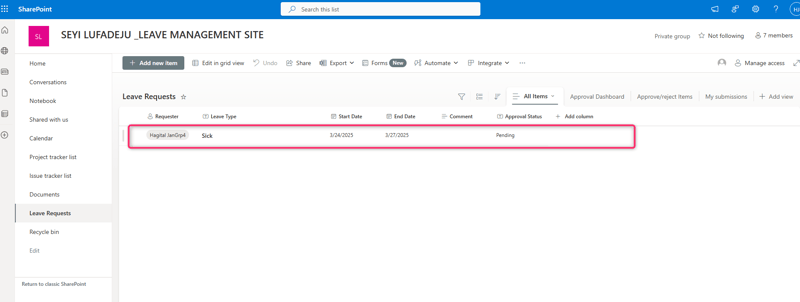
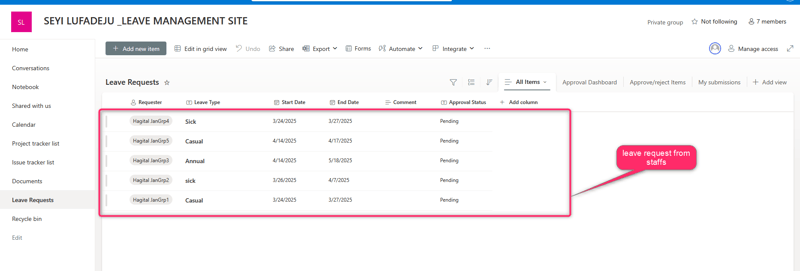
Step 5: Test the Workflow
- Staffs Submit Requests:
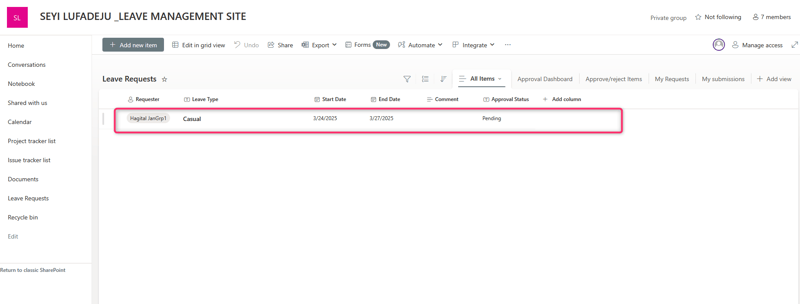
- Staff 1 add items via + New.
- Status defaults to Pending.
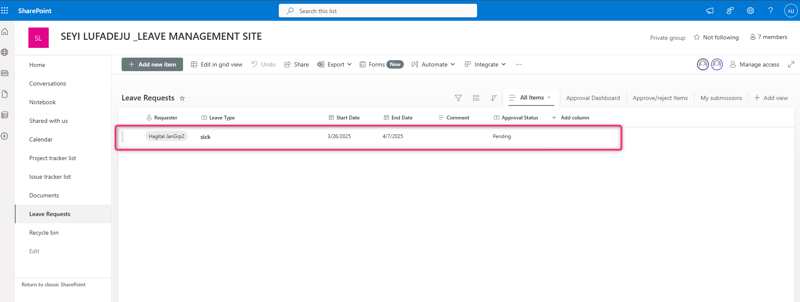
- Staff 2 add items via + New.
- Status defaults to Pending.
- Staff 3 add items via + New.
Status defaults to Pending.
Staff 4 add items via + New.
Status defaults to Pending.
- Staff 5 add items via + New.
- Status defaults to Pending.

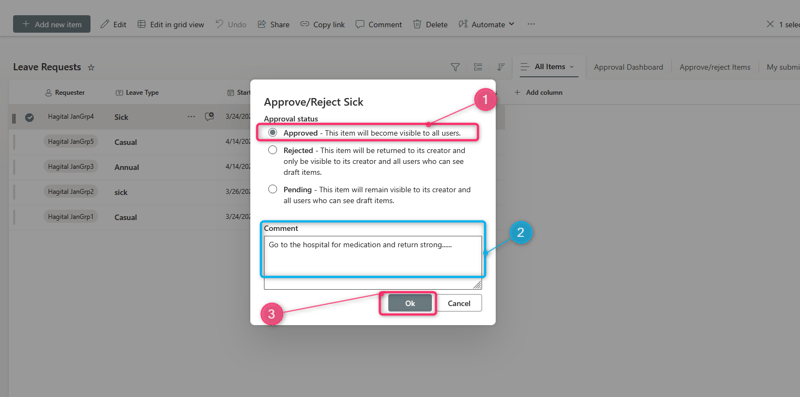
Manager Approval/Rejection:
- Manager navigates to Dashboard.
- Select a request > Edit.
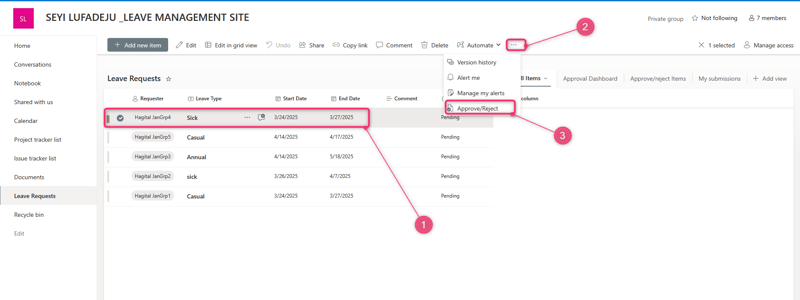
- Update Status to Approved or Rejected.
- Add Comments (optional).
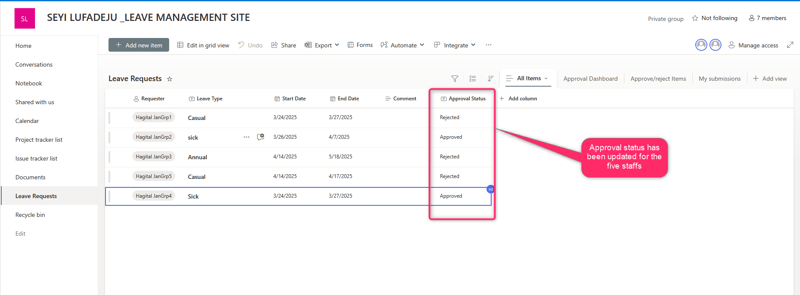
Follow the same step to Approve or Reject for other Staffs
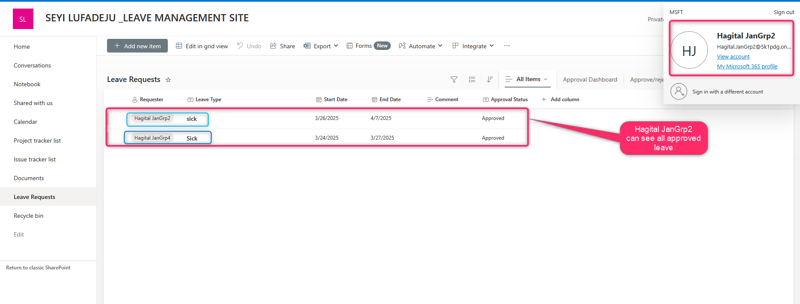
NOTE : All the approved leave request is visible to all staffs in the department (ie Hagital Grp2 Dashboard)
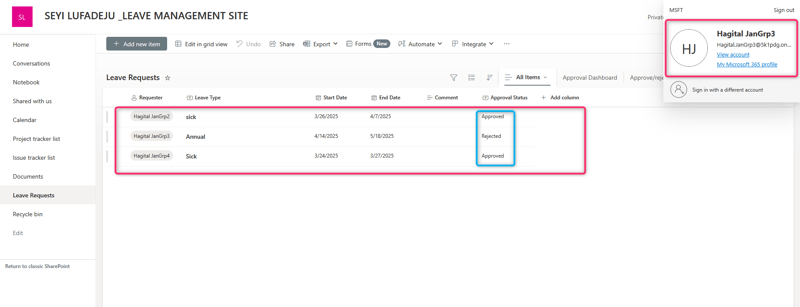
- Hagital Grp3 can see his leave request which was rejected and can also see other staffs leave request which was approved
Conclusion
I’ve successfully built a SharePoint site for managing leave requests with granular permissions and approval workflows. Key outcomes:
- Staff 1 manages the list with full control.
- Staff 2–5 submit and edit their own requests.
- Manager approves/rejects requests via dashboard.
All members view personalized statuses.
This solution ensures transparency, accountability, and streamlined communication for leave management.