


![Apple to Source More iPhones From India to Offset China Tariff Costs [Report]](https://www.iclarified.com/images/news/96954/96954/96954-640.jpg)
![Blackmagic Design Unveils DaVinci Resolve 20 With Over 100 New Features and AI Tools [Video]](https://www.iclarified.com/images/news/96951/96951/96951-640.jpg)


.webp?#)
.webp?#)
.webp?#)


_NicoElNino_Alamy.png?#)


![[The AI Show Episode 142]: ChatGPT’s New Image Generator, Studio Ghibli Craze and Backlash, Gemini 2.5, OpenAI Academy, 4o Updates, Vibe Marketing & xAI Acquires X](https://www.marketingaiinstitute.com/hubfs/ep%20142%20cover.png)


![From drop-out to software architect with Jason Lengstorf [Podcast #167]](https://cdn.hashnode.com/res/hashnode/image/upload/v1743796461357/f3d19cd7-e6f5-4d7c-8bfc-eb974bc8da68.png?#)


(1).jpg?width=1920&height=1920&fit=bounds&quality=80&format=jpg&auto=webp#)


.png?#)


How to Build a Python app with PyInstaller using Jenkins.
Requirements Docker Docker Compose VS Code Git Fork and clone the sample repository Sign into your GitHub account Fork the simple-python-pyinstaller-app by pasting the link into a new browser and press Enter key. Click fork and select create a new fork. Click create in the create a new fork page. Clone the new repo using VS Code by running the command: git clone [repo URL] You can get the repo URL by clicking Code in GitHub and select HTTPS link Make sure to create a folder to contain your clone repo by running the command mkdir [folder-name] cd [folder-name] Then you can carry on with the cloning. Start Your Jenkins controller First clone quickstart-tutorials repository N.BThis repo is customized for this hands-on lab. Once you are done cloning, run the following command to change your directory to quickstart-tutorial. cd quickstart-tutorials run the following command to start the controller. docker compose --profile python up -d Once the controllers have started successfully, it can be accessed at https://localhost:8080. Log in with admin as username and password. Create your Pipeline project in Jenkins In Jenkins UI, select New Item under Dashboard. Give a name to your Pipeline, select Pipeline under Select an item type section and click OK. Scroll down if needed, select Pipeline, then click OK at the bottom of the page. You may enter a brief description for your pipeline. In the left pane, select Pipeline. Under Definition, choose Pipeline script from SCM. From the SCM dropdown, select Git. In the Repository URL field, paste the URL of your forked repository. Click Save at the bottom of the page. Create your initial Pipeline as a Jenkinsfile Create a Jenkinsfile in your local simple-python-pyinstaller-app repository. This file will define your Pipeline, which automates building your Python app with PyInstaller. Once you commit and push the Jenkinsfile to GitHub, Jenkins will automatically detect and run it. First, create an initial Pipeline with a "Build" stage that executes the first part of the entire production process for your application. This "Build" stage compiles your simple Python application into byte code. Head over to your VS Code, create a new file at the root level and name it Jenkinsfile. Copy and paste the following Declarative Pipeline code into the Jenkinsfile. pipeline { agent any stages { stage('Build') { steps { sh 'python -m py_compile sources/add2vals.py sources/calc.py' stash(name: 'compiled-results', includes: 'sources/*.py*') } } } } Save and commit the edited Jenkinsfile into your local simple-python-pyinstaller-app Git repository. cd into simple-python-pyinstaller-app directory if you have not done so and run the following command: git add . git commit -m "Add initial Jenkinsfile" git push Back at Jenkins UI, select Build Now If your Pipeline run successfully, you will see a green check mark and #1 on the left side and the Build stage completed in the main view. You can now click on #1 to view the build details, where you'll see both the queue wait time and actual execution time for your build - this helps monitor performance and identify potential delays for future runs. On the left, you can click on Pipeline Overview to see the stages of the Pipeline. Click the Build stage to view detailed logs, including the Python command output (click the green Python section to expand it). This helps verify your build executed correctly. To return to your pipeline's main page, click simple-python-pyinstaller-app (or your pipeline name) in the top-left corner. Add a test stage to your Pipeline Head back to Jenkins UI and open Jenkinsfile. Copy and paste the following Declarative Pipeline syntax under Build stage of your Jenkinsfile. stage('Test') { steps { sh 'py.test --junit-xml test-reports/results.xml sources/test_calc.py' } post { always { junit 'test-reports/results.xml' } } } Your Jenkinsfile should look like this: pipeline { agent any stages { stage('Build') { steps { sh 'python -m py_compile sources/add2vals.py sources/calc.py' stash(name: 'compiled-results', includes: 'sources/*.py*') } } stage('Test') { steps { sh 'py.test --junit-xml test-reports/results.xml sources/test_calc.py' } post { always { junit 'test-reports/results.xml' } } } } } Save your Jenkinsfile and push the new changes to your remote Jenkinsfile for Jenkins to access by running the following co
Requirements
- Docker
- Docker Compose
- VS Code
- Git
Fork and clone the sample repository
- Sign into your GitHub account
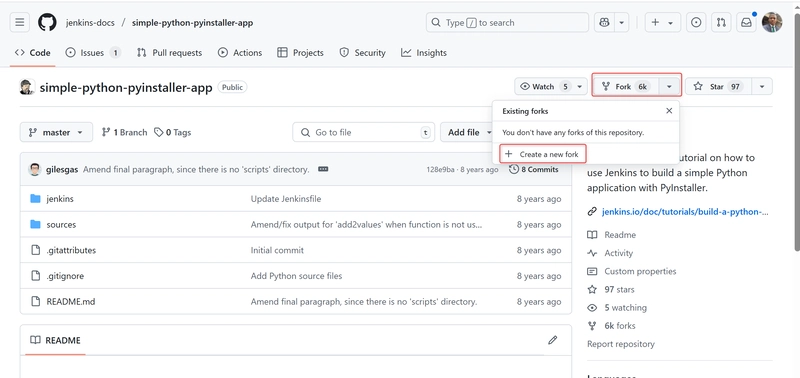
- Fork the simple-python-pyinstaller-app by pasting the link into a new browser and press Enter key.
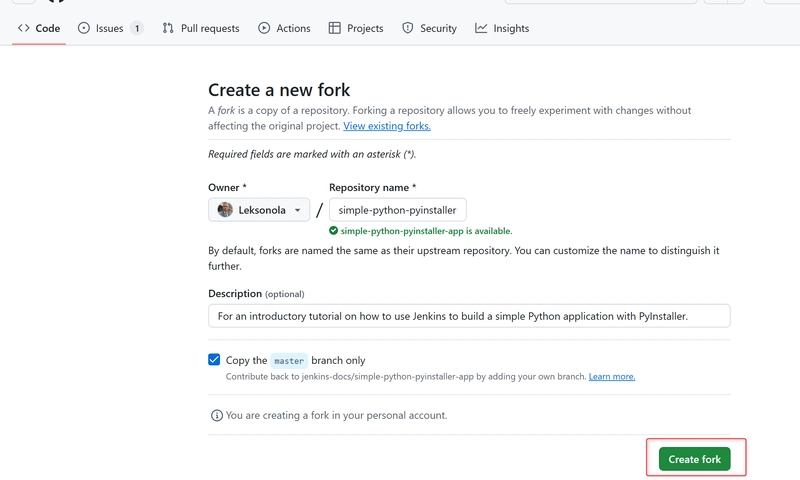
- Click fork and select create a new fork.
- Click create in the create a new fork page.
- Clone the new repo using VS Code by running the command:
git clone [repo URL]
- You can get the repo URL by clicking Code in GitHub and select HTTPS link

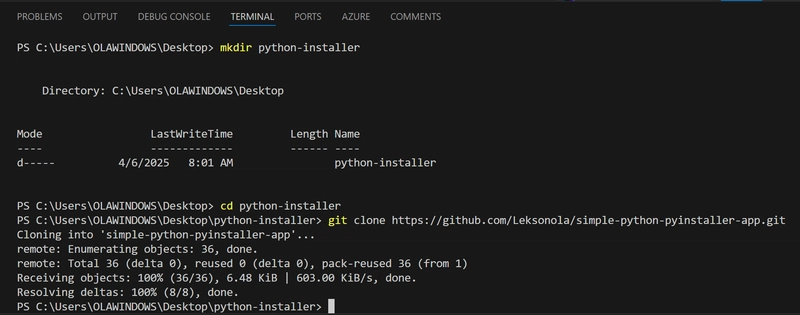
- Make sure to create a folder to contain your clone repo by running the command
mkdir [folder-name]

cd [folder-name]
Then you can carry on with the cloning.
Start Your Jenkins controller
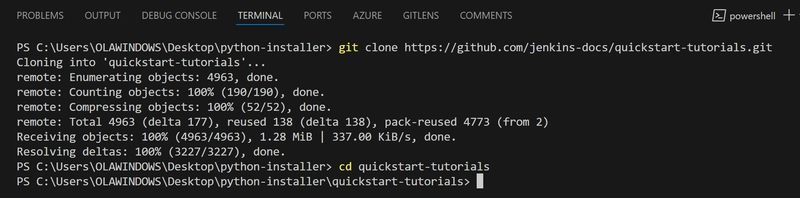
- First clone quickstart-tutorials repository
N.BThis repo is customized for this hands-on lab.
- Once you are done cloning, run the following command to change your directory to quickstart-tutorial.
cd quickstart-tutorials
- run the following command to start the controller.
docker compose --profile python up -d
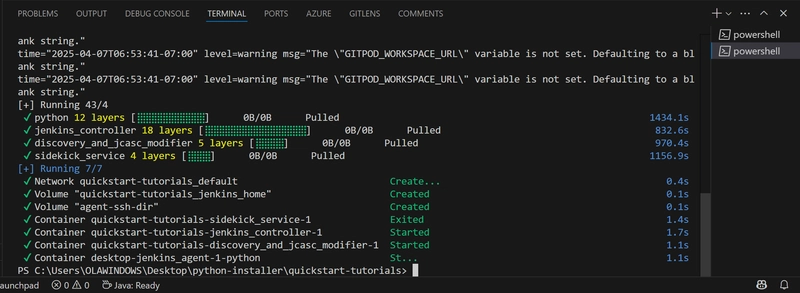
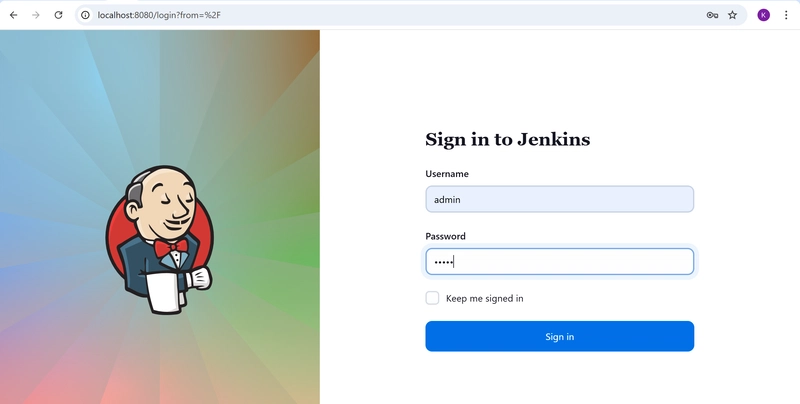
- Once the controllers have started successfully, it can be accessed at https://localhost:8080.
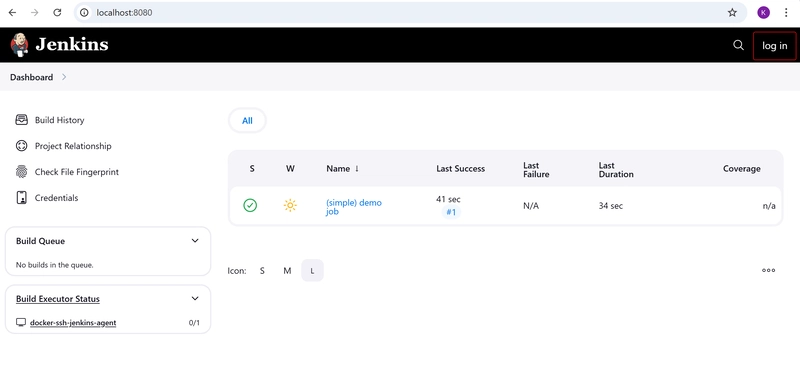
- Log in with admin as username and password.
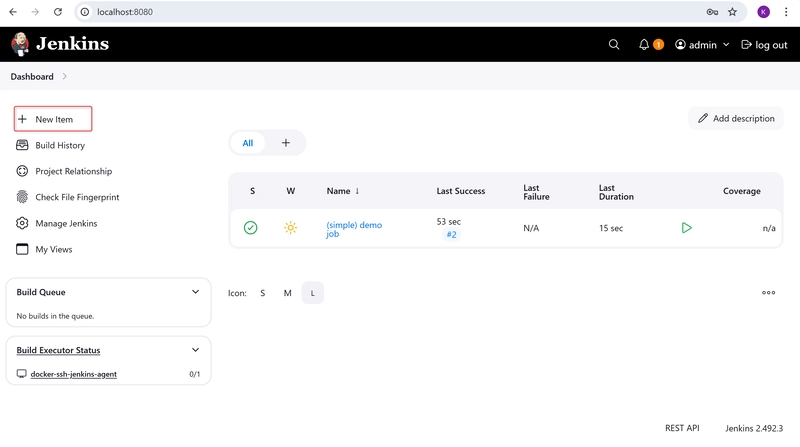
Create your Pipeline project in Jenkins
- In Jenkins UI, select New Item under Dashboard.
- Give a name to your Pipeline, select Pipeline under Select an item type section and click OK.
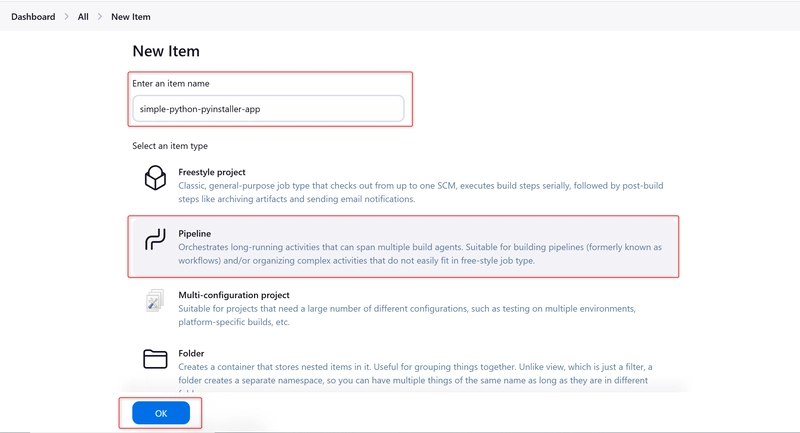
- Scroll down if needed, select Pipeline, then click OK at the bottom of the page.
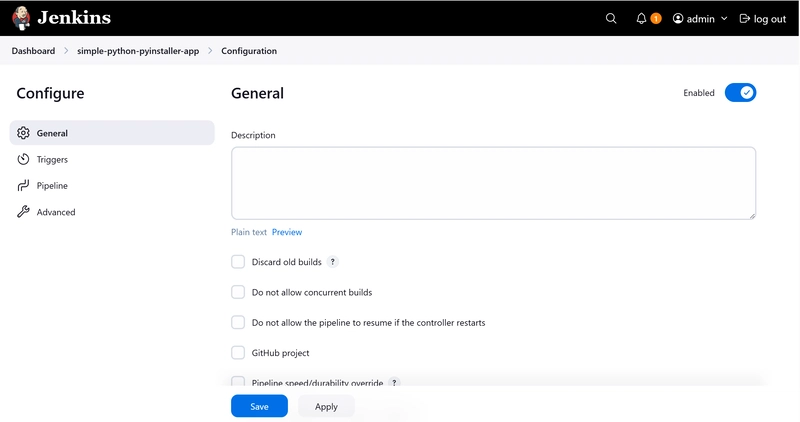
- You may enter a brief description for your pipeline.
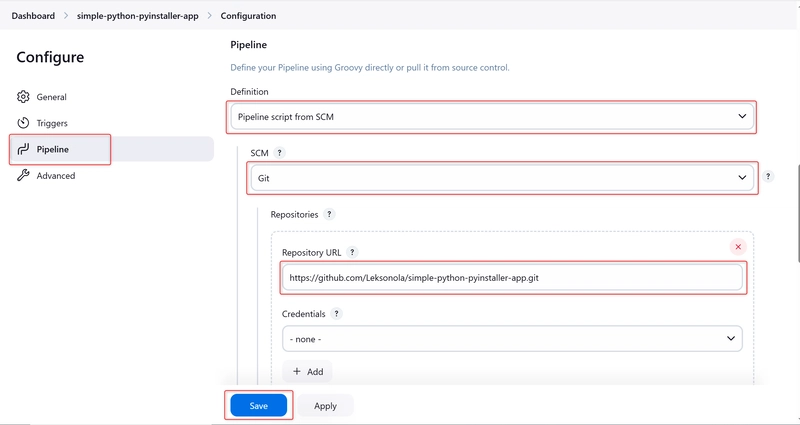
- In the left pane, select Pipeline.
- Under Definition, choose Pipeline script from SCM.
- From the SCM dropdown, select Git.
- In the Repository URL field, paste the URL of your forked repository.
- Click Save at the bottom of the page.
Create your initial Pipeline as a Jenkinsfile
Create a Jenkinsfile in your local simple-python-pyinstaller-app repository. This file will define your Pipeline, which automates building your Python app with PyInstaller.
Once you commit and push the Jenkinsfile to GitHub, Jenkins will automatically detect and run it.
First, create an initial Pipeline with a "Build" stage that executes the first part of the entire production process for your application. This "Build" stage compiles your simple Python application into byte code.
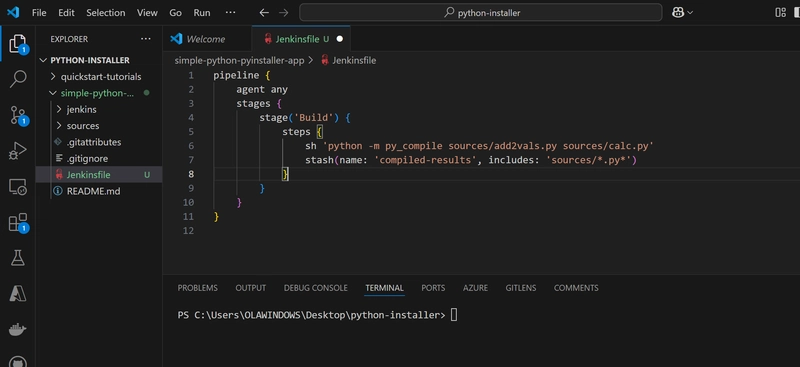
- Head over to your VS Code, create a new file at the root level and name it Jenkinsfile.
- Copy and paste the following Declarative Pipeline code into the Jenkinsfile.
pipeline {
    agent any
    stages {
        stage('Build') {
            steps {
                sh 'python -m py_compile sources/add2vals.py sources/calc.py'
                stash(name: 'compiled-results', includes: 'sources/*.py*')
            }
        }
    }
}
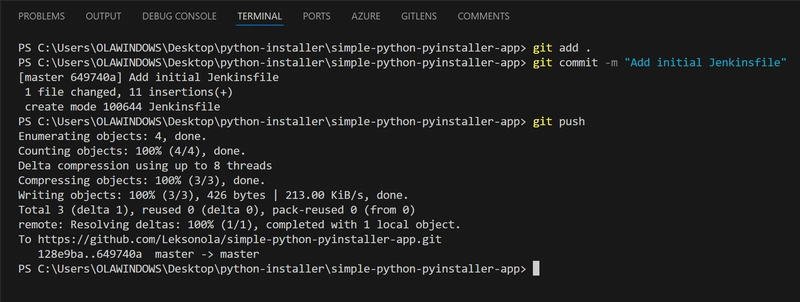
- Save and commit the edited Jenkinsfile into your local simple-python-pyinstaller-app Git repository. cd into simple-python-pyinstaller-app directory if you have not done so and run the following command:
git  add .

git commit -m "Add initial Jenkinsfile"

git push
- Back at Jenkins UI, select Build Now
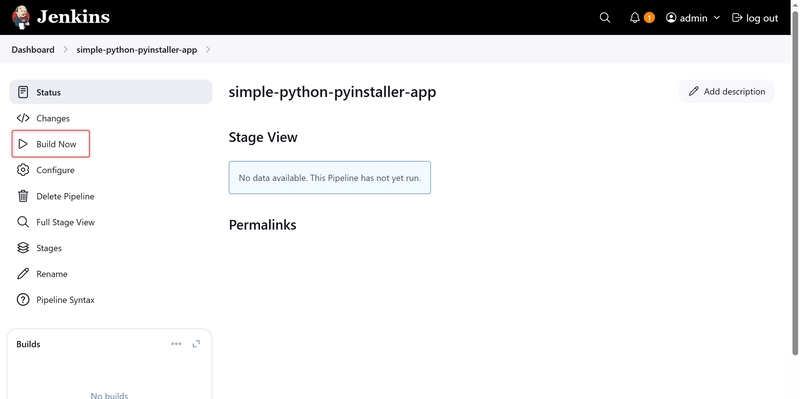
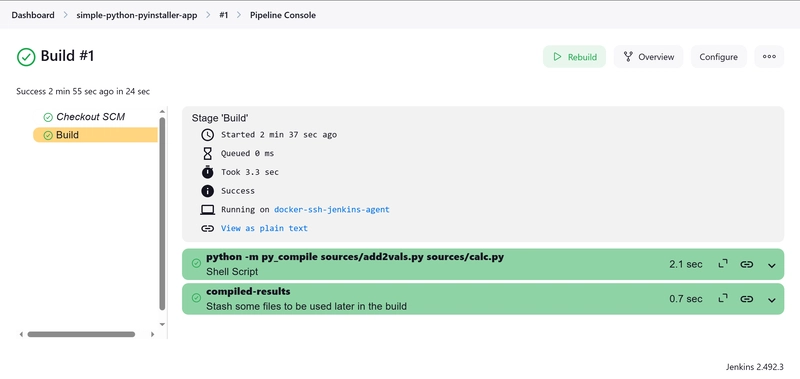
- If your Pipeline run successfully, you will see a green check mark and #1 on the left side and the Build stage completed in the main view.
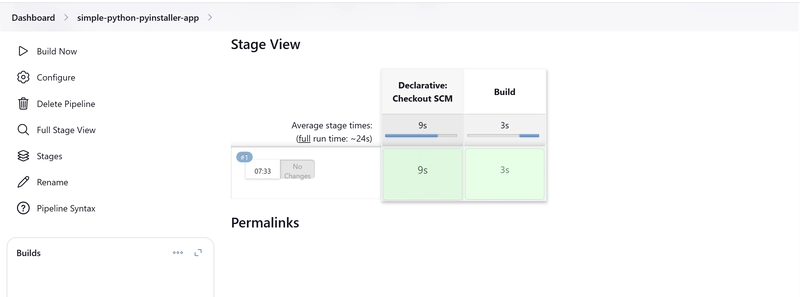
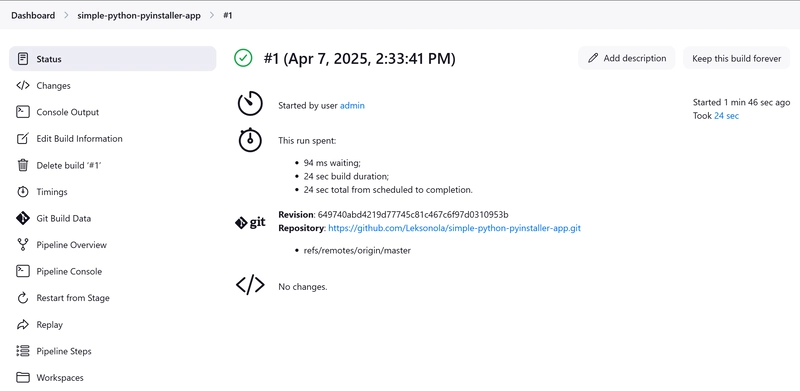
- You can now click on #1 to view the build details, where you'll see both the queue wait time and actual execution time for your build - this helps monitor performance and identify potential delays for future runs.
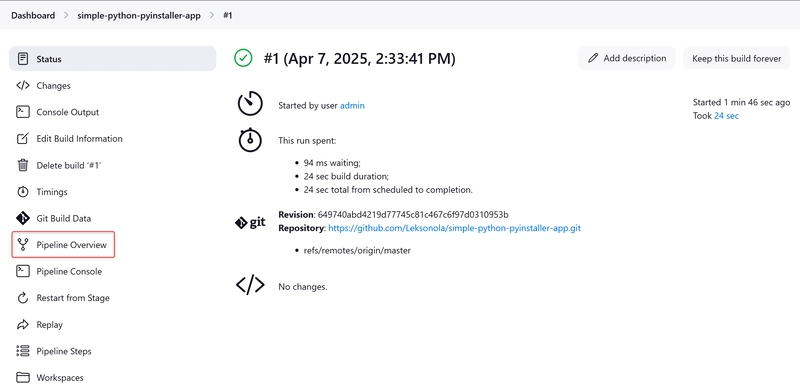
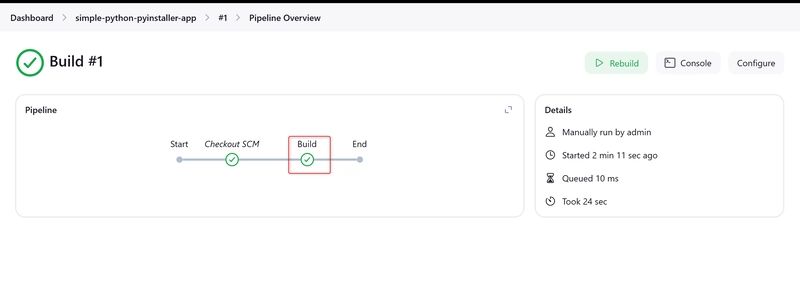
- On the left, you can click on Pipeline Overview to see the stages of the Pipeline.
- Click the Build stage to view detailed logs, including the Python command output (click the green Python section to expand it). This helps verify your build executed correctly.
- To return to your pipeline's main page, click simple-python-pyinstaller-app (or your pipeline name) in the top-left corner.

Add a test stage to your Pipeline
- Head back to Jenkins UI and open Jenkinsfile.
- Copy and paste the following Declarative Pipeline syntax under Build stage of your Jenkinsfile.
stage('Test') {
            steps {
                sh 'py.test --junit-xml test-reports/results.xml sources/test_calc.py'
            }
            post {
                always {
                    junit 'test-reports/results.xml'
                }
            }
        }
Your Jenkinsfile should look like this:
pipeline {
    agent any
    stages {
        stage('Build') {
            steps {
                sh 'python -m py_compile sources/add2vals.py sources/calc.py'
                stash(name: 'compiled-results', includes: 'sources/*.py*')
            }
        }
        stage('Test') {
            steps {
                sh 'py.test --junit-xml test-reports/results.xml sources/test_calc.py'
            }
            post {
                always {
                    junit 'test-reports/results.xml'
                }
            }
        }
    }
}
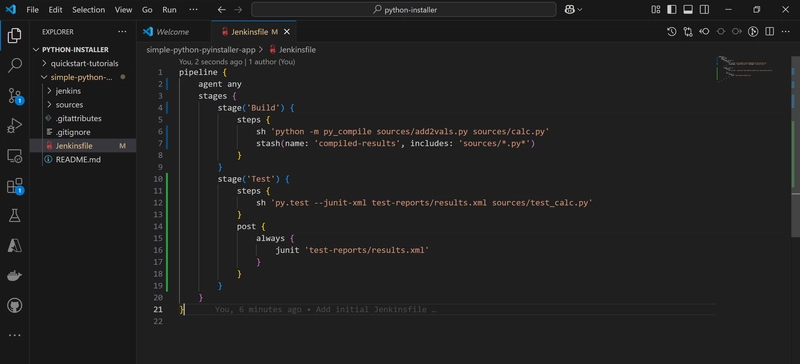
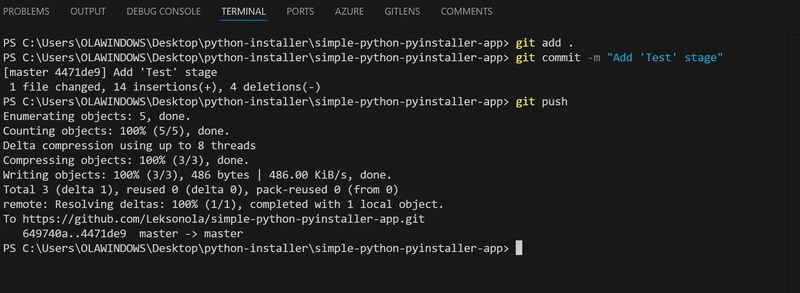
- Save your Jenkinsfile and push the new changes to your remote Jenkinsfile for Jenkins to access by running the following command:
git add .

git commit -m "Add 'Test' stage"

git push
- Click Build Now to launch another build
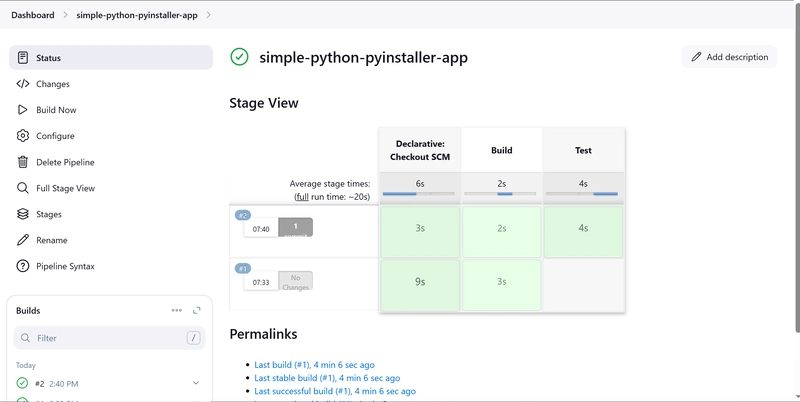
- After some time, a new column called 'Test' should appear in the Stage View.
- Click on #2 or the number corresponding to your most recent build on the left, under Build History, to view the build details.
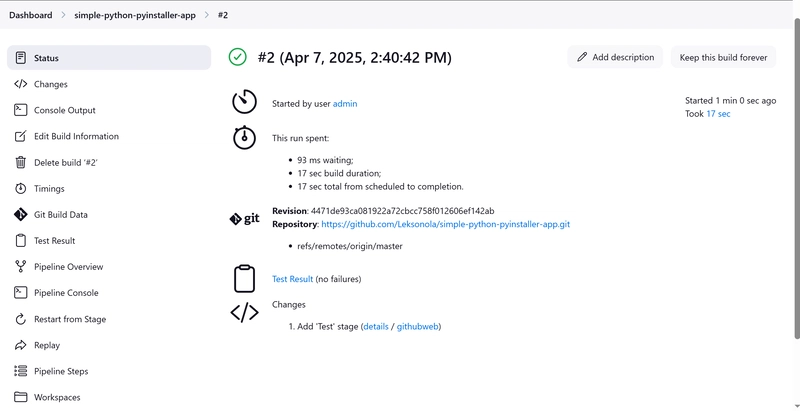
- Select Pipeline overview to see the stages of the Pipeline.
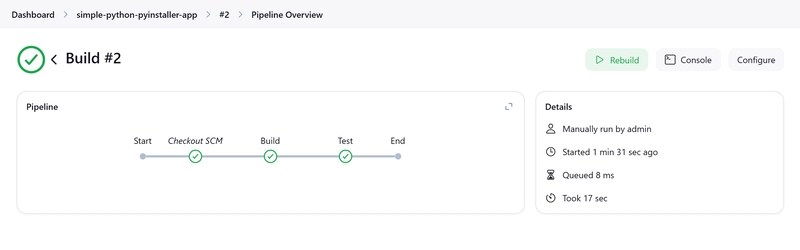
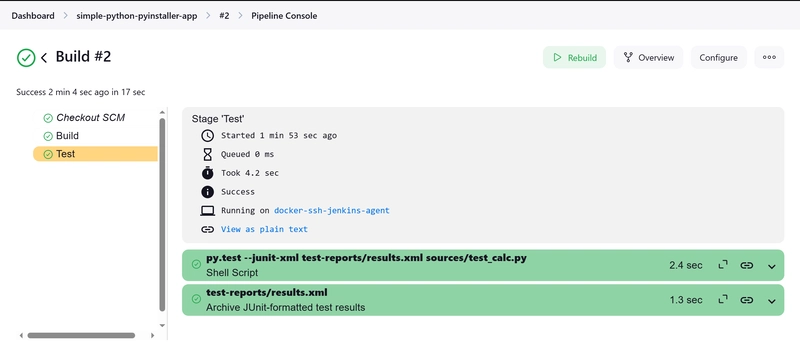
- Take note of the new 'Test' stage. You can select the checkmark next to 'Test' to view the output from that stage.
Add a final deliver stage to your Pipeline
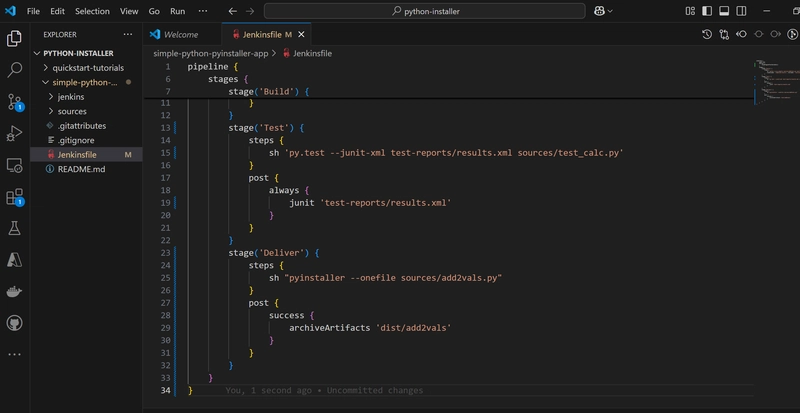
- Back at your VS Code with Jenkinsfile opened.
- Copy and paste the following Declarative Pipeline syntax under Test stage of your Jenkinsfile.
stage('Deliver') {
            steps {
                sh "pyinstaller --onefile sources/add2vals.py"
            }
            post {
                success {
                    archiveArtifacts 'dist/add2vals'
                }
            }
        }
and add a skipStagesAfterUnstable option, your Jenkinsfile will look like this:
pipeline {
    agent any
    options {
        skipStagesAfterUnstable()
    }
    stages {
        stage('Build') {
            steps {
                sh 'python -m py_compile sources/add2vals.py sources/calc.py'
                stash(name: 'compiled-results', includes: 'sources/*.py*')
            }
        }
        stage('Test') {
            steps {
                sh 'py.test --junit-xml test-reports/results.xml sources/test_calc.py'
            }
            post {
                always {
                    junit 'test-reports/results.xml'
                }
            }
        }
        stage('Deliver') {
            steps {
                sh "pyinstaller --onefile sources/add2vals.py"
            }
            post {
                success {
                    archiveArtifacts 'dist/add2vals'
                }
            }
        }
    }
}
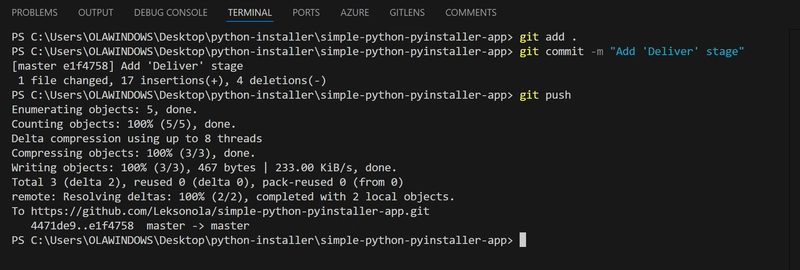
- Save your Jenkinsfile and push the new changes to your remote Jenkinsfile for Jenkins to access by running the following command:
git add .

git commit -m "Add 'Test' stage"

git push
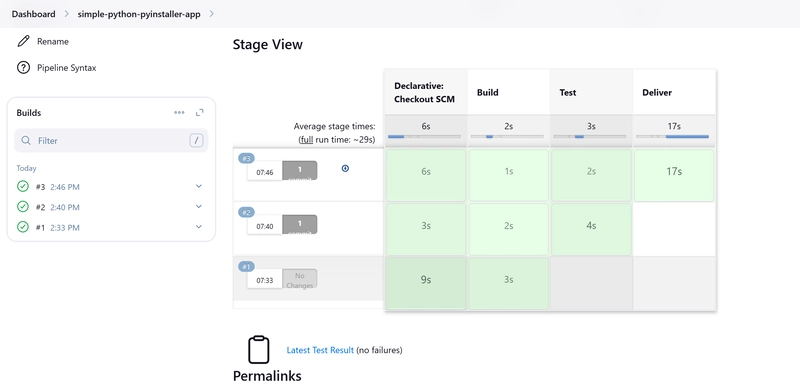
- Click on 'Build Now' on the left. After a short wait, a new column labeled 'Deliver' should appear in the Stage View.
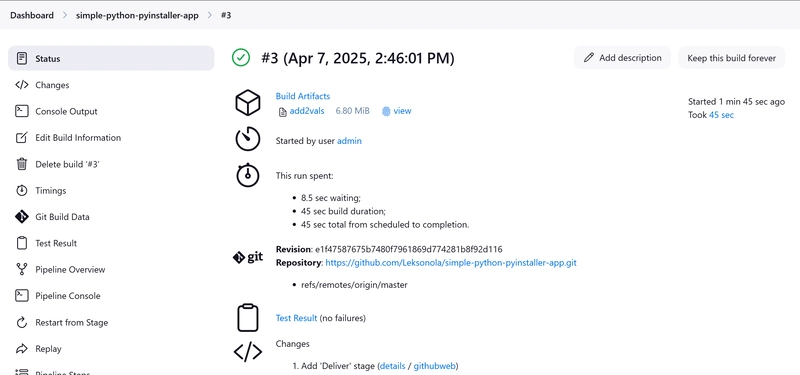
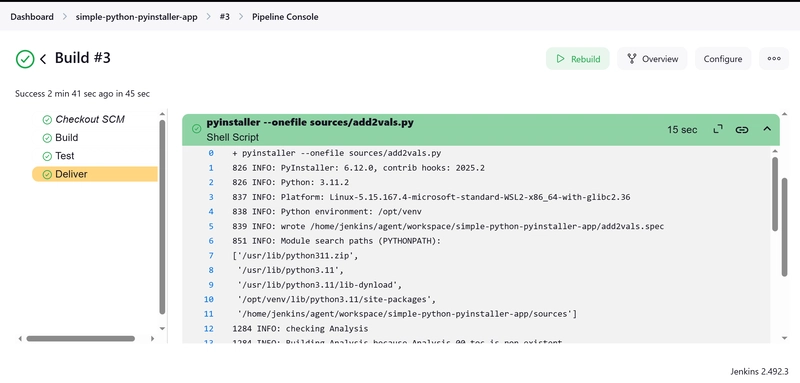
Click on #3 or the number for your most recent build in the left pane under Build History to view the build details.
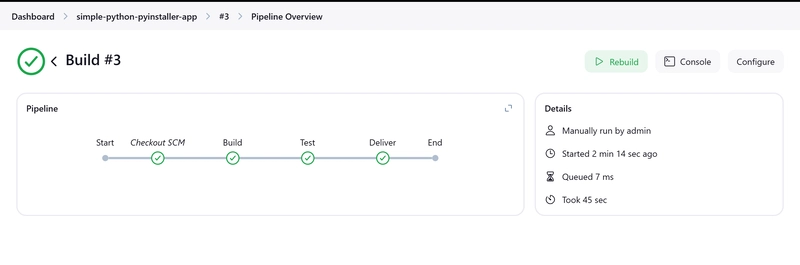
Next, click on 'Pipeline Overview' to see the stages of the pipeline. After selecting the green checkmark for 'Deliver' and then clicking on the first green section, you should see output similar to the one below, displaying the results of PyInstaller bundling your Python application into a standalone executable file.
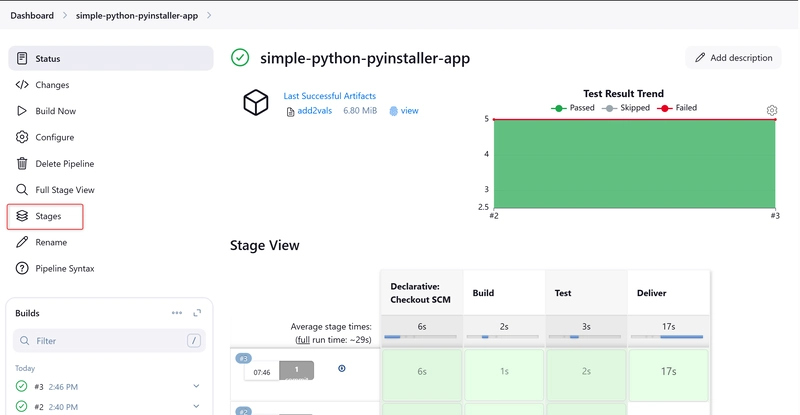
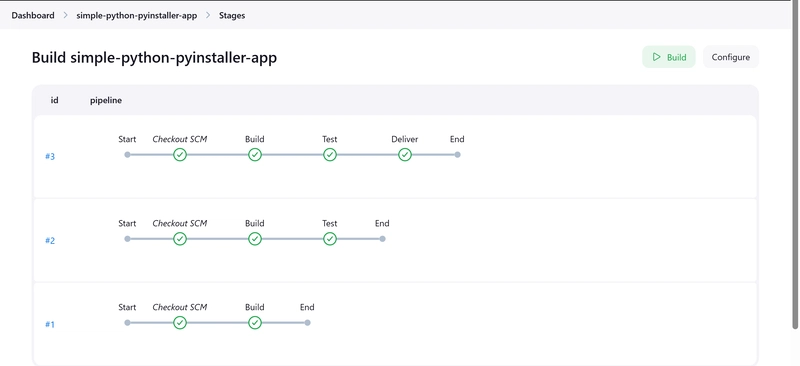
Now, click on 'simple-python-pyinstaller-app' at the top left, then select 'Stages' on the left. This will display your previous pipeline runs in reverse chronological order.
Thanks for staying till the end