Let Cursor Talk to Your APIs in Minutes! The Magic Bridge You Never Knew You Needed
Let's be honest—we've all been there. You're deep in the coding zone, fingers flying across the keyboard, when suddenly you need to implement that new endpoint your team just documented. Cue the dreaded context-switching dance: minimize your IDE, open the API docs, scroll endlessly to find the right endpoint, copy parameters, switch back to your code... rinse and repeat until your productivity is just a distant memory. What if your AI coding assistant could just... know your API specs? That's not science fiction, my friends—it's what happens when you connect Apidog MCP Server to Cursor. And trust me, it's an absolute game-changer for anyone who works with APIs (which, let's face it, is pretty much all of us these days). The API Documentation Problem We're All Suffering From Before we dive into the solution, let's commiserate about the problem. API documentation is simultaneously our best friend and worst enemy. We need it desperately, but accessing it constantly is like death by a thousand paper cuts to our productivity. I once spent three hours debugging an API integration only to discover I was using a deprecated parameter that had been updated in the docs months ago. Facepalm moment of the century. We've all been there, right? The real issue isn't just the context switching—it's that our AI coding assistants like Cursor are flying blind when it comes to our specific APIs. They're brilliant with general coding patterns, but ask them to generate code for your custom /users/preferences endpoint, and they're just guessing based on naming conventions. Enter Apidog MCP Server: The Bridge Your AI Assistant Has Been Begging For Apidog's Model Context Protocol (MCP) Server is like giving your AI assistant a direct line to your API documentation. It's the difference between your assistant having to guess what your API looks like versus having the actual blueprints right in front of it. And setting it up? Ridiculously simple. We're talking minutes, not hours. Here's the TL;DR version: Get an access token from Apidog Grab your project ID Add a tiny bit of config to Cursor Watch the magic happen Let's break this down step by step, shall we? Step 1: Grab Your Secret Decoder Ring (AKA Apidog Access Token) First things first—we need to get an access token from Apidog. This is basically your secret handshake that lets the MCP server access your API docs. Log into your Apidog account (create one if you haven't already—it's worth it!) Hover over your profile pic in the top-right corner Click "Account Settings > API Access Token" Create a shiny new token Copy that token somewhere safe—you'll need it in a minute! This token is like the VIP backstage pass to your API documentation. Guard it well, young padawan! Step 2: Find Your Project ID (It's Hiding in Plain Sight) Next up, we need to identify which API project we want our AI assistant to access: Open your project in Apidog Click "Settings" in the sidebar Look for "Project ID" in the Basic Settings page Copy that ID for the next step Think of this as telling your AI assistant exactly which book of API wisdom to read from your vast library. Step 3: Configure Cursor (The Moment of Truth!) Now for the fun part—connecting Cursor to your API specs through the Apidog MCP Server: Create or edit the MCP configuration file in one of these locations: Global configuration: ~/.cursor/mcp.json Project-specific: .cursor/mcp.json in your project directory Add this JSON configuration (I promise it's not scary): { "mcpServers": { "My API Documentation": { "command": "npx", "args": [ "-y", "apidog-mcp-server@latest", "--project=" ], "env": { "APIDOG_ACCESS_TOKEN": "" } } } } Just replace and with the values you collected earlier. If you're on Windows and the standard config is being temperamental (as Windows configs sometimes are), try this alternative: { "mcpServers": { "My API Documentation": { "command": "cmd.exe", "args": [ "/c", "npx -y apidog-mcp-server@latest --project=" ], "env": { "APIDOG_ACCESS_TOKEN": "" } } } } Save the file and restart Cursor That's it! No, seriously—that's all it takes. Three simple steps and your AI assistant now has a direct line to your API documentation. If this were a TV infomercial, this would be the moment where I'd say, "But wait, there's more!" And guess what? There is! The "Holy Cow, This Actually Works!" Moment Now comes the truly magical part. Let's see this beast in action with some examples that'll make you wonder how you ever lived without this setup: Example 1: Generate Code Based on Your API Specs Try asking Cursor something like: "Use MCP to fetch our API documentation and generate TypeScript interfaces for the Product schema and all related schemas" Watch as C
Let's be honest—we've all been there. You're deep in the coding zone, fingers flying across the keyboard, when suddenly you need to implement that new endpoint your team just documented. Cue the dreaded context-switching dance: minimize your IDE, open the API docs, scroll endlessly to find the right endpoint, copy parameters, switch back to your code... rinse and repeat until your productivity is just a distant memory.
What if your AI coding assistant could just... know your API specs?
That's not science fiction, my friends—it's what happens when you connect Apidog MCP Server to Cursor. And trust me, it's an absolute game-changer for anyone who works with APIs (which, let's face it, is pretty much all of us these days).
The API Documentation Problem We're All Suffering From
Before we dive into the solution, let's commiserate about the problem. API documentation is simultaneously our best friend and worst enemy. We need it desperately, but accessing it constantly is like death by a thousand paper cuts to our productivity.
I once spent three hours debugging an API integration only to discover I was using a deprecated parameter that had been updated in the docs months ago. Facepalm moment of the century. We've all been there, right?
The real issue isn't just the context switching—it's that our AI coding assistants like Cursor are flying blind when it comes to our specific APIs. They're brilliant with general coding patterns, but ask them to generate code for your custom /users/preferences endpoint, and they're just guessing based on naming conventions.
Enter Apidog MCP Server: The Bridge Your AI Assistant Has Been Begging For
Apidog's Model Context Protocol (MCP) Server is like giving your AI assistant a direct line to your API documentation. It's the difference between your assistant having to guess what your API looks like versus having the actual blueprints right in front of it.
And setting it up? Ridiculously simple. We're talking minutes, not hours.
Here's the TL;DR version:
- Get an access token from Apidog
- Grab your project ID
- Add a tiny bit of config to Cursor
- Watch the magic happen
Let's break this down step by step, shall we?
Step 1: Grab Your Secret Decoder Ring (AKA Apidog Access Token)
First things first—we need to get an access token from Apidog. This is basically your secret handshake that lets the MCP server access your API docs.
- Log into your Apidog account (create one if you haven't already—it's worth it!)
- Hover over your profile pic in the top-right corner
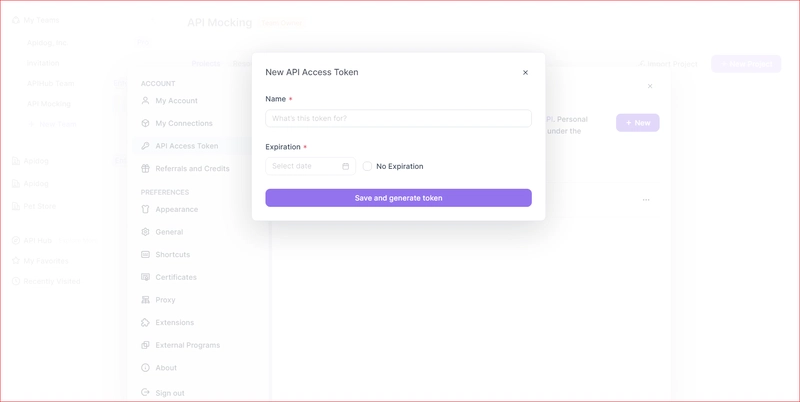
- Click "Account Settings > API Access Token"
- Create a shiny new token
- Copy that token somewhere safe—you'll need it in a minute!
This token is like the VIP backstage pass to your API documentation. Guard it well, young padawan!
Step 2: Find Your Project ID (It's Hiding in Plain Sight)
Next up, we need to identify which API project we want our AI assistant to access:
- Open your project in Apidog
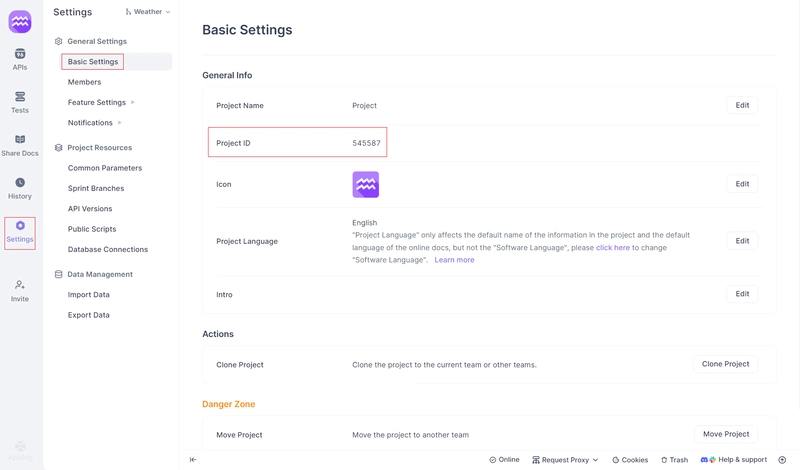
- Click "Settings" in the sidebar
- Look for "Project ID" in the Basic Settings page
- Copy that ID for the next step
Think of this as telling your AI assistant exactly which book of API wisdom to read from your vast library.
Step 3: Configure Cursor (The Moment of Truth!)
Now for the fun part—connecting Cursor to your API specs through the Apidog MCP Server:
-
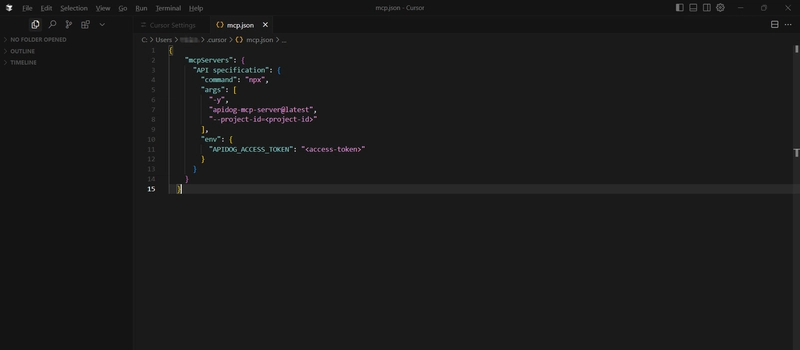
Create or edit the MCP configuration file in one of these locations:
- Global configuration:
~/.cursor/mcp.json - Project-specific:
.cursor/mcp.jsonin your project directory
- Global configuration:
Add this JSON configuration (I promise it's not scary):
{
  "mcpServers": {
    "My API Documentation": {
      "command": "npx",
      "args": [
        "-y",
        "apidog-mcp-server@latest",
        "--project="
      ],
      "env": {
        "APIDOG_ACCESS_TOKEN": ""
      }
    }
  }
}
Just replace
If you're on Windows and the standard config is being temperamental (as Windows configs sometimes are), try this alternative:
{
  "mcpServers": {
    "My API Documentation": {
      "command": "cmd.exe",
      "args": [
        "/c",
        "npx -y apidog-mcp-server@latest --project="
      ],
      "env": {
        "APIDOG_ACCESS_TOKEN": ""
      }
    }
  }
}
- Save the file and restart Cursor
That's it! No, seriously—that's all it takes. Three simple steps and your AI assistant now has a direct line to your API documentation. If this were a TV infomercial, this would be the moment where I'd say, "But wait, there's more!" And guess what? There is!
The "Holy Cow, This Actually Works!" Moment
Now comes the truly magical part. Let's see this beast in action with some examples that'll make you wonder how you ever lived without this setup:
Example 1: Generate Code Based on Your API Specs
Try asking Cursor something like:
"Use MCP to fetch our API documentation and generate TypeScript interfaces for the Product schema and all related schemas"
Watch as Cursor pulls the exact schema definitions from your API docs and generates perfectly aligned TypeScript interfaces. No more manual typing, no more mismatched properties, no more outdated models!
Example 2: Update Existing Code When APIs Change
When your API evolves (as they always do), just ask:
"Based on our API documentation, update this User DTO to include the new fields that were added to the /users endpoint"
Cursor will check your API specs, identify the new fields, and update your code accordingly. It's like having a dedicated API synchronization engineer at your fingertips!
Example 3: Create Complete API Clients
Need a full client implementation? Just ask:
"Generate a complete React hook for interacting with the product management API according to our documentation"
Cursor will create a fully-functional React hook with all the necessary methods, proper parameter typing, and even error handling based on your documented response codes.
Why This Integration Makes You a Better Developer (And Possibly a Happier Person)
Let's talk benefits, because they're substantial:
- 40-60% faster API integration - I timed myself implementing the same endpoint with and without this setup. The difference was staggering.
- Dramatically reduced errors - No more "Oops, I forgot that parameter was required" moments.
- Perfect synchronization between docs and code - When your docs change, your code can change just as easily.
- Onboarding new team members is a breeze - "Just ask Cursor about our API" is a lot easier than "Here's our 200-page API documentation, good luck!"
But perhaps the biggest benefit is the most intangible one: peace of mind. There's something deeply satisfying about knowing your AI assistant is working with accurate, up-to-date information about your APIs.
Pro Tips for API Documentation Superheroes
Want to take this integration to the next level? Here are some power-user tips:
Name your MCP server configurations meaningfully - If you work with multiple APIs, use names like "Payment API Documentation" or "User Management API Documentation" to help Cursor understand which API you're referring to.
-
Use specific prompting techniques:
- Reference specific endpoints: "Generate code for the /users/preferences endpoint from our API documentation"
- Ask for explanations: "Explain how the authentication flow works according to our API documentation"
- Request specific formats: "Create Java DTOs for all the models in our API documentation"
For teams, set up the APIDOG_ACCESS_TOKEN as an environment variable rather than including it in the configuration file. This keeps your token secure if you're sharing configurations in a repository.
The "Why Didn't I Do This Sooner?" Conclusion
Connecting Apidog MCP Server to Cursor is one of those rare technical setups that delivers immediate, tangible benefits with minimal effort. It's the coding equivalent of discovering you can skip the line at your favorite coffee shop—suddenly, everything just works better.
In a world where developer productivity is precious and context switching is the enemy, this integration is a secret weapon that gives you back time, reduces errors, and makes working with APIs genuinely enjoyable again.
So what are you waiting for? Take five minutes, set up this integration, and prepare for that satisfying moment when you ask Cursor about your API and it responds with perfect, documentation-aligned code. Your future self will thank you—probably while enjoying all that extra free time you've gained!

















![Apple Releases macOS Sequoia 15.5 Beta to Developers [Download]](https://www.iclarified.com/images/news/96915/96915/96915-640.jpg)
![Amazon Makes Last-Minute Bid for TikTok [Report]](https://www.iclarified.com/images/news/96917/96917/96917-640.jpg)
![Apple Releases iOS 18.5 Beta and iPadOS 18.5 Beta [Download]](https://www.iclarified.com/images/news/96907/96907/96907-640.jpg)













.jpg?#)









![[The AI Show Episode 142]: ChatGPT’s New Image Generator, Studio Ghibli Craze and Backlash, Gemini 2.5, OpenAI Academy, 4o Updates, Vibe Marketing & xAI Acquires X](https://www.marketingaiinstitute.com/hubfs/ep%20142%20cover.png)




















![Is this a suitable approach to architect a flutter app? [closed]](https://i.sstatic.net/4hMHGb1L.png)


