


![Apple's M5 iPad Pro Enters Advanced Testing for 2025 Launch [Gurman]](https://www.iclarified.com/images/news/96865/96865/96865-640.jpg)
![M5 MacBook Pro Set for Late 2025, Major Redesign Waits Until 2026 [Gurman]](https://www.iclarified.com/images/news/96868/96868/96868-640.jpg)
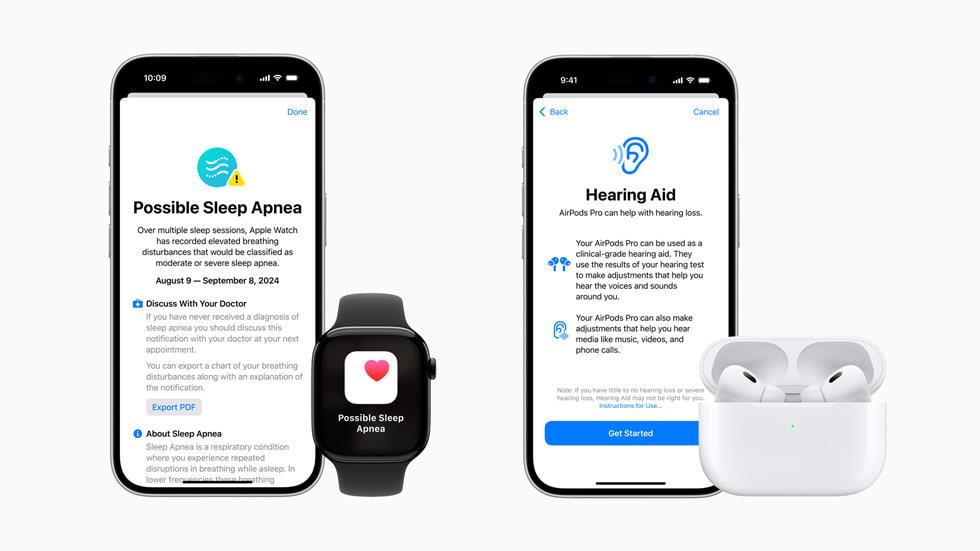
![Apple to Revamp Health App with AI-Powered Doctor [Gurman]](https://www.iclarified.com/images/news/96870/96870/96870-640.jpg)


![[The AI Show Episode 141]: Road to AGI (and Beyond) #1 — The AI Timeline is Accelerating](https://www.marketingaiinstitute.com/hubfs/ep%20141.1.png)
![[The AI Show Episode 140]: New AGI Warnings, OpenAI Suggests Government Policy, Sam Altman Teases Creative Writing Model, Claude Web Search & Apple’s AI Woes](https://www.marketingaiinstitute.com/hubfs/ep%20140%20cover.png)
![[The AI Show Episode 139]: The Government Knows AGI Is Coming, Superintelligence Strategy, OpenAI’s $20,000 Per Month Agents & Top 100 Gen AI Apps](https://www.marketingaiinstitute.com/hubfs/ep%20139%20cover-2.png)


![Best practices for database design when storing AI/LLM conversations with tool/function calls? [closed]](https://cdn.sstatic.net/Sites/softwareengineering/Img/apple-touch-icon@2.png?v=1ef7363febba)


![From broke musician to working dev. How college drop-out Ryan Furrer taught himself to code [Podcast #166]](https://cdn.hashnode.com/res/hashnode/image/upload/v1743189826063/2080cde4-6fc0-46fb-b98d-b3d59841e8c4.png?#)


.jpg?width=1920&height=1920&fit=bounds&quality=80&format=jpg&auto=webp#)


OSAMU-NAKAMURA.jpg?width=1920&height=1920&fit=bounds&quality=80&format=jpg&auto=webp#)


.png?#)


Creating an Animated Hamburger Navigation Menu: A Developer's Journey
After years of building websites for clients, I've learned that a good mobile navigation can make or break the user experience. Today, I want to share how I create my favorite animated hamburger menu - the one I find myself implementing on almost every project these days. Why I Love This Approach Before diving into the code, let me tell you why I'm such a fan of this particular implementation. I've tried countless hamburger menu variations over the years, but this one hits the sweet spot between visual appeal, performance, and accessibility. The first time I implemented something similar was for a restaurant client who wanted their mobile menu to feel as "delicious" as their food. The animated transitions and staggered menu appearance got rave reviews from both the client and their customers. Setting Up the Foundation Let's start with the HTML structure. Nothing fancy here, just the essential elements we need: Brand Home I've learned the hard way that accessibility matters, so I always include the aria-label on the button. That style="--i: 1;" might look strange, but trust me - it's the secret sauce for those staggered animations I'll explain later. The CSS Magic This is where things get interesting. First, I set up some CSS variables: :root { --primary: #6d28d9; --primary-light: #8b5cf6; --dark: #1f2937; --light: #f9fafb; --transition: 0.3s cubic-bezier(0.645, 0.045, 0.355, 1); } I can't tell you how many times I've had to hunt through a stylesheet to update colors in multiple places. Using variables saves me tons of time, especially when clients inevitably ask for color changes. The Hamburger Icon Animation The hamburger-to-X animation took me several attempts to get right. Here's the trick: .line { display: block; height: 3px; width: 100%; border-radius: 10px; background: var(--primary); position: absolute; transition: var(--transition); } .line1 { top: 0; transform-origin: top left; } .line2 { top: 50%; transform: translateY(-50%); } .line3 { bottom: 0; transform-origin: bottom left; } .hamburger.active .line1 { transform: rotate(45deg); width: 28px; } .hamburger.active .line2 { transform: translateX(20px); opacity: 0; } .hamburger.active .line3 { transform: rotate(-45deg); width: 28px; } The key insight I had was setting different transform-origins for the top and bottom lines. This creates that satisfying rotation effect where the lines seem to pivot naturally into the X shape. The Sliding Menu For the sliding menu, I use a combination of fixed positioning and transforms: .nav-menu { position: fixed; top: 0; right: 0; width: 300px; height: 100vh; background: white; box-shadow: -5px 0 15px rgba(0, 0, 0, 0.1); padding: 6rem 2rem 2rem; transform: translateX(100%); transition: transform var(--transition); z-index: 10; overflow-y: auto; } .nav-menu.active { transform: translateX(0); } I learned through painful experience that using right: -300px and changing to right: 0 causes repaints and can make animations janky. Using transform: translateX() is much smoother because it leverages GPU acceleration. The Staggered Animation This is my favorite part! The staggered animation for menu items: .nav-item { opacity: 0; transform: translateY(20px); transition: opacity 0.3s ease, transform 0.3s ease; transition-delay: calc(0.1s * var(--i)); } .nav-menu.active .nav-item { opacity: 1; transform: translateY(0); } Remember that weird style="--i: 1;" in the HTML? This is where it comes into play. Each menu item gets a different transition delay based on its position, creating that cascading effect. I discovered this technique while experimenting with CSS variables and it's been a game-changer for creating more natural-feeling animations. Responsive Design One mistake I made early in my career was building separate mobile and desktop menus. Now I know better: @media (min-width: 1024px) { .hamburger { display: none; } .nav-menu { position: static; width: auto; height: auto; background: transparent; box-shadow: none; padding: 0; transform: translateX(0); overflow-y: visible; } .nav-links { flex-direction: row; gap: 2rem; } } This approach means the same HTML works for both mobile and desktop, with CSS handling the presentation differences. It's cleaner, more maintainable, and just plain smarter. JavaScript: Bringing It All Together The JavaScript is where we make everything interactive: document.addEventListener('DOMContentLoaded', function() { const hamburger = document.querySelector('.hamburger'); const navMenu = document.querySelector('.nav-menu'); const navOverlay = document.querySelector('.nav-overlay'); const navLinks = document.querySelectorAll('.nav-link'); /

After years of building websites for clients, I've learned that a good mobile navigation can make or break the user experience. Today, I want to share how I create my favorite animated hamburger menu - the one I find myself implementing on almost every project these days.
Why I Love This Approach
Before diving into the code, let me tell you why I'm such a fan of this particular implementation. I've tried countless hamburger menu variations over the years, but this one hits the sweet spot between visual appeal, performance, and accessibility.
The first time I implemented something similar was for a restaurant client who wanted their mobile menu to feel as "delicious" as their food. The animated transitions and staggered menu appearance got rave reviews from both the client and their customers.
Setting Up the Foundation
Let's start with the HTML structure. Nothing fancy here, just the essential elements we need:
I've learned the hard way that accessibility matters, so I always include the aria-label on the button. That style="--i: 1;" might look strange, but trust me - it's the secret sauce for those staggered animations I'll explain later.
The CSS Magic
This is where things get interesting. First, I set up some CSS variables:
:root {
  --primary: #6d28d9;
  --primary-light: #8b5cf6;
  --dark: #1f2937;
  --light: #f9fafb;
  --transition: 0.3s cubic-bezier(0.645, 0.045, 0.355, 1);
}
I can't tell you how many times I've had to hunt through a stylesheet to update colors in multiple places. Using variables saves me tons of time, especially when clients inevitably ask for color changes.
The Hamburger Icon Animation
The hamburger-to-X animation took me several attempts to get right. Here's the trick:
.line {
  display: block;
  height: 3px;
  width: 100%;
  border-radius: 10px;
  background: var(--primary);
  position: absolute;
  transition: var(--transition);
}

.line1 {
  top: 0;
  transform-origin: top left;
}

.line2 {
  top: 50%;
  transform: translateY(-50%);
}

.line3 {
  bottom: 0;
  transform-origin: bottom left;
}

.hamburger.active .line1 {
  transform: rotate(45deg);
  width: 28px;
}

.hamburger.active .line2 {
  transform: translateX(20px);
  opacity: 0;
}

.hamburger.active .line3 {
  transform: rotate(-45deg);
  width: 28px;
}
The key insight I had was setting different transform-origins for the top and bottom lines. This creates that satisfying rotation effect where the lines seem to pivot naturally into the X shape.
The Sliding Menu
For the sliding menu, I use a combination of fixed positioning and transforms:
.nav-menu {
  position: fixed;
  top: 0;
  right: 0;
  width: 300px;
  height: 100vh;
  background: white;
  box-shadow: -5px 0 15px rgba(0, 0, 0, 0.1);
  padding: 6rem 2rem 2rem;
  transform: translateX(100%);
  transition: transform var(--transition);
  z-index: 10;
  overflow-y: auto;
}

.nav-menu.active {
  transform: translateX(0);
}
I learned through painful experience that using right: -300px and changing to right: 0 causes repaints and can make animations janky. Using transform: translateX() is much smoother because it leverages GPU acceleration.
The Staggered Animation
This is my favorite part! The staggered animation for menu items:
.nav-item {
  opacity: 0;
  transform: translateY(20px);
  transition: opacity 0.3s ease, transform 0.3s ease;
  transition-delay: calc(0.1s * var(--i));
}

.nav-menu.active .nav-item {
  opacity: 1;
  transform: translateY(0);
}
Remember that weird style="--i: 1;" in the HTML? This is where it comes into play. Each menu item gets a different transition delay based on its position, creating that cascading effect. I discovered this technique while experimenting with CSS variables and it's been a game-changer for creating more natural-feeling animations.
Responsive Design
One mistake I made early in my career was building separate mobile and desktop menus. Now I know better:
@media (min-width: 1024px) {
  .hamburger {
    display: none;
  }

  .nav-menu {
    position: static;
    width: auto;
    height: auto;
    background: transparent;
    box-shadow: none;
    padding: 0;
    transform: translateX(0);
    overflow-y: visible;
  }

  .nav-links {
    flex-direction: row;
    gap: 2rem;
  }

}
This approach means the same HTML works for both mobile and desktop, with CSS handling the presentation differences. It's cleaner, more maintainable, and just plain smarter.
JavaScript: Bringing It All Together
The JavaScript is where we make everything interactive:
document.addEventListener('DOMContentLoaded', function() {
  const hamburger = document.querySelector('.hamburger');
  const navMenu = document.querySelector('.nav-menu');
  const navOverlay = document.querySelector('.nav-overlay');
  const navLinks = document.querySelectorAll('.nav-link');

  // Toggle menu function
  function toggleMenu() {
    hamburger.classList.toggle('active');
    navMenu.classList.toggle('active');
    navOverlay.classList.toggle('active');

    // Toggle body scroll
    if (navMenu.classList.contains('active')) {
      document.body.style.overflow = 'hidden';
    } else {
      document.body.style.overflow = '';
    }
  }

  // Event listeners
  hamburger.addEventListener('click', toggleMenu);
  navOverlay.addEventListener('click', toggleMenu);

  // More event handlers...
});
A little trick I've learned: disabling body scroll when the menu is open prevents that annoying background scrolling on mobile. It's these small details that make a big difference in user experience.
I also add keyboard support for accessibility:
document.addEventListener('keydown', function(e) {
  if (e.key === 'Escape' && navMenu.classList.contains('active')) {
    toggleMenu();
  }
});
This came from real user feedback - a client with vision impairments pointed out that they couldn't close the menu with their keyboard. Now I always include keyboard navigation in my menus.
Real-World Challenges and Solutions
In the real world, I've encountered some challenges with this implementation:
iOS Safari Issues: On some older iOS versions, the fixed positioning can be buggy. I've found that adding -webkit-overflow-scrolling: touch; to the .nav-menu helps with this.
Content Behind Overlay: Sometimes content behind the overlay can still receive focus with tab navigation. I solve this by adding a higher z-index to the menu and managing focus within it.
Animation Performance: On lower-end devices, the animations can sometimes be choppy. In these cases, I simplify the animations or use the will-change property judiciously (though be careful with this - it can cause more harm than good if overused).
Conclusion
This hamburger menu has become my go-to solution after years of refinement. It's accessible, performs well, and looks great on all devices. The animations add that touch of polish that clients love, and the code is clean and maintainable.
The best part? It's endlessly customizable. Change the colors, adjust the timing, modify the animations - make it your own! Web development is as much art as science, and this is one canvas where you can really express your creativity.
What's your favorite hamburger menu implementation? Have you found other techniques that work well? I'd love to hear about them in the comments!