


![Apple's M5 iPad Pro Enters Advanced Testing for 2025 Launch [Gurman]](https://www.iclarified.com/images/news/96865/96865/96865-640.jpg)
![M5 MacBook Pro Set for Late 2025, Major Redesign Waits Until 2026 [Gurman]](https://www.iclarified.com/images/news/96868/96868/96868-640.jpg)
![Apple to Revamp Health App with AI-Powered Doctor [Gurman]](https://www.iclarified.com/images/news/96870/96870/96870-640.jpg)


![What Google Messages features are rolling out [March 2025]](https://i0.wp.com/9to5google.com/wp-content/uploads/sites/4/2023/12/google-messages-name-cover.png?resize=1200%2C628&quality=82&strip=all&ssl=1)


![[The AI Show Episode 141]: Road to AGI (and Beyond) #1 — The AI Timeline is Accelerating](https://www.marketingaiinstitute.com/hubfs/ep%20141.1.png)
![[The AI Show Episode 140]: New AGI Warnings, OpenAI Suggests Government Policy, Sam Altman Teases Creative Writing Model, Claude Web Search & Apple’s AI Woes](https://www.marketingaiinstitute.com/hubfs/ep%20140%20cover.png)
![[The AI Show Episode 139]: The Government Knows AGI Is Coming, Superintelligence Strategy, OpenAI’s $20,000 Per Month Agents & Top 100 Gen AI Apps](https://www.marketingaiinstitute.com/hubfs/ep%20139%20cover-2.png)


![Best practices for database design when storing AI/LLM conversations with tool/function calls? [closed]](https://cdn.sstatic.net/Sites/softwareengineering/Img/apple-touch-icon@2.png?v=1ef7363febba)


![From broke musician to working dev. How college drop-out Ryan Furrer taught himself to code [Podcast #166]](https://cdn.hashnode.com/res/hashnode/image/upload/v1743189826063/2080cde4-6fc0-46fb-b98d-b3d59841e8c4.png?#)


.jpg?width=1920&height=1920&fit=bounds&quality=80&format=jpg&auto=webp#)
OSAMU-NAKAMURA.jpg?width=1920&height=1920&fit=bounds&quality=80&format=jpg&auto=webp#)


.png?#)


AI Agents from Zero to Hero — Part 3
Build from scratch using only Ollama (no GPU, no APIKEY) The post AI Agents from Zero to Hero — Part 3 appeared first on Towards Data Science.

Intro
In Part 1 of this tutorial series, we introduced AI Agents, autonomous programs that perform tasks, make decisions, and communicate with others.
In Part 2 of this tutorial series, we understood how to make the Agent try and retry until the task is completed through Iterations and Chains.
A single Agent can usually operate effectively using a tool, but it can be less effective when using many tools simultaneously. One way to tackle complicated tasks is through a “divide-and-conquer” approach: create a specialized Agent for each task and have them work together as a Multi-Agent System (MAS).
In a MAS, multiple agents collaborate to achieve common goals, often tackling challenges that are too difficult for a single Agent to handle alone. There are two main ways they can interact:
- Sequential flow – The Agents do their work in a specific order, one after the other. For example, Agent 1 finishes its task, and then Agent 2 uses the result to do its task. This is useful when tasks depend on each other and must be done step-by-step.
- Hierarchical flow – Usually, one higher-level Agent manages the whole process and gives instructions to lower level Agents which focus on specific tasks. This is useful when the final output requires some back-and-forth.
In this tutorial, I’m going to show how to build from scratch different types of Multi-Agent Systems, from simple to more advanced. I will present some useful Python code that can be easily applied in other similar cases (just copy, paste, run) and walk through every line of code with comments so that you can replicate this example (link to full code at the end of the article).
Setup
Please refer to Part 1 for the setup of Ollama and the main LLM.
import ollama
llm = "qwen2.5"
In this example, I will ask the model to process images, therefore I’m also going to need a Vision LLM. It is a specialized version of a Large Language Model that, integrating NLP with CV, is designed to understand visual inputs, such as images and videos, in addition to text.
Microsoft’s LLaVa is an efficient choice as it can also run without a GPU.

After the download is completed, you can move on to Python and start writing code. Let’s load an image so that we can try out the Vision LLM.
from matplotlib import image as pltimg, pyplot as plt
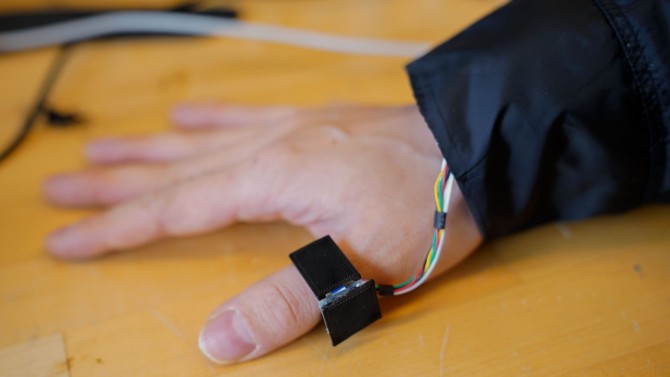
image_file = "draghi.jpeg"
plt.imshow(pltimg.imread(image_file))
plt.show()In order to test the Vision LLM, you can just pass the image as an input:
import ollama

ollama.generate(model="llava",
 prompt="describe the image",
 images=[image_file])["response"]
Sequential Multi-Agent System
I shall build two Agents that will work in a sequential flow, one after the other, where the second takes the output of the first as an input, just like a Chain.

- The first Agent must process an image provided by the user and return a verbal description of what it sees.
- The second Agent will search the internet and try to understand where and when the picture was taken, based on the description provided by the first Agent.
Both Agents shall use one Tool each. The first Agent will have the Vision LLM as a Tool. Please remember that with Ollama, in order to use a Tool, the function must be described in a dictionary.
def process_image(path: str) -> str:
    return ollama.generate(model="llava", prompt="describe the image", images=[path])["response"]

tool_process_image = {'type':'function', 'function':{
  'name': 'process_image',
  'description': 'Load an image for a given path and describe what you see',
  'parameters': {'type': 'object',
                'required': ['path'],
                'properties': {
                    'path': {'type':'str', 'description':'the path of the image'},
}}}}
The second Agent should have a web-searching Tool. In the previous articles of this tutorial series, I showed how to leverage the DuckDuckGo package for searching the web. So, this time, we can use a new Tool: Wikipedia (pip install wikipedia==1.4.0). You can directly use the original library or import the LangChain wrapper.
from langchain_community.tools import WikipediaQueryRun
from langchain_community.utilities import WikipediaAPIWrapper

def search_wikipedia(query:str) -> str:
    return WikipediaQueryRun(api_wrapper=WikipediaAPIWrapper()).run(query)

tool_search_wikipedia = {'type':'function', 'function':{
  'name': 'search_wikipedia',
  'description': 'Search on Wikipedia by passing some keywords',
  'parameters': {'type': 'object',
                'required': ['query'],
                'properties': {
                    'query': {'type':'str', 'description':'The input must be short keywords, not a long text'},
}}}}
## test
search_wikipedia(query="draghi")
First, you need to write a prompt to describe the task of each Agent (the more detailed, the better), and that will be the first message in the chat history with the LLM.
prompt = '''
You are a photographer that analyzes and describes images in details.
'''
messages_1 = [{"role":"system", "content":prompt}]
One important decision to make when building a MAS is whether the Agents should share the chat history or not. The management of chat history depends on the design and objectives of the system:
- Shared chat history – Agents have access to a common conversation log, allowing them to see what other Agents have said or done in previous interactions. This can enhance the collaboration and the understanding of the overall context.
- Separate chat history – Agents only have access to their own interactions, focusing only on their own communication. This design is typically used when independent decision-making is important.
I recommend keeping the chats separate unless it is necessary to do otherwise. LLMs might have a limited context window, so it’s better to make the history as lite as possible.
prompt = '''
You are a detective. You read the image description provided by the photographer, and you search Wikipedia to understand when and where the picture was taken.
'''

messages_2 = [{"role":"system", "content":prompt}]
For convenience, I shall use the function defined in the previous articles to process the model’s response.
def use_tool(agent_res:dict, dic_tools:dict) -> dict:
    ## use tool
    if "tool_calls" in agent_res["message"].keys():
        for tool in agent_res["message"]["tool_calls"]:
            t_name, t_inputs = tool["function"]["name"], tool["function"]["arguments"]
            if f := dic_tools.get(t_name):
                ### calling tool
                print('

                                Read More


