


![Apple M4 Mac Mini on Sale for $499 [Lowest Price Ever]](https://www.iclarified.com/images/news/96788/96788/96788-640.jpg)
![Apple Shares First Look and Premiere Date for 'The Buccaneers' Season Two [Video]](https://www.iclarified.com/images/news/96786/96786/96786-640.jpg)
![Apple to Craft Key Foldable iPhone Components From Liquid Metal [Kuo]](https://www.iclarified.com/images/news/96784/96784/96784-640.jpg)


_Federico_Caputo_Alamy.jpg?#)


![[The AI Show Episode 139]: The Government Knows AGI Is Coming, Superintelligence Strategy, OpenAI’s $20,000 Per Month Agents & Top 100 Gen AI Apps](https://www.marketingaiinstitute.com/hubfs/ep%20139%20cover-2.png)


![[The AI Show Episode 138]: Introducing GPT-4.5, Claude 3.7 Sonnet, Alexa+, Deep Research Now in ChatGPT Plus & How AI Is Disrupting Writing](https://www.marketingaiinstitute.com/hubfs/ep%20138%20cover.png)


![From hating coding to programming satellites at age 37 with Francesco Ciulla [Podcast #165]](https://cdn.hashnode.com/res/hashnode/image/upload/v1742585568977/09b25b8e-8c92-4f4b-853f-64b7f7915980.png?#)


.jpg?width=1920&height=1920&fit=bounds&quality=80&format=jpg&auto=webp#)


.png?#)


How to use containers for Node.js development
Requirements How to containerize a Node.js application Overview In this section, you’ll learn how to configure a development environment for your containerized application. This includes the following steps: Adding a local database and persisting data Configuring your container to run a development environment Debugging your containerized application Add a local database and persist data Open your compose.yaml file in an IDE or text editor. Uncomment the database-related instructions. Below is the updated compose.yaml file: server: build: context: . environment: NODE_ENV: production ports: - 3000:3000 depends_on: db: condition: service_healthy db: image: postgres restart: always user: postgres secrets: - db-password volumes: - db-data:/var/lib/postgresql/data environment: - POSTGRES_DB=example - POSTGRES_PASSWORD_FILE=/run/secrets/db-password expose: - 5432 healthcheck: test: ["CMD", "pg_isready"] interval: 10s timeout: 5s retries: 5 volumes: db-data: secrets: db-password: file: db/password.txt Open the src/persistence/postgres.js file in an IDE or text editor. You’ll notice that the application uses a PostgreSQL database and requires specific environment variables to establish a connection. Currently, these variables are not defined in the compose.yaml file. Add the necessary environment variables to configure the database connection. Below is the updated compose.yaml file with the required changes: POSTGRES_HOST: db POSTGRES_USER: postgres POSTGRES_PASSWORD_FILE: /run/secrets/db-password POSTGRES_DB: example Add a secrets section under the server service to ensure your application securely manages the database password. Below is the updated compose.yaml file with the necessary changes: secrets: - db-password Inside the docker-nodejs-sample directory, create a new directory named db. Within the db directory, create a file named password.txt. This file will store your database password securely. Open the password.txt file in an IDE or text editor and enter a password of your choice. Ensure the password is on a single line with no additional lines, hidden characters, or newline characters. Save all the files you’ve modified. Run the following command to start your application: docker compose up --build Open a browser and verify that the application is running at http://localhost:3000 Add a few items to the todo list to verify data persistence. Once you’ve added items, press Ctrl+C in the terminal to stop your application. Run the command docker compose rm in the terminal to remove your containers. docker compose rm -Refresh http://localhost:3000 in your browser and verify that the todo items persisted, even after the containers were removed and ran again. Update your Dockerfile for Development Open the Dockerfile in an IDE or text editor. Notice that the current Dockerfile doesn’t install development dependencies or run nodemon. You’ll need to update it to support development workflows. Instead of creating separate Dockerfiles for production and development, you can use a multi-stage Dockerfile to handle both scenarios. Update your Dockerfile to the following multi-stage configuration: FROM node:${NODE_VERSION}-alpine as base WORKDIR /usr/src/app EXPOSE 3000 FROM base as dev RUN --mount=type=bind,source=package.json,target=package.json \ --mount=type=bind,source=package-lock.json,target=package-lock.json \ --mount=type=cache,target=/root/.npm \ npm ci --include=dev USER node COPY . . CMD npm run dev FROM base as prod RUN --mount=type=bind,source=package.json,target=package.json \ --mount=type=bind,source=package-lock.json,target=package-lock.json \ --mount=type=cache,target=/root/.npm \ npm ci --omit=dev USER node COPY . . CMD node src/index.js In the Dockerfile, you start by adding a label (base) to the FROM node:${NODE_VERSION}-alpine statement. This allows you to reference this build stage in subsequent stages. Next, you introduce a new build stage labeled dev, which installs development dependencies and starts the container using npm run dev. Finally, you add a prod stage that excludes development dependencies and runs the application using node src/index.js. Update your Compose file for development To run the dev stage with Compose, update your compose.yaml file. Open the file in an IDE or text editor and add the target: dev instruction to target the dev stage from your multi-stage Dockerfile. Additionally, add a new volume to the server service for a bind mount. For this application, mount ./src from your local machine to /usr/src/app/src in the container. Finally, publish port 9229 to enable debugging. Run your development container and debug your application Run the followi
Requirements
Overview
In this section, you’ll learn how to configure a development environment for your containerized application. This includes the following steps:
- Adding a local database and persisting data
- Configuring your container to run a development environment
- Debugging your containerized application
Add a local database and persist data
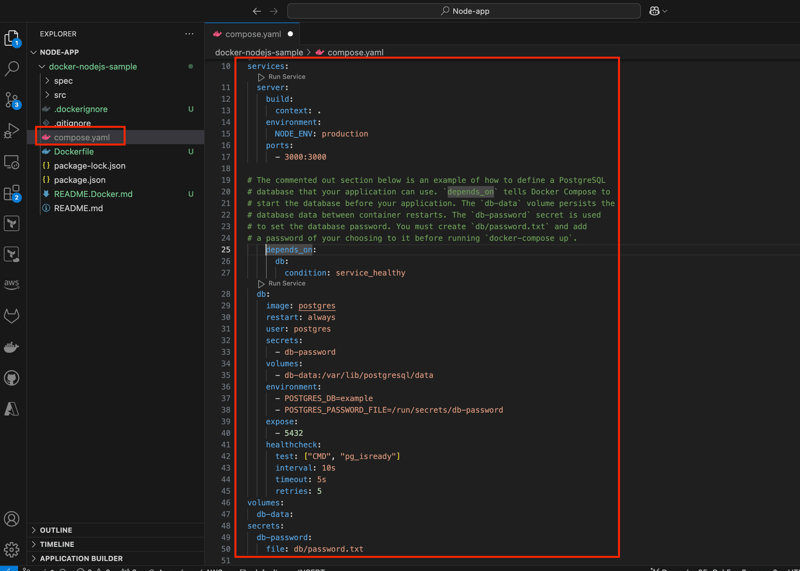
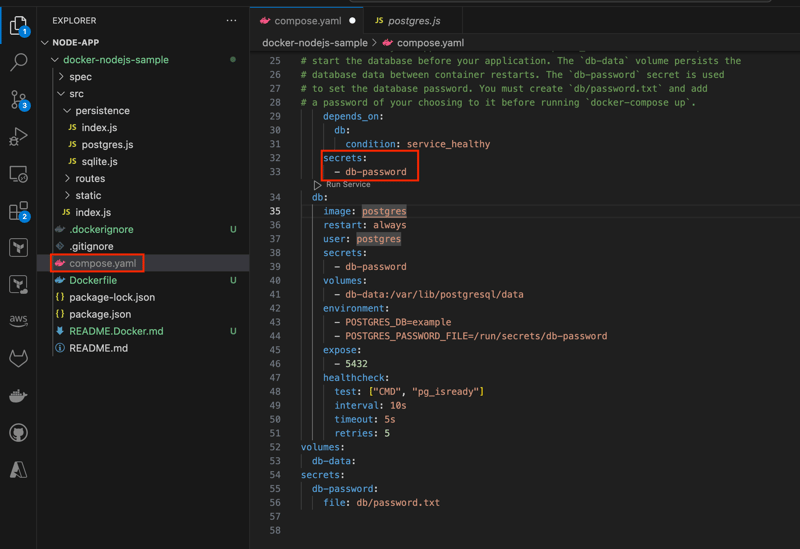
Open your compose.yaml file in an IDE or text editor. Uncomment the database-related instructions. Below is the updated compose.yaml file:
  server:
    build:
      context: .
    environment:
      NODE_ENV: production
    ports:
      - 3000:3000
    depends_on:
      db:
        condition: service_healthy
  db:
    image: postgres
    restart: always
    user: postgres
    secrets:
      - db-password
    volumes:
      - db-data:/var/lib/postgresql/data
    environment:
      - POSTGRES_DB=example
      - POSTGRES_PASSWORD_FILE=/run/secrets/db-password
    expose:
      - 5432
    healthcheck:
      test: ["CMD", "pg_isready"]
      interval: 10s
      timeout: 5s
      retries: 5
volumes:
  db-data:
secrets:
  db-password:
    file: db/password.txt
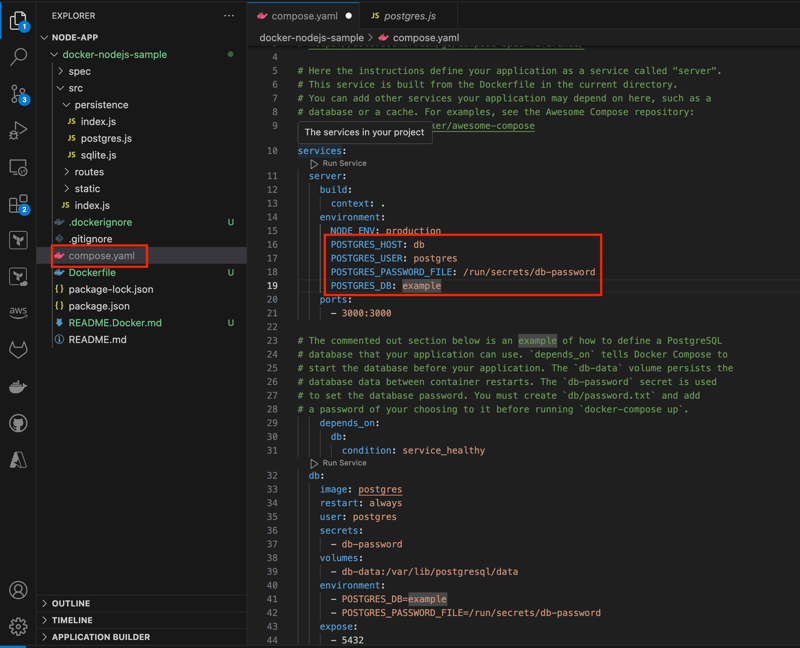
Open the src/persistence/postgres.js file in an IDE or text editor. You’ll notice that the application uses a PostgreSQL database and requires specific environment variables to establish a connection. Currently, these variables are not defined in the compose.yaml file.
Add the necessary environment variables to configure the database connection. Below is the updated compose.yaml file with the required changes:
POSTGRES_HOST: db

    POSTGRES_USER: postgres

    POSTGRES_PASSWORD_FILE: /run/secrets/db-password

    POSTGRES_DB: example
- Add a secrets section under the server service to ensure your application securely manages the database password. Below is the updated compose.yaml file with the necessary changes:
secrets:
      - db-password
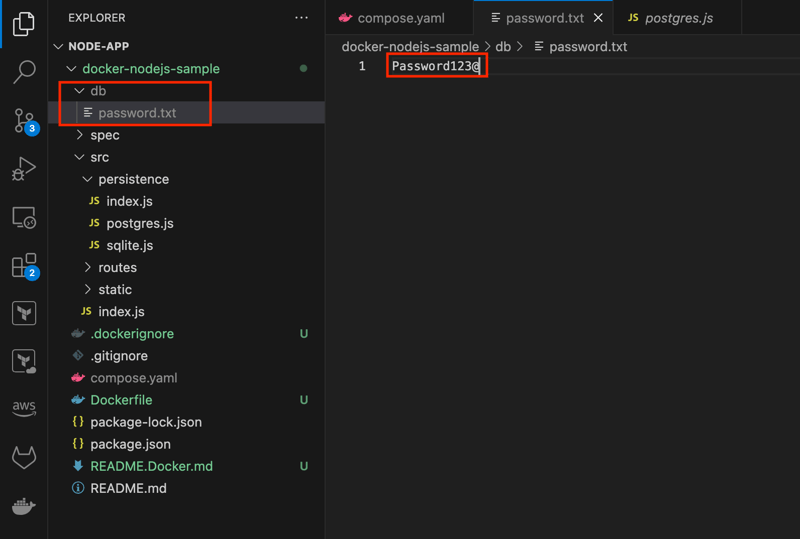
Inside the docker-nodejs-sample directory, create a new directory named db.
Within the db directory, create a file named password.txt. This file will store your database password securely.
Open the password.txt file in an IDE or text editor and enter a password of your choice. Ensure the password is on a single line with no additional lines, hidden characters, or newline characters.
Save all the files you’ve modified.
Run the following command to start your application:
docker compose up --build
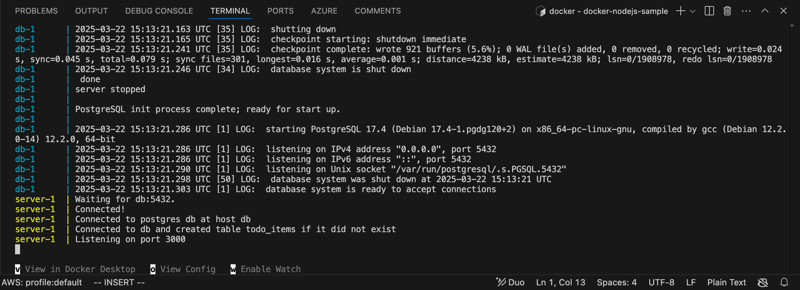
- Open a browser and verify that the application is running at http://localhost:3000

Add a few items to the todo list to verify data persistence.

Once you’ve added items, press Ctrl+C in the terminal to stop your application.
Run the command docker compose rm in the terminal to remove your containers.
docker compose rm

-Refresh http://localhost:3000 in your browser and verify that the todo items persisted, even after the containers were removed and ran again.
Update your Dockerfile for Development
Open the Dockerfile in an IDE or text editor. Notice that the current Dockerfile doesn’t install development dependencies or run nodemon. You’ll need to update it to support development workflows.
Instead of creating separate Dockerfiles for production and development, you can use a multi-stage Dockerfile to handle both scenarios.
Update your Dockerfile to the following multi-stage configuration:
FROM node:${NODE_VERSION}-alpine as base
WORKDIR /usr/src/app
EXPOSE 3000

FROM base as dev
RUN --mount=type=bind,source=package.json,target=package.json \
    --mount=type=bind,source=package-lock.json,target=package-lock.json \
    --mount=type=cache,target=/root/.npm \
    npm ci --include=dev
USER node
COPY . .
CMD npm run dev

FROM base as prod
RUN --mount=type=bind,source=package.json,target=package.json \
    --mount=type=bind,source=package-lock.json,target=package-lock.json \
    --mount=type=cache,target=/root/.npm \
    npm ci --omit=dev
USER node
COPY . .
CMD node src/index.js
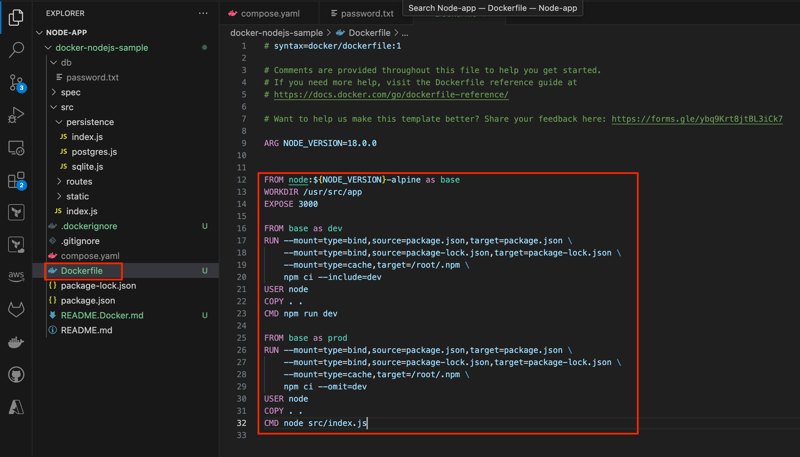
In the Dockerfile, you start by adding a label (base) to the FROM node:${NODE_VERSION}-alpine statement. This allows you to reference this build stage in subsequent stages. Next, you introduce a new build stage labeled dev, which installs development dependencies and starts the container using npm run dev. Finally, you add a prod stage that excludes development dependencies and runs the application using node src/index.js.
Update your Compose file for development
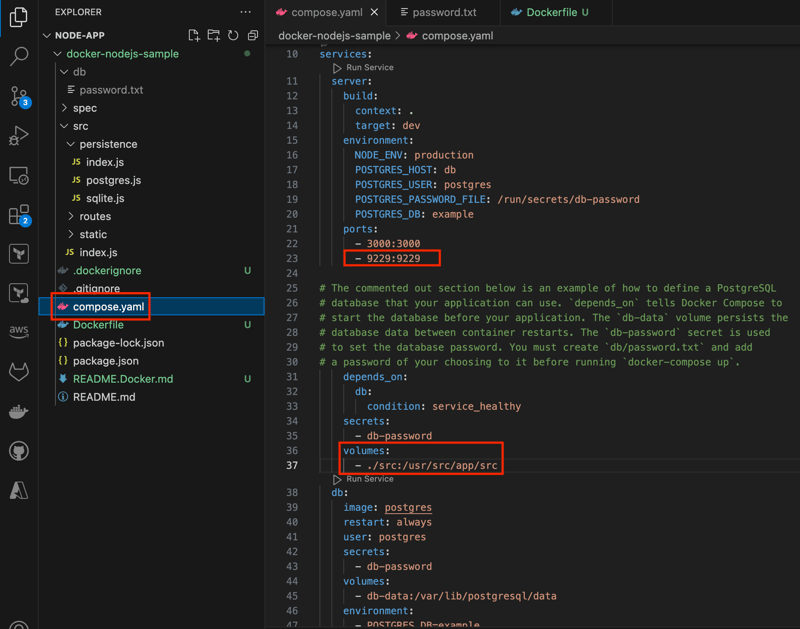
To run the dev stage with Compose, update your compose.yaml file. Open the file in an IDE or text editor and add the target: dev instruction to target the dev stage from your multi-stage Dockerfile.
Additionally, add a new volume to the server service for a bind mount. For this application, mount ./src from your local machine to /usr/src/app/src in the container.
Finally, publish port 9229 to enable debugging.
Run your development container and debug your application
Run the following command to run your application with the new changes to the Dockerfile and compose.yaml file.
docker compose up --build
- Open a browser and verify that the application is running at http://localhost:3000
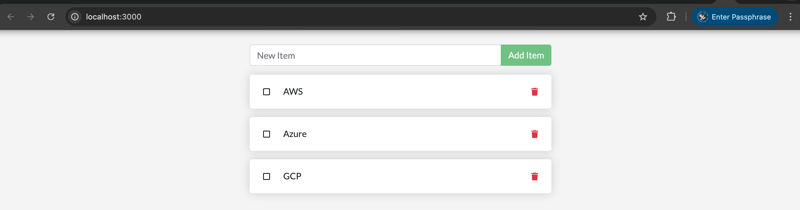
Any changes made to the application’s source files on your local machine will now be instantly reflected in the running container.
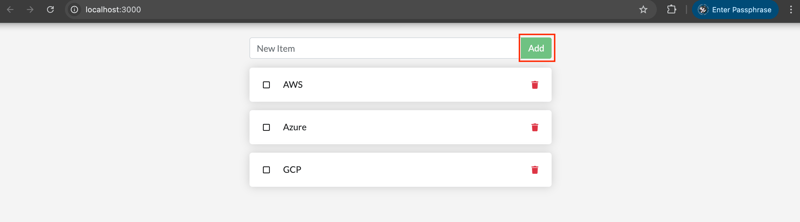
Open the docker-nodejs-sample/src/static/js/app.js file in an IDE or text editor and update the button text on line 109 from Add Item to Add.
Thanks for staying till the end