


![Nomad Goods Launches 15% Sitewide Sale for 48 Hours Only [Deal]](https://www.iclarified.com/images/news/96899/96899/96899-640.jpg)


![Apple Watch Series 10 Prototype with Mystery Sensor Surfaces [Images]](https://www.iclarified.com/images/news/96892/96892/96892-640.jpg)


![[The AI Show Episode 142]: ChatGPT’s New Image Generator, Studio Ghibli Craze and Backlash, Gemini 2.5, OpenAI Academy, 4o Updates, Vibe Marketing & xAI Acquires X](https://www.marketingaiinstitute.com/hubfs/ep%20142%20cover.png)


![Is this a suitable approach to architect a flutter app? [closed]](https://i.sstatic.net/4hMHGb1L.png)


![From broke musician to working dev. How college drop-out Ryan Furrer taught himself to code [Podcast #166]](https://cdn.hashnode.com/res/hashnode/image/upload/v1743189826063/2080cde4-6fc0-46fb-b98d-b3d59841e8c4.png?#)


The essential guide to installing Amazon Q Developer CLI on Windows
Following on from my previous post on how to install Amazon Q Developer CLI on Linux environments, I thought I would share a similar guide for those of you using Windows. Whilst there is no native Windows installation yet, you can install and run Amazon Q Developer CLI on your Windows machines using the Windows Subsystem for Linux, or wsl for short. In this post I will walk you through what you need to do. Installing wsl You might already have wsl installed on your machine, in which case you can skip this step. If you do not, then Microsoft have put together a blog post that walks you through this process. Once you have wsl up and running we can begin. Installing Amazon Q Developer CLI The steps below are covered in the official Amazon Q Developer CLI installation documentation From a Windows command shell enter the following command: wsl -d Ubuntu This is going to download and install a virtual Ubuntu instance in your wsl environment. If you have already done this in the past, it will just log you into your Ubuntu wsl environment. After installing Ubuntu, you will be asked to create a default user account (that will typically copy the name of the Windows user you are logged in as), and then enter a password. After you have completed that you are all ready to go. You will notice that the default directory when you are in your wsl account maps to your Windows home directory. For the installation we will change this and enter the home directory of the wsl environment, which we can do by simply typing: cd You will notice that the directory path has changed. The first thing we need to do is install some missing packages that the installation will need. We will use the native package manager of Ubuntu to do this. sudo apt install unzip You will be asked to enter the password for the Ubuntu user you created (not the Windows password, unless of course you used the same one!). This will install the unzip utility and should not take long. The next step is to download the zip file that contains the installer. From the wsl command line, we use the following command: curl --proto '=https' --tlsv1.2 -sSf https://desktop-release.codewhisperer.us-east-1.amazonaws.com/latest/q-x86_64-linux-musl.zip -o q.zip This should download the installer into your current directory, which should be the home directory. Make sure you check! that you are running in the wsl home directory and not the windows home directory. If you use the "pwd" command, it will tell you. It should say "/home/{youruser}" - if it does not, then make sure you enter the "cd" command again. Now we will unzip this by using the following command: unzip q.zip Which creates a subdirectory called "q" with all the files we need. We are nearly ready to run the installer, but first we need to enable it by running the following commands: cd q chmod +x install.sh The chmod command changes permissions of files in Linux, and we are enable the install.sh to be executable so we can run the installer. Which we do using the following command: ./install.sh You will be asked if you want it to modify your shell config. Answer "Yes" as what this is doing is adding a new path to point to the Amazon Q Developer CLI executables. Once that has completed, you will now need to activate your new shell. You can either exit and re-launch your wsl environment, or just type: bash Amazon Q Developer is now installed, the next stage us to create our Builder ID and then use it to login. Logging into Amazon Q Developer using a Builder ID From the command enter the following command: q login You will see two options for Login method which you can select using the up and down arrow keys. You want to select the first option, "Use for Free with Builder ID" When you select this option, it will ask you to open a URL in a web browser. Copy the URL, and then open it up in a web browser. You will now need to either create a new Builder ID, or login using an existing Builder ID you might already have. I have created a short video that shows you these steps. Once you have completed that, you will be logged into Amazon Q Developer and can access it from wsl by invoking: q chat Congratulations, you are now ready to go! In the video you will also see me running "q doctor" which is a way to check to see that everything is running ok with Amazon Q Developer. Hello World Now that we have Amazon Q Developer installed, we can start using it by starting a new wsl session, and then invoking it using the "q chat" or "q ai" commands. We start our wsl session: wsl -d Ubuntu If you notice that in my session, the default directory is the Windows home directory. If I invoke Amazon Q Developer cli here, then this is going to be its working directory. I can now invoke Amazon Q Developer CLI using the following command: q chat And I now have access to all the features and capabili
Following on from my previous post on how to install Amazon Q Developer CLI on Linux environments, I thought I would share a similar guide for those of you using Windows.
Whilst there is no native Windows installation yet, you can install and run Amazon Q Developer CLI on your Windows machines using the Windows Subsystem for Linux, or wsl for short. In this post I will walk you through what you need to do.
Installing wsl
You might already have wsl installed on your machine, in which case you can skip this step. If you do not, then Microsoft have put together a blog post that walks you through this process.
Once you have wsl up and running we can begin.
Installing Amazon Q Developer CLI
The steps below are covered in the official Amazon Q Developer CLI installation documentation
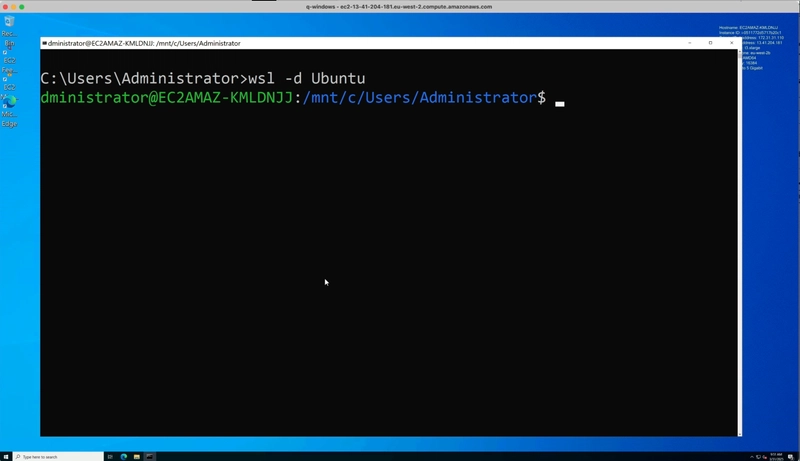
From a Windows command shell enter the following command:
wsl -d Ubuntu
This is going to download and install a virtual Ubuntu instance in your wsl environment. If you have already done this in the past, it will just log you into your Ubuntu wsl environment.
After installing Ubuntu, you will be asked to create a default user account (that will typically copy the name of the Windows user you are logged in as), and then enter a password. After you have completed that you are all ready to go.
You will notice that the default directory when you are in your wsl account maps to your Windows home directory.
For the installation we will change this and enter the home directory of the wsl environment, which we can do by simply typing:
cd
You will notice that the directory path has changed.
The first thing we need to do is install some missing packages that the installation will need. We will use the native package manager of Ubuntu to do this.
sudo apt install unzip
You will be asked to enter the password for the Ubuntu user you created (not the Windows password, unless of course you used the same one!). This will install the unzip utility and should not take long.
The next step is to download the zip file that contains the installer. From the wsl command line, we use the following command:
curl --proto '=https' --tlsv1.2 -sSf https://desktop-release.codewhisperer.us-east-1.amazonaws.com/latest/q-x86_64-linux-musl.zip -o q.zip
This should download the installer into your current directory, which should be the home directory.
Make sure you check! that you are running in the wsl home directory and not the windows home directory. If you use the "pwd" command, it will tell you. It should say "/home/{youruser}" - if it does not, then make sure you enter the "cd" command again.
Now we will unzip this by using the following command:
unzip q.zip
Which creates a subdirectory called "q" with all the files we need. We are nearly ready to run the installer, but first we need to enable it by running the following commands:
cd q
chmod +x install.sh
The chmod command changes permissions of files in Linux, and we are enable the install.sh to be executable so we can run the installer. Which we do using the following command:
./install.sh
You will be asked if you want it to modify your shell config. Answer "Yes" as what this is doing is adding a new path to point to the Amazon Q Developer CLI executables. Once that has completed, you will now need to activate your new shell. You can either exit and re-launch your wsl environment, or just type:
bash
Amazon Q Developer is now installed, the next stage us to create our Builder ID and then use it to login.
Logging into Amazon Q Developer using a Builder ID
From the command enter the following command:
q login
You will see two options for Login method which you can select using the up and down arrow keys. You want to select the first option, "Use for Free with Builder ID"
When you select this option, it will ask you to open a URL in a web browser. Copy the URL, and then open it up in a web browser. You will now need to either create a new Builder ID, or login using an existing Builder ID you might already have.
I have created a short video that shows you these steps.
Once you have completed that, you will be logged into Amazon Q Developer and can access it from wsl by invoking:
q chat
Congratulations, you are now ready to go!
In the video you will also see me running "q doctor" which is a way to check to see that everything is running ok with Amazon Q Developer.
Hello World
Now that we have Amazon Q Developer installed, we can start using it by starting a new wsl session, and then invoking it using the "q chat" or "q ai" commands.
We start our wsl session:
wsl -d Ubuntu
If you notice that in my session, the default directory is the Windows home directory. If I invoke Amazon Q Developer cli here, then this is going to be its working directory.
I can now invoke Amazon Q Developer CLI using the following command:
q chat
And I now have access to all the features and capabilities of Amazon Q Developer. In this example video, I show how I can use it to create a simple Windows batch file that I run from a native Windows command shell.
After I have completed my activities, I can exit from Amazon Q Developer by typing "/q", and then leave my wsl session any time entering "exit"
Conclusion
In this post I shared how you can install Amazon Q Developer CLI on your Windows machine using the Windows Subsystem for Linux, and showed you how you can get started.
Get started with Amazon Q Developer
You can try Amazon Q Developer CLI for free today, by signing up for a Builder ID and then downloading the app from here.
Until next time folks!
Made with