


![iOS 19 Leak: First Look at Alleged VisionOS Inspired Redesign [Video]](https://www.iclarified.com/images/news/96824/96824/96824-640.jpg)

![OpenAI Announces 4o Image Generation [Video]](https://www.iclarified.com/images/news/96821/96821/96821-640.jpg)


![Do you care about Find My Device privacy settings? [Poll]](https://i0.wp.com/9to5google.com/wp-content/uploads/sites/4/2024/06/Chipolo-One-Point-with-Find-My-Device-app.jpg?resize=1200%2C628&quality=82&strip=all&ssl=1)


![[The AI Show Episode 140]: New AGI Warnings, OpenAI Suggests Government Policy, Sam Altman Teases Creative Writing Model, Claude Web Search & Apple’s AI Woes](https://www.marketingaiinstitute.com/hubfs/ep%20140%20cover.png)
![[The AI Show Episode 139]: The Government Knows AGI Is Coming, Superintelligence Strategy, OpenAI’s $20,000 Per Month Agents & Top 100 Gen AI Apps](https://www.marketingaiinstitute.com/hubfs/ep%20139%20cover-2.png)


.png?width=1920&height=1920&fit=bounds&quality=80&format=jpg&auto=webp#)


Building a Multi-Switch VLAN Network: A Successful Implementation
Introduction In modern networking, Virtual LANs (VLANs) play a crucial role in segmenting networks for improved security, efficiency, and manageability. Recently, I built a multi-switch VLAN network in Cisco Packet Tracer, connecting different departments while ensuring seamless communication within VLANs. In this article, I'll walk you through the setup, configuration, and successful implementation of VLANs and trunking across multiple switches. Network Design Overview In my network topology, I designed a three-switch network that connects multiple departments: ** Finance Department (VLAN 2)** Devices with IP range 192.168.1.2 - 192.168.1.4 Call Center (VLAN 3) - Devices with IP range 192.168.1.5 - 192.168.1.8 ** HR Department (VLAN 2) -** Devices with IP range 192.168.1.9 - 192.168.1.10 Each department's devices are connected to their respective access ports on the switches. To ensure inter-switch communication, I configured trunk ports between switches. Step-by-Step Configuration 1️⃣ Creating VLANs on Each Switch Each switch was configured with the necessary VLANs. I used the following commands: Switch(config)# vlan 2 Switch(config-vlan)# name Finance Switch(config-vlan)# exit Switch(config)# vlan 3 Switch(config-vlan)# name Call_Center Switch(config-vlan)# exit Assigning VLANs to Access Ports After creating VLANs, I assigned specific ports to each VLAN: Switch(config)# interface FastEthernet 0/1 Switch(config-if)# switchport mode access Switch(config-if)# switchport access vlan 2 Switch(config-if)# exit Similarly, I assigned VLAN 3 to the respective ports. Configuring Trunk Ports Between Switches To allow VLAN traffic between switches, I set up trunk links on interconnecting ports: Switch(config)# interface FastEthernet 0/3 Switch(config-if)# switchport mode trunk Switch(config-if)# switchport trunk allowed vlan 2,3 Switch(config-if)# exit Testing and Results Once the VLANs and trunks were configured, I tested connectivity using the ping command. Devices within VLAN 2 could successfully communicate with each other. Devices within VLAN 3 were able to exchange data seamlessly. Trunk ports functioned correctly, ensuring VLAN communication across switches. Conclusion This project was a great hands-on experience in configuring VLANs and implementing inter-switch trunking. Proper VLAN segmentation enhances network performance by reducing broadcast domains and improving security. By successfully configuring VLANs and trunks, I was able to establish efficient communication between departments while keeping the network properly structured.
Introduction
In modern networking, Virtual LANs (VLANs) play a crucial role in segmenting networks for improved security, efficiency, and manageability. Recently, I built a multi-switch VLAN network in Cisco Packet Tracer, connecting different departments while ensuring seamless communication within VLANs. In this article, I'll walk you through the setup, configuration, and successful implementation of VLANs and trunking across multiple switches.
Network Design Overview
In my network topology, I designed a three-switch network that connects multiple departments:
** Finance Department (VLAN 2)**
Devices with IP range 192.168.1.2 - 192.168.1.4
Call Center (VLAN 3) -
Devices with IP range 192.168.1.5 - 192.168.1.8
** HR Department (VLAN 2) -**
Devices with IP range 192.168.1.9 - 192.168.1.10
Each department's devices are connected to their respective access ports on the switches. To ensure inter-switch communication, I configured trunk ports between switches.
Step-by-Step Configuration
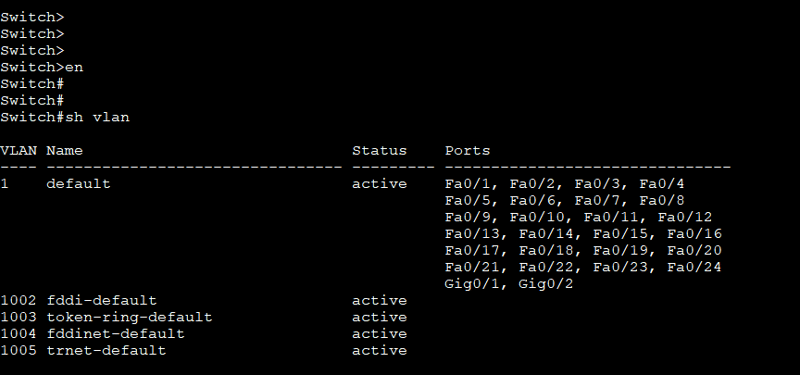
1️⃣ Creating VLANs on Each Switch
Each switch was configured with the necessary VLANs. I used the following commands:
Switch(config)# vlan 2
Switch(config-vlan)# name Finance
Switch(config-vlan)# exit
Switch(config)# vlan 3
Switch(config-vlan)# name Call_Center
Switch(config-vlan)# exit
Assigning VLANs to Access Ports
After creating VLANs, I assigned specific ports to each VLAN:
Switch(config)# interface FastEthernet 0/1
Switch(config-if)# switchport mode access
Switch(config-if)# switchport access vlan 2
Switch(config-if)# exit
Similarly, I assigned VLAN 3 to the respective ports.
Configuring Trunk Ports Between Switches
To allow VLAN traffic between switches, I set up trunk links on interconnecting ports:
Switch(config)# interface FastEthernet 0/3
Switch(config-if)# switchport mode trunk
Switch(config-if)# switchport trunk allowed vlan 2,3
Switch(config-if)# exit
Testing and Results
Once the VLANs and trunks were configured, I tested connectivity using the ping command.
Devices within VLAN 2 could successfully communicate with each other.
Devices within VLAN 3 were able to exchange data seamlessly.
Trunk ports functioned correctly, ensuring VLAN communication across switches.
Conclusion
This project was a great hands-on experience in configuring VLANs and implementing inter-switch trunking. Proper VLAN segmentation enhances network performance by reducing broadcast domains and improving security.
By successfully configuring VLANs and trunks, I was able to establish efficient communication between departments while keeping the network properly structured.