


![iOS 19 Leak: First Look at Alleged VisionOS Inspired Redesign [Video]](https://www.iclarified.com/images/news/96824/96824/96824-640.jpg)

![OpenAI Announces 4o Image Generation [Video]](https://www.iclarified.com/images/news/96821/96821/96821-640.jpg)


![Do you care about Find My Device privacy settings? [Poll]](https://i0.wp.com/9to5google.com/wp-content/uploads/sites/4/2024/06/Chipolo-One-Point-with-Find-My-Device-app.jpg?resize=1200%2C628&quality=82&strip=all&ssl=1)


![[The AI Show Episode 140]: New AGI Warnings, OpenAI Suggests Government Policy, Sam Altman Teases Creative Writing Model, Claude Web Search & Apple’s AI Woes](https://www.marketingaiinstitute.com/hubfs/ep%20140%20cover.png)
![[The AI Show Episode 139]: The Government Knows AGI Is Coming, Superintelligence Strategy, OpenAI’s $20,000 Per Month Agents & Top 100 Gen AI Apps](https://www.marketingaiinstitute.com/hubfs/ep%20139%20cover-2.png)


.png?width=1920&height=1920&fit=bounds&quality=80&format=jpg&auto=webp#)


Orchestrating AWS Lambda with GraphQL and Apollo Connectors
AWS Lambda is a computing service that enables you to run arbitrary code functions without needing to provision, manage, or scale servers. It’s often used in the logic tier of a multi-tier architecture to handle tasks such as processing files in S3 o...

AWS Lambda is a computing service that enables you to run arbitrary code functions without needing to provision, manage, or scale servers. It’s often used in the logic tier of a multi-tier architecture to handle tasks such as processing files in S3 or performing CRUD operations on a database.
AWS also offers an API Gateway, allowing developers to invoke AWS Lambda functions, which provides enhanced security and performance features like rate limiting. But even with the API Gateway, you have to coordinate these microservices, as your client applications likely each have unique data needs. Data might need to be transformed, filtered, or combined before it is returned to the client.
These orchestration tasks can reduce your productivity and take time and effort away from solving the business problem your application is trying to solve.
Apollo GraphQL is an API orchestration layer that helps teams ship new features faster and more independently by composing any number of underlying services and data sources into a single endpoint. This allows clients on-demand access to precisely what the experience needs, regardless of the source of that data.
This article will teach you how to orchestrate AWS Lambda functions using Apollo GraphQL. Specifically, here’s what we will cover:
GraphQL Primer
For those unfamiliar with GraphQL, here’s a primer that offers some background on the challenges GraphQL addresses and how data is typically managed through REST APIs in GraphQL before the emergence of Apollo Connectors. If you’re familiar with GraphQL, feel free to skip this section.
GraphQL is a query language for APIs. This query language and corresponding runtime enable clients to specify exactly the data they require, minimizing over-fetching and under-fetching.
In contrast to REST, which necessitates multiple endpoints for various data requirements, GraphQL streamlines queries into a single request, enhancing performance and reducing network latency.
GraphQL also uses a strongly typed schema. This improves API documentation and makes validation, early error detection, and immersive developer tooling easy.
To illustrate the difference between REST APIs and GraphQL, consider the following REST API call: /user/123
Response:
{
  "id": 123,
  "name": "Alice Johnson",
  "email": "alice@example.com",
  "phone": "555-1234",
  "address": {
    "street": "123 Main St",
    "city": "Springfield",
    "state": "IL",
    "zip": "62704"
  },
  "createdAt": "2022-01-01T12:00:00Z",
  "updatedAt": "2022-05-15T14:30:00Z",
  "isAdmin": false
}
If you were only interested in the name and email, using REST would be a lot of data returned from the network to the client for no reason. Using GraphQL, the GraphQL query to return the name and email would be the following:
query {
  user(id: 123) {
    name
    email
  }
}
The result set is just the data the client needs:
{
  "data": {
    "user": {
      "name": "Alice Johnson",
      "email": "alice@example.com"
    }
  }
}
This is a simple example showing the benefit of not over-fetching data, but GraphQL has many other advantages. One of them is the separation between client and server. Since both parties leverage and respect the GraphQL type schema, both teams can operate more independently with the back end defining where the data resides and the front end only asking for data it needs.
So how does GraphQL know how to populate data for every field in your schema? It does this through resolvers. Resolvers can fetch data from a back-end databases or third-party API such as REST APIs, gRPC, and so on. These functions comprise procedural code compiled and maintained for each field in the schema. Thus, one field can have a resolver that queries a REST API and another can query a gRPC endpoint.
To illustrate resolvers, consider the example above. Let’s add a field, status, that queries a REST API to determine if the user is full-time, part-time, or terminated.
First we have defined our schema as:
type User {
  id: ID!
  name: String!
  email: String!
  status: String!  # Need this from an external REST API
}

type Query {
  user(id: ID!): User
}
The user query in this case will accept a user id and return a type User. The resolver function to support the data fetching resembles the following:
const resolvers = {
  Query: {
    user: async (_, { id }) => {
      // Fetch user details from one REST API
      const userResponse = await fetch(`https://api.company.com/users/${id}`);
      const userData = await userResponse.json();

      // Fetch employee status from another REST API
      const statusResponse = await fetch(`https://api.company.com/employees/${id}/status`);
      const statusData = await statusResponse.json();

      return {
        id: userData.id,
        name: userData.name,
        email: userData.email,
        status: statusData.status, // e.g., "Full-Time", "Part-Time", "Terminated"
      };
    },
  },
};
Notice that not only are there two fetches needed to obtain the information the query requires, but we also need to write procedural code and deploy it.
A better approach would be to declaratively specify to GraphQL where the REST API is located and what data to return. Apollo Connectors is the solution to this challenge, simplifying the process and allowing you to declaratively integrate REST API data without requiring code compilation and maintenance.
Now that you have a general idea of GraphQL and the challenges it addresses, let’s delve into the example we will build out.
Tutorial Overview
In this tutorial, you will create two AWS Lambda functions that return product information, which are described as follows:
Products Request:
POST /2015-03-31/functions/products/invocations
Response:
{
  "statusCode": 200,
  "body": [
    {
      "id": "RANQi6AZkUXCbZ",
      "name": "OG Olive Putter - Blade",
      "description": "The traditional Block in a blade shape is made from a solid block of Olive wood. The head weight is approximately 360 grams with the addition of pure tungsten weights. Paired with a walnut center-line and white accents colors.",
      "image": "https://keynote-strapi-production.up.railway.app/uploads/thumbnail_IMG_9102_3119483fac.png"
    },
    {
      "id": "RANYrWRy876AA5",
      "name": "Butter Knife Olive Putter- Blade",
      "description": "The traditional Block in a extremely thin blade shape (~1\") is made from a solid block of Olive wood. The head weight is approximately 330 grams with the addition of pure tungsten weights.",
      "image": "https://keynote-strapi-production.up.railway.app/uploads/thumbnail_IMG_9104_97c221e79c.png"
    },...
Product-price request:
POST: /2015-03-31/functions/product-price/invocations
Response:
{
  "default_price": 49900,
  "is_active": true,
  "currency": "usd",
  "billing_schema": "per_unit",
  "recurring": {
    "interval": 0,
    "interval_count": 3
  }
}
To expose these two lambda microservices, you need to create API Gateway triggers. This involves either setting up a distinct API Gateway for each lambda or consolidating them under one or a few API Gateway instances with specified routes for each lambda.
Creating a trigger may feel tedious and repetitive in a microservices setup. But there is an alternative available. You could directly invoke those functions via REST using the InvokeFunction permission assigned to an IAM user. This article will show you this method and guide you through function creation, necessary AWS IAM permissions, and configuring the Apollo Connector to invoke the function.
Prerequisites
To follow along in this tutorial, you will need to have a basic understanding of AWS Lambda functions as well as AWS security. You’ll also need access to the following:
An AWS account with permissions to create IAM Users and Policies
An Apollo GraphQL account, you can sign up for a free plan here.
We will also use the following tools:
VS Code: Microsoft VS Code is a free source code editor from Microsoft
Apollo Rover CLI: Rover is the command-line interface for managing and maintaining graphs
Apollo Studio: A web-based portal used for managing all aspects of your graph
Apollo Connectors Mapping Playground: A website that takes a JSON document and helps developers create the selection mapping used with Apollo Connectors
Section 1: Create the AWS Resources
First, let’s configure our AWS environment, starting with security. In our scenario, we will create an IAM User, “ConnectorUser,” with access to an AWS Policy, “ConnectorLambdaPolicy,” with the minimum permissions needed to access the AWS Lambda functions.
Note that you could create user groups and assign permission policies to those groups in a production environment. But for this article, we are reducing the number of administrative steps to focus on the core integration with GraphQL.
Step 1: Create an AWS Policy
To create a policy, navigate to IAM within the AWS Management console, then select “Policies” under Access Management. Click “Create Policy”. This will open the policy editor page, as shown below:
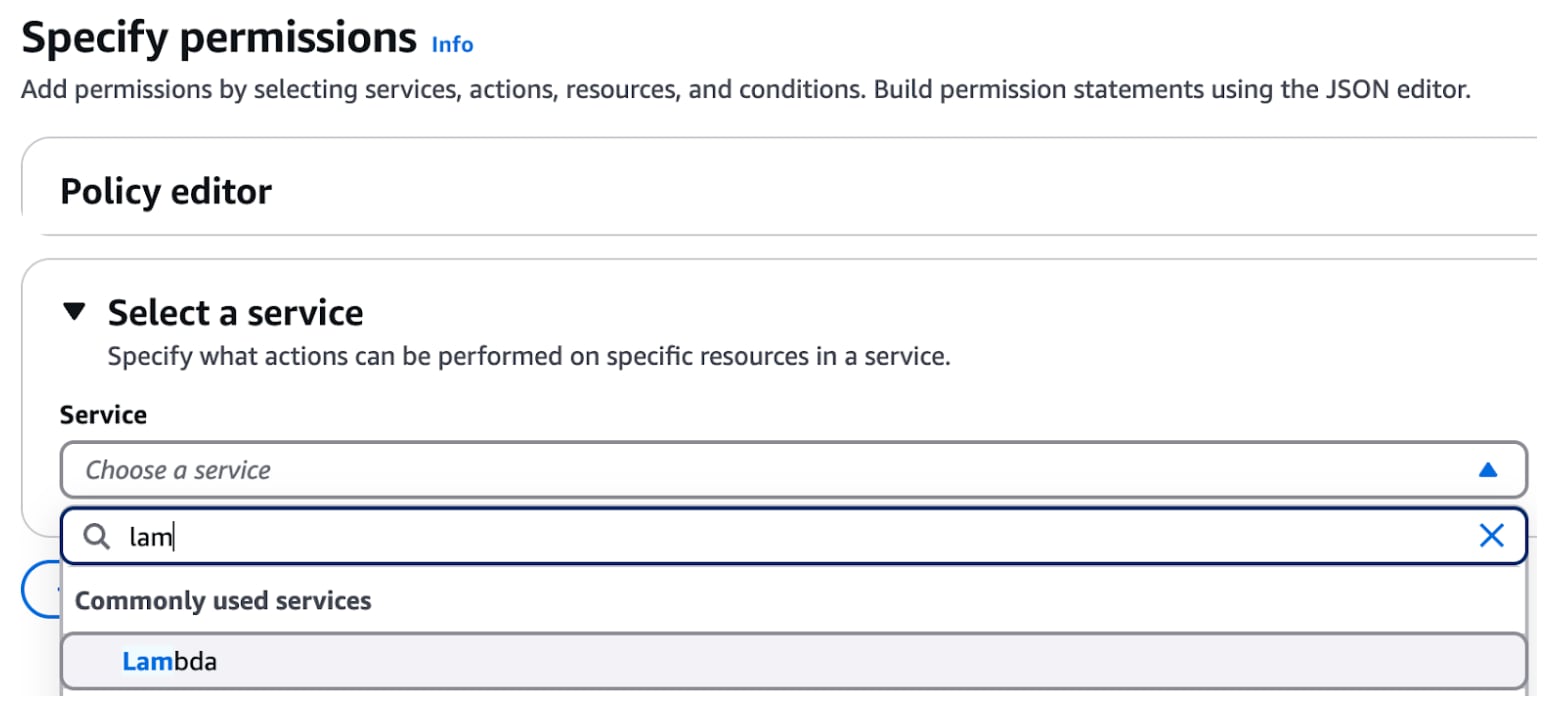
Choose the “Lambda” service and under the Access level select “InvokeFunction” from the Write drop down menu as shown below:
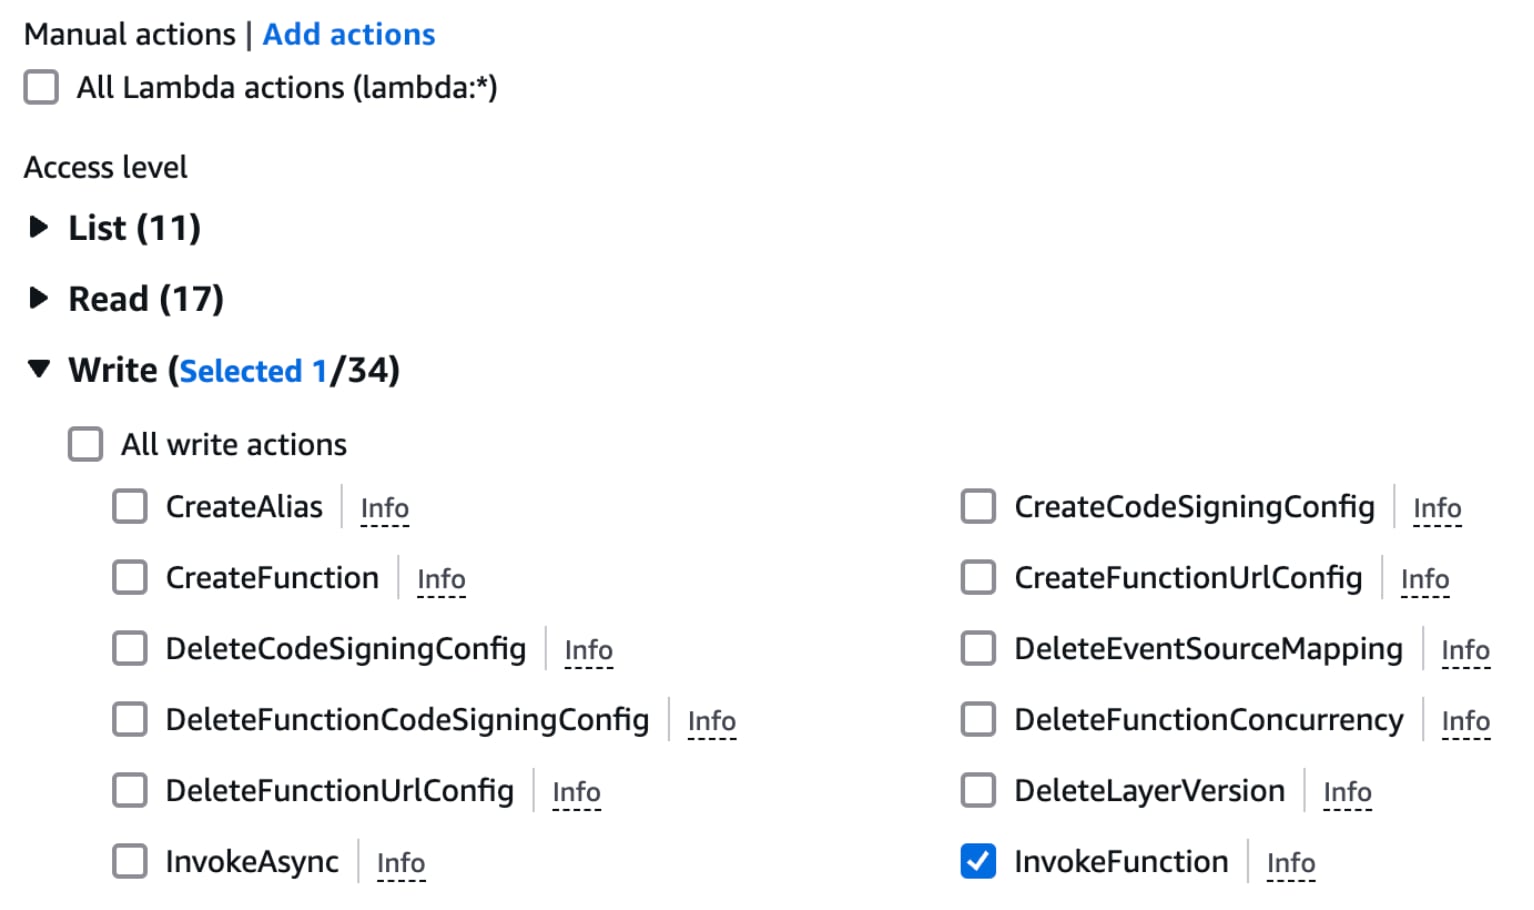
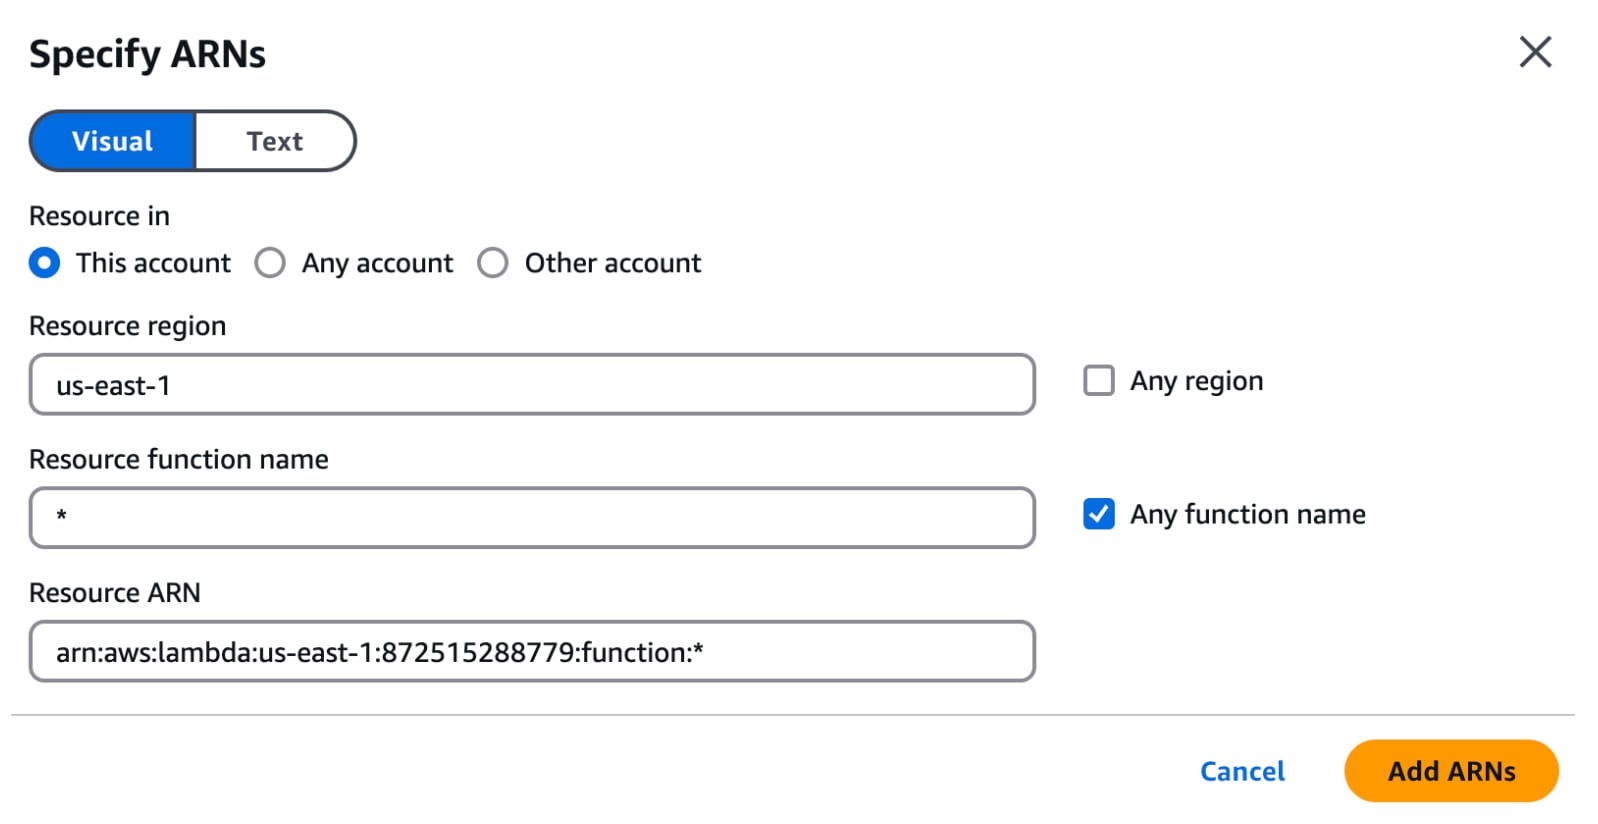
Under the Resources menu, you can choose either All ARNs or a specific option. It's a best practice to be as granular as possible when defining security configurations. In this example, let’s limit our selection to the “us-east-1” region by clicking on the “Specific” option and then “Add ARNs.” Enter “us-east-1” in the resource region and select “Any function name.”
With the policy created, we can assign an IAM user to that policy.
Step 2: Create the IAM User and Attach a Policy
Click on Users under “Access Management” then Create User. Provide a name for the user, “ConnectorUser”.

Next, select “Attach policies directly,” choose the policy we just created, “ConnectorLambdaPolicy,” and click “Create User.”
Step 3: Create AWS Lambda Functions
In your AWS console, create a new NodeJS AWS Lambda function, “products”.
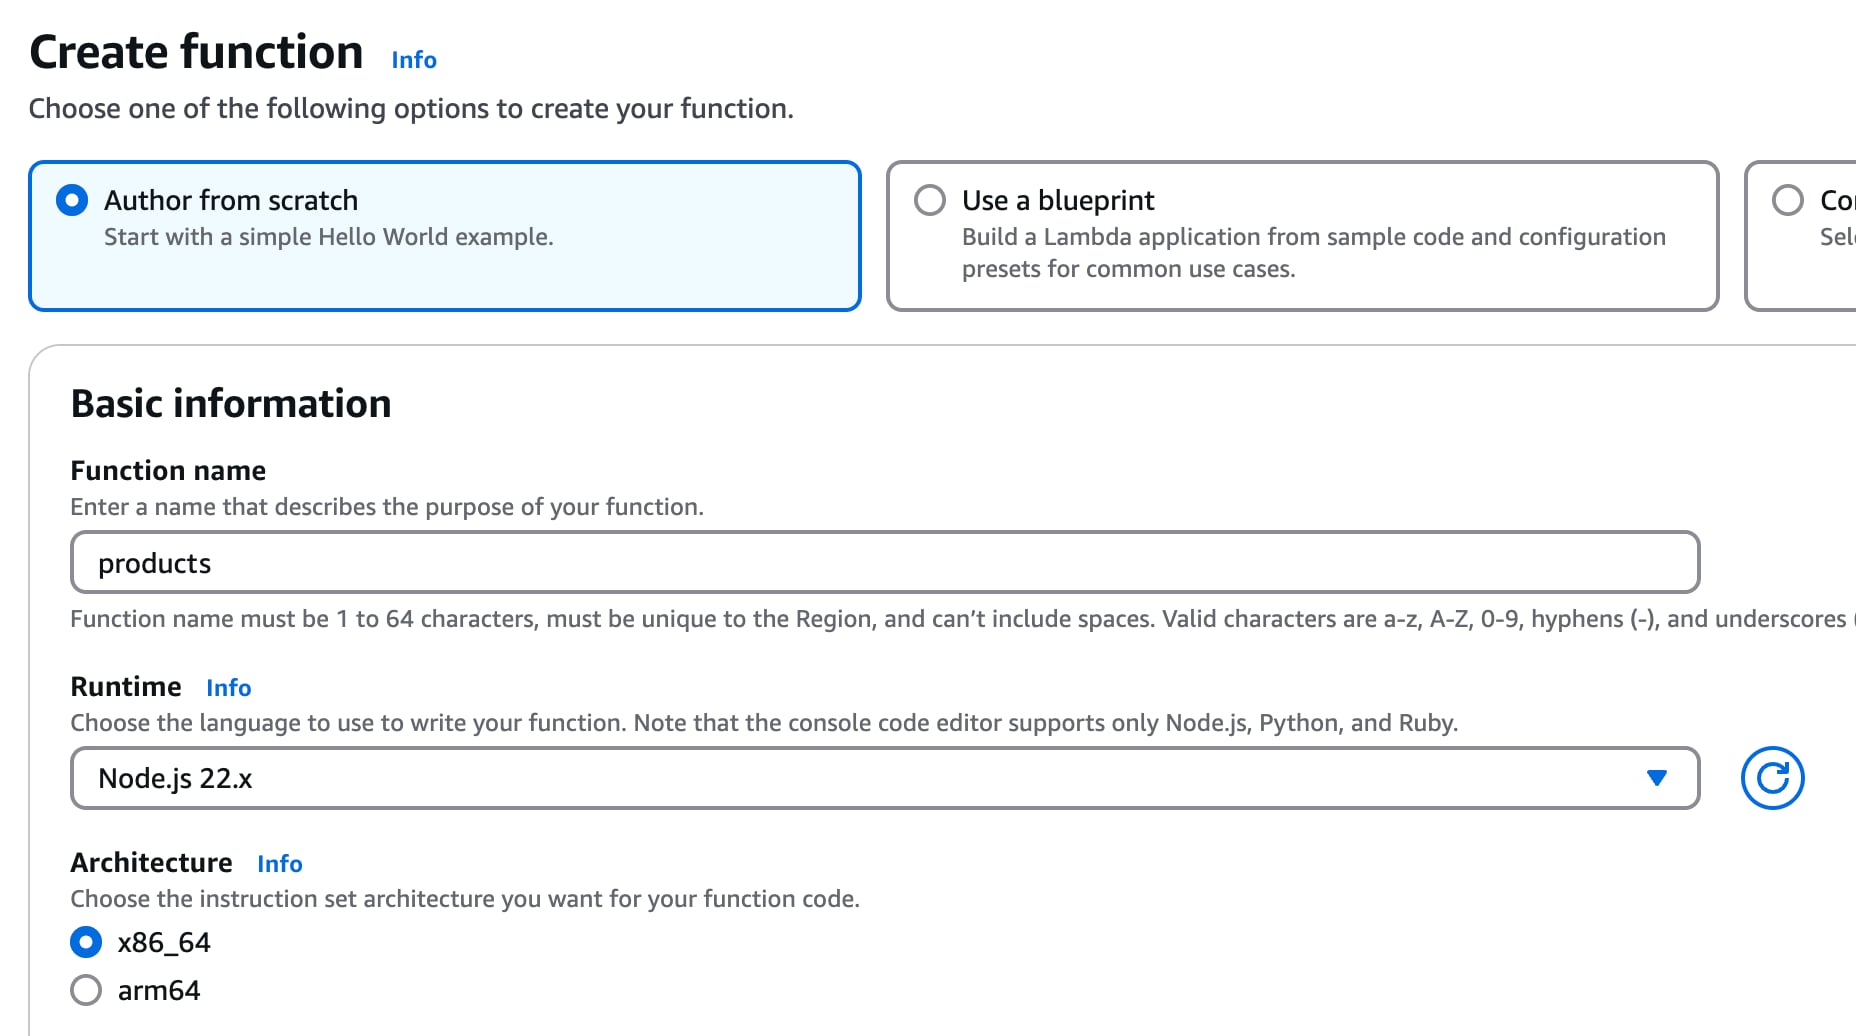
Select “Node.JS” for the runtime then click “Create function”. Once created, paste in the the function code from this Gist.
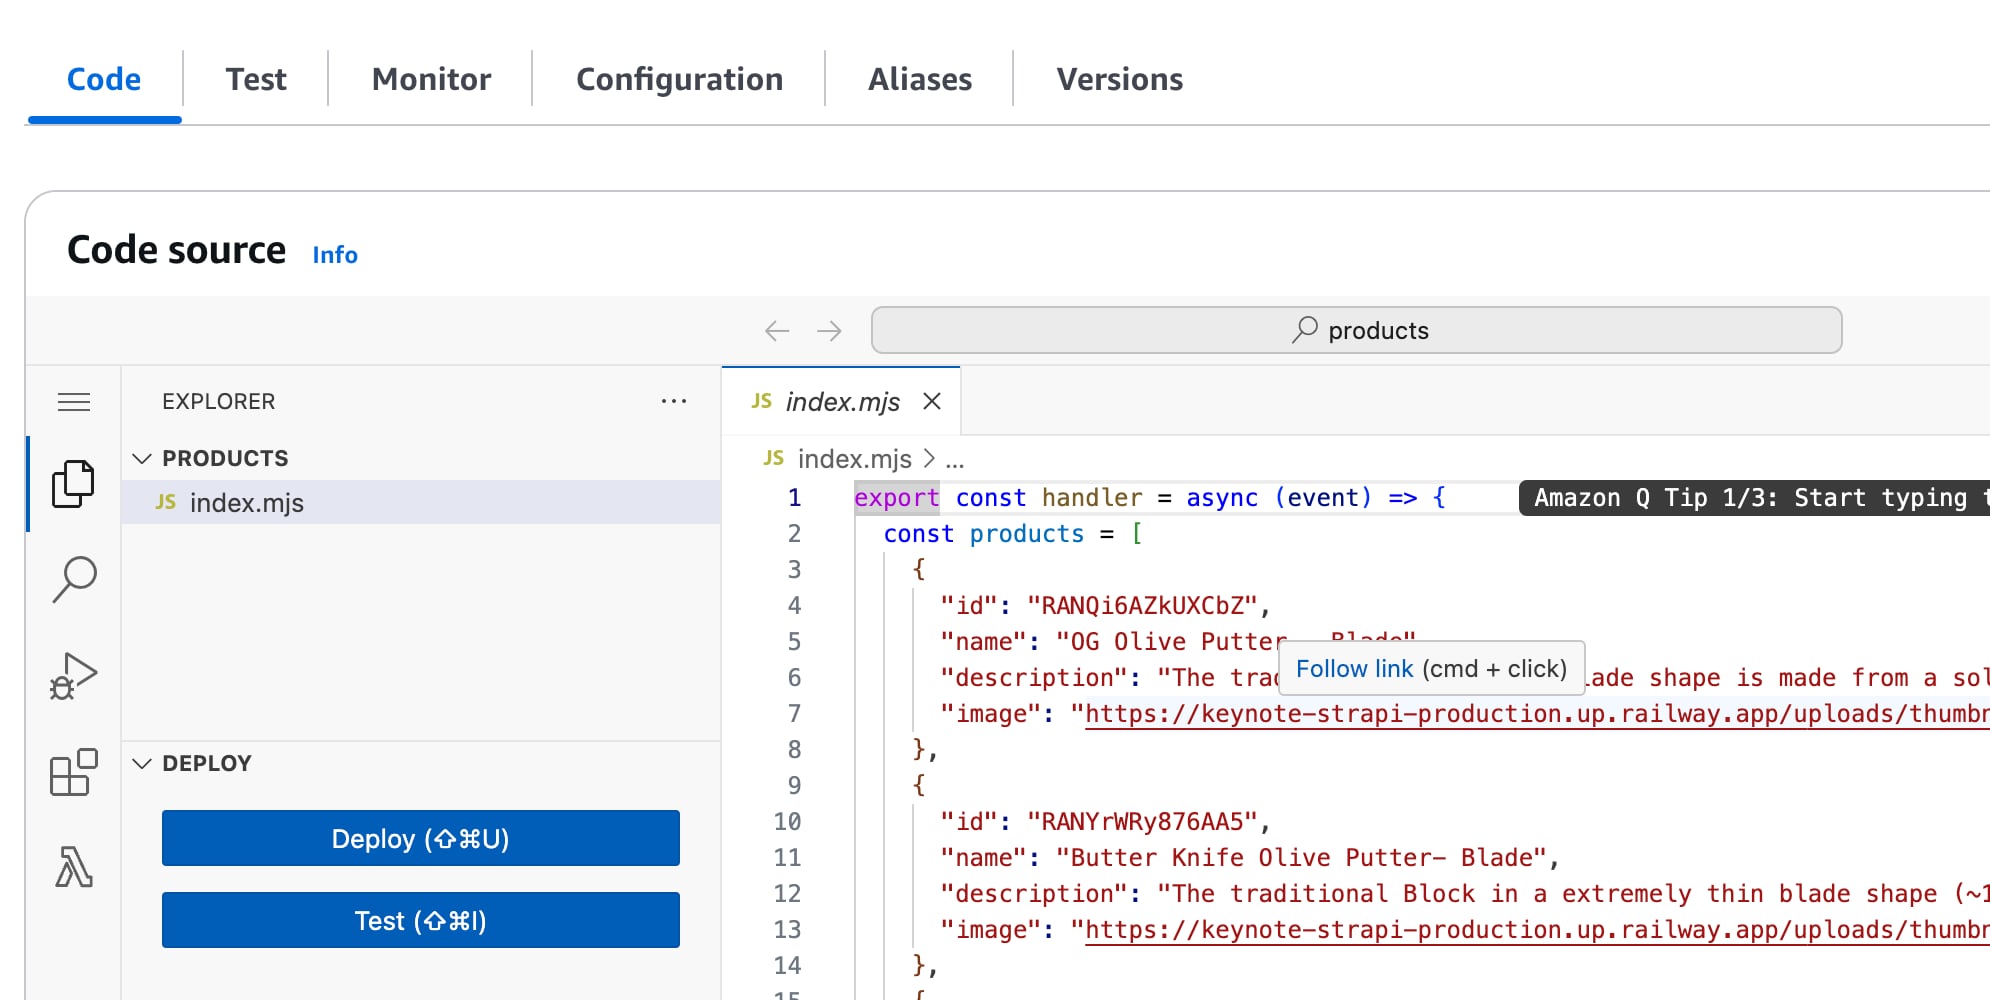
Repeat this process, creating another function for, “product-price” and use the function code from this Gist.
Section 2: Create an Apollo Connector
In this section, we will install the Apollo Rover CLI tool, create an Apollo Studio free tier account, and clone the Apollo Connectors repository. If you already have an Apollo environment available, you can skip steps 1 and 2.
Step 1: Install Rover
Rover is the command-line interface for managing and maintaining graphs. It also provides a modern hot-reloading experience for developing and running your connectors locally. If you don’t have Rover installed, install it by following the steps here.
Step 2: Create an Apollo Studio Free Tier Account
Apollo Studio is a cloud-based management platform designed to explore, deliver, and collaborate on graphs. If you do not have an Apollo Studio account, create one on a free plan by navigating here.
Step 3: Clone the Apollo Connectors Repository
To help you start your first Apollo Connector, a GitHub repository provides sample connectors and a template script. When run, this script will create all the necessary files and configurations you need to begin.
Go ahead and clone the repository from here.
Note: While not required, I recommended using VS Code, as this repo leverages VS Code-specific settings files.
Step 4: Create a .env File
Before you run the Create Connectors template script, create a .env locally with a user API key from your Apollo Studio. You can create and obtain this key here. Populating this .env file will add this API key to the connector template you create in the next step.

Step 5: Create Your New Connector from a Template
Execute npm start and provide a location to create the connector template. You can use default values for the remaining questions.
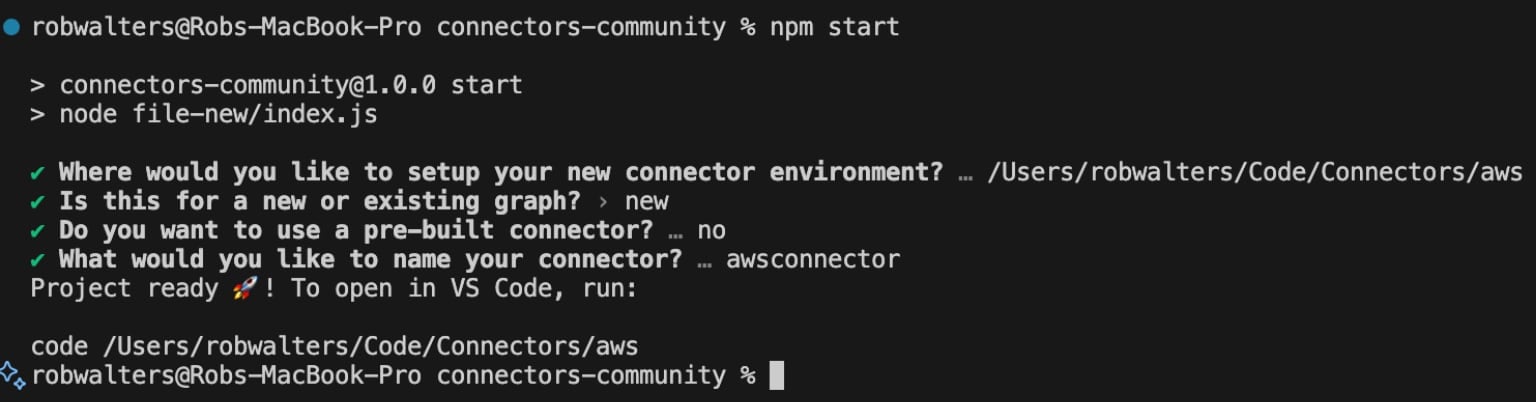
This script will create all the necessary files to run a local Apollo GraphQL instance in the specified directory. Load the newly created connector using VS Code or your preferred code editor. You will return to this editor soon, but first, we need to obtain some access keys from AWS.
Step 6: Create an AWS Access Key
Since we connect to AWS using SigV4, we must create an AWS access key and enter the KEY values in the settings.json file. Return to the AWS IAM Console and select the ConnectorUser you created in Step 1. Create a new access key by clicking on “Create access key”.
You will be presented with multiple options as far as where the use of this key will originate. Since we are first running locally, select “Third-party service” and then continue the wizard until you are presented with the key and secret key as shown below:
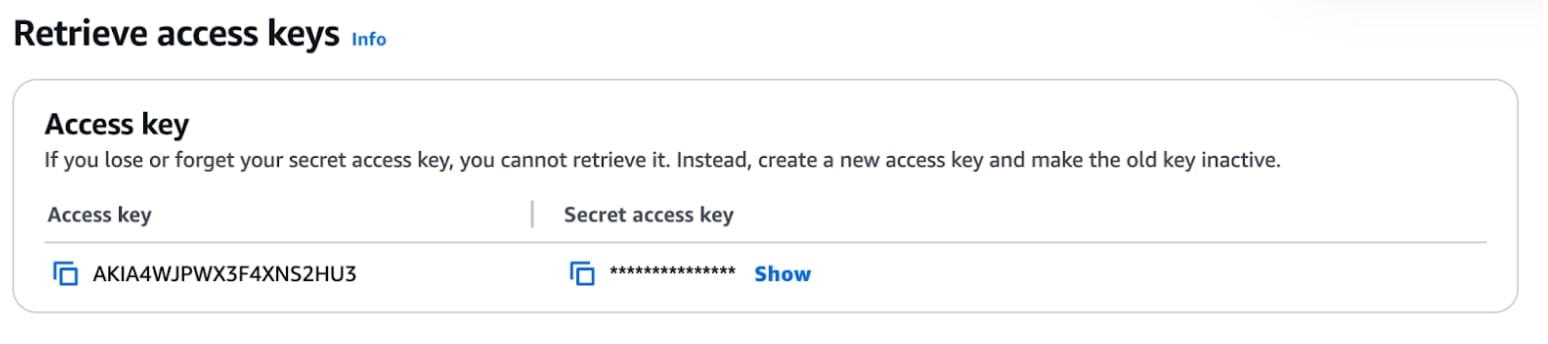
Add the access key and secret access key to the settings.json file as “AWS_ACCESS_KEY_ID” and “AWS_SECRET_ACCESS_KEY” respectively.
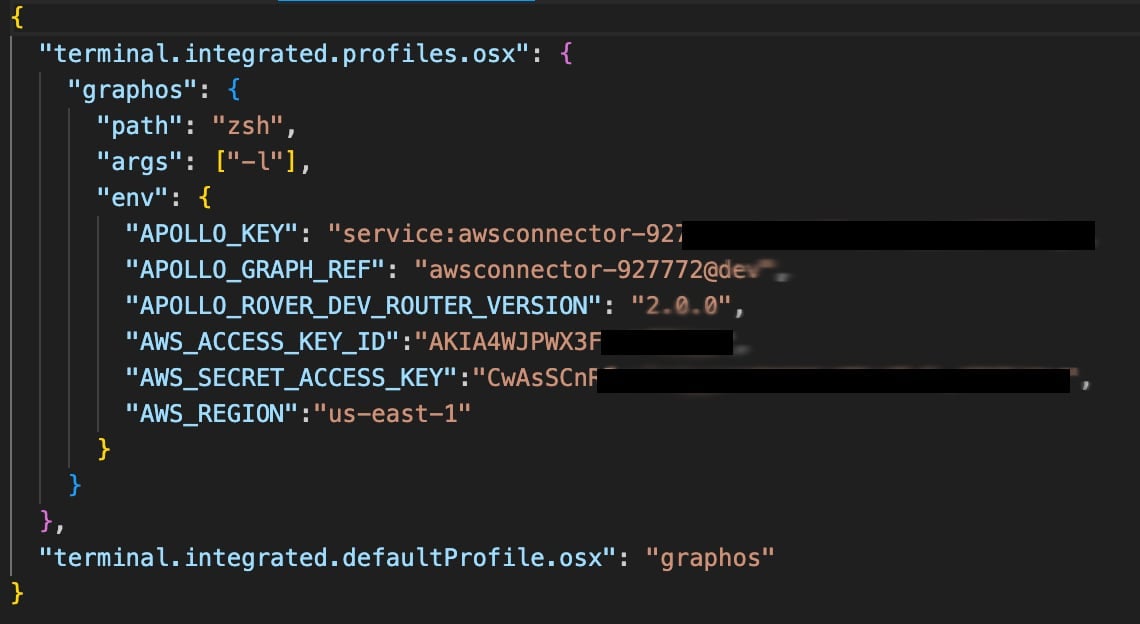
You'll need to reload the window since VS Code only loads these files under the .vscode directory once.

Note: In this step, we saved the key to the settings.json file. While this is acceptable for development, consider saving environment variables in .env files.
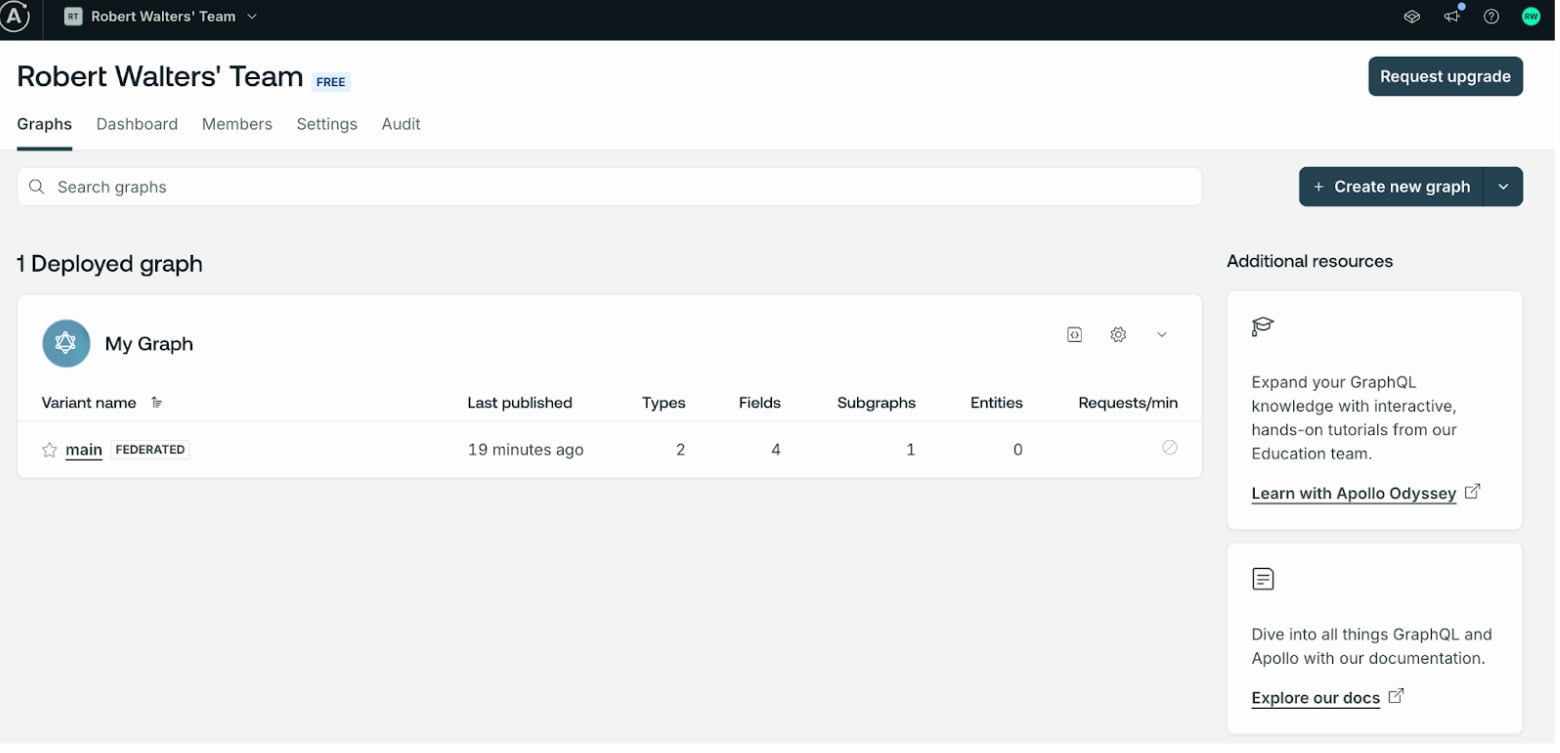
Step 7: Configure the Graph
The supergraph.yaml file is used to define all the subgraphs that are part of this federation. Modify the supergraph.yaml file as follows:
federation_version: =2.10.0
subgraphs:
  awsconnector:
    routing_url: http://lambda
    schema:
      file: connector.graphql
Step 8: Configure Apollo Router
Apollo Router supports AWS SigV4 authentication. To configure the connector to use this, modify the router.yaml file and add an authentication section as follows:
authentication:
  connector:
    sources:
      awsconnector.lambda:   # subgraph name . connector source name
        aws_sig_v4:
          default_chain:
            region: "us-east-1"
            service_name: "lambda"
There are other AWS security configuration options available, including using assume role. The full documentation for subgraph authentication is available here.
Step 9: Build the connector
Now that we have configured the environment variables and authentication information, we are ready to build the connector. Open the connector.graphql file and erase the contents. Next, copy the following extend schema:
extend schema
  @link(
    url: "https://specs.apollo.dev/federation/v2.10"
    import: ["@key"]
  )
  @link(
    url: "https://specs.apollo.dev/connect/v0.1"
    import: ["@source", "@connect"]
  )

  @source(
    name: "lambda"
    http: { baseURL: "https://lambda.us-east-1.amazonaws.com" }
  )
Extend schema is used to link the Apollo Connectors directives into the current schema. In this article we are defining the base URL of our lambda function. If your REST API has HTTP headers that apply to all references of this source, such as Content-Length restrictions, you can add them here in the @source declaration. Next, let’s define the Product schema:
type Product {
  id: ID!
  name: String
  description: String
  image: String
  price: Price
    @connect(
      source: "lambda"
      http: {
        POST: "/2015-03-31/functions/product-price/invocations"
        body: """
        product_id: $this.id
        """
      }
      selection: """
      amount: default_price
      isActive: is_active
      currency
      recurringInterval: recurring.interval -> match(
        [0,"ONE_TIME"],
        [1,"DAILY"],
        [2,"MONTHLY"],
        [3,"ANNUALLY"],
      )
      recurringCount: recurring.interval_count
      """
    )
}
Notice our query Products has an @connect directive that defines, at a minimum, the source name. Here, you can add the HTTP-specific configuration you need for this field, such as Authorizations headers. In this scenario, since we only defined a baseUrl in the extend schema section, we need to put the specific URL for the InvokeFunction, which is /2015-03-31/functions/product-price/invocations.
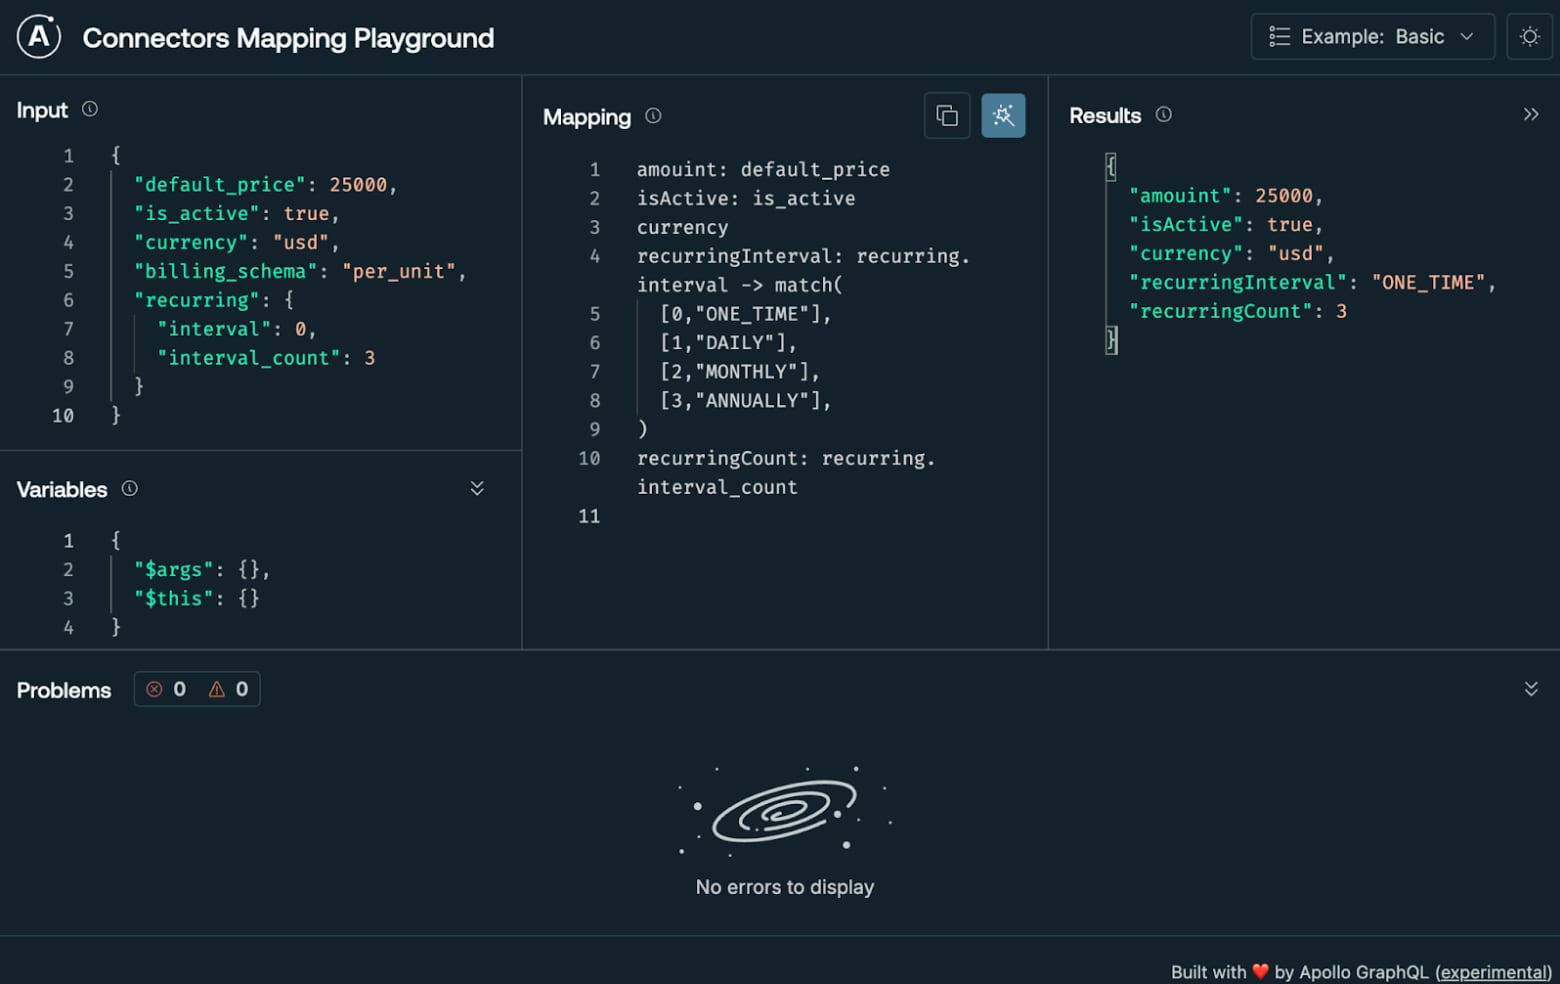
The selection field allows you to transform and map values returned from the REST API using the mapping definition defined in the selection field. While a complete discussion of selection mapping is beyond the scope of this article, check out the documentation for a detailed look at Mapping GraphQL Responses. Apollo provides a free online tool that makes building mappings intuitive and fast.
Next, let’s define the Price schema and products Query.
type Price {
  amount: Float
  isActive: Boolean
  currency: String
  recurringInterval: RecurringInterval
  recurringCount: Int
}
enum RecurringInterval {
  ONE_TIME
  DAILY
  MONTHLY
  ANNUALLY
}

type Query {
  products: [Product]
    # https://docs.aws.amazon.com/lambda/latest/api/API_Invoke.html
    @connect(
      source: "lambda"
      http: { POST: "/2015-03-31/functions/products/invocations" }
      selection: """
      $.body {
        id
        name
        description
        image
      }
      """
    )
}
Now we're ready to run our connector and issue queries to our graph! The complete configuration script is available at this Gist.
Step 10: Run the Connector
If you're using VS Code, the repository includes a tasks.json file that adds a “rover dev” task, which launches Rover locally.
{
    "version": "2.0.0",
    "tasks": [{
        "label": "rover dev",
        "command": "rover", // Could be any other shell command
        "args": ["dev", "--supergraph-config","supergraph.yaml", "--router-config","router.yaml"],
        "type": "shell",
        "problemMatcher": [],
    }]
}
If you are not using VS Code, you can start your graph by executing rover dev –supergraph-config supergraph.yaml –router-config router.yaml from a terminal window.
If everything is configured correctly, you’ll see the following:
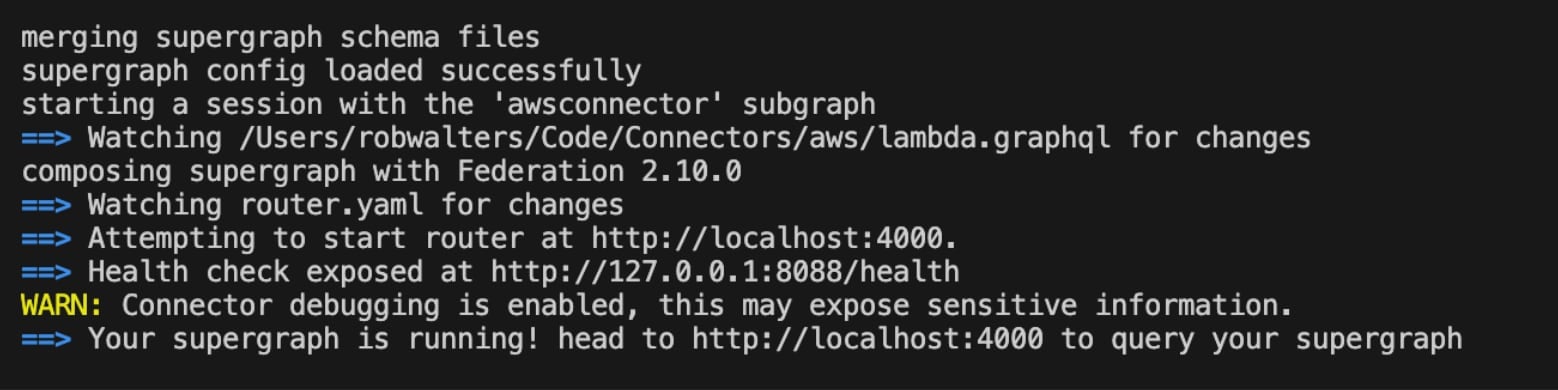
Section 3: How to Use Apollo Sandbox
The rover dev command you launched in the previous step configures a local Apollo Router instance for development mode. This mode makes it easy for developers to create, execute, and debug ad-hoc GraphQL queries using the Apollo Sandbox web portal. This portal is located at http://localhost:4000 by default.
Launch the portal and click on the products field. This will populate the Operation pane with all the available fields in the schema. In the operation pane, you can modify and build your GraphQL query. Clicking the Run button (which displays the query name, Products, in our example) will execute the query and show the results in the Response panel, as illustrated in the figure above.
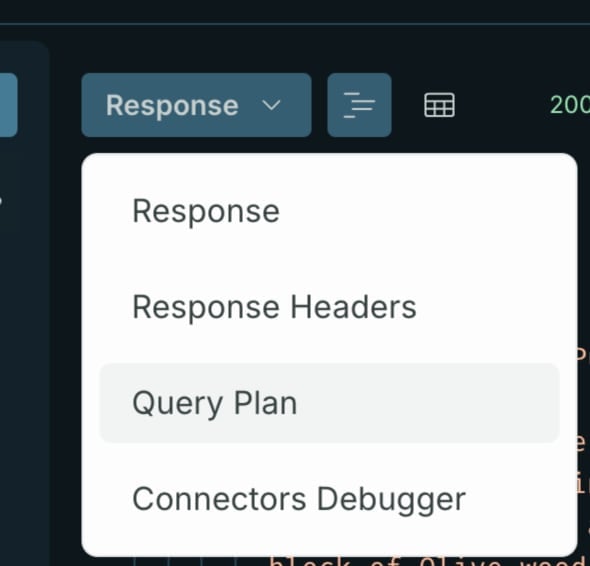
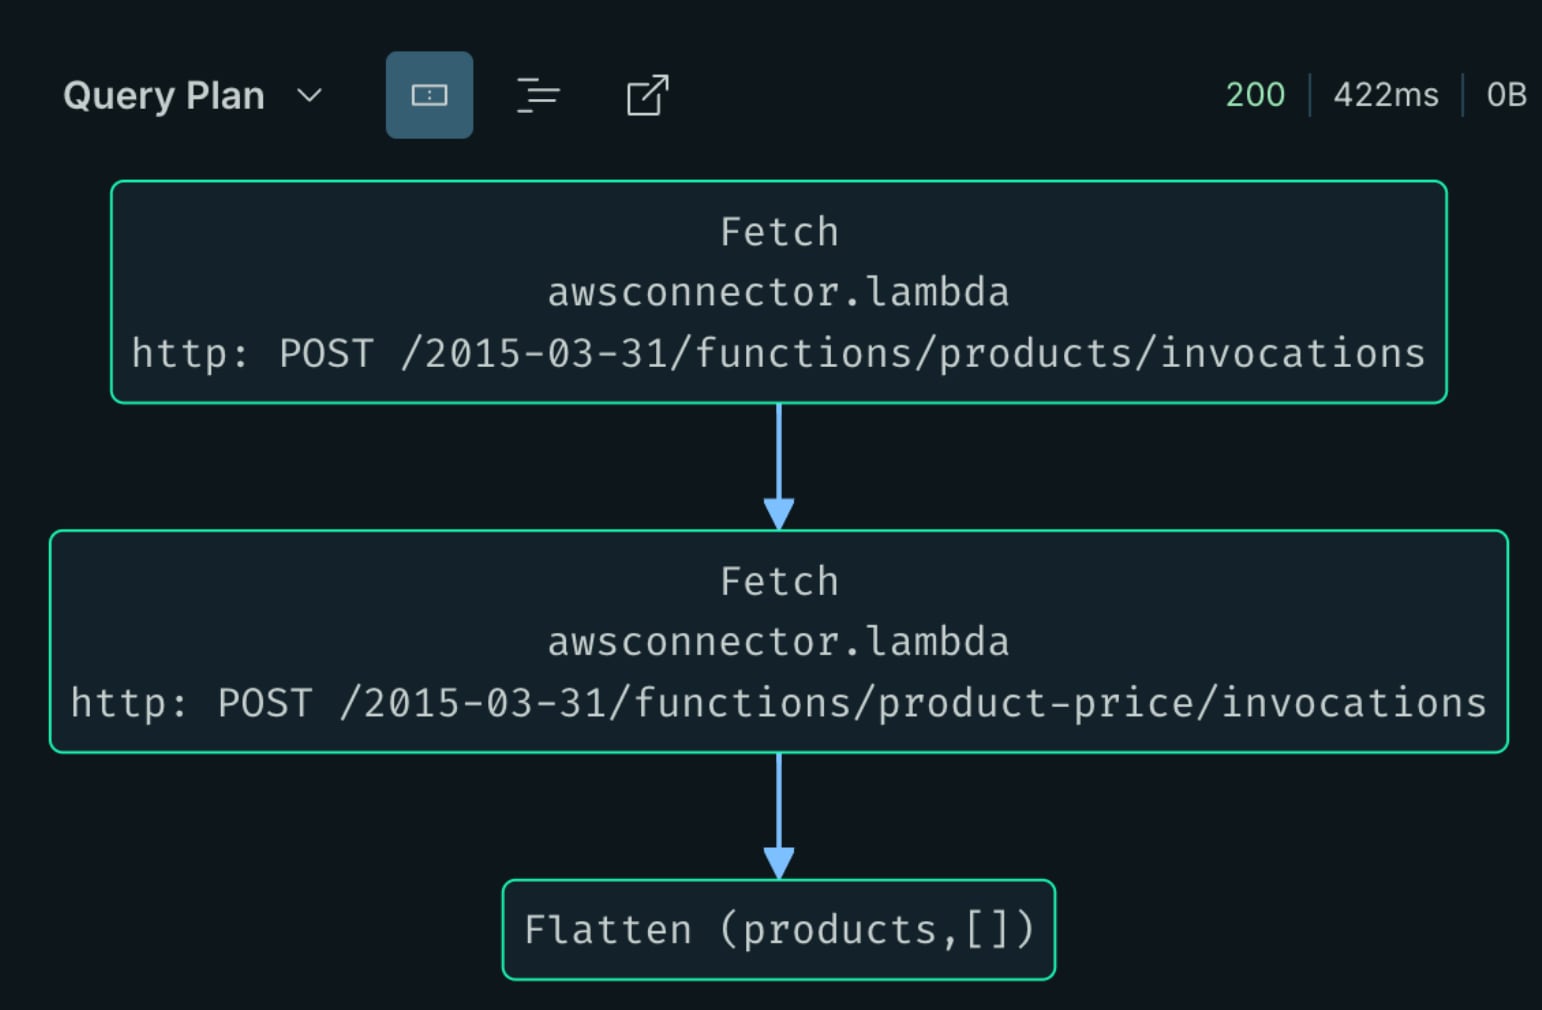
In this example, you can see that data has been returned from our AWS Lambda function. To confirm, you can view the query plan by selecting "Query Plan” from the Response drop-down menu.
The query plan illustrates the orchestration of our two AWS Lambda functions that fetch product and product price data.
A helpful debugging feature is the Connectors Debugger, available in the drop-down as shown in the previous figure.
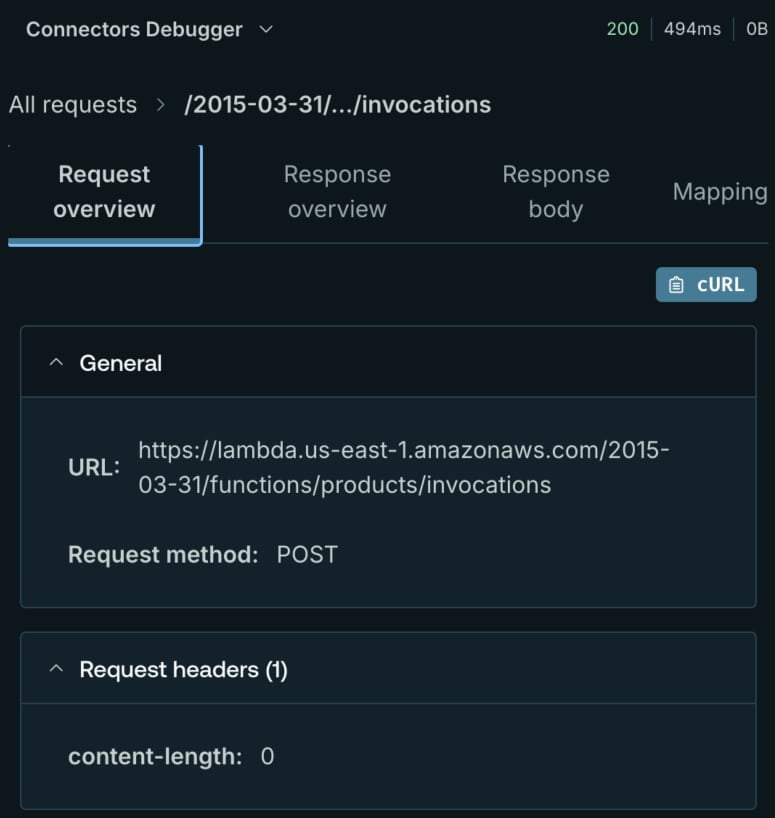
The Connection Debugger provides a comprehensive view of the HTTP request, including headers, body, response code, and the selection mapping used in the query. If you’re experiencing difficulties running queries, use this debugger – it will save you a lot of time.
Summary
In this article, you learned how to:
Set up AWS IAM User, Policies, and Lambda functions
Create an Apollo Connector to obtain data from an AWS Lambda function
Configure the Apollo Router
Execute and debug queries using Apollo Sandbox
Integrating AWS Lambda with Apollo Connectors offers a simplified, resolver-free method for incorporating cloud functions into your GraphQL API. By utilizing Apollo Connectors, you can declaratively link REST-based Lambda functions to your supergraph while ensuring secure authentication with AWS SigV4.
You can learn more about Apollo Connectors from the following resources:
Blog: Discover how Apollo Connectors integrate with Apollo Federation through insights from Apollo's Founder & CTO: REST API Orchestration with GraphQL.
Blog: Delve into the engineering journey behind Apollo Connectors and the process of their creation: Our Journey to Apollo Connectors
Webinar: Apollo Connectors GA Launch Webinar


