


![Apple to Avoid EU Fine Over Browser Choice Screen [Report]](https://www.iclarified.com/images/news/96813/96813/96813-640.jpg)


![iOS 18.4 Release Candidate comes bundled with over 50 new changes and features [Video]](https://i0.wp.com/9to5mac.com/wp-content/uploads/sites/6/2025/03/iOS-18.4-Release-Candidate-Visual-Intelligence-Action-Button-iPhone-16e.jpg?resize=1200%2C628&quality=82&strip=all&ssl=1)


-xl-xl.jpg)


_alon_harel_Alamy.jpg?#)


![[The AI Show Episode 140]: New AGI Warnings, OpenAI Suggests Government Policy, Sam Altman Teases Creative Writing Model, Claude Web Search & Apple’s AI Woes](https://www.marketingaiinstitute.com/hubfs/ep%20140%20cover.png)
![[The AI Show Episode 139]: The Government Knows AGI Is Coming, Superintelligence Strategy, OpenAI’s $20,000 Per Month Agents & Top 100 Gen AI Apps](https://www.marketingaiinstitute.com/hubfs/ep%20139%20cover-2.png)


.png?width=1920&height=1920&fit=bounds&quality=80&format=jpg&auto=webp#)
.png?width=1920&height=1920&fit=bounds&quality=80&format=jpg&auto=webp#)


Integration Tests for Plugin Developers: API Interaction
In our previous blog posts (1,2), we created integration tests that interact with UI components and assert different properties of UI components. However, sometimes we need to check the internal state of our plugin or invoke some method to simplify or speed up the test and avoid too many UI interactions. Let’s explore exactly how […]
In our previous blog posts (1,2), we created integration tests that interact with UI components and assert different properties of UI components. However, sometimes we need to check the internal state of our plugin or invoke some method to simplify or speed up the test and avoid too many UI interactions. Let’s explore exactly how we can do this.
Java Management Extension
Going back to our last post, the IDE and tests were running in different processes, which means we need some way to communicate between them. There are a lot of different ways we can do this. For example, the first version of the framework we used exclusively for performance testing worked via files (this mode is still supported in the Starter framework). With this approach, the Starter framework prepares a simple text file with a list of commands and passes this file to the IDE. The IDE reads the file, parses the commands and arguments, and executes them one by one.
Though functional, this approach has significant downsides. There is no real communication between the IDE and the test. All the test can do is prepare commands and wait until the IDE is finished running them. There is also no way for the IDE to communicate the results back to the test other than by storing some information in the files, which will only be read once the testing is complete.
It’s clear that we need a more flexible approach. We could opt for gRPC or create our own custom protocol, but fortunately there is already a standard Java technology – Java Management Extensions (or JMX for short) – that is a perfect choice for what we’re trying to achieve.
JMX supports different connectors to manage the state of the JVM. In our case, we’re using a standard Java Remote Method Invocation (RMI) protocol. This protocol allows us to access objects and invoke methods from tests in the JVM of the IDE.
The architecture of our RMI protocol is as follows:
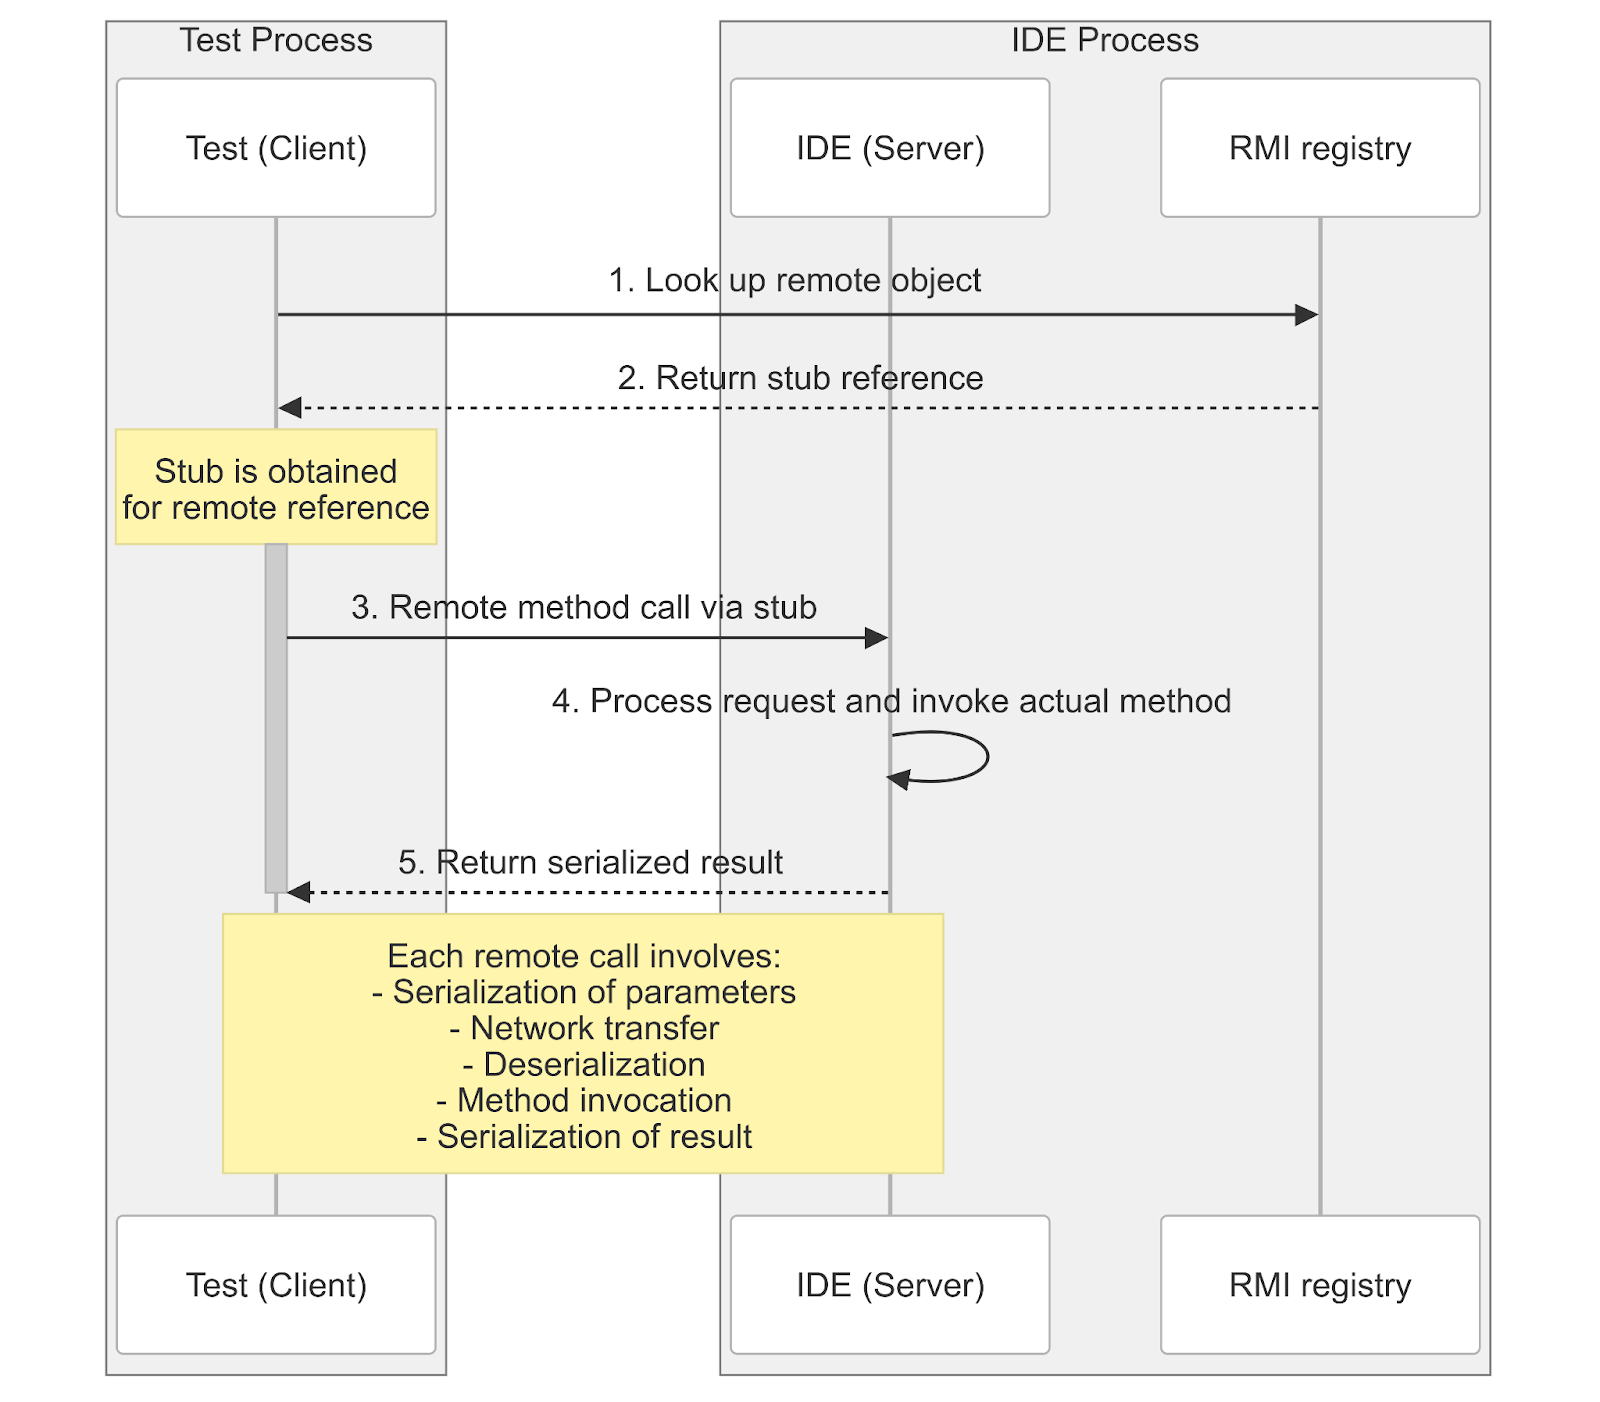
When a test wants to invoke a method on a remote object:
- The test looks up the remote object in the RMI registry (the IDE in our case).
- The IDE returns a reference to the stub, which implements the same interface as the remote object.
- When the client calls a method on the stub:
- The stub serializes the method call, including any parameters.
- It sends the serialized data over the network to the remote server.
- The RMI runtime inside the IDE unmarshals the request and invokes the corresponding method on the actual remote object.
- The method executes, and the result is serialized and sent back to the client via the stub.
- The stub unmarshals the response and returns the result to the caller.
Thus, the stub makes remote calls feel like local method calls, without the caller worrying about low-level networking, data conversion, or request handling.
Creating stubs
To demonstrate how this works in practice, let’s add the following code to our plugin:
package org.jetbrains.testPlugin

import com.intellij.openapi.components.Service
import com.jetbrains.rd.generator.nova.array

class PluginStorage {
   companion object {
       @JvmStatic
       fun getPluginStorage() = Storage("static method", listOf("static1", "static2"))
   }
}
@Service
class PluginService {
   fun someMethod(): Unit = Unit
   fun getAnswer(): Int = 42
}
@Service(Service.Level.PROJECT)
class PluginProjectService {
   fun getStrings(): Array = arrayOf("foo","bar")
}
data class Storage(val key: String, val attributes: List)
This file contains one class with the static method getPluginStorage, and two light services – one application-level PluginService and one project-level PluginProjectService.
We want to be able to call the methods of these classes from our test and verify their return values.
Before we can do this, we need to create stubs for all of the classes we wish to use. So, let’s create a Stubs.kt file in our test code:
import com.intellij.driver.client.Remote

@Remote("org.jetbrains.testPlugin.PluginStorage", plugin = "org.example.demo")
interface PluginStorage{
   fun getPluginStorage(): Storage
}


@Remote("org.jetbrains.testPlugin.PluginService", plugin = "org.example.demo")
interface PluginService {
   fun getAnswer(): Int
}


@Remote("org.jetbrains.testPlugin.PluginProjectService", plugin = "org.example.demo")
interface PluginProjectService {
   fun getStrings(): Array
}


@Remote("org.jetbrains.testPlugin.Storage", plugin = "org.example.demo")
interface Storage{
   fun getAttributes(): List
   fun getKey(): String
}
All we’ve done is take our classes and declare corresponding interfaces with methods that we will need in our tests. We don’t need to create stubs for methods that won’t be used.
We also need to provide a fully qualified name of the class that will correspond to our stubs using the @Remote annotation. Here, we use strings to avoid introducing dependency between production and test code.
The second parameter that we need to specify is pluginId, where our classes are located. This parameter is required since IntelliJ-based IDEs use separate classloaders for each plugin, and the code that will call methods on the IDE side (Invoker) needs to know where to search for them.
There is built-in support for such annotations inside IntelliJ IDEA:

When you rename or move the target class using refactorings, the annotation will be updated accordingly. You can also use gutters to navigate to the target class from a stub.
Calling IDE methods from tests
Now that we have our stubs set up, we’re ready to use them in our test:
import com.intellij.driver.client.*
import com.intellij.driver.sdk.*
import com.intellij.ide.starter.ci.*
import com.intellij.ide.starter.di.di
import com.intellij.ide.starter.driver.engine.runIdeWithDriver
import com.intellij.ide.starter.ide.IdeProductProvider
import com.intellij.ide.starter.models.TestCase
import com.intellij.ide.starter.plugins.PluginConfigurator
import com.intellij.ide.starter.project.GitHubProject
import com.intellij.ide.starter.runner.Starter
import org.junit.jupiter.api.*
import org.kodein.di.*
import kotlin.io.path.Path

class PluginTest {
   @Test
   fun testStubs() {
       Starter.newContext(
           testName = "testExample", TestCase(
               IdeProductProvider.IC, projectInfo = GitHubProject.fromGithub(
                   branchName = "master",
                   repoRelativeUrl = "JetBrains/ij-perf-report-aggregator"
               )
           ).withVersion("2024.2")
       ).apply {
           val pathToPlugin = System.getProperty("path.to.build.plugin")
           PluginConfigurator(this).installPluginFromPath(Path(pathToPlugin))
       }.runIdeWithDriver().useDriverAndCloseIde {
           val storage = utility().getPluginStorage()
           val key = storage.getKey()
           val attributes = storage.getAttributes()
           Assertions.assertEquals("static method", key)
           Assertions.assertEquals(listOf("static1", "static2"), attributes)


           val answer = service().getAnswer()
           Assertions.assertEquals(42, answer)


           waitForProjectOpen()
           val project = singleProject()
           val strings = service(project).getStrings()
           Assertions.assertArrayEquals(arrayOf("foo", "bar"), strings)
       }
   }
}
There are two methods that will help us to invoke our methods: service and utility. The first one will return us an instance of service, and the second will return an instance of any class.
You might notice that the project-level service requires the Project stub. To get it, we use the singleProject method, which is implemented in the same way as demonstrated above:
service
Note: Service and utility proxies can be acquired on each call, there is no need to cache them in clients.
JMX/RMI limitations
The main inconvenience of using JMX/RMI is that you have to create stub interfaces and methods for all objects which you wish to use in your tests. But on the other hand, you don’t have to modify your production code in any way.
As with any protocol, JMX/RMI has its limitations:
- Parameters and return values can only be:
- Primitives and their wrappers:
Integer,Short,Long,Double,Float, andByte. String.@Remotereferences.- An array of primitive values or
Stringor@Remotereferences. - Lists of primitive values or
Stringor@Remotereferences.
- Only
publicmethods can be called. - JMX/RMI can’t interact with suspend methods.
What’s next?
Stay tuned for upcoming blog posts in this series, where we’ll cover:
- GitHub Actions: setting up continuous integration.
- Common pitfalls: tips and tricks for stable UI tests.


