


![iOS 19 Leak: First Look at Alleged VisionOS Inspired Redesign [Video]](https://www.iclarified.com/images/news/96824/96824/96824-640.jpg)

![OpenAI Announces 4o Image Generation [Video]](https://www.iclarified.com/images/news/96821/96821/96821-640.jpg)


![Do you care about Find My Device privacy settings? [Poll]](https://i0.wp.com/9to5google.com/wp-content/uploads/sites/4/2024/06/Chipolo-One-Point-with-Find-My-Device-app.jpg?resize=1200%2C628&quality=82&strip=all&ssl=1)


![[The AI Show Episode 140]: New AGI Warnings, OpenAI Suggests Government Policy, Sam Altman Teases Creative Writing Model, Claude Web Search & Apple’s AI Woes](https://www.marketingaiinstitute.com/hubfs/ep%20140%20cover.png)
![[The AI Show Episode 139]: The Government Knows AGI Is Coming, Superintelligence Strategy, OpenAI’s $20,000 Per Month Agents & Top 100 Gen AI Apps](https://www.marketingaiinstitute.com/hubfs/ep%20139%20cover-2.png)


.png?width=1920&height=1920&fit=bounds&quality=80&format=jpg&auto=webp#)


How to Host a Static Website on AWS S3 and CloudFront
DevOps might seem like a complex field with various specializations and tools. In this article, I’ll simplify one key aspect by demonstrating how to host a static website using Amazon S3 (Simple Storage Service) and CloudFront, AWS’s Content Delivery...
DevOps might seem like a complex field with various specializations and tools. In this article, I’ll simplify one key aspect by demonstrating how to host a static website using Amazon S3 (Simple Storage Service) and CloudFront, AWS’s Content Delivery Network (CDN) that caches and distributes content efficiently for faster access.
To follow along, you should have:
An AWS account.
A basic understanding of AWS architecture (You can gain insights here.)
Knowledge of AWS IAM (Identity and Access Management for secure resource access control)
Familiarity with Git and GitHub
Let’s dive in and set up our static site hosting step by step.
Table of Contents:
What is AWS S3?
Amazon Simple Storage Service (Amazon S3) is an object storage service designed to store and retrieve any amount of data from anywhere.
Using Amazon S3 is straightforward. You start by selecting a region, creating a storage container called a "bucket," and then uploading your data. There is no limit to how much data you can store, and you can retrieve it at any time.
Amazon S3 automatically creates backups of your data by storing copies across multiple devices. It also allows you to preserve different versions of your files, helping you recover data if it’s accidentally lost. If you delete a file by mistake, you can restore it using Amazon S3’s versioning feature.
Amazon S3 offers configurable lifecycle policies to help manage data efficiently throughout its lifecycle. Security is a top priority for AWS, ensuring that data uploads and retrievals are protected using SSL encryption for secure transmission. AWS also provides multiple security features to safeguard your data, including fine-grained access controls and encryption at rest. Let’s explore these two features in a bit more detail.
Fine-Grained Access Controls in S3
Amazon S3 provides fine-grained access control, allowing you to define who can access your data and what actions they can perform. This is managed through:
AWS Identity and Access Management (IAM): Controls user permissions at the AWS account level. You can grant specific users or roles permissions to access S3.
S3 bucket policies: JSON-based policies applied at the bucket level to control access for all objects in a bucket.
Access Control Lists (ACLs): Defines permissions for individual objects within a bucket (less commonly used since bucket policies are more powerful).
Block public access settings: Prevents accidental public exposure of S3 data by restricting open access.
Encryption at Rest in S3
Encryption at rest ensures that stored data remains secure, even if unauthorized access occurs. S3 supports multiple encryption options:
Server-Side Encryption (SSE):
SSE-S3: AWS manages encryption keys automatically.
SSE-KMS: Uses AWS Key Management Service (KMS) for additional control over encryption keys.
SSE-C: Customers provide their own encryption keys.
Client-Side Encryption:
- Data is encrypted before being uploaded to S3 using customer-managed encryption keys.
We could spend endless time researching and exploring the theory behind Amazon S3, but practical application solidifies learning. Now, let’s move on to uploading a static website to Amazon S3.
As mentioned earlier, you should have a basic understanding of how AWS works, including signing up, signing in, and creating IAM users. This is crucial because we will use an IAM user to perform operations securely. Understanding Identity and Access Management is essential in AWS, as it ensures proper access control and security while managing resources.
How to Upload a Static Website to Amazon S3
To upload a static website, you first need a static site. If you do not have one, you can use a free template from Free CSS.
I’ve also provided a ready-to-use template that you can clone from this GitHub repository: Mediplus Free Template.
Now that your static project is ready, let’s go to AWS and upload it to an Amazon S3 bucket.
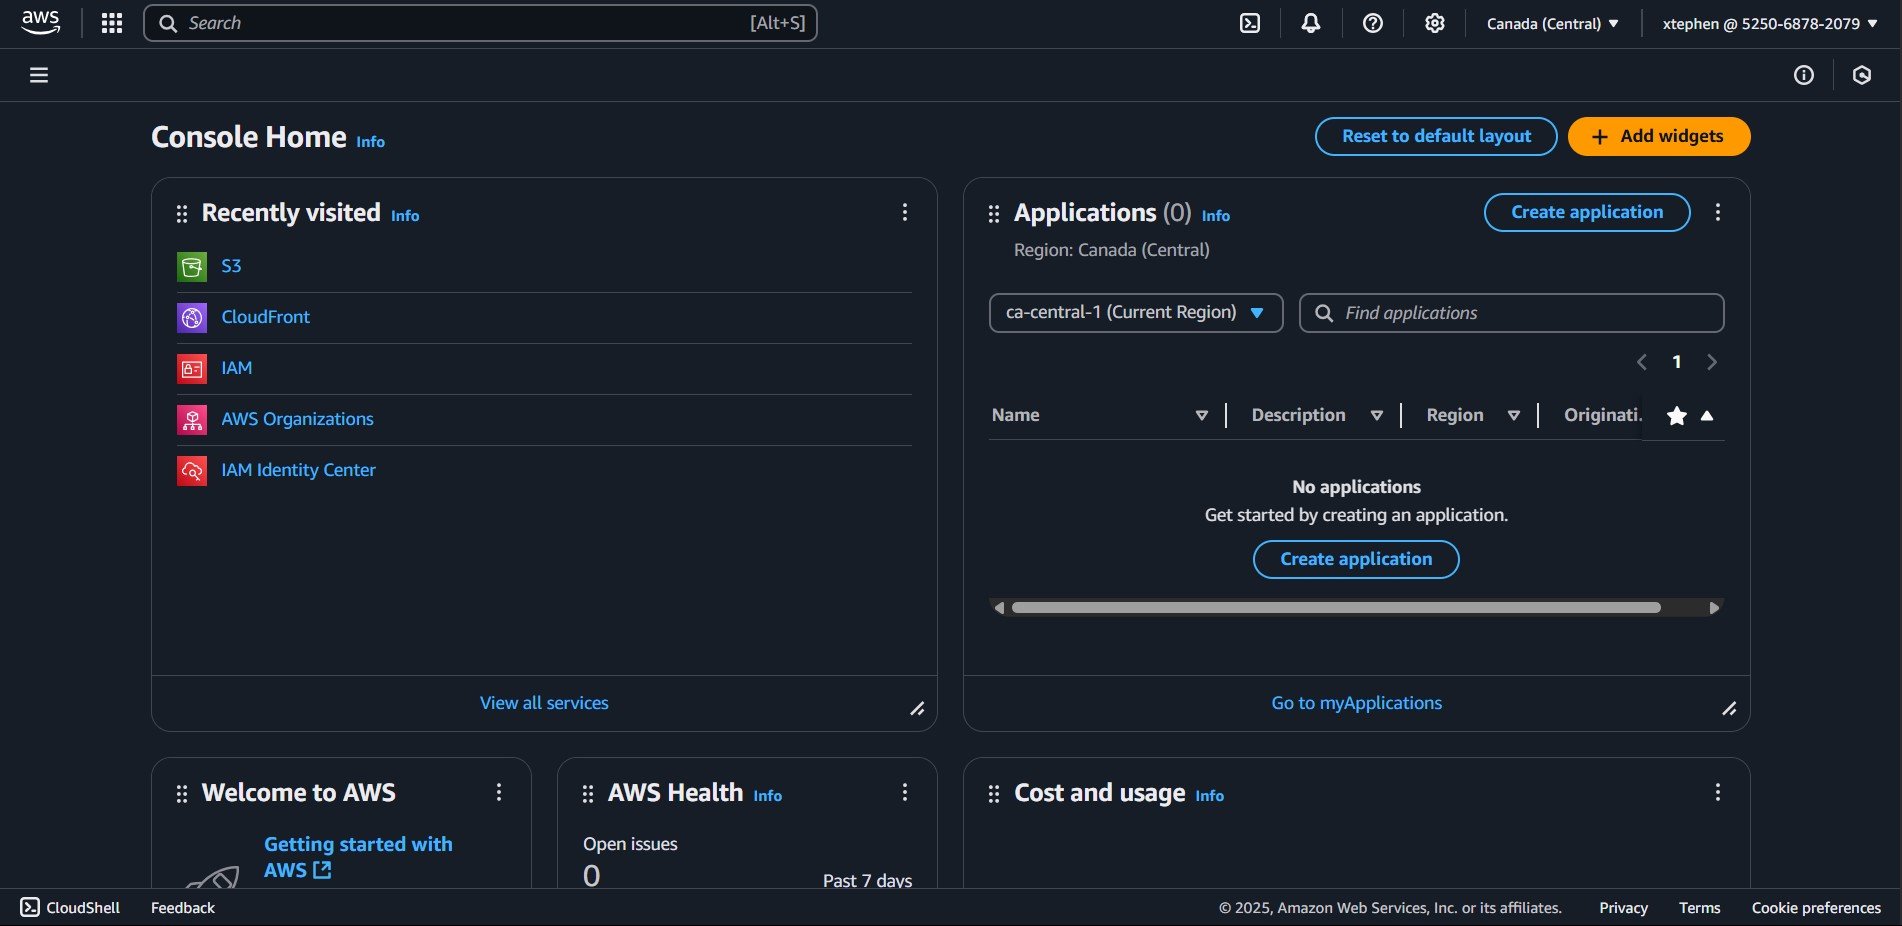
Login to your AWS account using your IAM user credentials. Once logged in, you will be redirected to the AWS Management Console.
Your AWS Dashboard should look similar to this:
Navigate to the S3 service by clicking on the S3 link in the AWS dashboard. If you don’t see it, which is unlikely, use the search bar at the top of the dashboard. Simply type "S3", and it will appear in the results. Click on it to proceed.
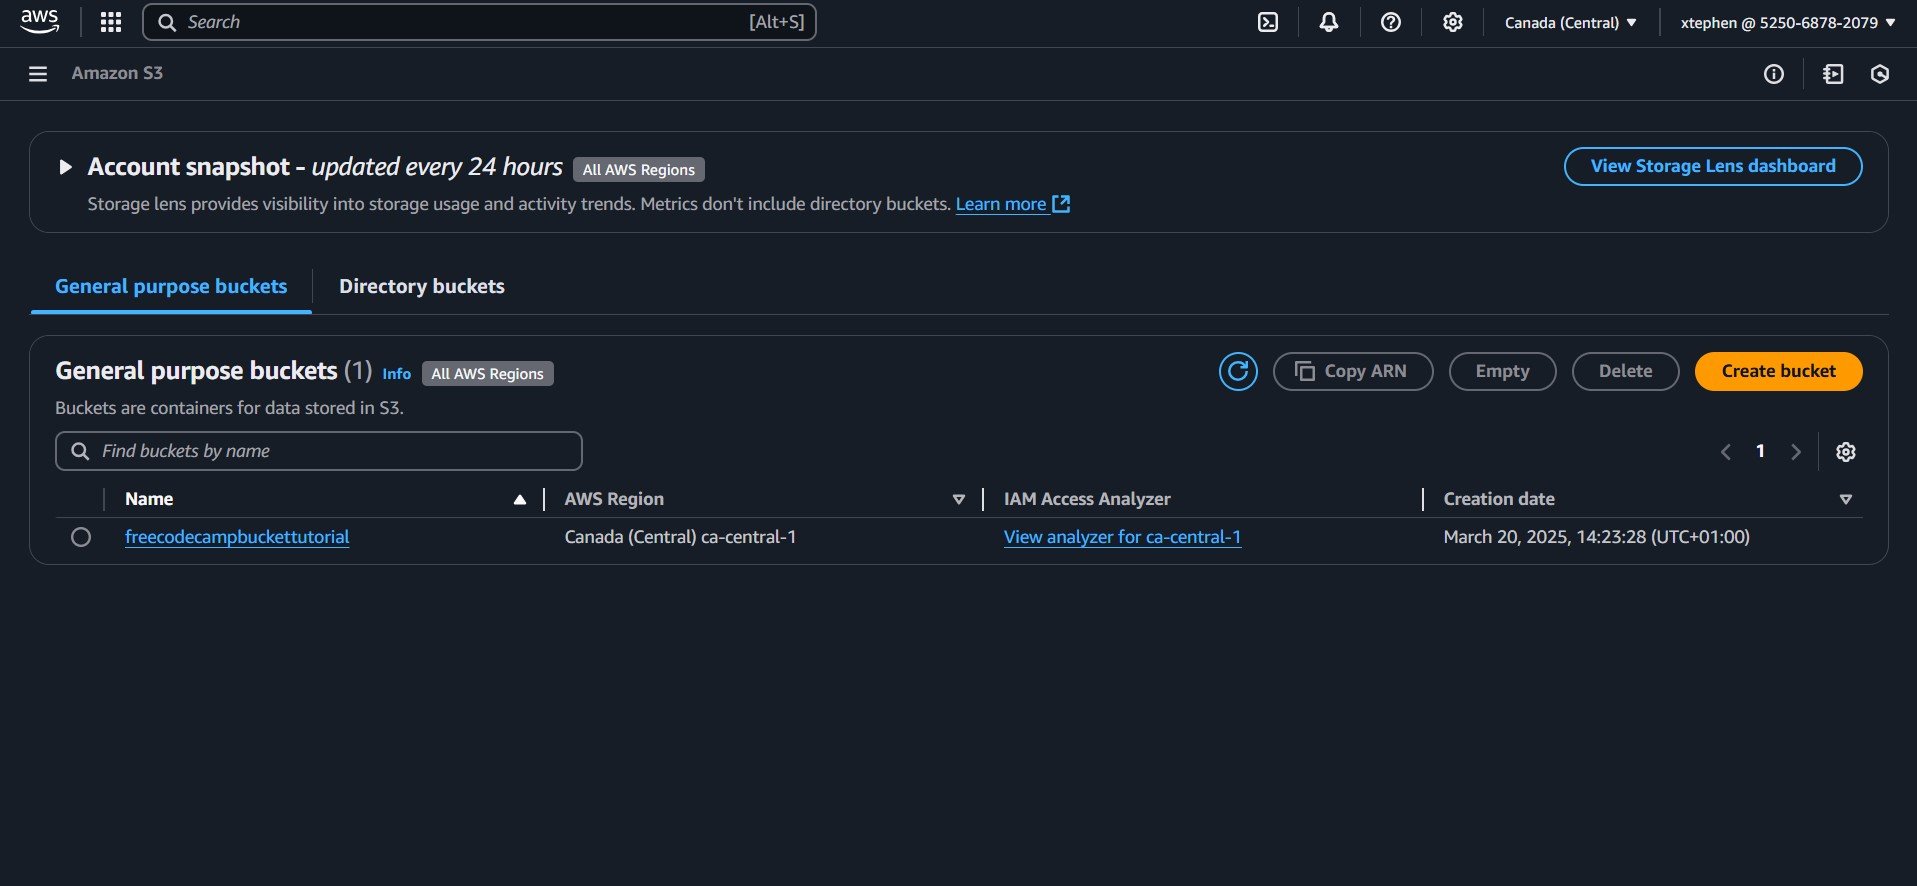
Once you arrive at the Amazon S3 page, you will see the Create Bucket button.
S3 buckets are the backbone for many applications, including content delivery, data backup, archiving, static website hosting, and big data storage for analytics.
What is a Bucket?
Amazon S3 buckets are the fundamental storage containers within AWS Simple Storage Service that provide secure, scalable repositories for digital assets.
Each bucket features a globally unique name, regional deployment, and flat object storage architecture identified by unique keys.
With 99.999999999% durability through built-in redundancy, S3 buckets support crucial infrastructure needs including content distribution, data archiving, and static website hosting. Admins can implement comprehensive data governance through configurable access controls (policies, ACLs, IAM), lifecycle management, versioning capabilities, and encryption protocols to meet organizational security requirements.
How to Create a Bucket
To create a bucket, click on the "Create bucket" button. You will then be redirected to the bucket creation page.

Choose any name you like, as long as it follows AWS bucket naming rules.
You will also see various configuration options, but for now, leave them as default. We will make the necessary adjustments later in the project.
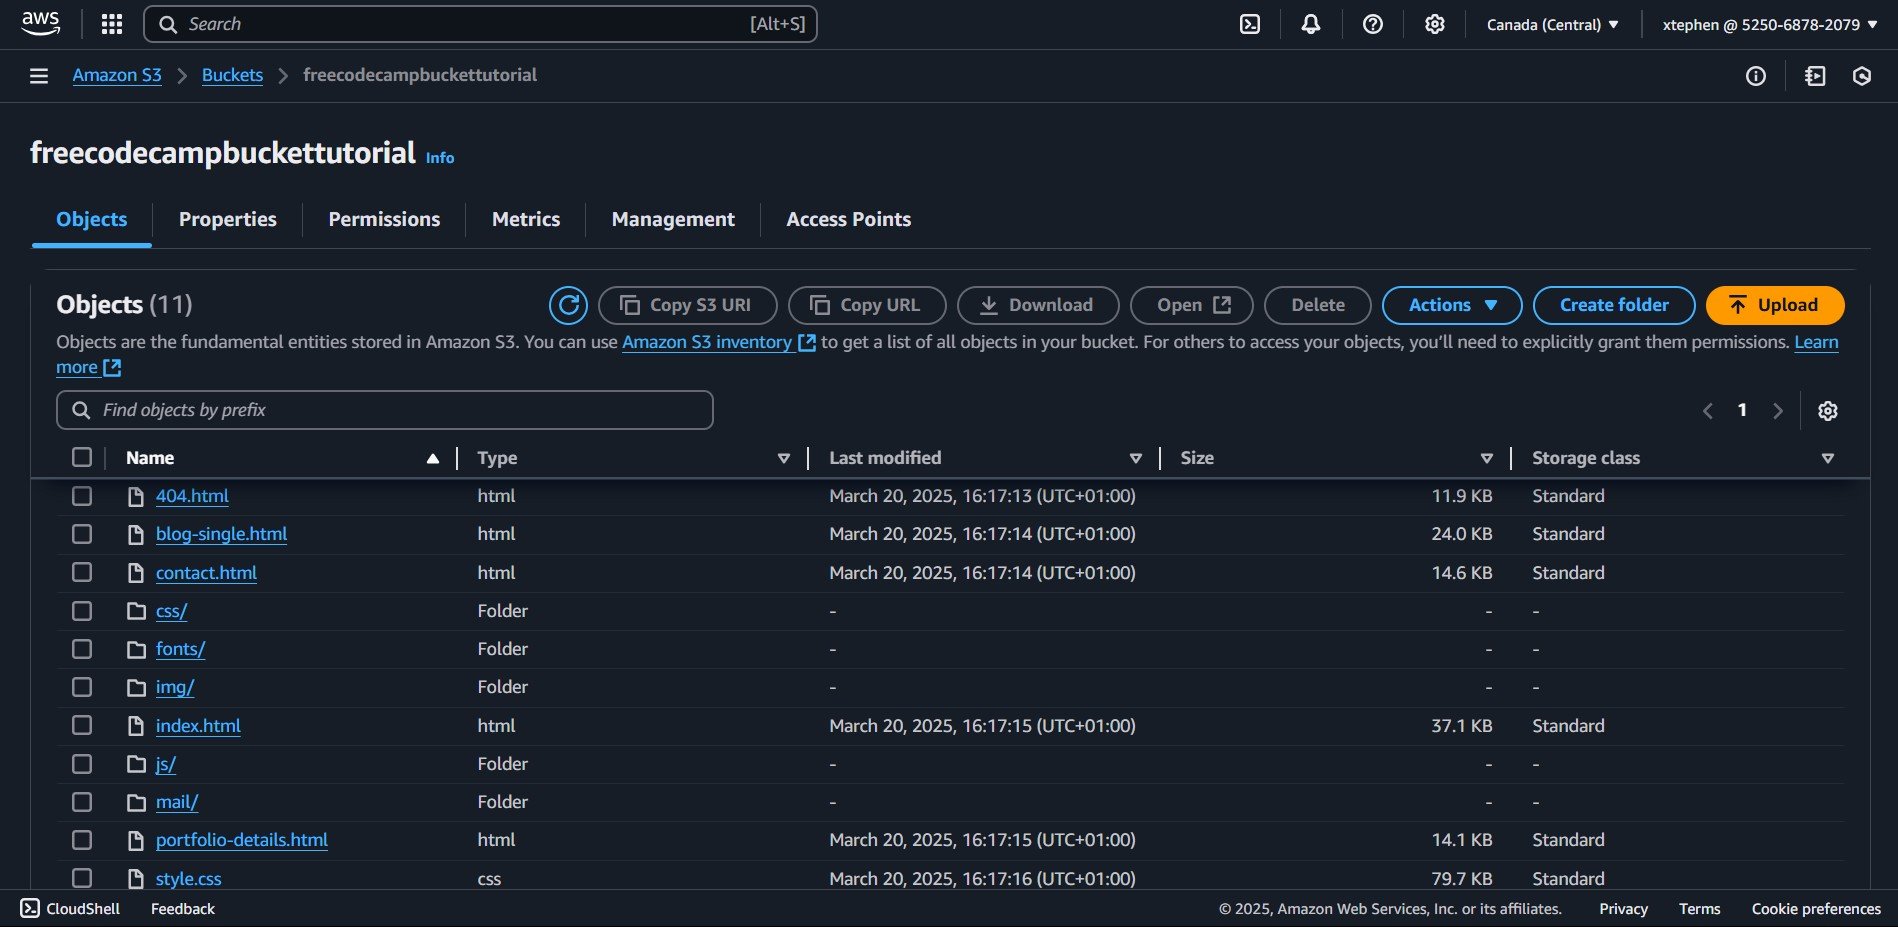
Finally, click on "Create bucket", and just like that your bucket is created! You should now see your bucket, which acts as a container for storing your files or data:
How to Upload Files and Folders to an S3 Bucket
Now, let’s upload the static site we created or cloned to our S3 bucket.
1. Click on your bucket:
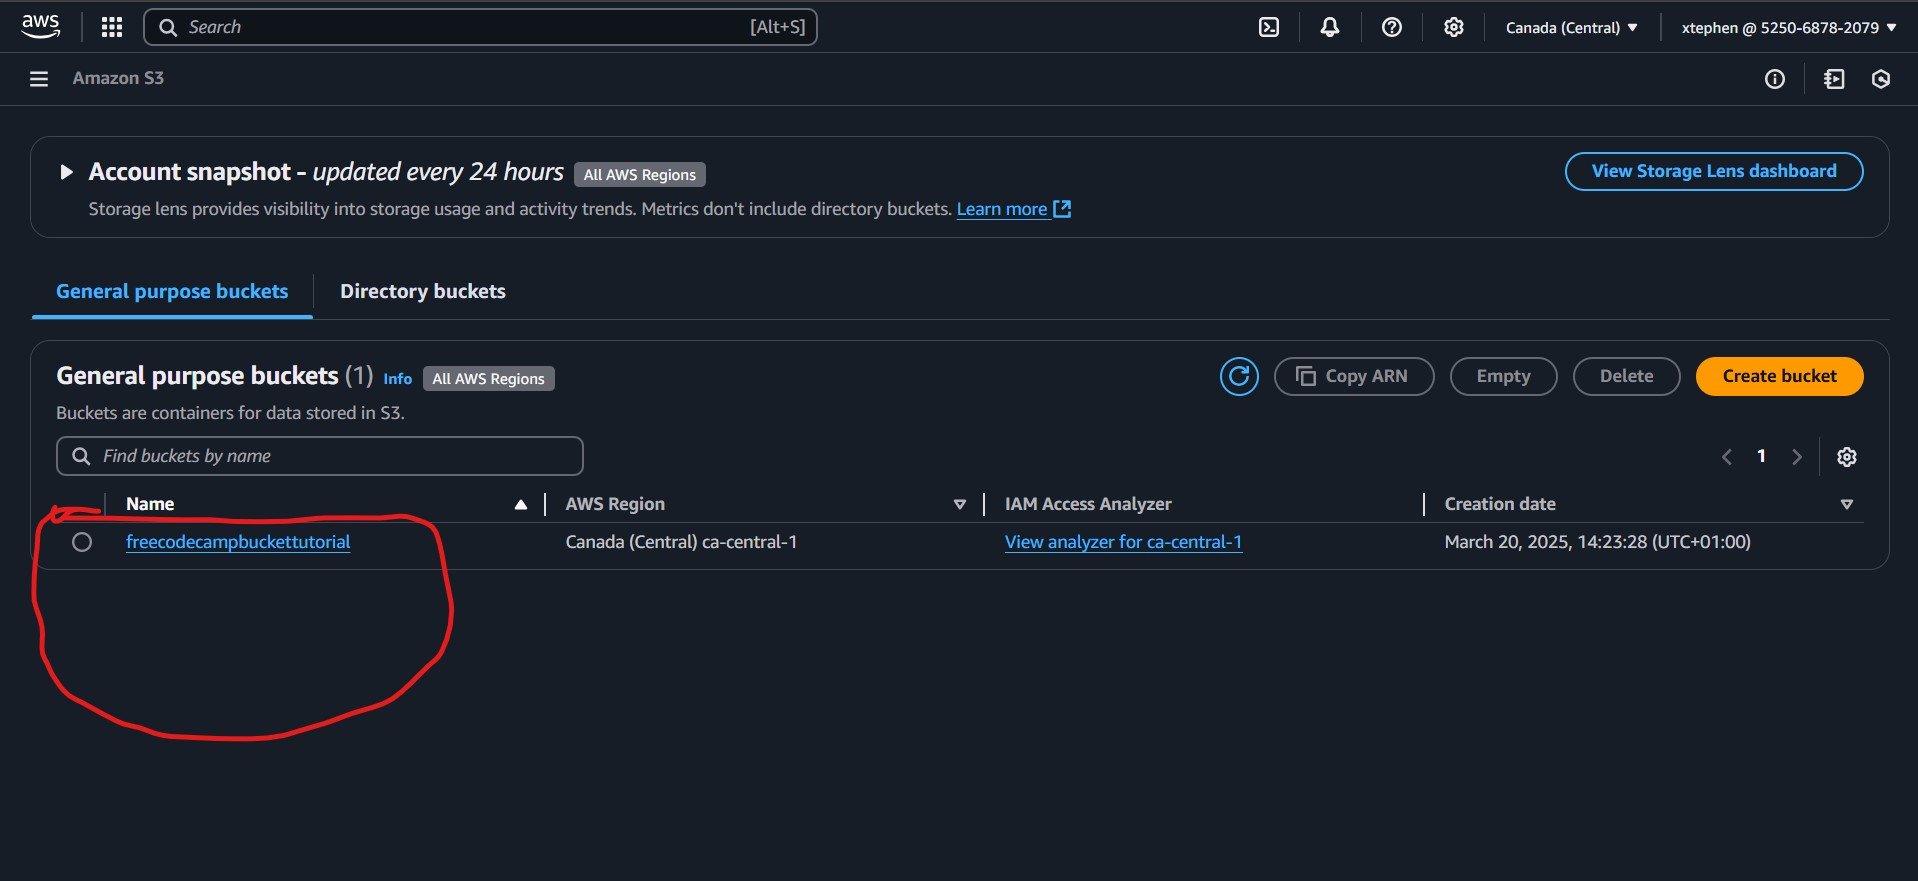
After clicking on your bucket, you will be taken to the bucket details page, where you can manage various settings and configurations. This page provides options to adjust permissions and properties, monitor metrics, manage access points, and upload files using the "Upload" button.
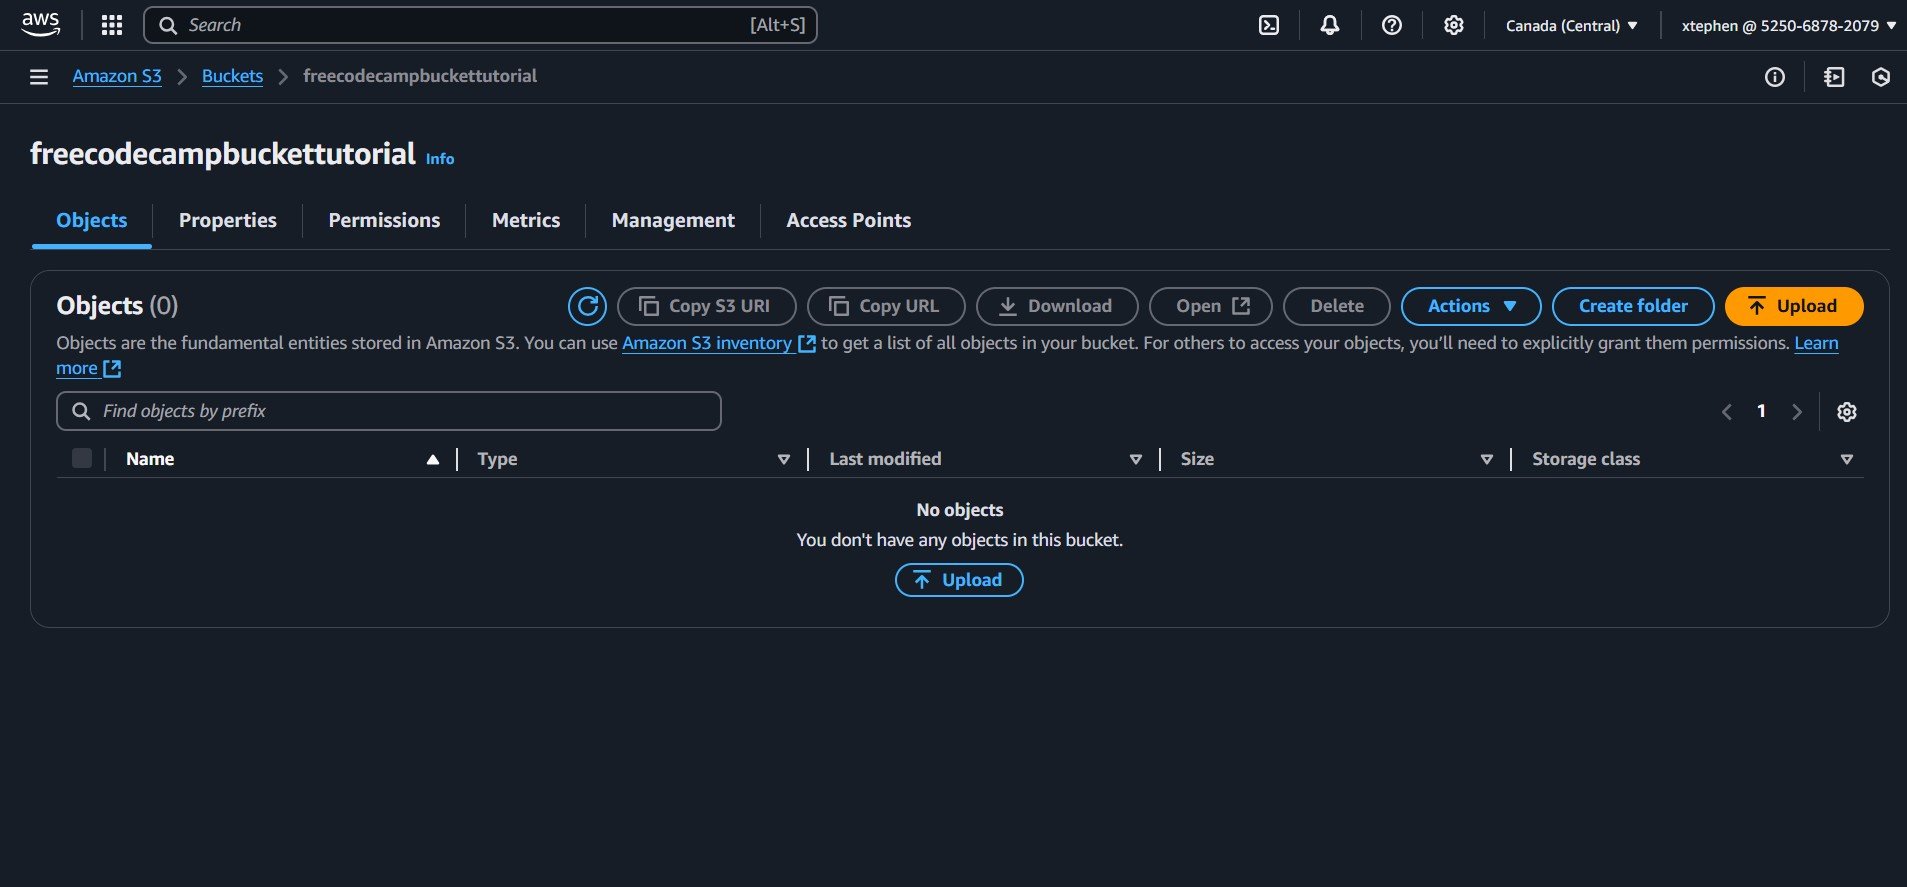
2. Upload project files:
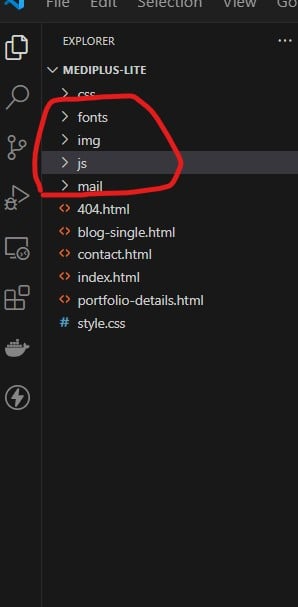
If your static site project is ready, it should contain the essential files needed for deployment. While the structure may vary, it should include an index.html file, along with necessary assets such as images (or an image folder), CSS files (or a CSS folder), and JavaScript files (or a JS folder) to ensure proper functionality and styling.
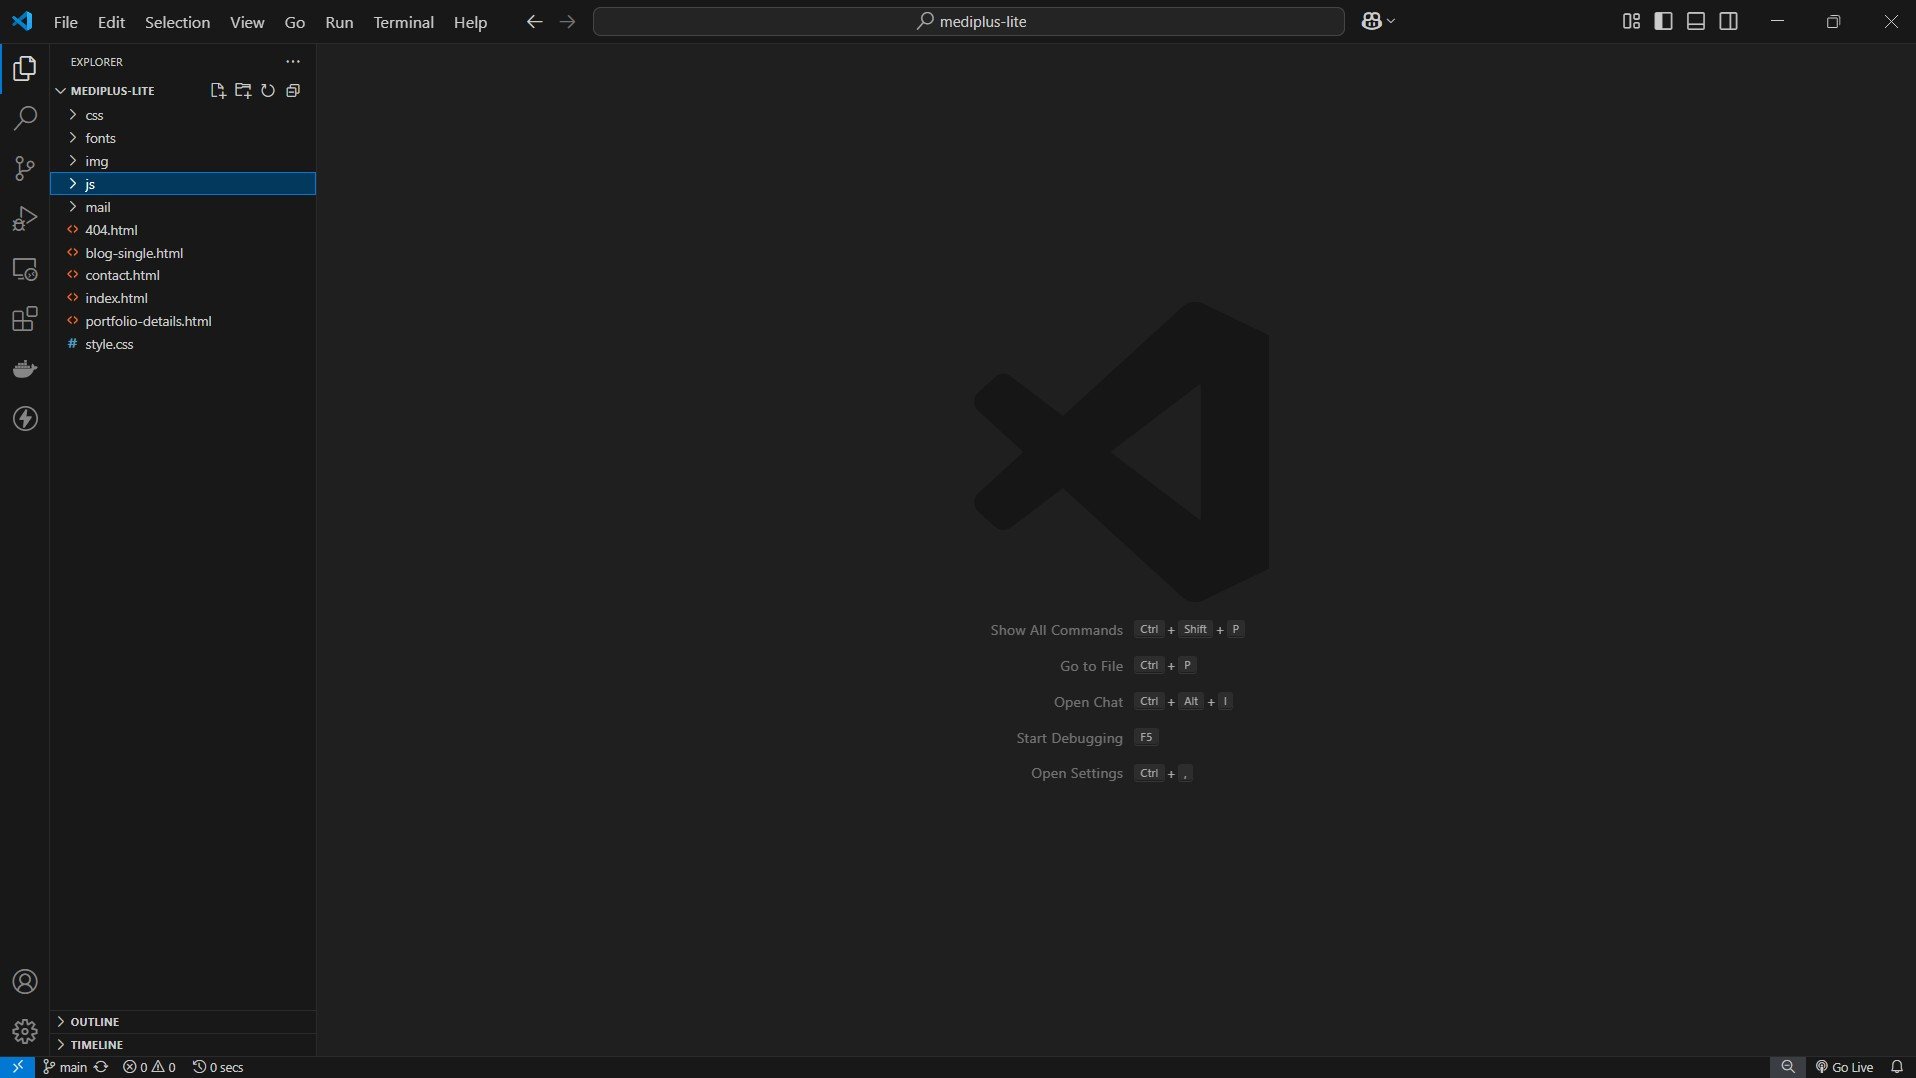
Let’s start by uploading the necessary files according to our project structure. Start with the root-level files such as index.html, along with any other essential files on the root-level. Ensure you follow your project structure carefully and upload all required files first to maintain proper structure.
Then click on the upload button:
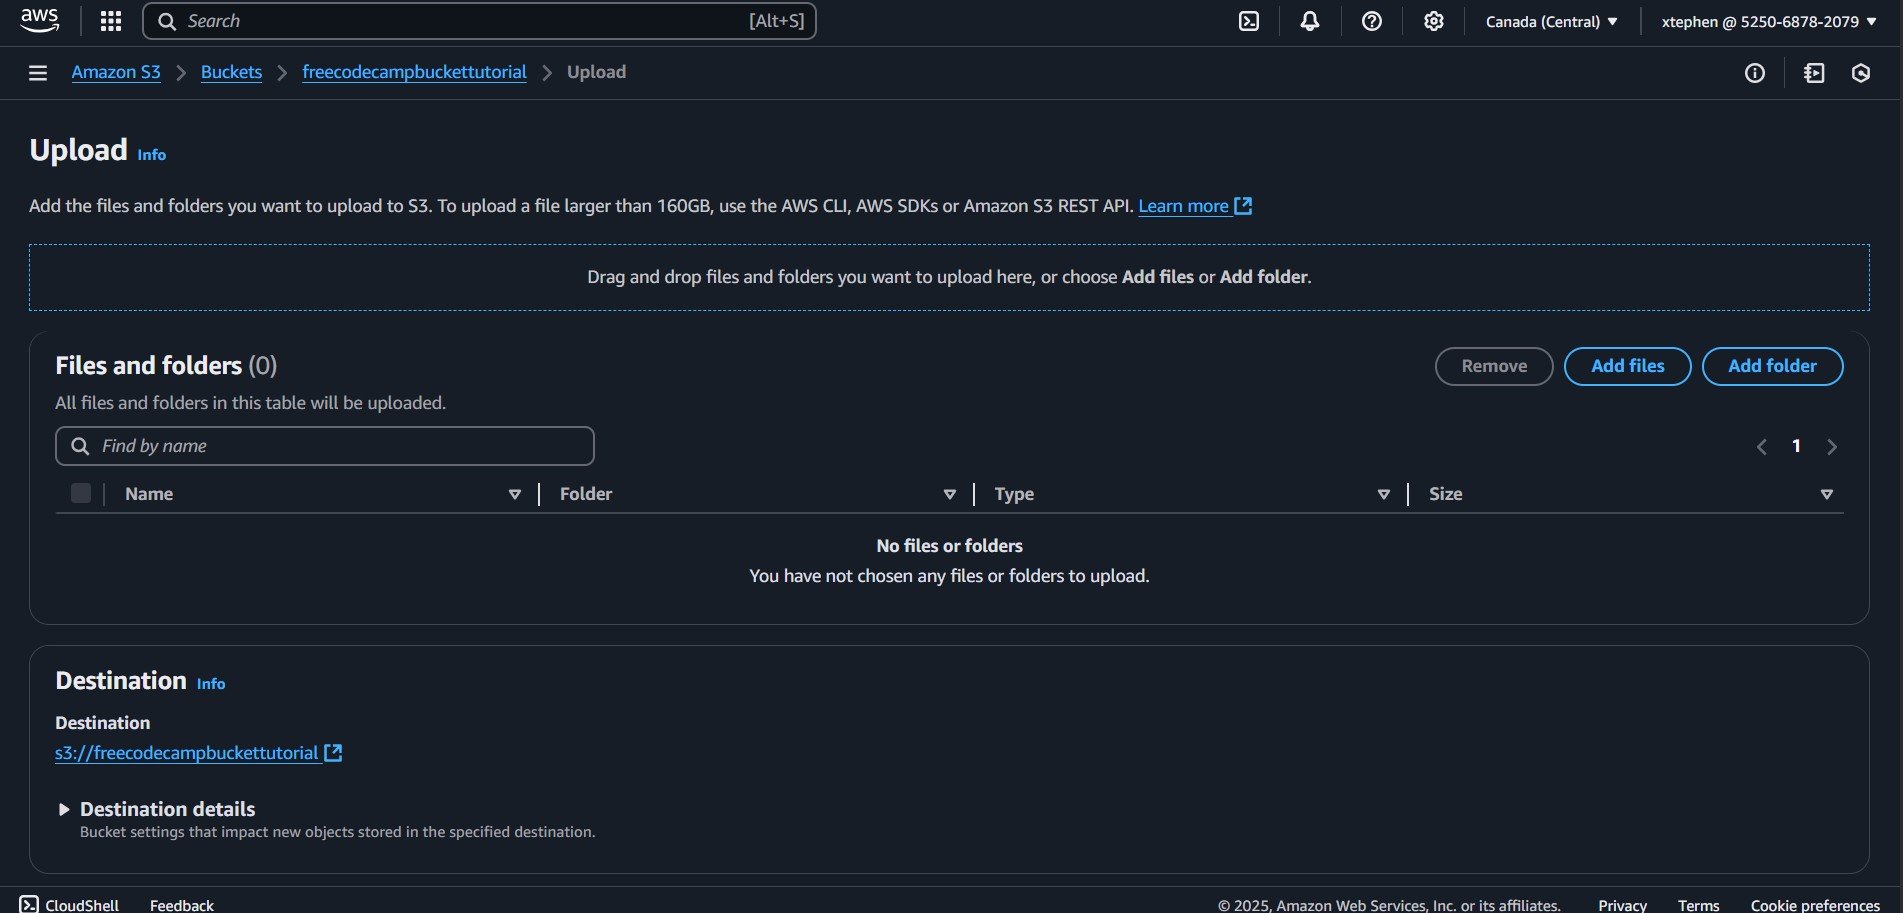
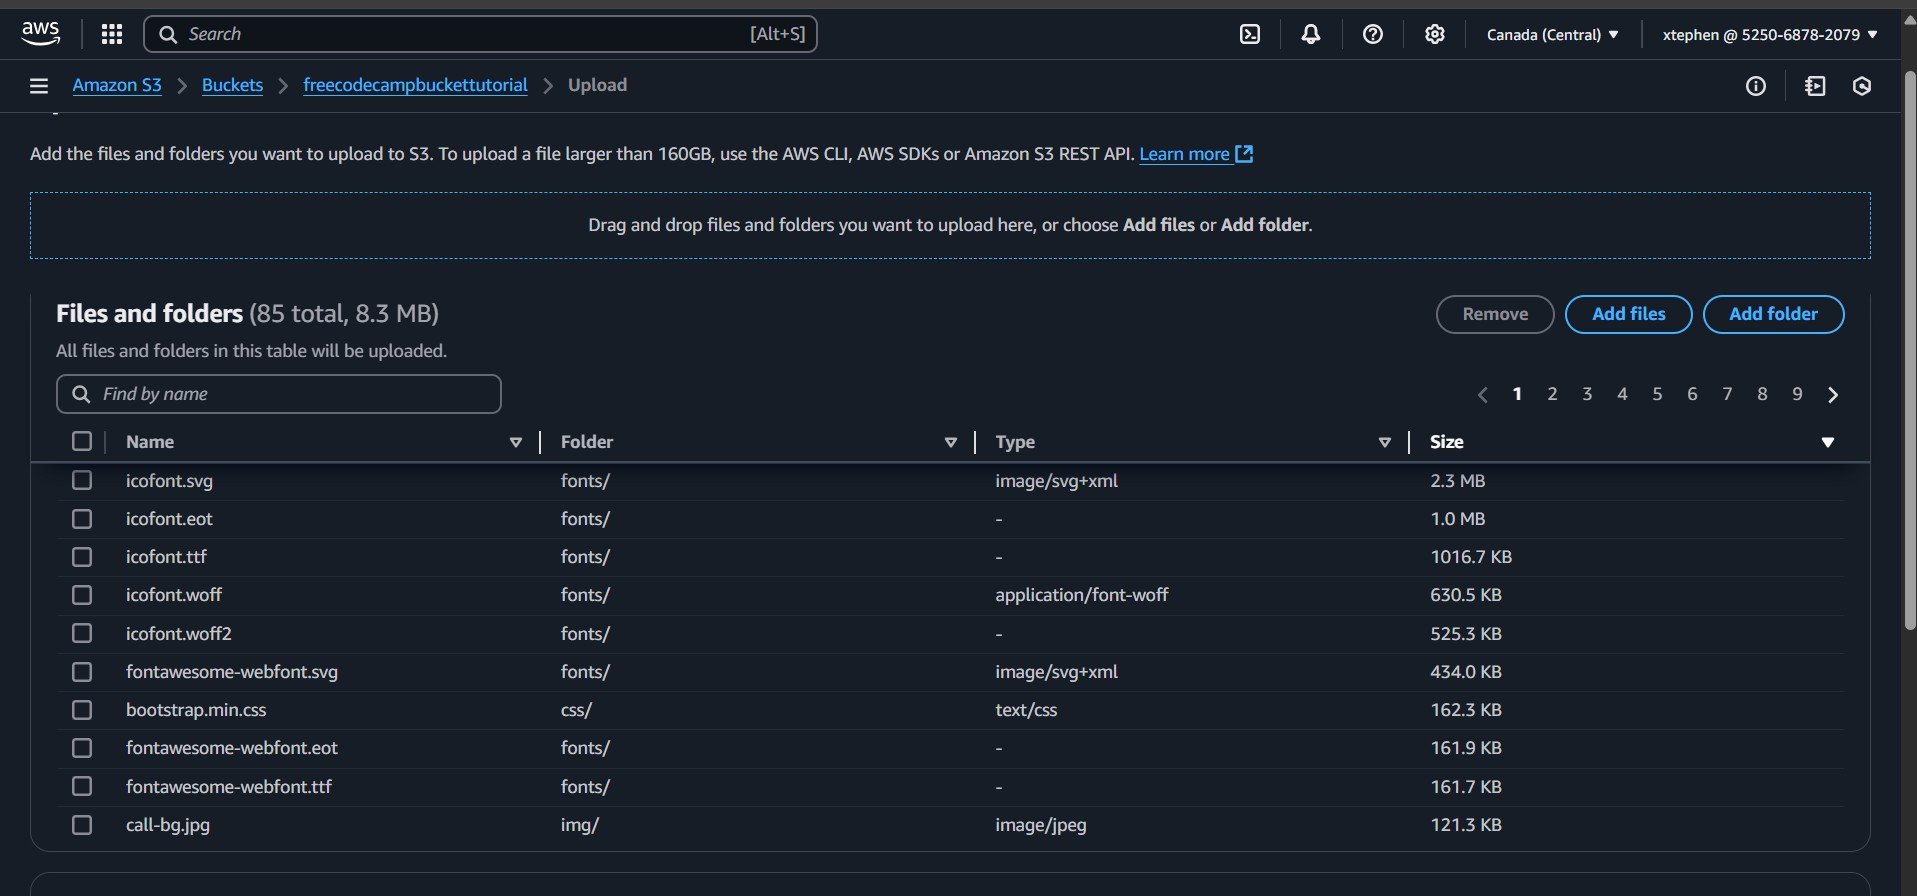
On the Upload page, you will see the "Add files" and "Add folder" buttons. Let's start by uploading individual files. Click on "Add files" to begin selecting and uploading the necessary files.
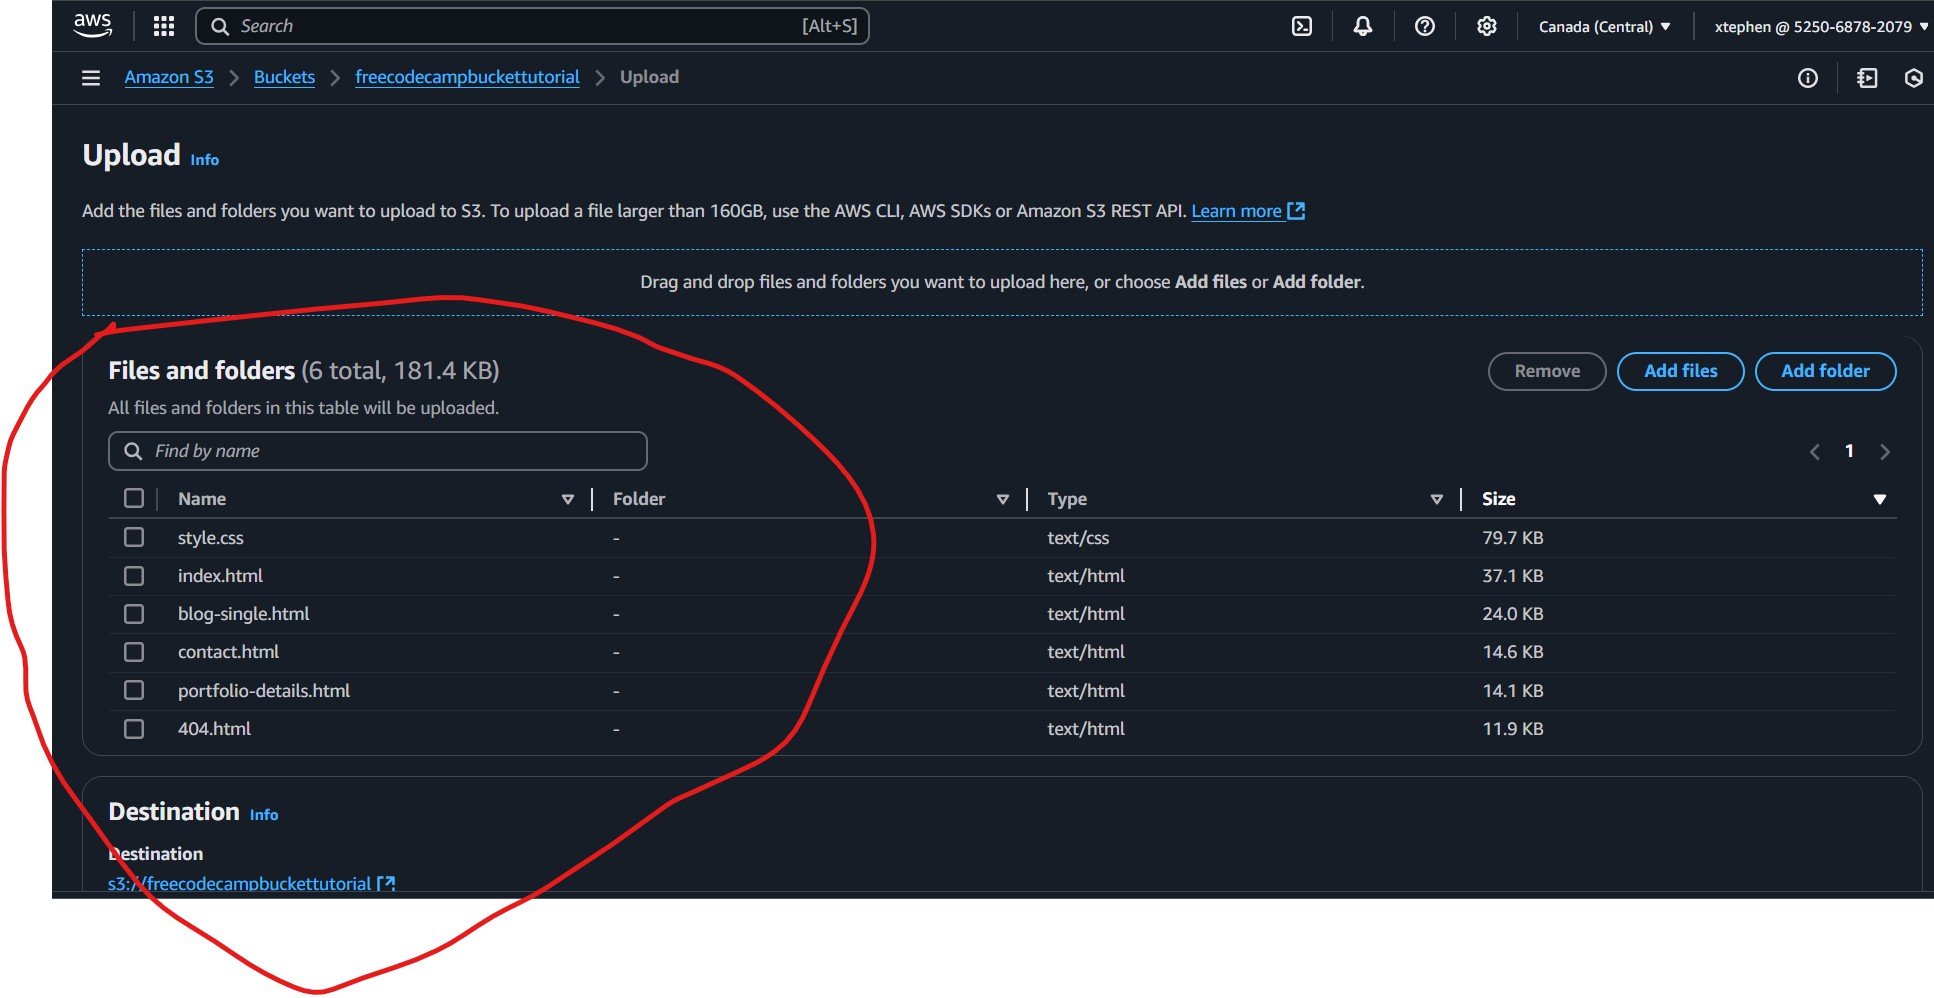
After successfully uploading your files, ensure you follow your project structure. If your static site only requires individual files, proceed accordingly. But if your project relies on specific folders for assets like images and CSS, you’ll need to upload those as well. In my case, my project structure includes folders for images and CSS e.t.c, so I will be uploading both files and folders.
3. Upload project folders
To upload your folders click on the “Add folder” button.
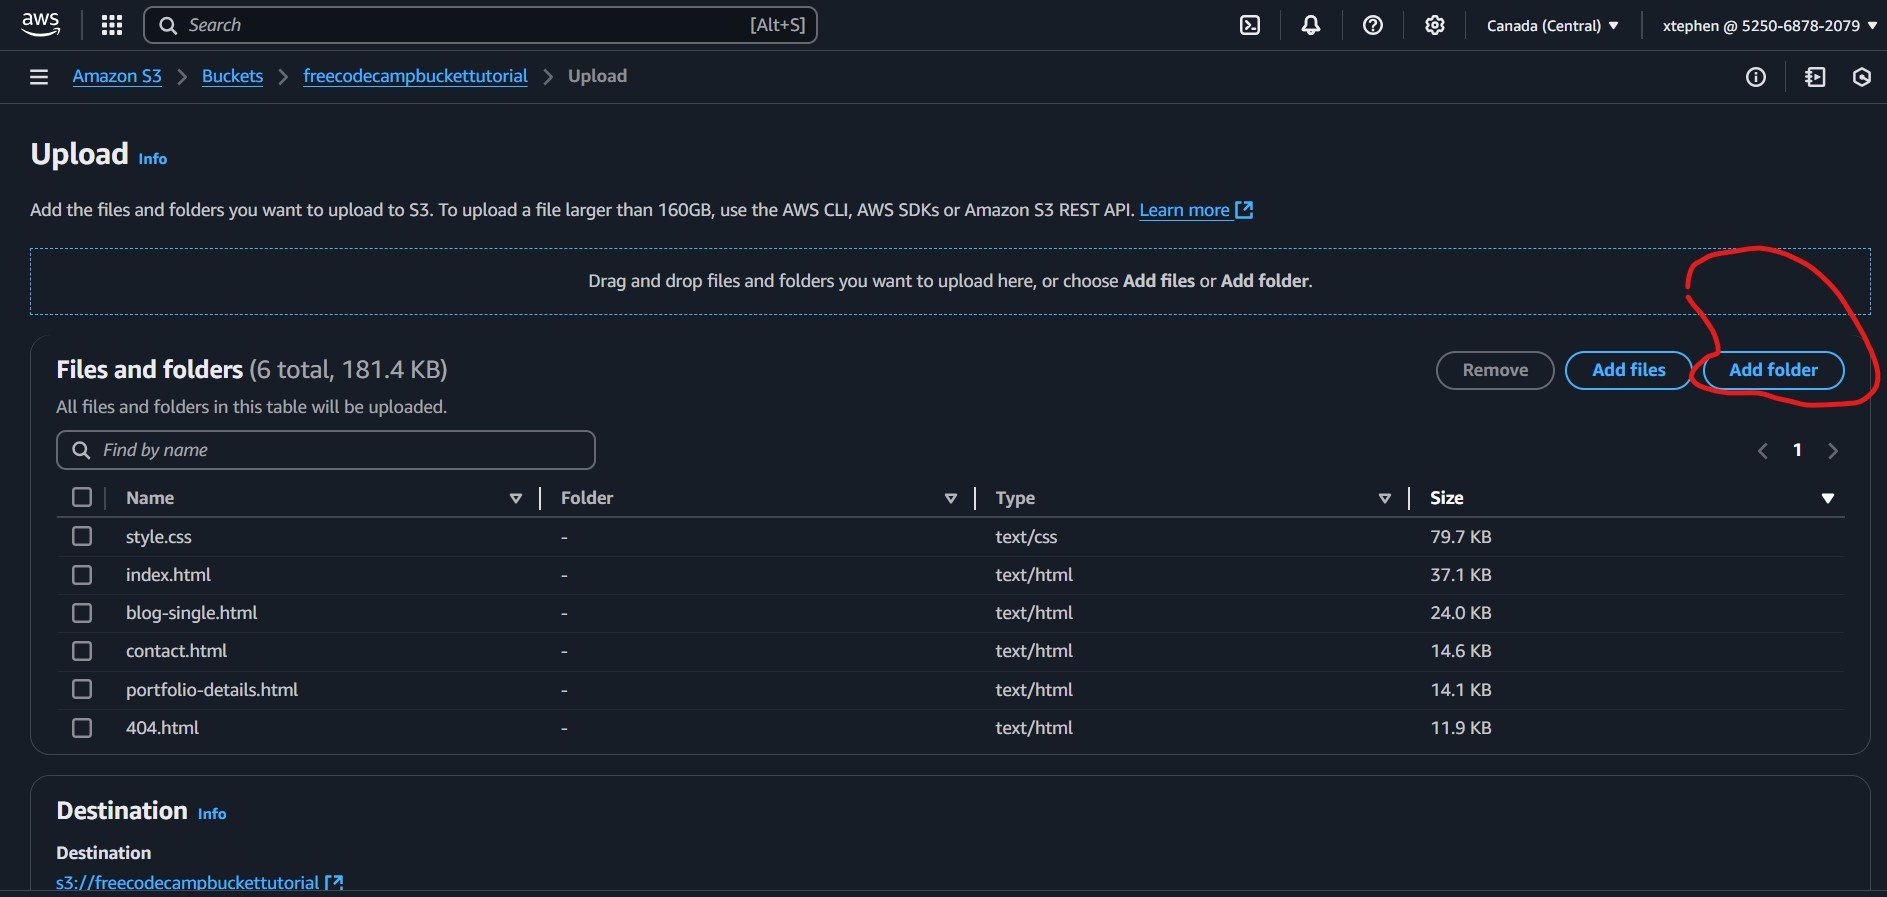
Now, upload your folders by clicking on the "Add folder" button and selecting the necessary folders, such as those containing images, CSS, or JavaScript files, based on your project structure.
You will notice that as you upload folders, S3 automatically extracts and structures the files by name, type, and size. This can sometimes be confusing for beginners, as the files are displayed in a structured format.
Once you have successfully uploaded your files and folders, scroll down and click the "Upload" button to complete the process.
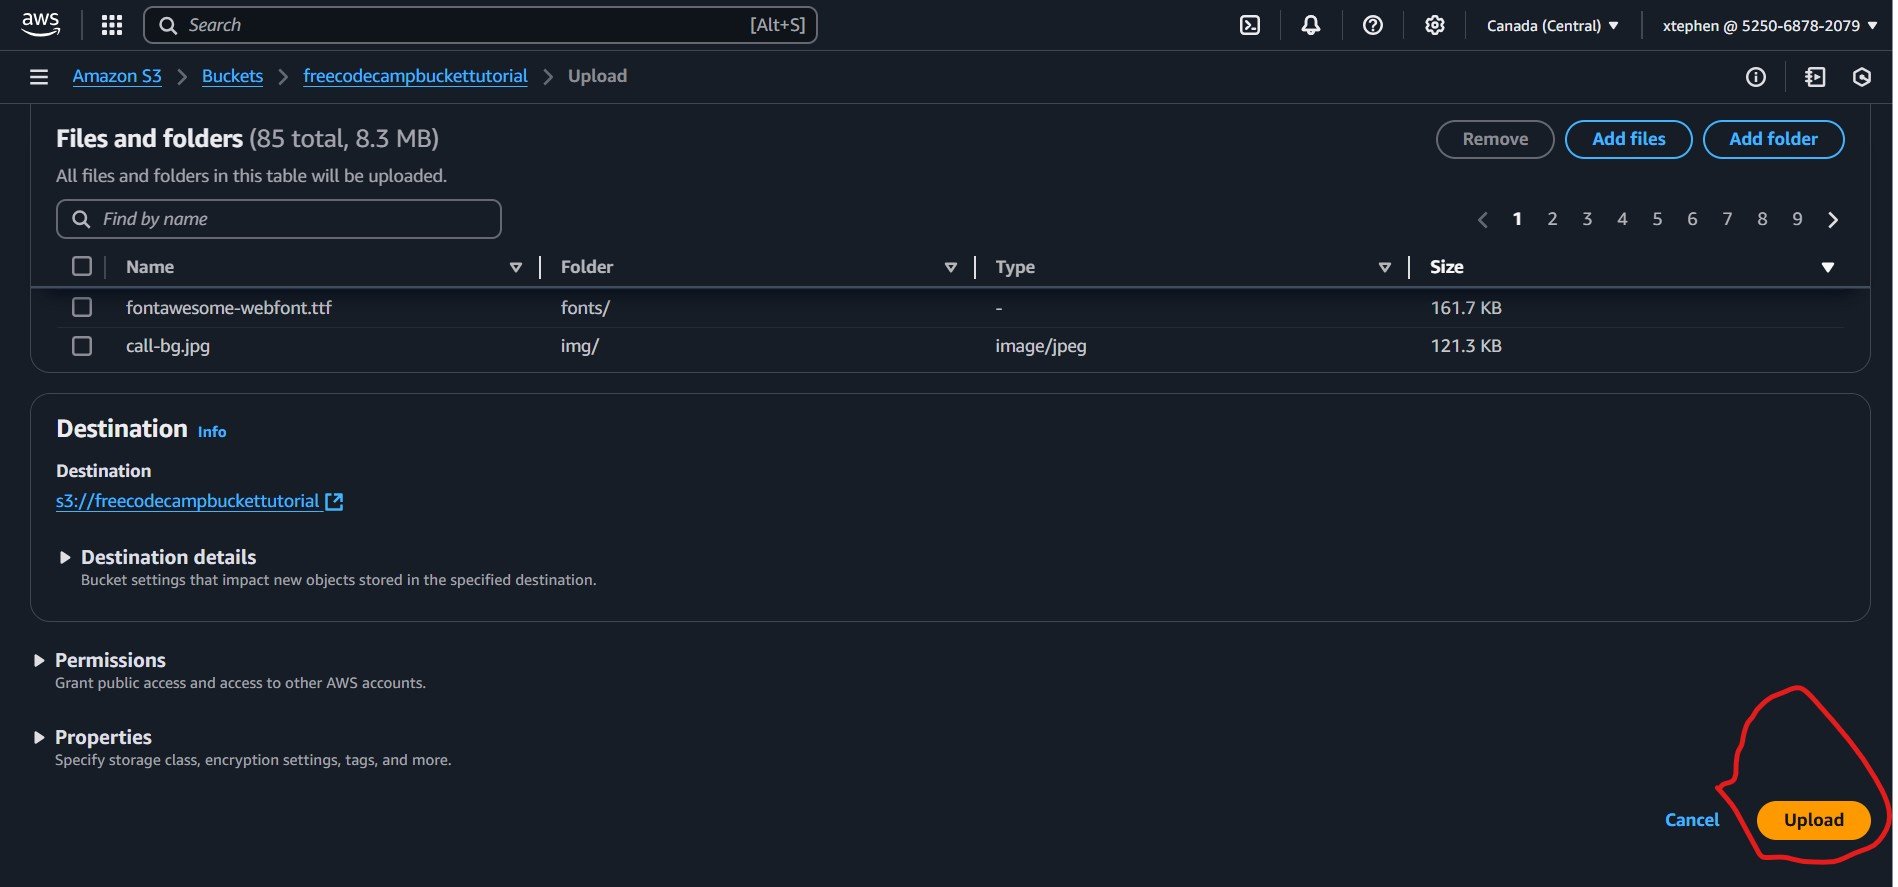
After clicking on "Upload", AWS S3 will begin uploading your files. You will see a progress indicator showing the status of each file being uploaded in real time.
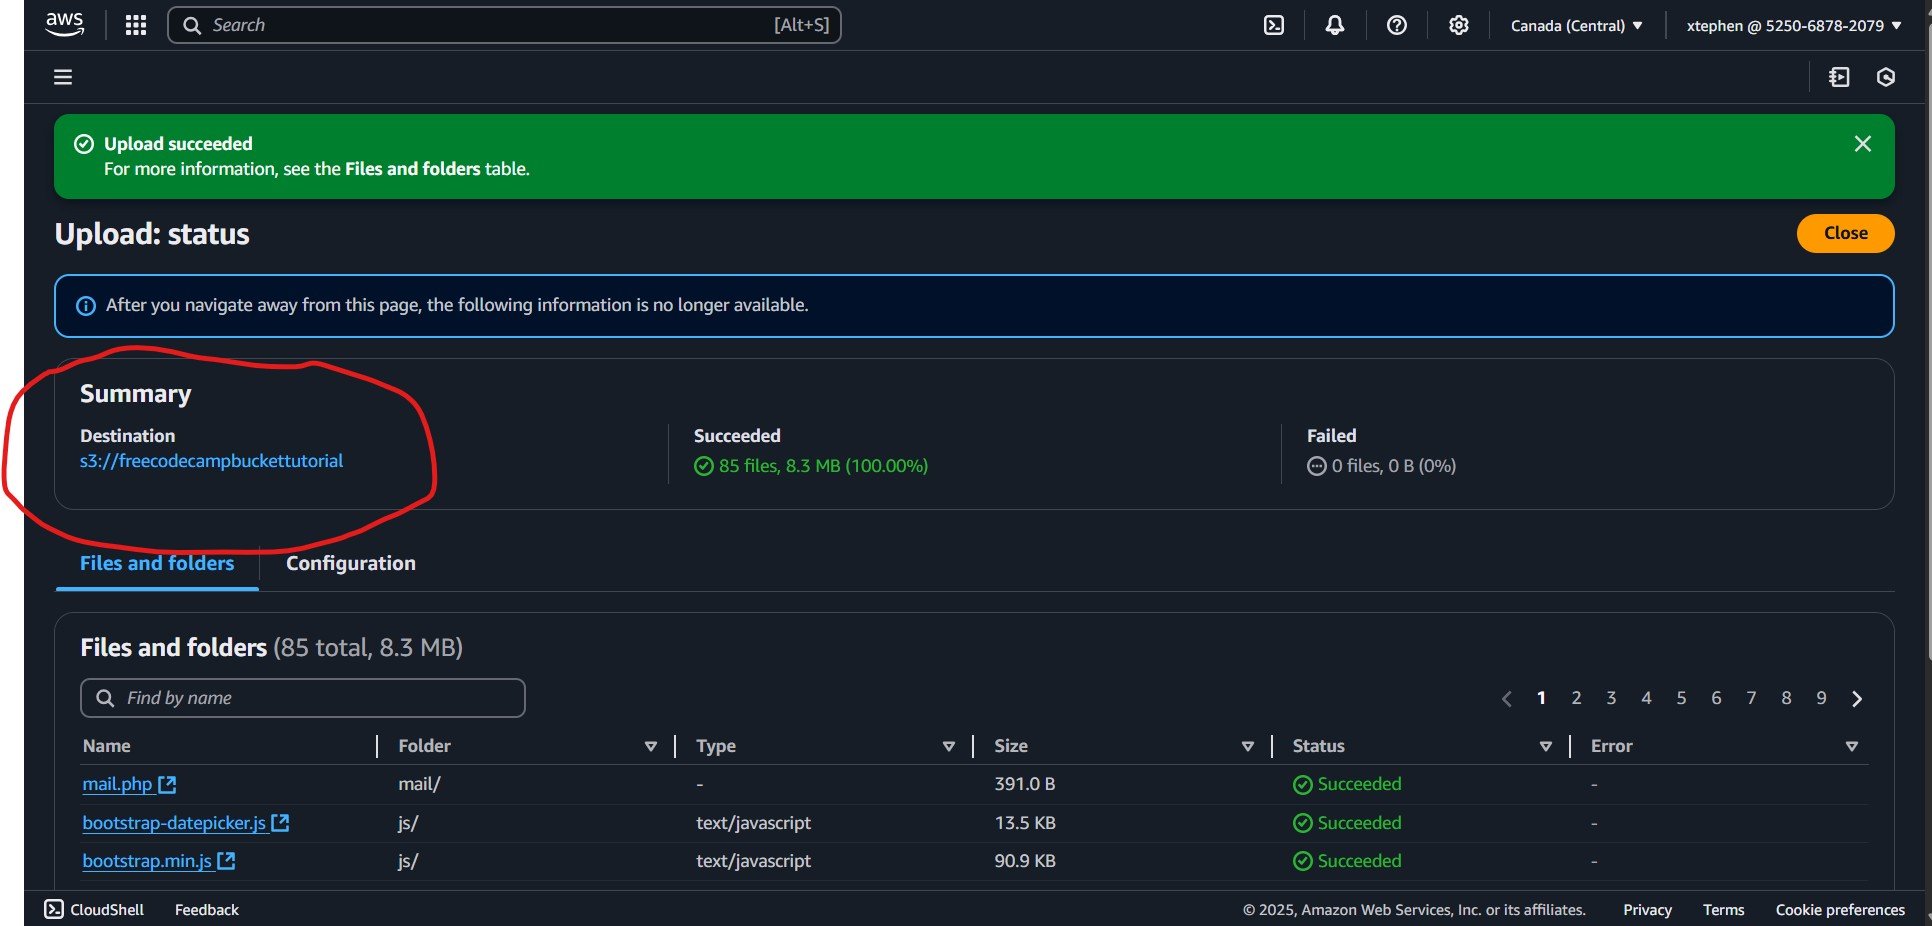
Upon completing the upload, you will see a confirmation message stating "Upload Succeeded." AWS S3 will then generate a URL which you can find in the Summary section of the bucket’s details page. (Refer to the image below for reference.)
Congratulations! you have successfully uploaded your project into AWS S3. Now let’s make this accessible on the web.
Click on the "Close" button to exit the upload page. Now, while still in your bucket, let's configure the necessary settings and permissions to ensure proper access and functionality for our static website.
How to Set Permissions and Properties in AWS S3
After uploading your files, the next step is to configure permissions and properties to ensure your static website functions correctly.
Permissions: By default, S3 objects are private. To make your website publicly accessible, you need to adjust the bucket policy and object permissions accordingly.
Properties: You can configure various settings such as versioning, encryption, and static website hosting under the Properties tab of your bucket, but we won’t be going too deep as we are just going through the basics.
Let’s start with setting up permissions:
Permissions
By default, public access is blocked in S3 for security reasons. But for this tutorial, we will be enabling public access to ensure our static website is accessible to users.
In the image below, you can see that the public access is blocked by default:
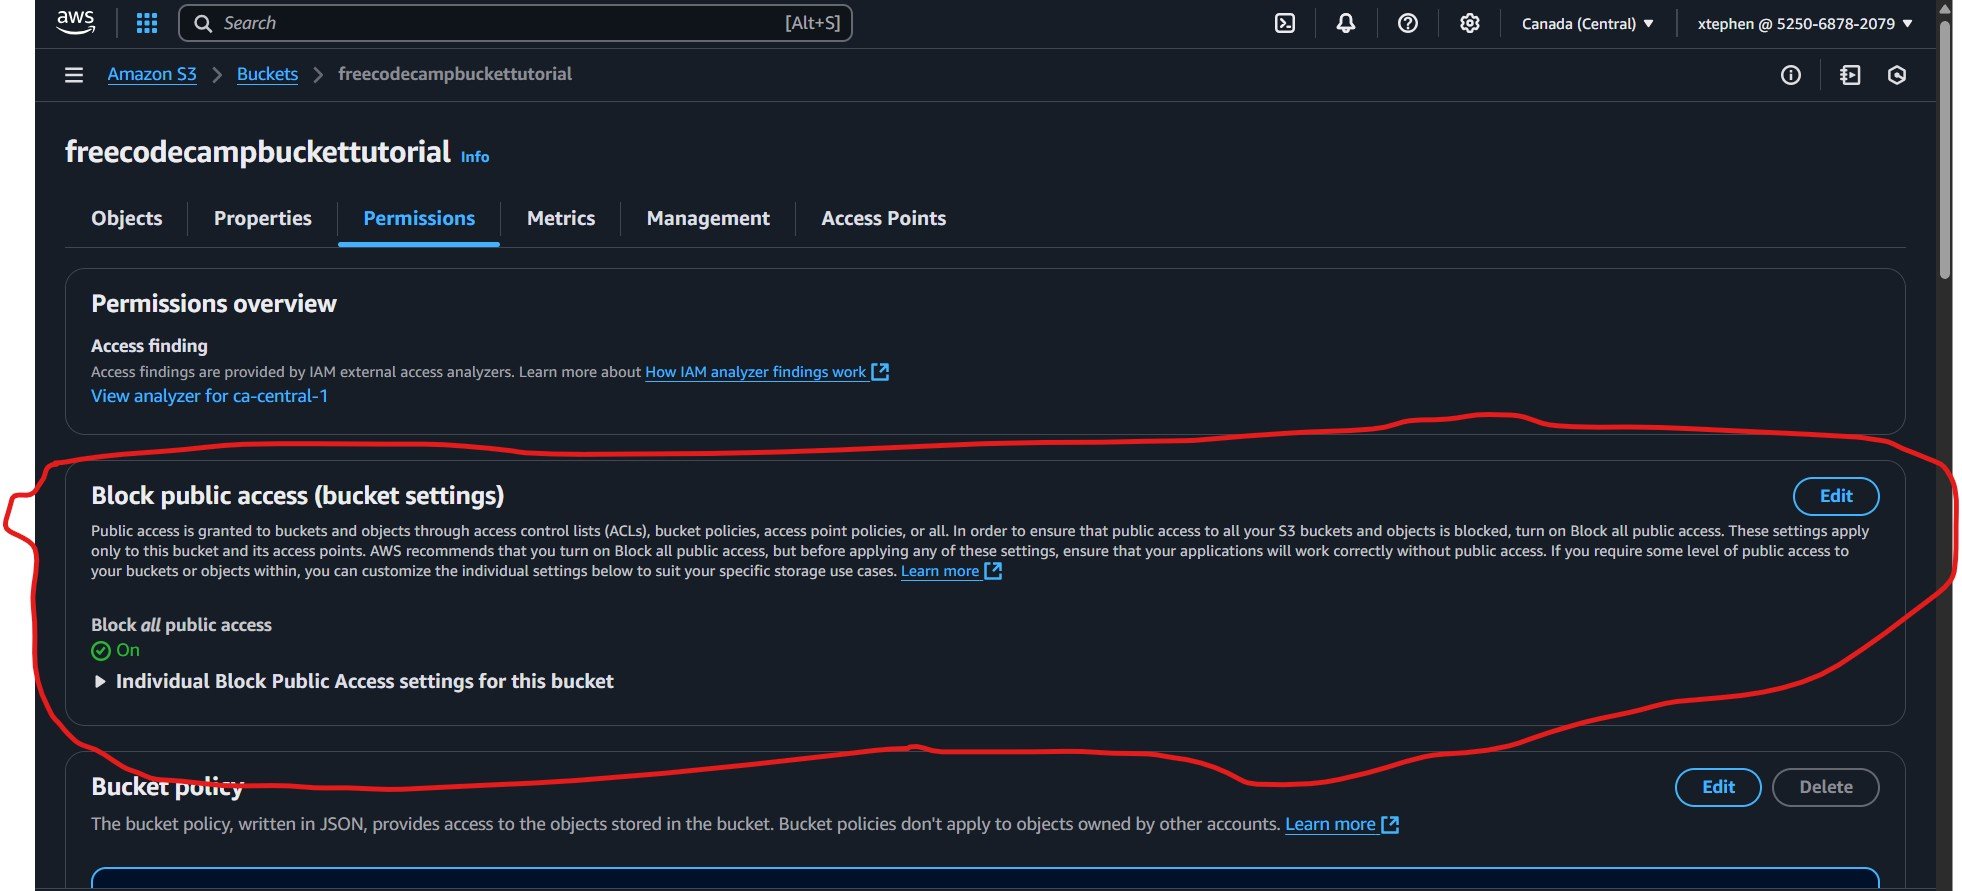
To enable public access, click on the "Edit" button in the top-right corner. Then, uncheck the "Block all public access" option. After that, click on "Save changes" to apply the update.
Now you can see that the public access has been blocked:
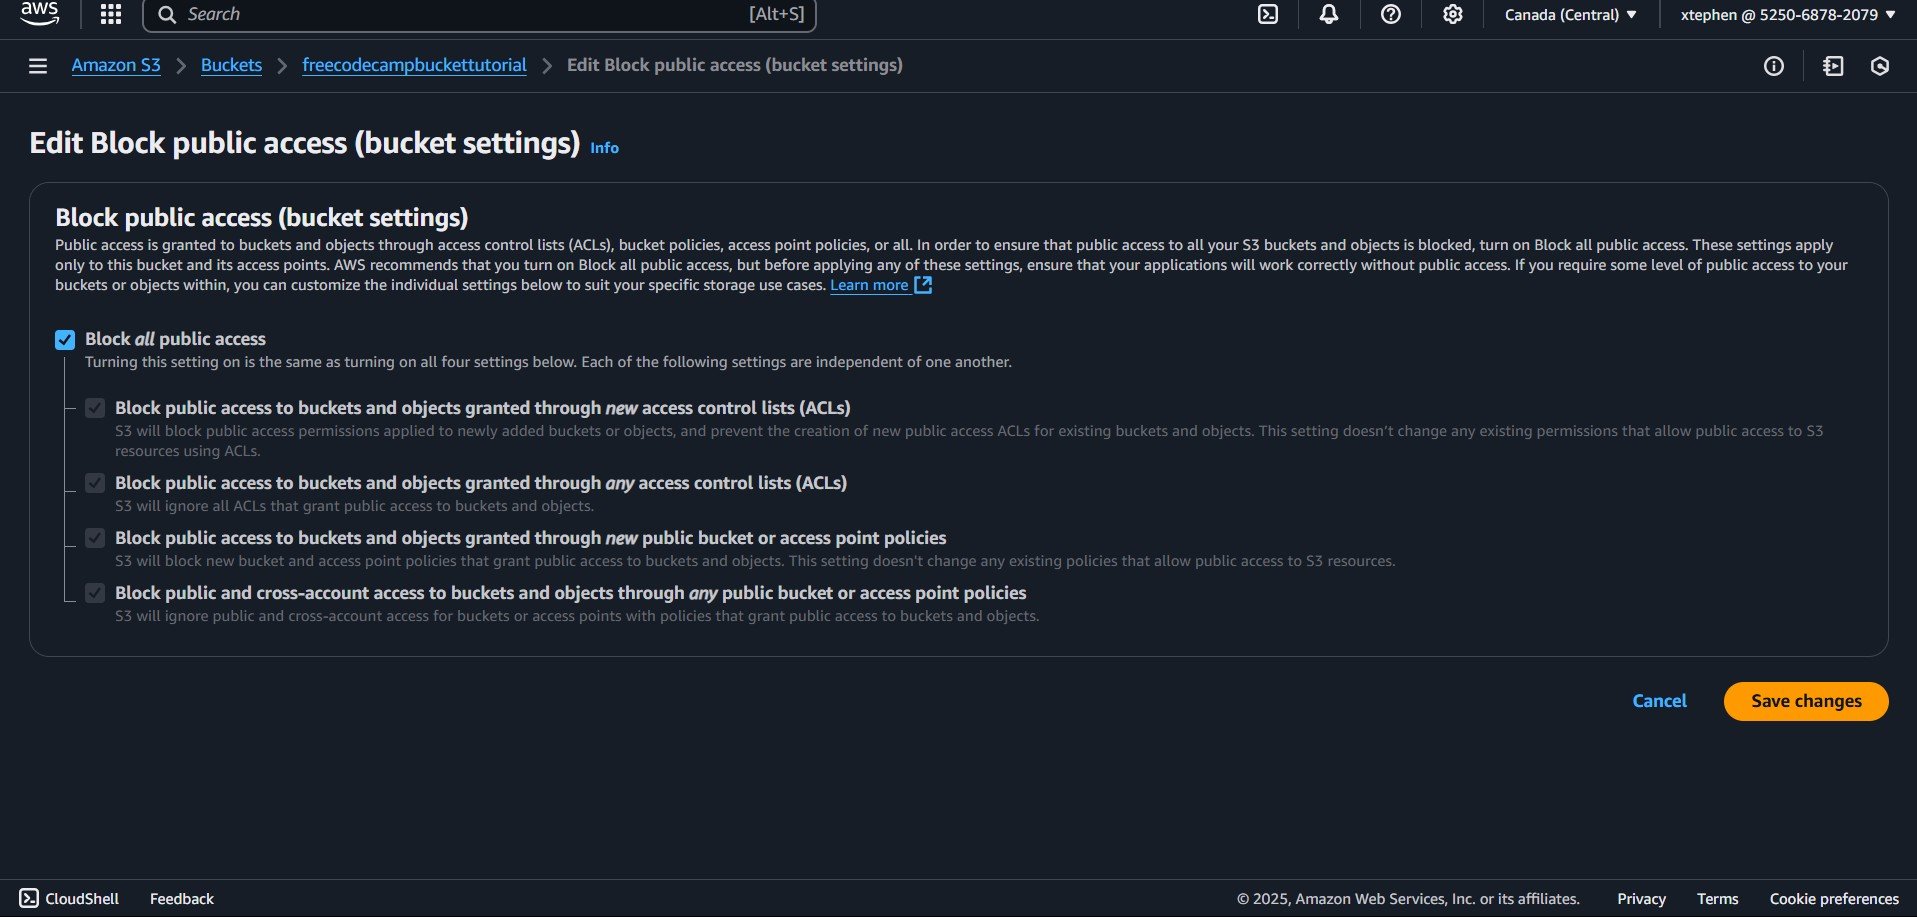
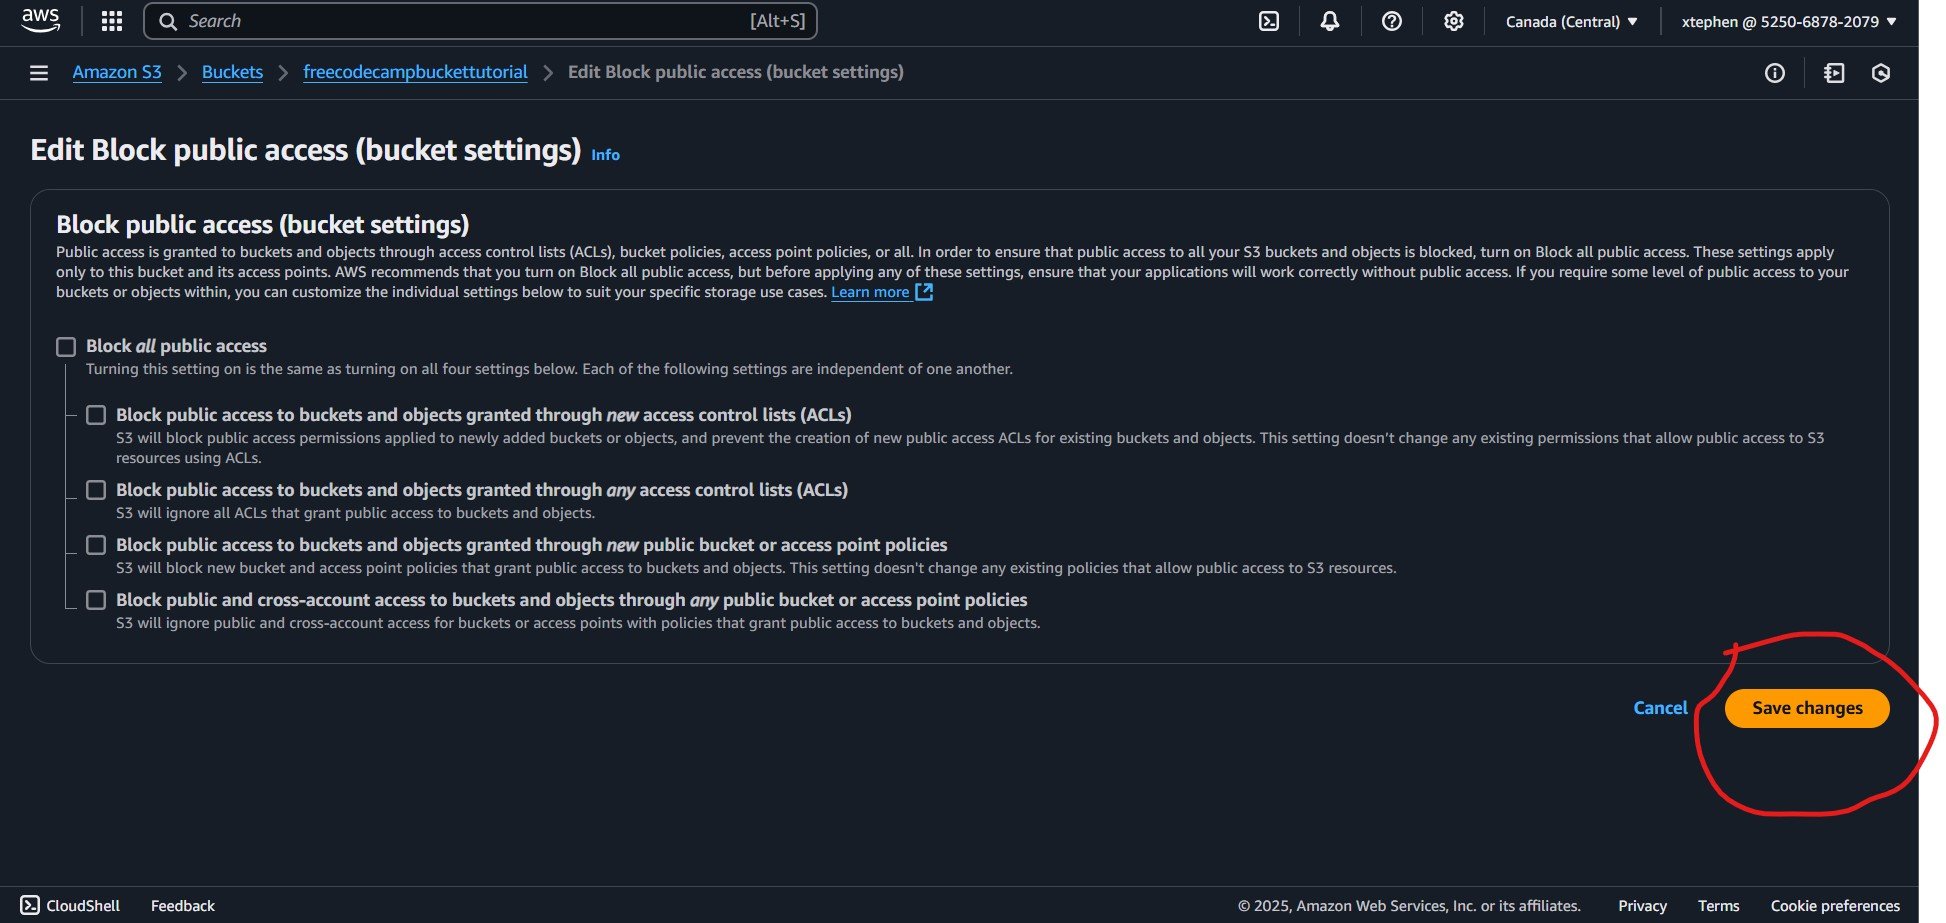
Public access is now enabled. Click on "Save changes" to confirm and apply the update.
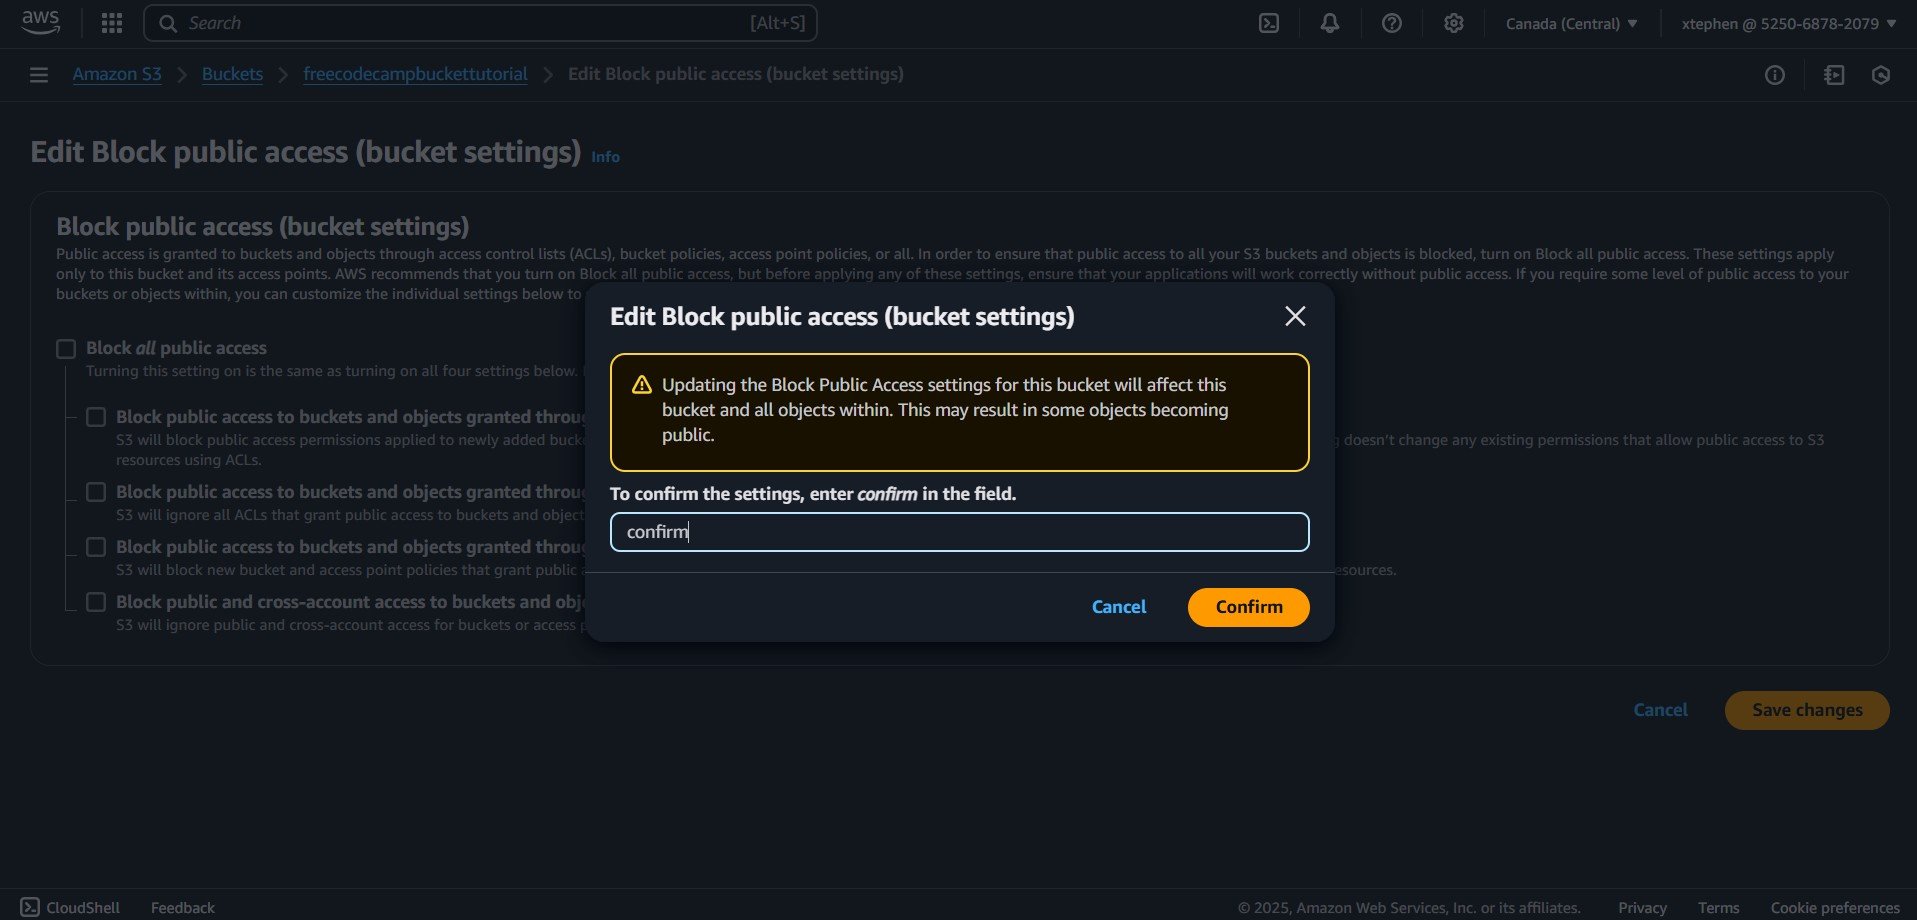
Enabling public access
AWS S3 will prompt you to enter a confirmation text to validate the settings. Input the required text and confirm, and public access will be enabled successfully.
So now that we have enabled public access, let’s set a bucket policy.
What is a Bucket Policy?
A bucket policy is a JSON-based access control policy that defines permissions for your S3 bucket. It allows you to specify who can access your bucket and what actions they can perform.
With a bucket policy, you can:
Grant or restrict public access to objects in your bucket.
Allow specific AWS users or services to interact with your bucket.
Define read, write, or delete permissions for different users.
In this next section, we will configure a bucket policy to make our static website publicly accessible.
How to Set Up a Bucket Policy
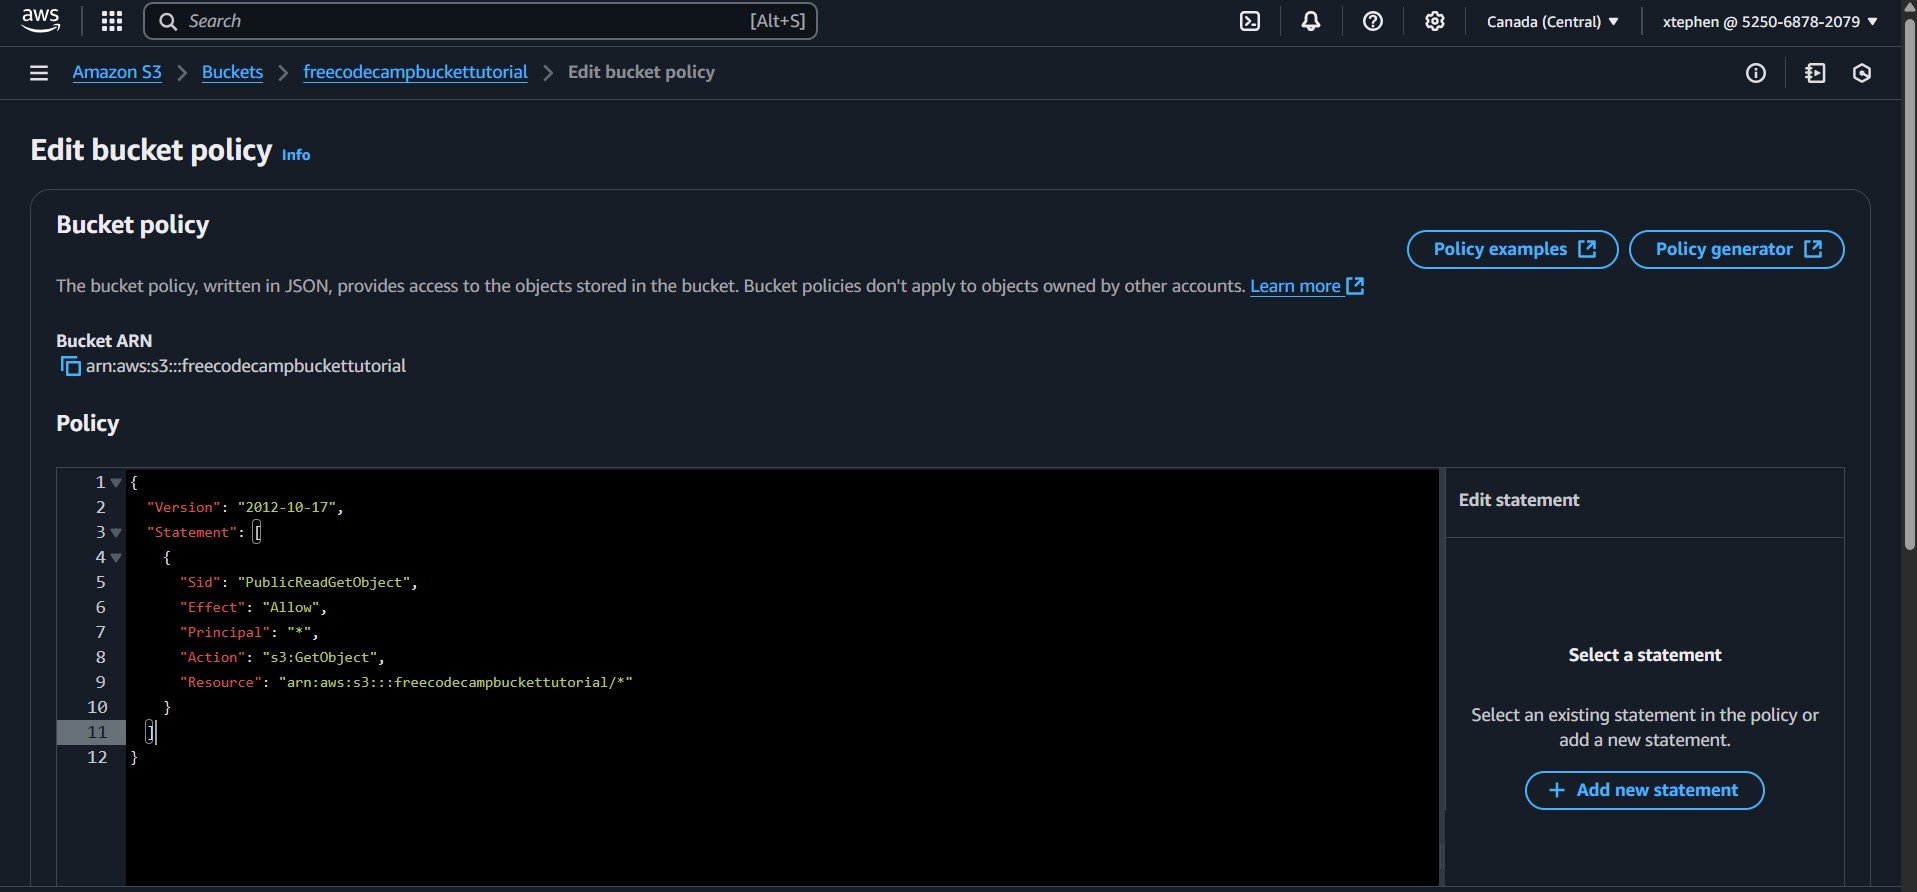
Setting up a bucket policy is simple. Click on the "Edit" button in the Bucket Policy section and paste the following JSON policy into the editor:
{
  "Version": "2012-10-17",
  "Statement": [
    {
      "Sid": "PublicReadGetObject",
      "Effect": "Allow",
      "Principal": "*",
      "Action": "s3:GetObject",
      "Resource": "arn:aws:s3:::your-bucket-name/*"
    }
  ]
}
Understanding the policy attributes:
Version: Defines the policy language version. The
"2012-10-17"version is the latest and most commonly used for S3 policies.Statement: A list of rules that define what actions are allowed or denied.
Sid (Statement ID): A unique identifier for the policy statement (optional but useful for reference).
Effect: Specifies whether the rule allows or denies the specified action. In this case, it’s
"Allow".Principal: Defines who has access. The
"*"means anyone (public access).Action: Specifies the allowed operation.
"s3:GetObject"allows users to retrieve (read) objects from the bucket.Resource: Defines the specific bucket and objects the policy applies to. Replace
"your-bucket-name"with your actual bucket name. The"/*"means all objects within the bucket.
This policy makes all objects in the bucket publicly readable, allowing users to access your static website files via a browser.
if you followed closely, your bucket policy page should look like this:
Now, click on the "Save changes" button, usually located at the bottom right of the page, to apply your changes.
After following the required steps Bucket policy has been set and public access has been enabled.
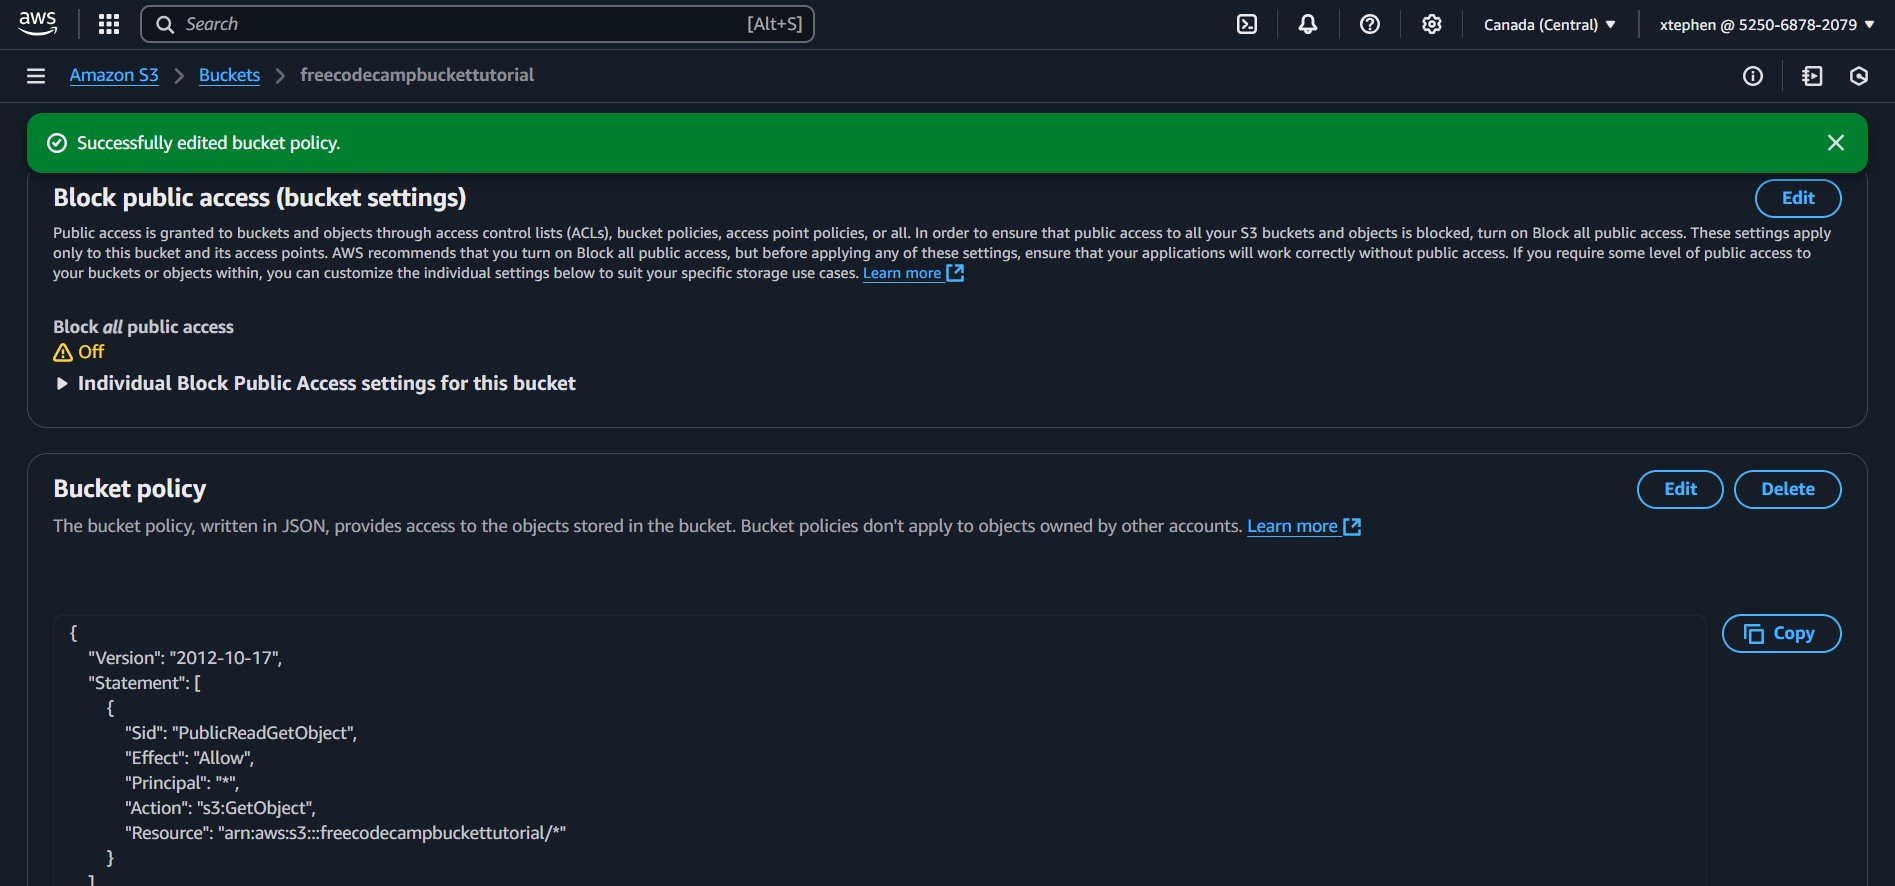
Congratulations! You have successfully set up your bucket policy and enabled public access, meaning anyone can now access your website. But wait, where's the URL?
There's one last step: we need to enable static website hosting. To do this, you’ll need to navigate to the Properties tab and configure static website hosting so your site can be accessed on the web. I’ll walk you through the process in the next section.
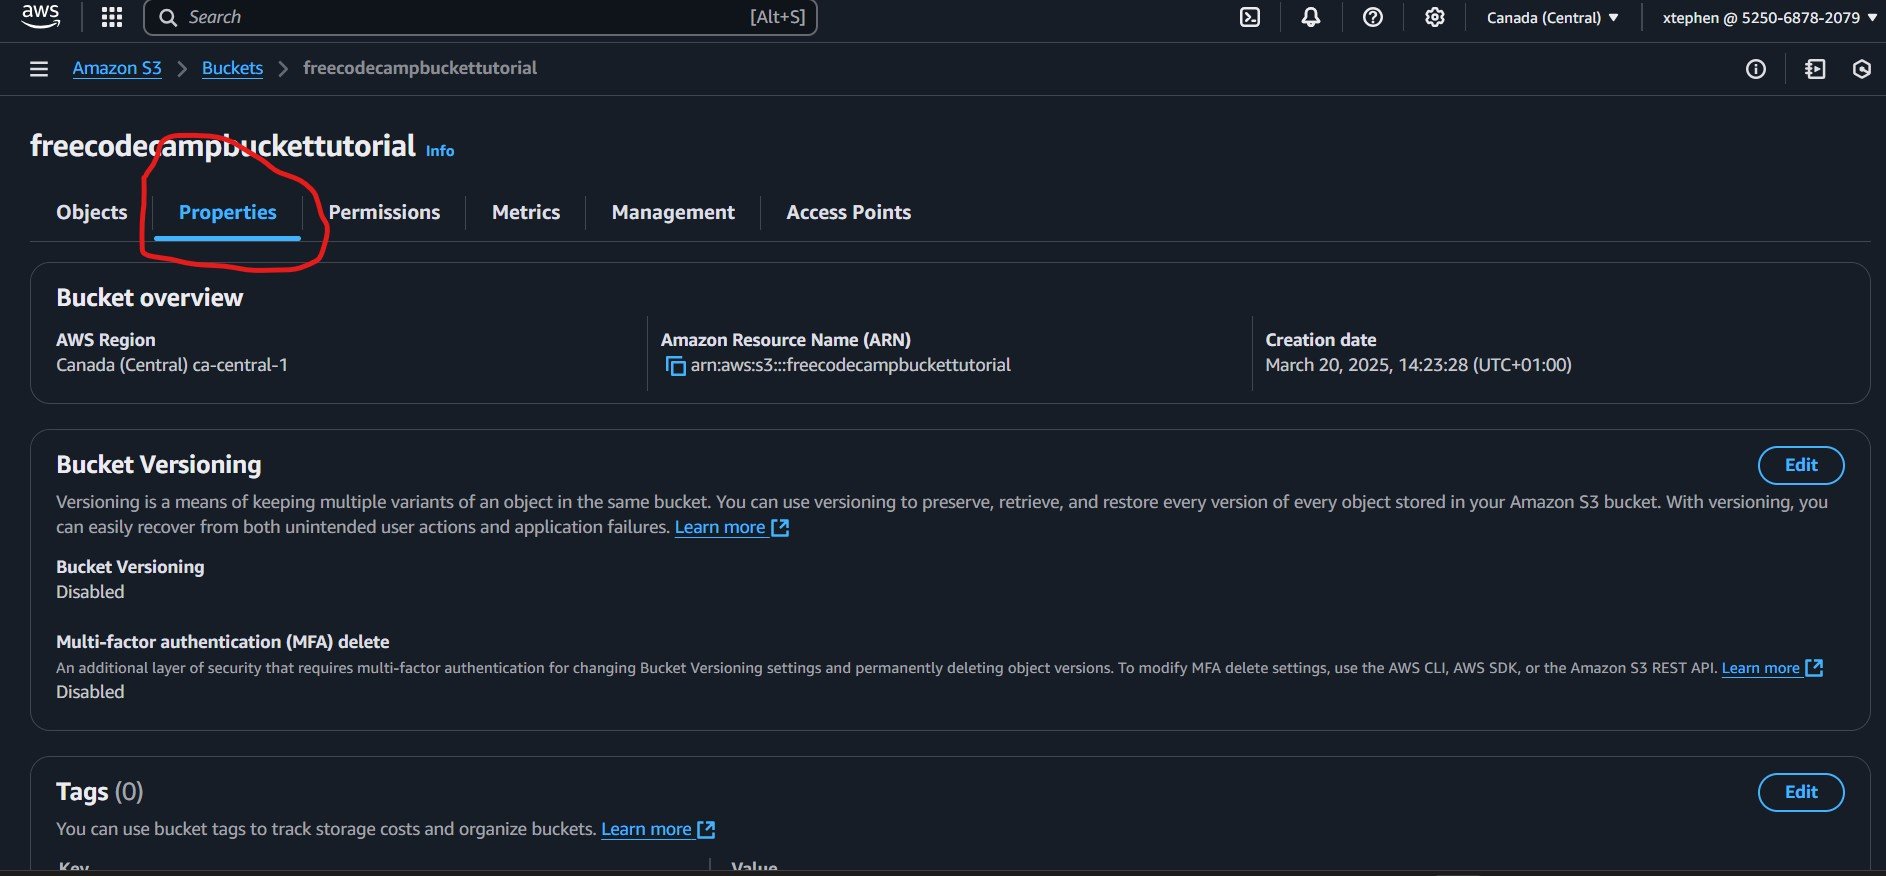
How to Enable Static Hosting
Enabling static website hosting is simple. Scroll to the bottom of the Properties tab, and you will find the Static website hosting section. By default, this option is disabled. Let's enable it to make our website accessible on the web.
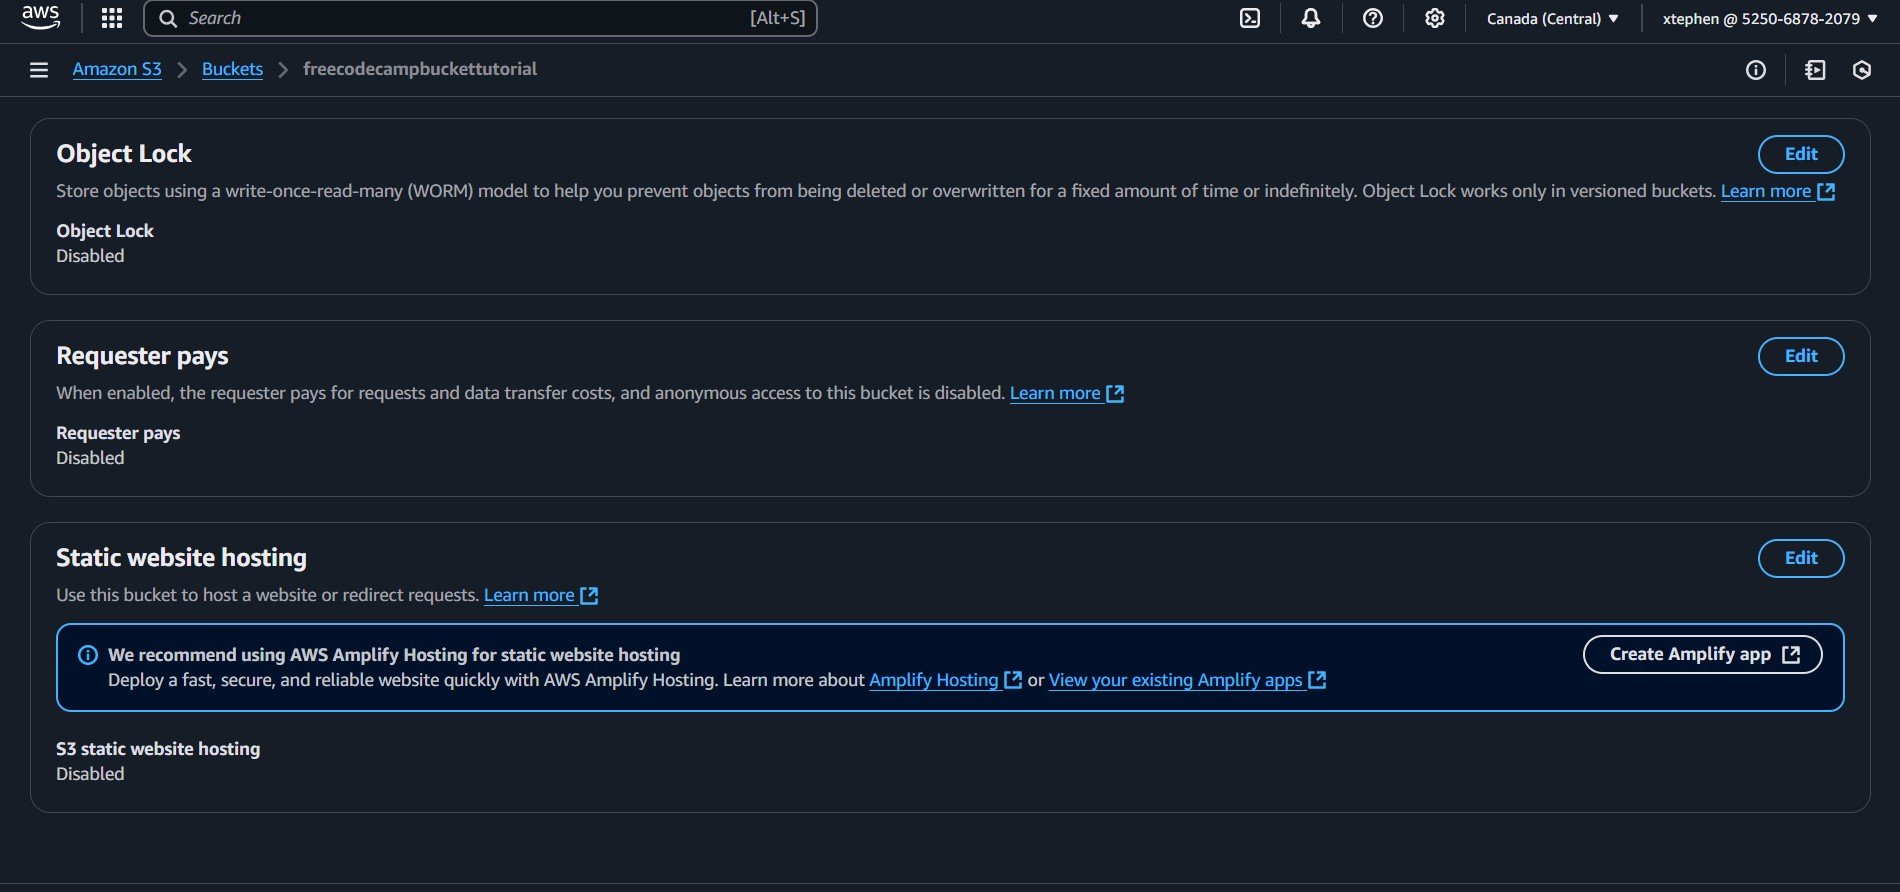
Click on the "Edit" button on the right side of the Static website hosting section. By default, this option is disabled, so change it to Enabled. Once enabled, you will see several configuration options, most of which are optional for this tutorial.
The most important setting here is the Index document, which specifies the default file that loads when someone accesses your site. The placeholder text indicates that it expects an index.html file. Simply type index.html in the Index document field to proceed.
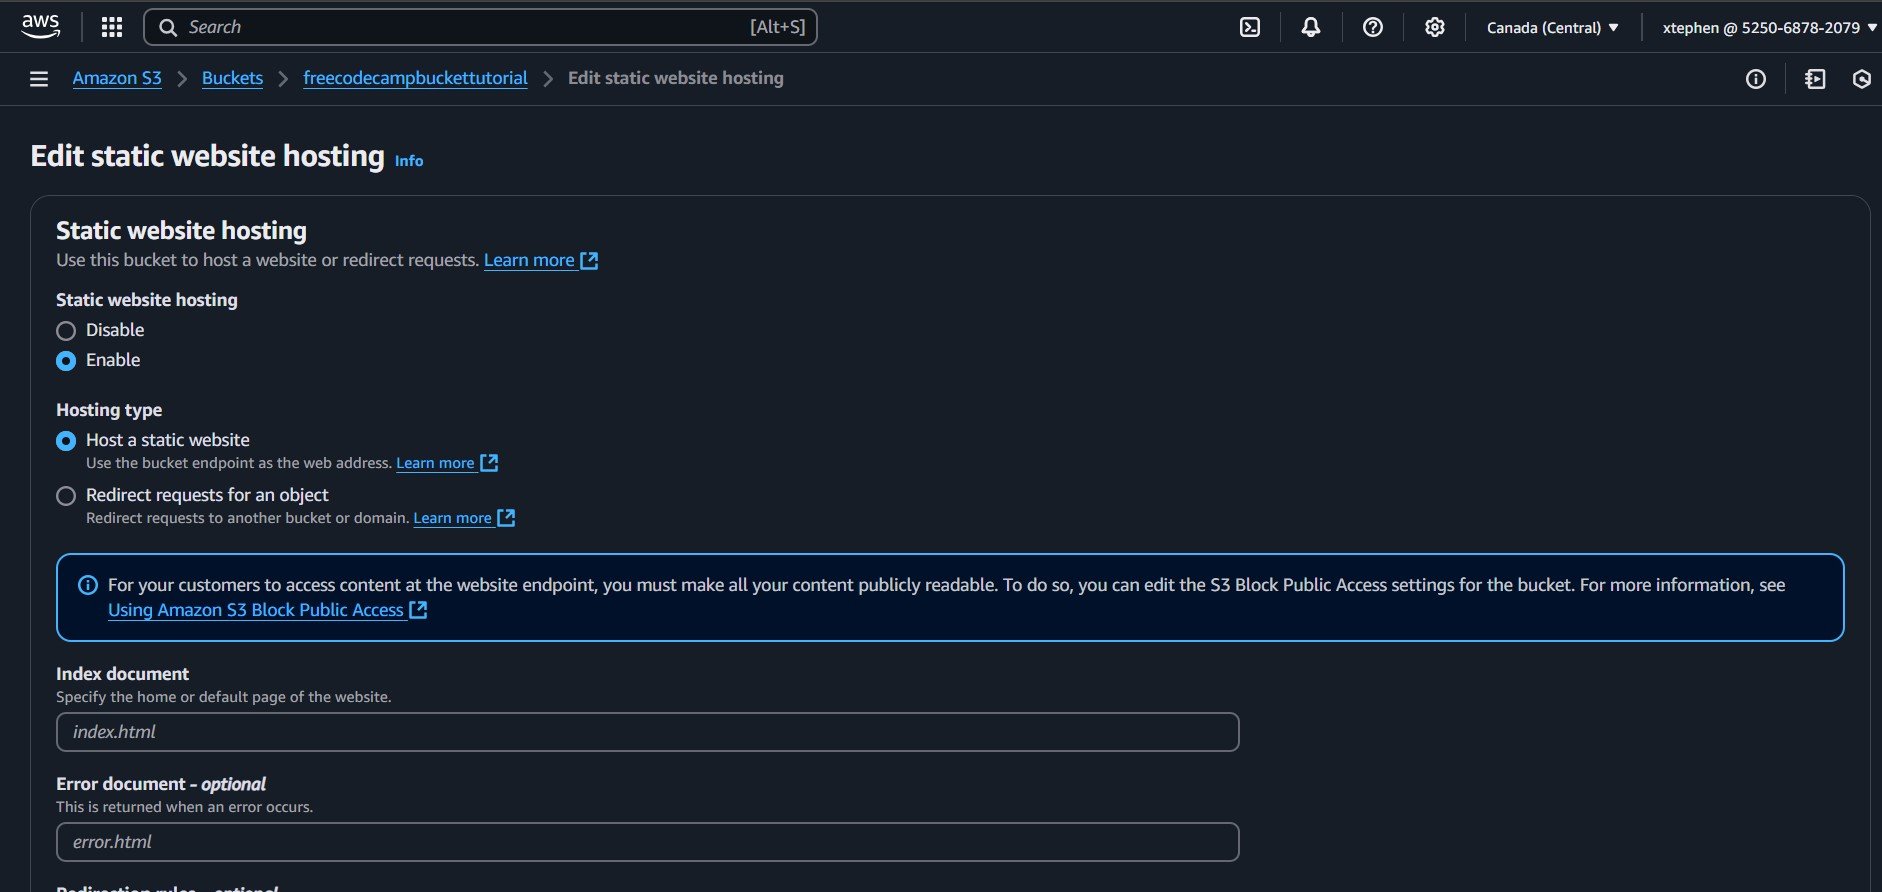
After entering index.html in the Index document field, scroll down and click on "Save changes" to apply the configuration.
After successfully applying the changes, you should find your Static Website URL at the bottom of the Static website hosting section in the Properties tab of your bucket.
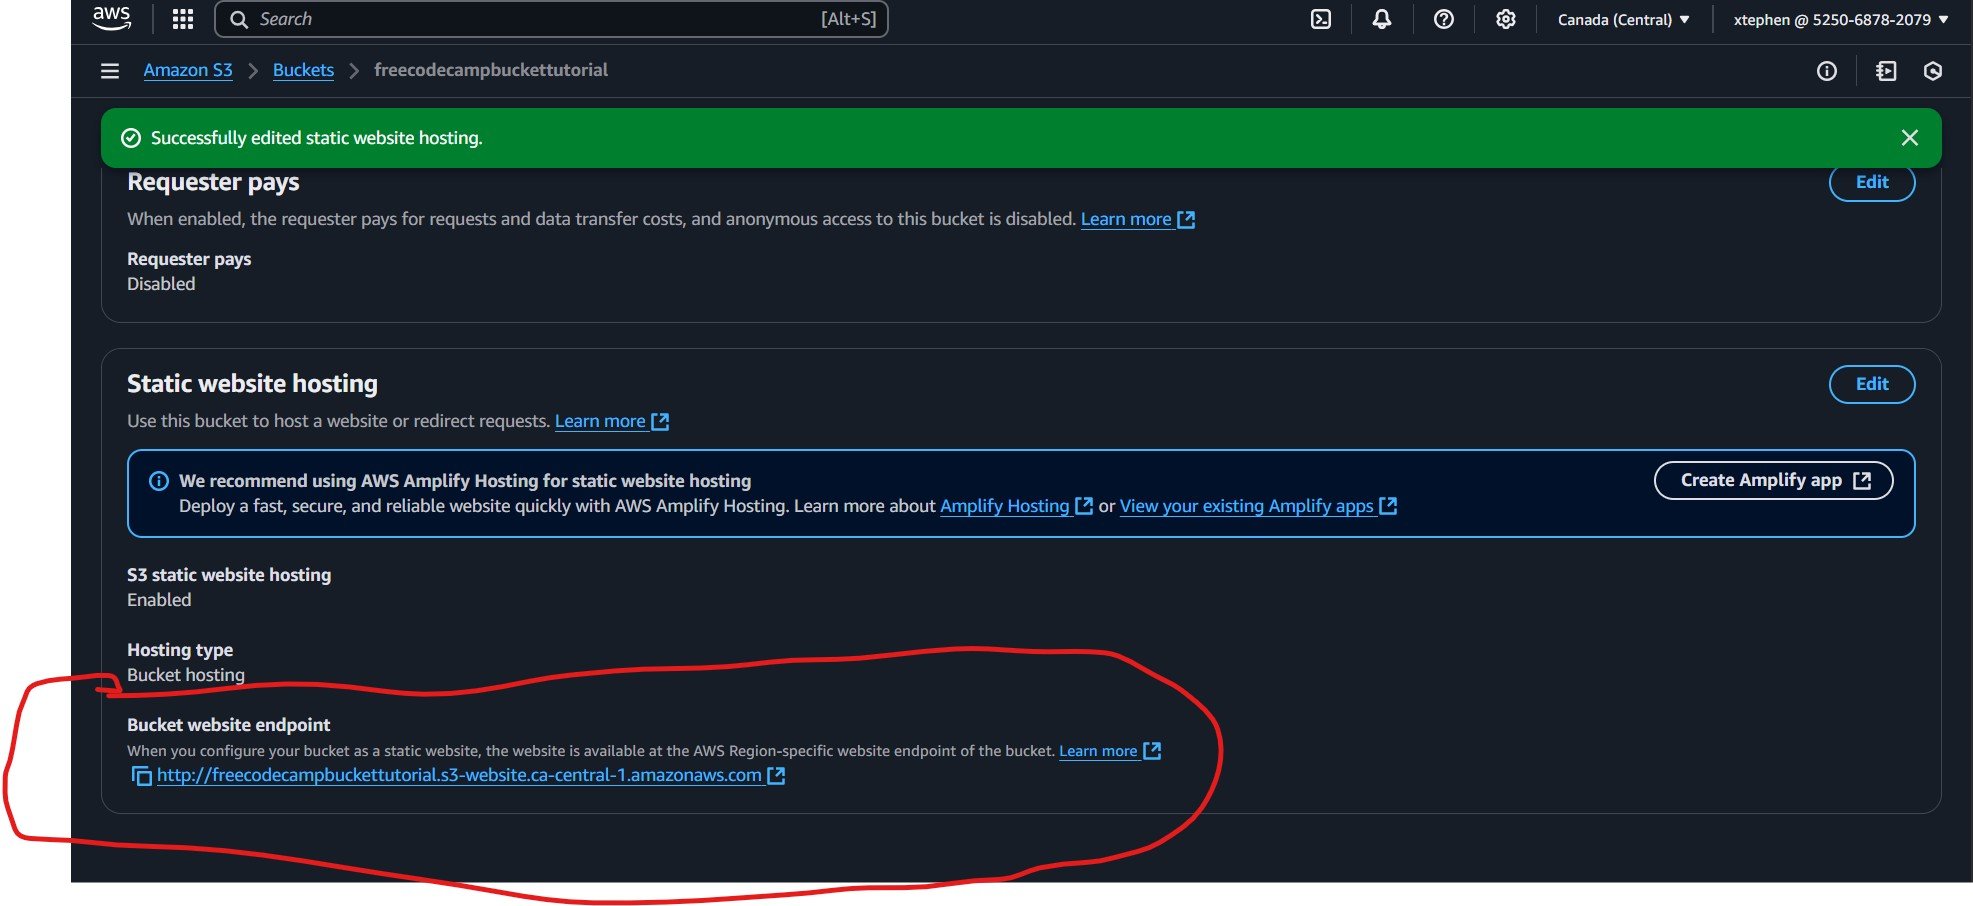
Congratulations! You have just hosted your website on AWS S3. That’s a solid step into the world of DevOps.
Your URL should look something like this: http://your-bucket-name.s3-website.your-region.amazonaws.com/.
Simply copy and paste your Static Website URL into your browser to see your hosted site live.
Now, you have the skills to host a static website for a client and share the URL with them.
So go grab some coffee and banana bread, you have earned it. Then we’ll move on to the next part of the tutorial.
Amazon CloudFront
Amazon CloudFront is a fast, highly secure, and programmable content delivery network (CDN) that improves website performance and security.
Our static website is hosted on S3(http://your-bucket-name.s3-website.your-region.amazonaws.com/) – but you might notice that the site is accessible via HTTP but lacks proper security measures such as SSL/TLS encryption. CloudFront addresses these limitations by providing a secure and scalable way to serve both static and dynamic content globally.
It delivers content to users with low latency by caching copies of your website at edge locations worldwide. When a user requests a resource, CloudFront serves it from the nearest edge location, significantly improving speed and availability.
Key Features of Amazon CloudFront
Secure content delivery: CloudFront supports SSL/TLS encryption, ensuring data is transferred securely between clients and servers.
DDoS protection: Integrated with AWS Shield, CloudFront helps mitigate Distributed Denial of Service (DDoS) attacks.
Global content caching: CloudFront caches content at multiple edge locations, reducing server load and latency.
Customizable distribution: Users can configure cache behavior, origin settings, and security policies.
Seamless integration with AWS tools: CloudFront integrates with AWS Lambda@Edge, S3, EC2, and API Gateway, supporting both static and dynamic content delivery.
Cost optimization: Reduces data transfer costs by caching and serving content from edge locations instead of directly from the origin.
Why Amazon S3 Alone is Not Enough
Amazon S3 is a scalable and durable object storage service, but it lacks key features required for securely serving web content.
First of all, it doesn’t have HTTPS by default. When hosting a site on S3, it is only accessible over HTTP unless additional configurations are made.
Second, it has higher latency. S3 buckets are hosted in a specific AWS region, which may result in slower content delivery for users in different locations.
It also doesn’t have built-in caching, which means that every request is served from S3, increasing response time and potential costs.
And finally, there’s no DDoS protection – unlike CloudFront, S3 does not provide native protection against cyberattacks.
Why You Should Serve Your Website with CloudFront
While Amazon S3 is a great storage solution, it lacks the security and performance optimizations needed for web hosting. Amazon CloudFront enhances security with SSL/TLS encryption, improves performance with global caching, and provides robust security features like DDoS protection.
By leveraging CloudFront, you can ensure your website is not only fast but also secure, scalable, and cost-effective.
To get started with hosting your site on CloudFront, navigate to the CloudFront service page in AWS. You can do this by going to your AWS Management Console homepage or dashboard and searching for “CloudFront” using the search bar in the top left corner. Click on “CloudFront” from the search results to proceed.
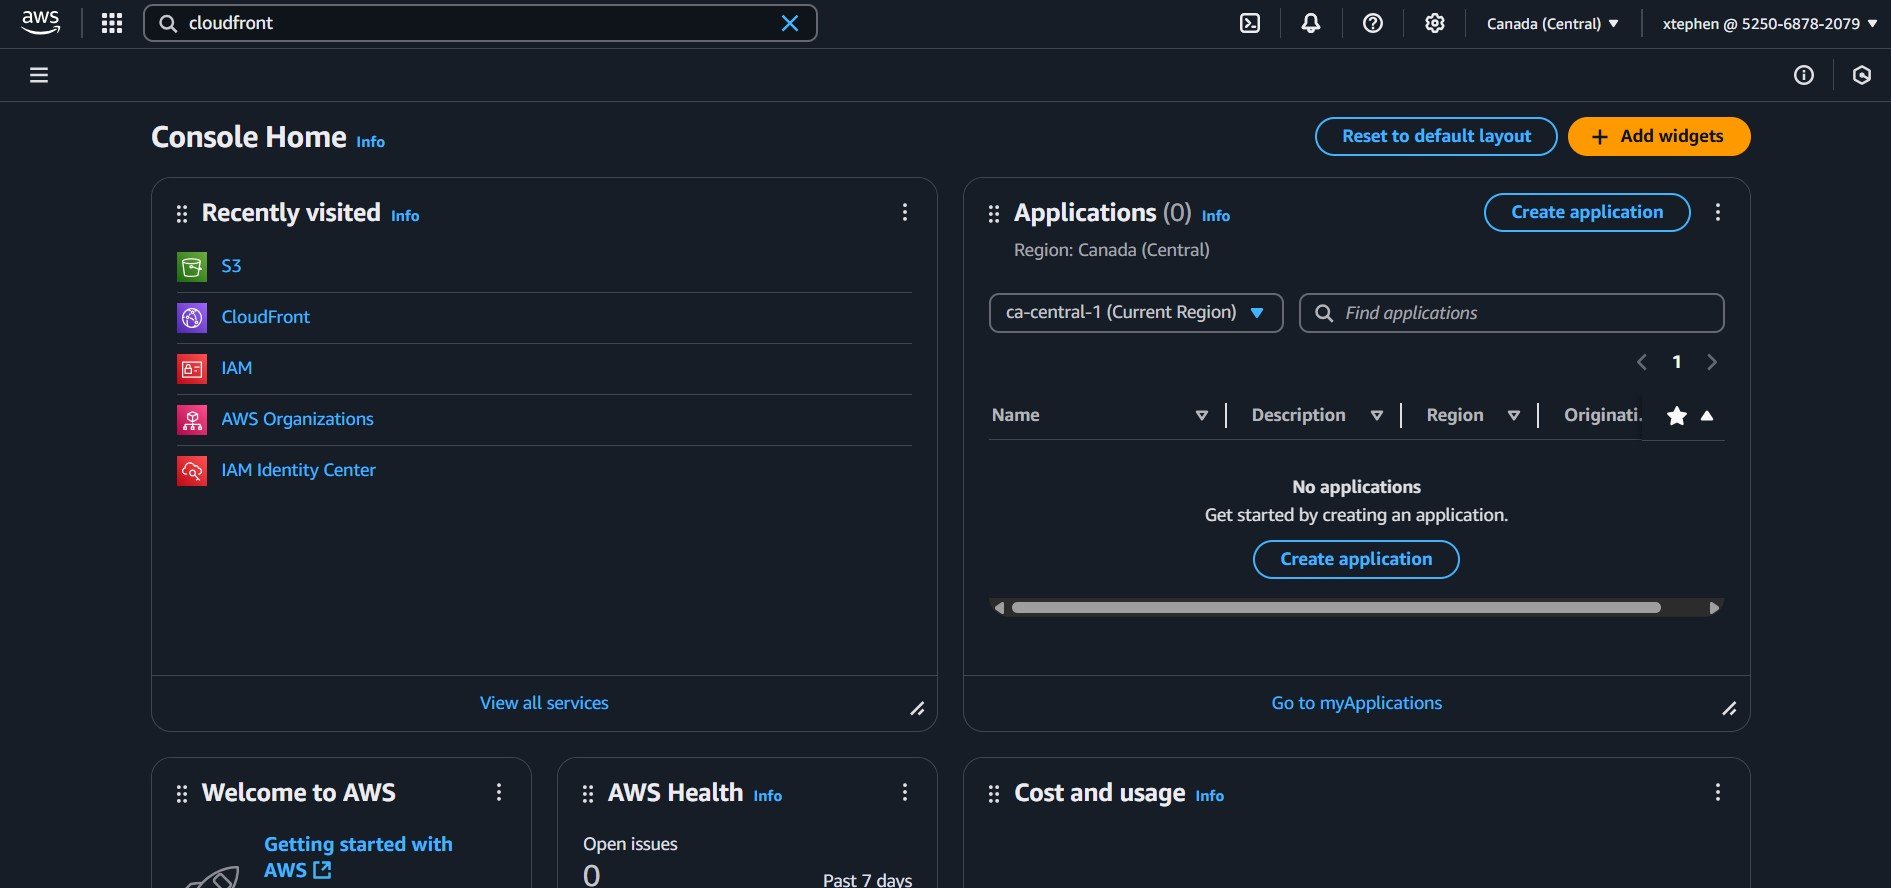
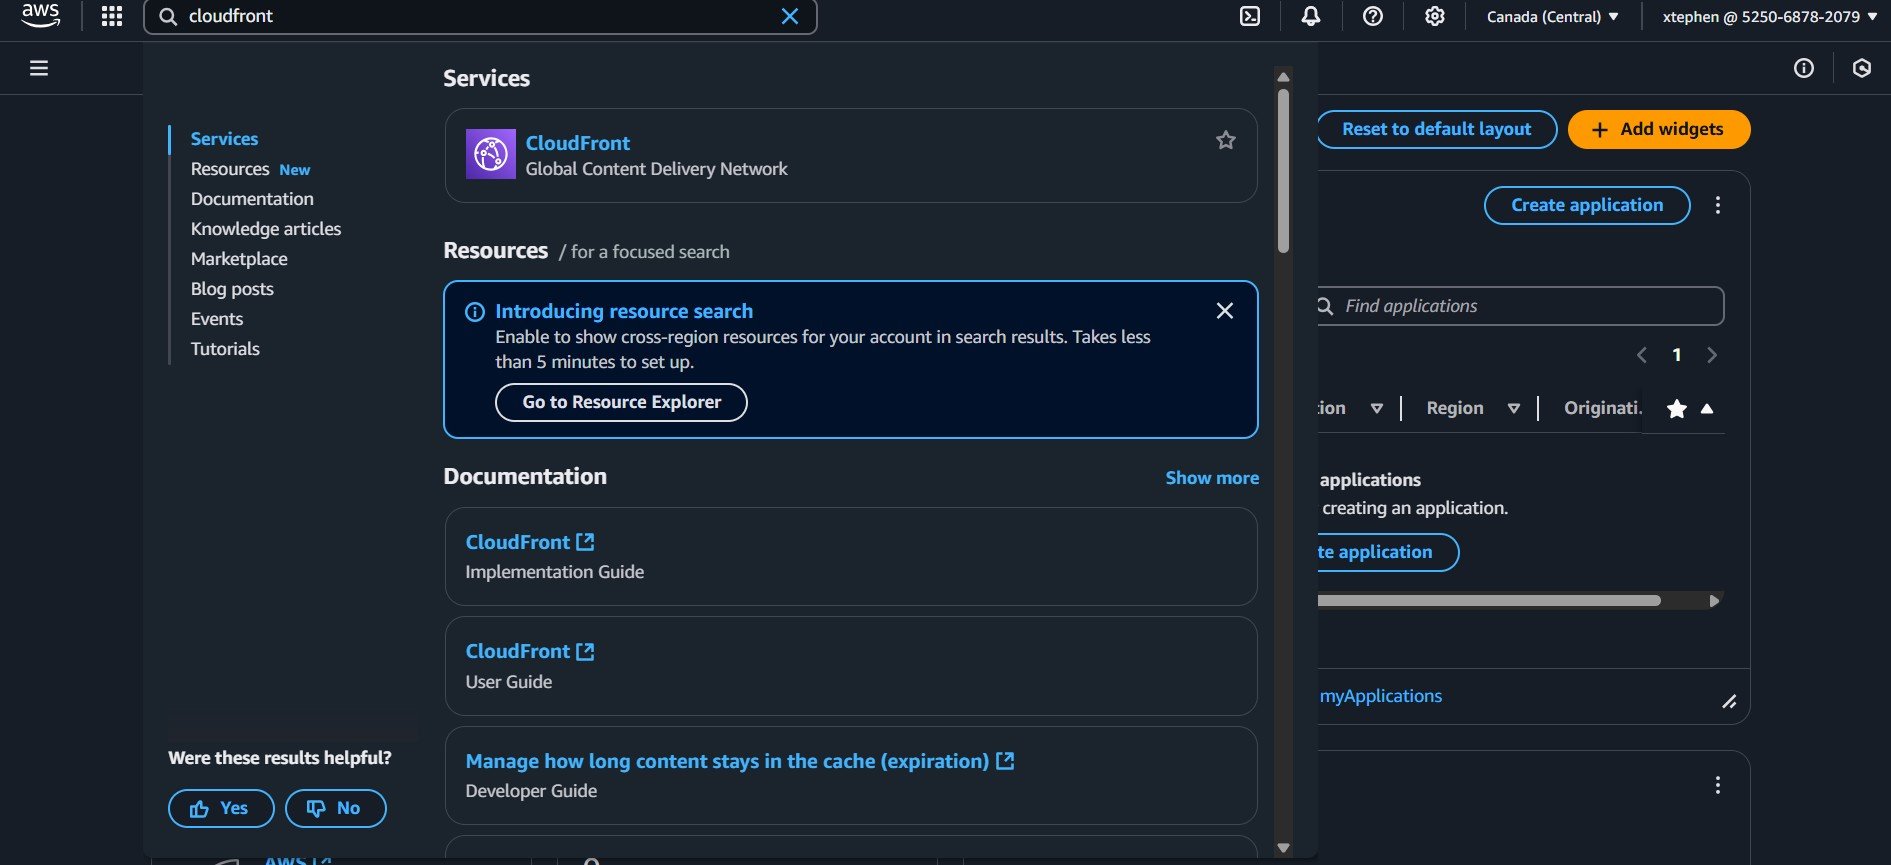
Once you navigate to the AWS CloudFront page, you will see a Create Distribution button. Click on it to begin setting up CloudFront for your website.
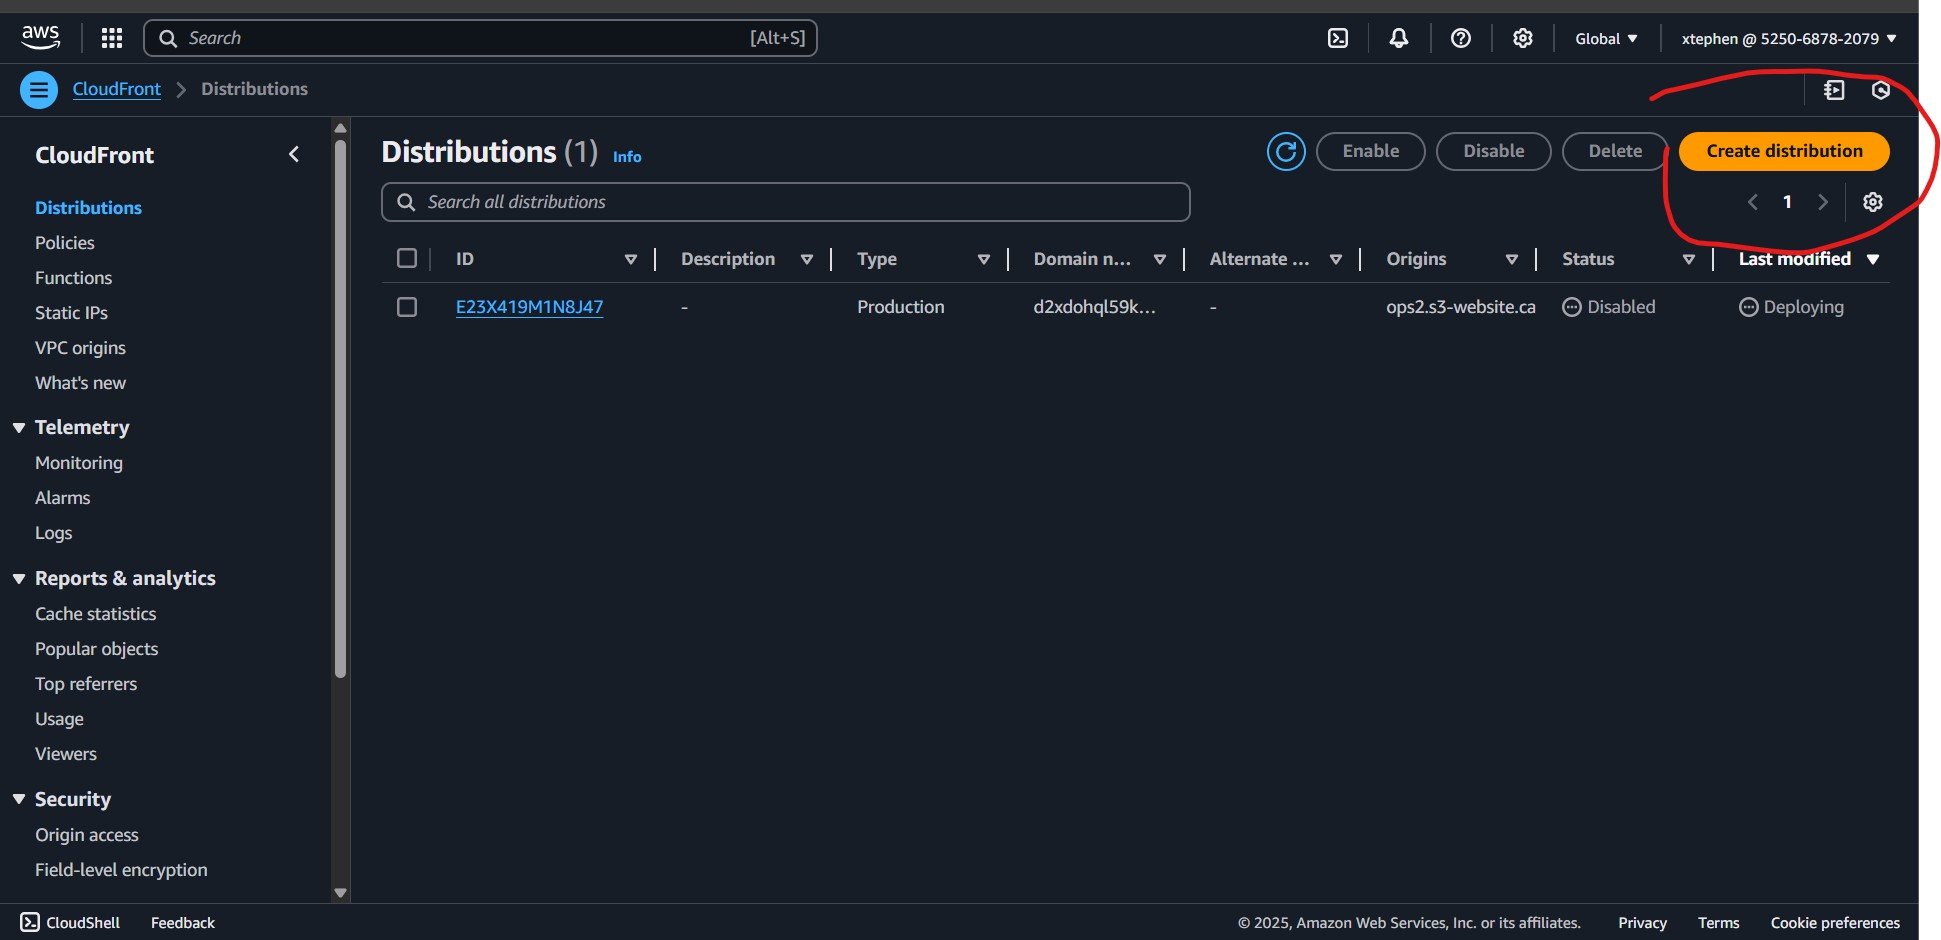
What is a CloudFront Distribution?
A CloudFront distribution is the configuration that defines how CloudFront delivers content to users. It acts as a link between your origin server (such as an S3 bucket) and CloudFront’s global network of edge locations. When a user requests your site, CloudFront retrieves content from the nearest edge location instead of always fetching it from the origin, ensuring faster load times, reduced latency, and improved security.
There are two types of distributions in CloudFront:
Web Distribution: Used for websites, APIs, and dynamic or static content.
RTMP Distribution (Deprecated): Previously used for streaming media (now replaced by modern streaming services).
For our S3-hosted website, we will be creating a Web Distribution to securely serve content over HTTPS while improving speed and reliability.
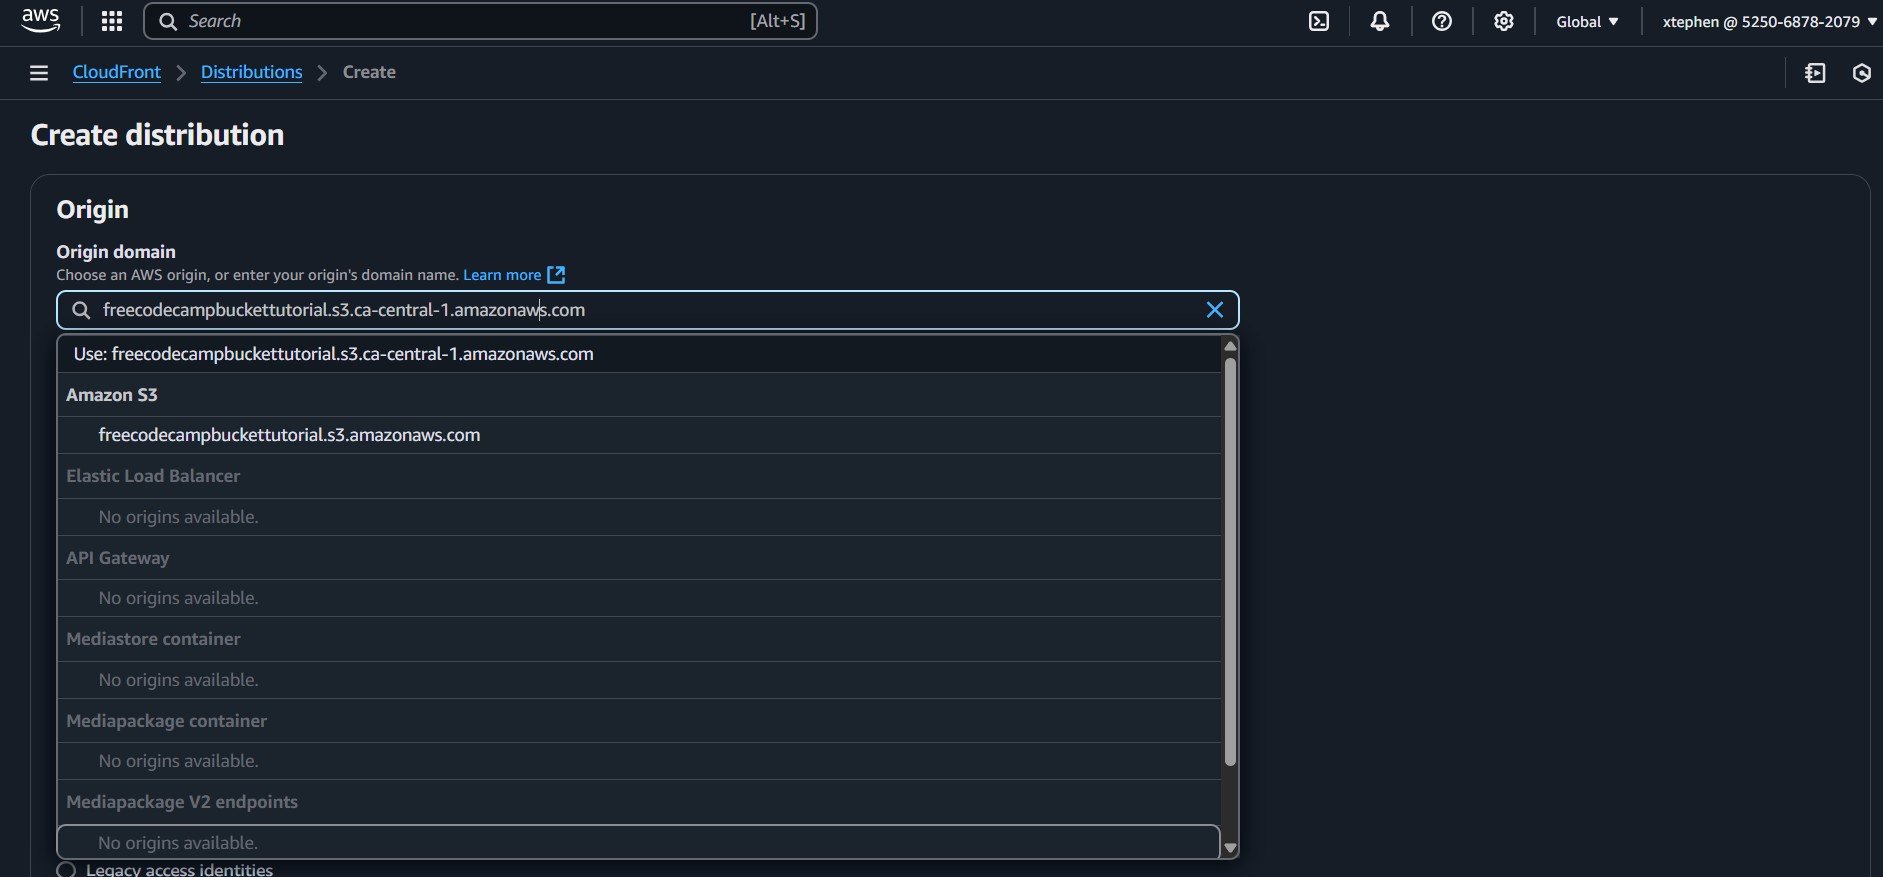
After clicking the Create Distribution button, you will be directed to the Create Distribution page, where you can configure various settings. In this tutorial, we will focus on the essential options.
Under the Origin section, select your S3 bucket as the origin domain.
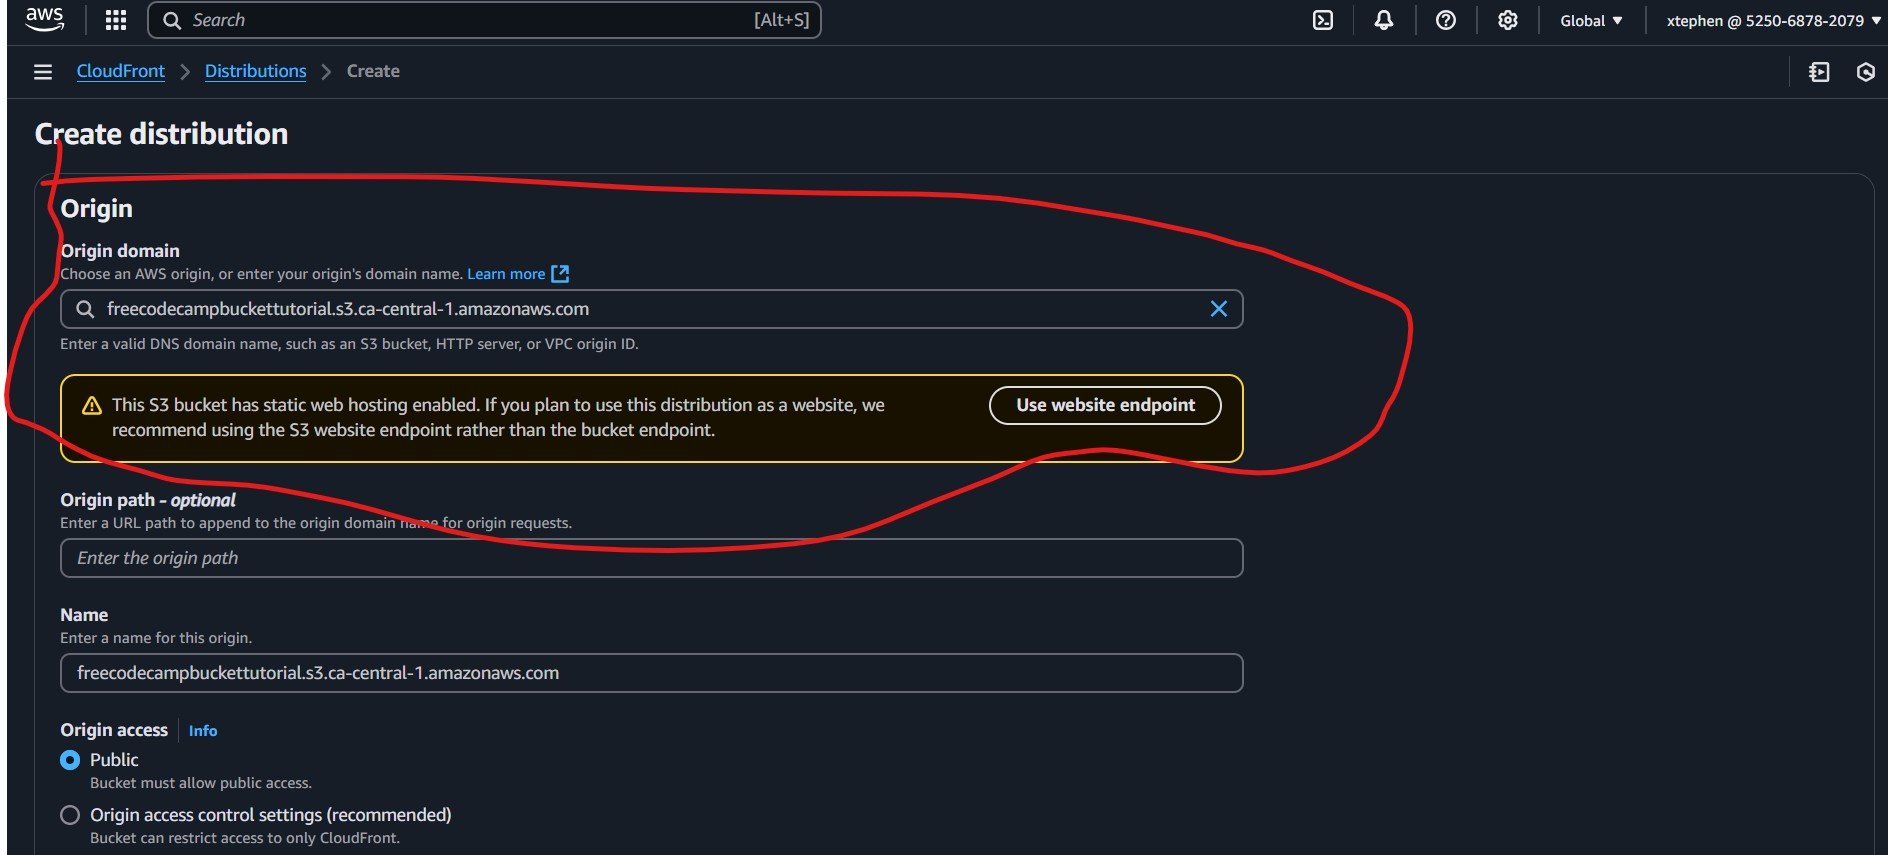
If your S3 bucket has static website hosting enabled, AWS recommends using the S3 website endpoint instead of the default bucket endpoint.
Enter the correct S3 website endpoint in the Origin domain field. For example:
freecodecampbuckettutorial.s3-website.ca-central-1.amazonaws.comEnsure you use the S3 website endpoint rather than the standard S3 bucket URL to avoid issues with accessing your site.
By following these steps, you ensure that CloudFront correctly serves your static website from the S3 bucket.
Make sure that you use the S3 website endpoint rather than the standard S3 bucket URL to avoid issues with accessing your site. This will be suggested to you descriptively while filling in the origin name. Click on “Use website endpoint” and it will populate the field with the S3 bucket website endpoint instead of the bucket URL.
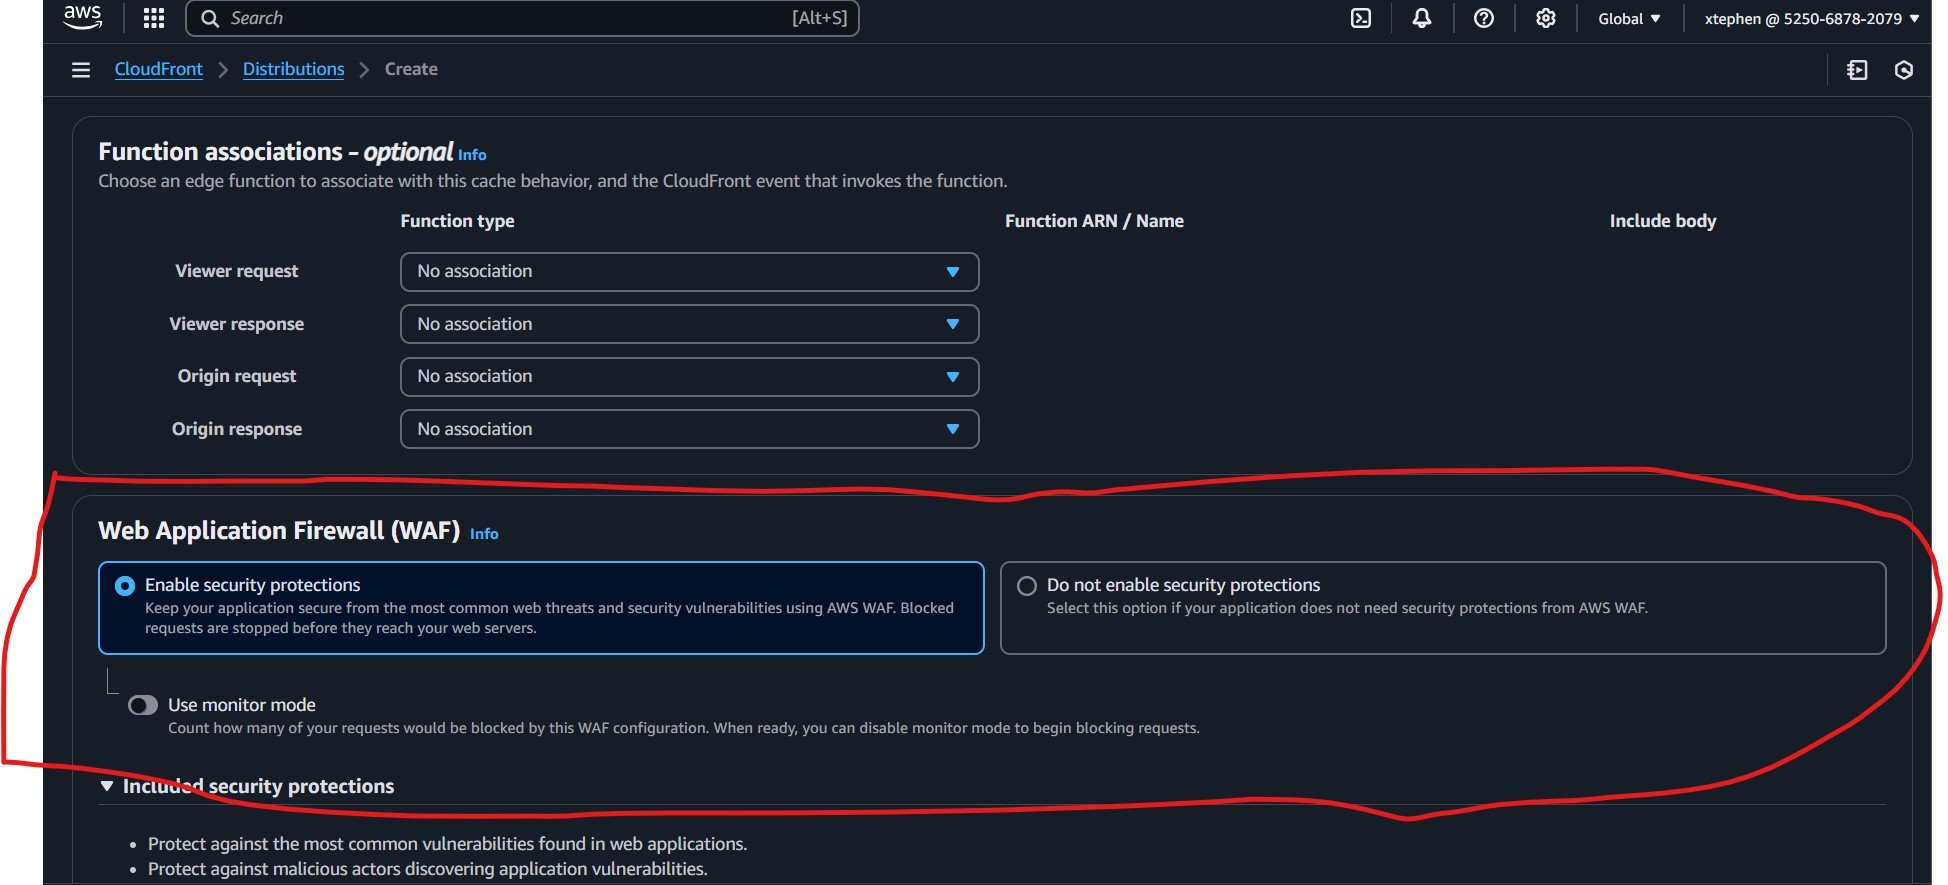
Next, scroll down to the Web Application Firewall (WAF) section at the bottom of the page and enable security protections to safeguard your website from common web threats. Select “Create Distribution” to deploy your CloudFront distribution.
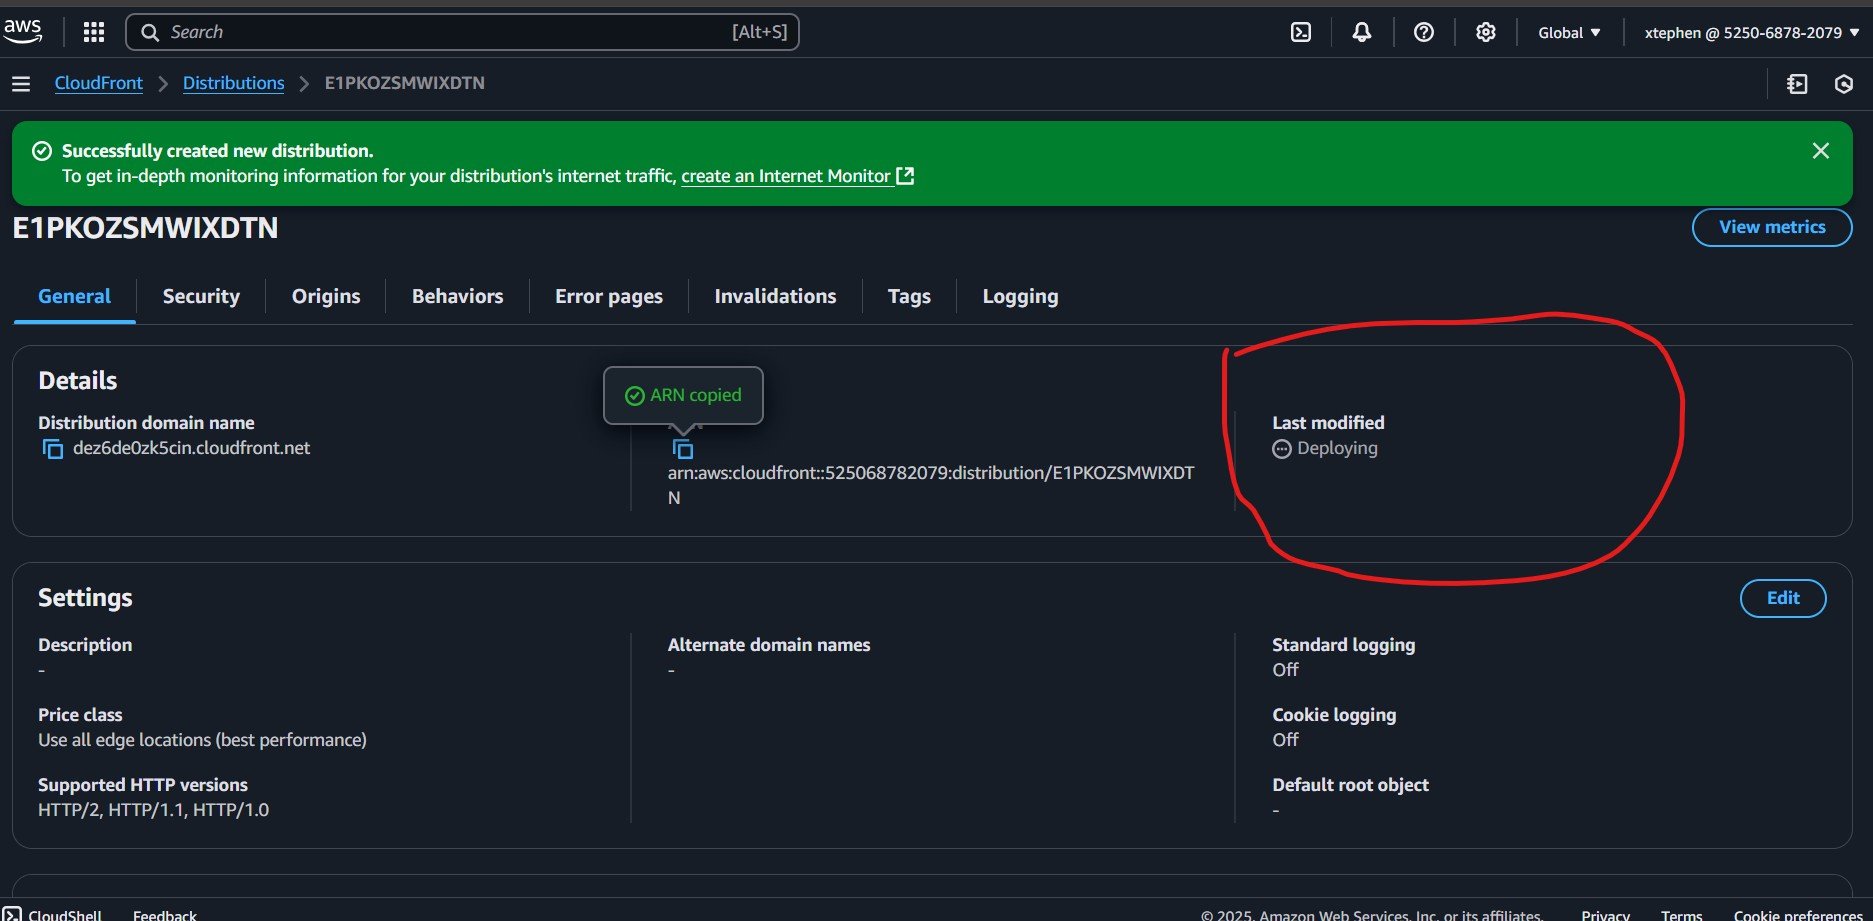
Your CloudFront Distributions page should now display the newly created distribution. The page will include key details such as:
Distribution ID: A unique identifier for your CloudFront distribution.
Domain Name: The CloudFront-provided URL (for example,
d1234abcd.cloudfront.net), which you can use to access your site.
After creating your CloudFront distribution, navigate to your Distributions page and check the Last Modified section for its status. If the status shows Deploying, you will need to wait until it changes, which may take several minutes.
Once the deployment is complete, the status will typically update to a timestamp, indicating that the distribution is ready for use. Ensure the status has changed before proceeding with further configurations or accessing your CloudFront distribution.
Your website is now successfully hosted on CloudFront!
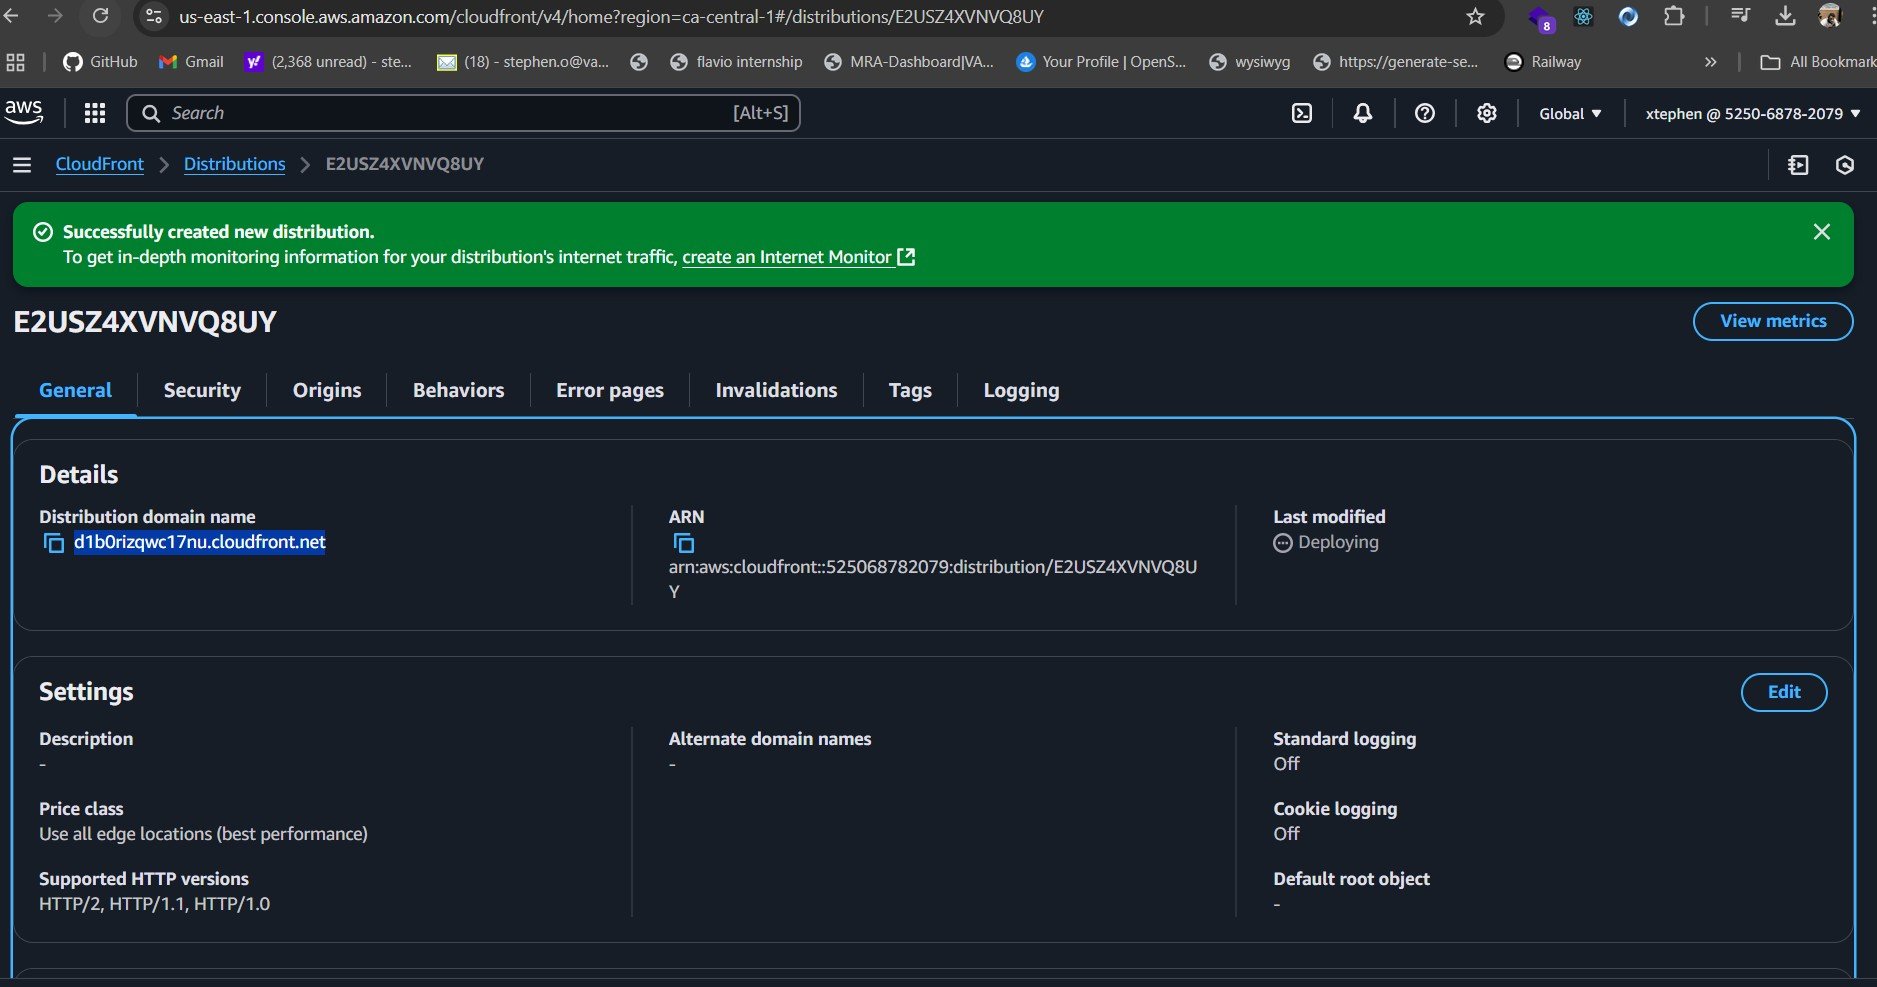
We now have our CloudFront Domain Name (for example, d1234abcd.cloudfront.net), which you can find in the Details section of your distribution. Before making any further changes, let’s preview the site by copying and pasting the domain name into a web browser.
At this stage, when you try to access your website using the CloudFront Domain Name, you’ll notice that the site cannot be reached. This happens because CloudFront does not yet have permission to fetch content from your S3 bucket.
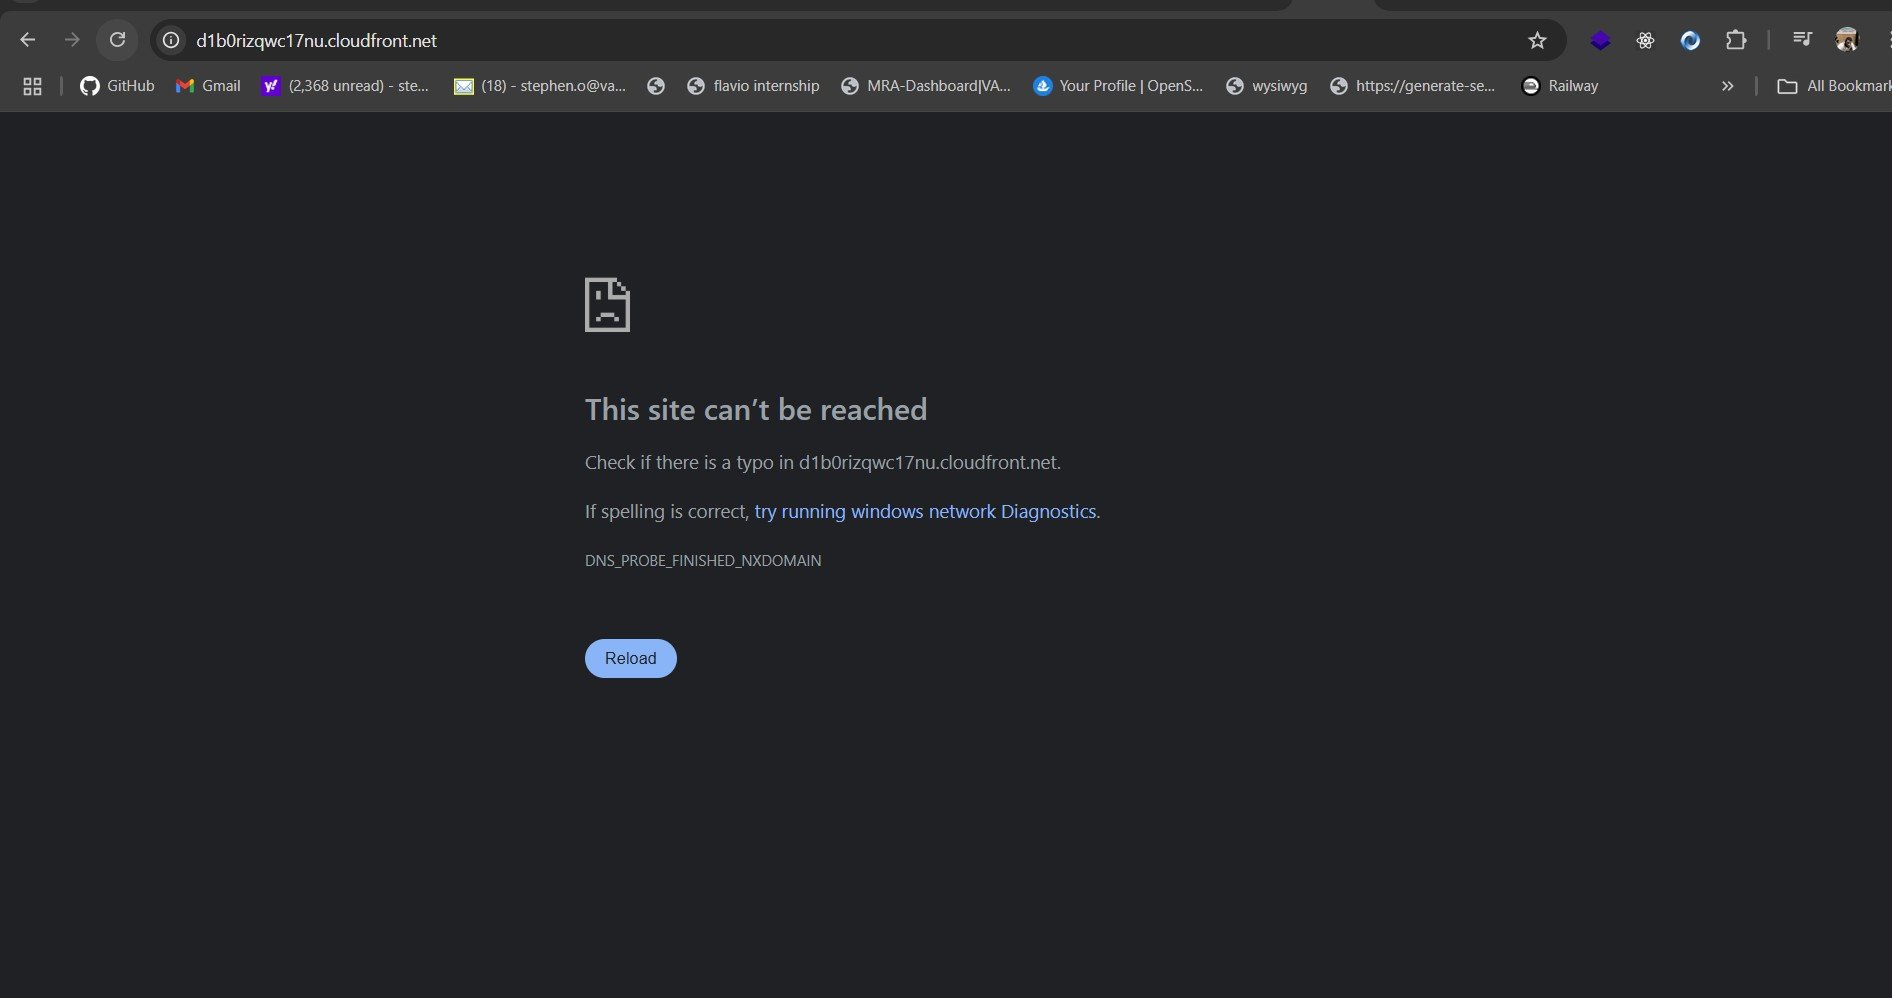
To fix this, you need to update your S3 bucket policy to explicitly allow CloudFront to access your objects. You can do this by adding a condition that grants access to requests coming specifically from your CloudFront distribution.
Understanding the Amazon Resource Name (ARN)
An Amazon Resource Name (ARN) is a unique identifier assigned to AWS resources. Every CloudFront distribution has its own ARN, which you can find at the top of the CloudFront distribution details page. It looks like something like this:
arn:aws:cloudfront::123456789012:distribution/E2ABC3XYZ456
This ARN is crucial because we use it in our bucket policy to restrict access to only our CloudFront distribution, ensuring no other services or users can retrieve data directly from our S3 bucket.
Updated S3 Bucket Policy
To allow CloudFront to serve content from our S3 bucket, we update the S3 bucket policy as follows:
{
  "Version": "2012-10-17",
  "Statement": [
    {
      "Effect": "Allow",
      "Principal": {
        "Service": "cloudfront.amazonaws.com"
      },
      "Action": "s3:GetObject",
      "Resource": "arn:aws:s3:::your-bucket-name/*",
      "Condition": {
        "StringEquals": {
          "AWS:SourceArn": "arn:aws:cloudfront::[ACCOUNT_ID]:distribution/[DISTRIBUTION_ID]"
        }
      }
    },
    {
      "Effect": "Allow",
      "Principal": "*",
      "Action": "s3:GetObject",
      "Resource": "arn:aws:s3:::your-bucket-name/*"
    }
  ]
}
Breaking down the bucket policy:
First statement that grants CloudFront access:
“Effect”: “Allow”: This permits access to the specified resource."Principal": { "Service": "cloudfront.amazonaws.com" }: Grants access specifically to CloudFront."Action": "s3:GetObject": Allows CloudFront to retrieve objects from the S3 bucket."Resource": "arn:aws:s3:::your-bucket-name/*": Grants access to all objects in the S3 bucket.“Condition”: Ensures that only requests originating from our CloudFront distribution are allowed using:AWS:SourceArn": "arn:aws:cloudfront::123456789012:distribution/E2ABC3XYZ456
Second statement (optional, and grants public access)
This statement allows all users (
Principal: "*") to access the S3 objects.If you want to restrict access only to CloudFront, you can remove this second statement.
After editing and updating your S3 bucket policy to allow CloudFront access, you can refresh the page where you preview your CloudFront domain name (for example, d1234abcd.cloudfront.net). Open it in a browser, and if you have carefully followed all the instructions, you have successfully hosted a static site on S3 and CloudFront.
Your website is now fully protected, well done! Congratulations, DevOps pro!
FIST BUMPS!
Conclusion
In this guide, we’ve only scratched the surface of what AWS can do. S3 and CloudFront are powerful services, but there’s still so much more you can explore, from advanced security settings to automation and performance optimizations.
As you continue your AWS journey, you can dive deeper into topics like caching strategies, custom domain configurations, and integrating AWS Lambda@Edge for dynamic content. The possibilities are endless.
This is just the beginning, and you’re off to a great start. Keep experimenting, keep learning, and soon we will be mastering even more advanced AWS capabilities. Happy building!

![How to become a self-taught developer while supporting a family [Podcast #164]](https://cdn.hashnode.com/res/hashnode/image/upload/v1741989957776/7e938ad4-f691-4c9e-8c6b-dc26da7767e1.png?#)


