_Igor_Mojzes_Alamy.jpg?#)


![Apple Considers Delaying Smart Home Hub Until 2026 [Gurman]](https://www.iclarified.com/images/news/96946/96946/96946-640.jpg)
![Tariffs Threaten Apple's $999 iPhone Price Point in the U.S. [Gurman]](https://www.iclarified.com/images/news/96943/96943/96943-640.jpg)
![iPhone 17 Pro Won't Feature Two-Toned Back [Gurman]](https://www.iclarified.com/images/news/96944/96944/96944-640.jpg)


.webp?#)
.webp?#)
.webp?#)


![[The AI Show Episode 142]: ChatGPT’s New Image Generator, Studio Ghibli Craze and Backlash, Gemini 2.5, OpenAI Academy, 4o Updates, Vibe Marketing & xAI Acquires X](https://www.marketingaiinstitute.com/hubfs/ep%20142%20cover.png)


![From drop-out to software architect with Jason Lengstorf [Podcast #167]](https://cdn.hashnode.com/res/hashnode/image/upload/v1743796461357/f3d19cd7-e6f5-4d7c-8bfc-eb974bc8da68.png?#)


-Mario-Kart-World-Hands-On-Preview-Is-It-Good-00-08-36.jpg?width=1920&height=1920&fit=bounds&quality=80&format=jpg&auto=webp#)

(1).jpg?width=1920&height=1920&fit=bounds&quality=80&format=jpg&auto=webp#)


.png?#)


Enabling Ethernet support and OpenSSH on Raspberry Pi 5 with Buildroot
In my last post, I discussed logging into a Raspberry Pi 5 image built with Buildroot over a serial connection. However, this method requires either the official debug probe or a more common serial adapter. Another widely used alternative is leveraging the Raspberry Pi 5's Ethernet port to log into the system using SSH. Device Tree configuration The Ethernet interface for the Raspberry Pi 5 is defined in two different Device Tree Source (DTS) files included in the Linux Kernel source. These files are: arch/arm/boot/dts/broadcom/bcm2712-rpi-5-b.dts arch/arm/boot/dts/broadcom/rp1.dtsi A DTS (Device Tree Source) file is a human-readable text file that describes hardware components and their configurations for systems using the Device Tree, such as Linux-based embedded systems. This file is compiled into a DTB (Device Tree Blob), which the operating system reads at boot time to understand the hardware layout without relying on hardcoded Kernel configurations. The Ethernet interface is described in the following DTS entry: rp1_eth: ethernet@100000 { reg = ; compatible = "cdns,macb"; #address-cells = ; #size-cells = ; interrupts = ; clocks = ; clock-names = "pclk", "hclk", "tsu_clk"; phy-mode = "rgmii-id"; cdns,aw2w-max-pipe = /bits/ 8 ; cdns,ar2r-max-pipe = /bits/ 8 ; cdns,use-aw2b-fill; local-mac-address = [00 00 00 00 00 00]; status = "disabled"; }; And it is referenced and enable in the following DTS entry: &rp1_eth { status = "okay"; phy-handle = ; phy-reset-gpios = ; phy-reset-duration = ; phy1: ethernet-phy@1 { reg = ; brcm,powerdown-enable; }; }; Installing and Setting Up Buildroot Assuming all required dependencies are already installed, Buildroot can be downloaded and extracted as follows: mkdir ~/buildroot && cd ~/buildroot wget https://buildroot.org/downloads/buildroot-2024.11.1.tar.gz tar zxf buildroot-2024.11.1.tar.gz --strip-components=1 Next, create an output directory where Buildroot will store all build artifacts, and configure it for the Raspberry Pi 5: cd ~/buildroot mkdir output && cd output make O=$PWD -C ../buildroot-2025.02 raspberrypi5_defconfig Enabling Ethernet Support for Raspberry Pi 5 Raspberry Pi 5 features a Cadence Ethernet controller integrated into the RP1 chip and a Broadcom BCM54213 PHY connected to it. To support Ethernet networking, the following Kernel configuration options must be enabled: CONFIG_NET_VENDOR_CADENCE CONFIG_MACB CONFIG_BROADCOM_PHY These configuration can be enable from within Buildroot output folder, by simply running: make linux-menuconfig These options ensure that the necessary device drivers are compiled to support Ethernet functionality. The rest of the Kernel configuration, including network stack configuration, remains as per the default. Enabling OpenSSH in Buildroot To enable the OpenSSH server and client in your image, open the Buildroot menu configuration tool: make menuconfig Then, navigate to Target packages -> Networking applications. Once inside, scroll down to find and enable OpenSSH: We also will need ifupdown scripts enabled to be able to bring our network up when needed. While still in Target packages -> Networking applications, make sure the following option is enable (should be default for Raspberry Pi 5): BR2_PACKAGE_IFUPDOWN_SCRIPTS=y Customizing the Root Filesystem In order to store OpenSSH custom configuration file, we can take advantage of a Buildroot feature called RootFS Overlay. We will also use this feature to configure our network interface. Before enabling the feature, it is necessary to create a folder that will store the RootFS overlay. The folder must have the following tree: +-- rootfs_overlay | +-- etc/ | +-- ssh/ | +-- sshd_config | +-- network/ | +-- interfaces To create such a folder-tree, one can run: mkdir -p ~/rootfs_overlay/etc/ssh ~/rootfs_overlay/etc/network sshd_config must contain the configuration for the ssh server we are building. In this case, we could only enable root login over ssh, by running the following: echo "PermitRootLogin yes" > ~/rootfs_overlay/etc/ssh/sshd_config Note that enabling root login over ssh is not recommended in a real-life application due to cyber security reasons. For the network configuration, interfaces file should be filled using the following command: cat > ~/rootfs_overlay/etc/network/interfaces Enable root login with password (BR2_TARGET_ENABLE_ROOT_LOGIN [=y]) Once everything is set up, the compilation can be triggered by running: make After the compilation is finished without errors, all is left to do is to write the image into the SD card (assuming it is enumerated as /dev/sda), by running: dd if=images/sdcard.img of=/dev/sda status=progress
In my last post, I discussed logging into a Raspberry Pi 5 image built with Buildroot over a serial connection. However, this method requires either the official debug probe or a more common serial adapter.
Another widely used alternative is leveraging the Raspberry Pi 5's Ethernet port to log into the system using SSH.
Device Tree configuration
The Ethernet interface for the Raspberry Pi 5 is defined in two different Device Tree Source (DTS) files included in the Linux Kernel source. These files are:
A DTS (Device Tree Source) file is a human-readable text file that describes hardware components and their configurations for systems using the Device Tree, such as Linux-based embedded systems. This file is compiled into a DTB (Device Tree Blob), which the operating system reads at boot time to understand the hardware layout without relying on hardcoded Kernel configurations.
The Ethernet interface is described in the following DTS entry:
rp1_eth: ethernet@100000 {
    reg = <0xc0 0x40100000  0x0 0x4000>;
    compatible = "cdns,macb";
    #address-cells = <1>;
    #size-cells = <0>;
    interrupts = ;
    clocks = <&macb_pclk &macb_hclk &rp1_clocks RP1_CLK_ETH_TSU>;
    clock-names = "pclk", "hclk", "tsu_clk";
    phy-mode = "rgmii-id";
    cdns,aw2w-max-pipe = /bits/ 8 <8>;
    cdns,ar2r-max-pipe = /bits/ 8 <8>;
    cdns,use-aw2b-fill;
    local-mac-address = [00 00 00 00 00 00];
    status = "disabled";
};
And it is referenced and enable in the following DTS entry:
&rp1_eth {
    status = "okay";
    phy-handle = <&phy1>;
    phy-reset-gpios = <&rp1_gpio 32 GPIO_ACTIVE_LOW>;
    phy-reset-duration = <5>;

    phy1: ethernet-phy@1 {
        reg = <0x1>;
        brcm,powerdown-enable;
    };
};
Installing and Setting Up Buildroot
Assuming all required dependencies are already installed, Buildroot can be downloaded and extracted as follows:
mkdir ~/buildroot && cd ~/buildroot
wget https://buildroot.org/downloads/buildroot-2024.11.1.tar.gz
tar zxf buildroot-2024.11.1.tar.gz --strip-components=1
Next, create an output directory where Buildroot will store all build artifacts, and configure it for the Raspberry Pi 5:
cd ~/buildroot
mkdir output && cd output
make O=$PWD -C ../buildroot-2025.02 raspberrypi5_defconfig
Enabling Ethernet Support for Raspberry Pi 5
Raspberry Pi 5 features a Cadence Ethernet controller integrated into the RP1 chip and a Broadcom BCM54213 PHY connected to it. To support Ethernet networking, the following Kernel configuration options must be enabled:
CONFIG_NET_VENDOR_CADENCE
CONFIG_MACB
CONFIG_BROADCOM_PHY
These configuration can be enable from within Buildroot output folder, by simply running:
make linux-menuconfig
These options ensure that the necessary device drivers are compiled to support Ethernet functionality. The rest of the Kernel configuration, including network stack configuration, remains as per the default.
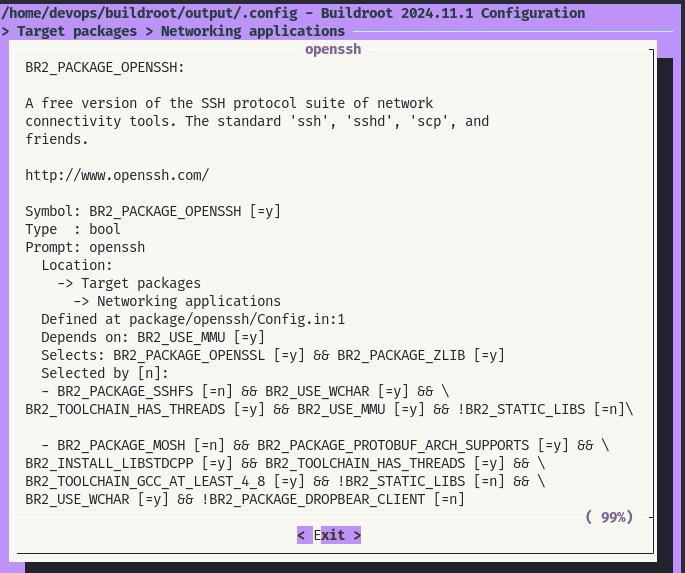
Enabling OpenSSH in Buildroot
To enable the OpenSSH server and client in your image, open the Buildroot menu configuration tool:
make menuconfig
Then, navigate to Target packages -> Networking applications. Once inside, scroll down to find and enable OpenSSH:
We also will need ifupdown scripts enabled to be able to bring our network up when needed. While still in Target packages -> Networking applications, make sure the following option is enable (should be default for Raspberry Pi 5):
BR2_PACKAGE_IFUPDOWN_SCRIPTS=y
Customizing the Root Filesystem
In order to store OpenSSH custom configuration file, we can take advantage of a Buildroot feature called RootFS Overlay. We will also use this feature to configure our network interface.
Before enabling the feature, it is necessary to create a folder that will store the RootFS overlay. The folder must have the following tree:
+-- rootfs_overlay
|    +-- etc/
|        +-- ssh/
|            +-- sshd_config
|        +-- network/
|            +-- interfaces
To create such a folder-tree, one can run:
mkdir -p ~/rootfs_overlay/etc/ssh ~/rootfs_overlay/etc/network
sshd_config must contain the configuration for the ssh server we are building. In this case, we could only enable root login over ssh, by running the following:
echo "PermitRootLogin yes" > ~/rootfs_overlay/etc/ssh/sshd_config
Note that enabling root login over ssh is not recommended in a real-life application due to cyber security reasons.
For the network configuration, interfaces file should be filled using the following command:
cat > ~/rootfs_overlay/etc/network/interfaces << EOF
auto lo
iface lo inet loopback

auto eth0
iface eth0 inet static
  address 192.168.0.199
  netmask 255.255.255.0
  gateway 192.168.0.1
  pre-up /etc/network/nfs_check
  wait-delay 15
  hostname $(hostname)
EOF
Back on output folder, on Buildroot menu one must enable the following option, passing the path of the rootfs_overlay folder that had just been created:
BR2_ROOTFS_OVERLAY="~/rootfs_overlay"
By setting this option, Buildroot will copy each file or folder from the configured path directly over the target file system after it has been built. Hidden directories of version control systems, like .git, .svn, .hg, etc., files called .empty and files ending in ~ are excluded from the copy.
We should also set the root password so we can later login over ssh. Using the arrow keys and Enter key to navigate through the Buildroot menu, the root password can be set by on the following option:
-> System configuration
| -> Enable root login with password (BR2_TARGET_ENABLE_ROOT_LOGIN [=y])
Once everything is set up, the compilation can be triggered by running:
make
After the compilation is finished without errors, all is left to do is to write the image into the SD card (assuming it is enumerated as /dev/sda), by running:
dd if=images/sdcard.img of=/dev/sda status=progress
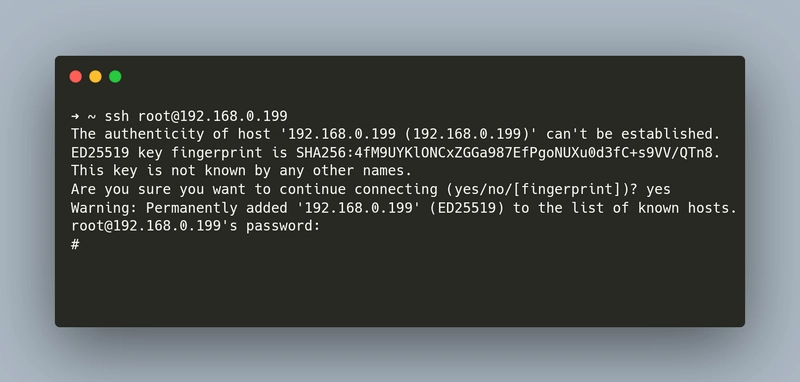
Connecting to the Board Over SSH
After finishing flashing and powering up the board, it is necessary to connect an Ethernet cable between the board and the host computer. It is also necessary to set a static IP on the host's network interface so we can communicate with the board:
ifconfig interface_name down
ifconfig interface_name 192.168.0.190 netmask 255.255.255.0
ifconfig interface_name up
Finally, we must install OpenSSH client on our host computer, and run the ssh command to login into root user using the IP address we configured previously on interfaces file (assuming Debian/Ubuntu environment):
apt-get install openssh-client
ssh root@192.168.0.199
If everything went fine, you should now be logged in the board and be able to use it over SSH protocol.
Conclusion
And that’s it for this post! With everything set up, your Raspberry Pi 5 Buildroot image is ready to roll over SSH. Whether you're building a cool project or just diving deeper into embedded Linux, I hope this guide helped you somehow.