


![Nomad Goods Launches 15% Sitewide Sale for 48 Hours Only [Deal]](https://www.iclarified.com/images/news/96899/96899/96899-640.jpg)


![Apple Watch Series 10 Prototype with Mystery Sensor Surfaces [Images]](https://www.iclarified.com/images/news/96892/96892/96892-640.jpg)


![watchOS 11.4 now available with three new features for Apple Watch [U: Back]](https://i0.wp.com/9to5mac.com/wp-content/uploads/sites/6/2025/01/watchOS-11.4-hero.jpg?resize=1200%2C628&quality=82&strip=all&ssl=1)


_Andrew_Angelov_Alamy.jpg?#)


![[The AI Show Episode 142]: ChatGPT’s New Image Generator, Studio Ghibli Craze and Backlash, Gemini 2.5, OpenAI Academy, 4o Updates, Vibe Marketing & xAI Acquires X](https://www.marketingaiinstitute.com/hubfs/ep%20142%20cover.png)


![Is this a suitable approach to architect a flutter app? [closed]](https://i.sstatic.net/4hMHGb1L.png)


![From broke musician to working dev. How college drop-out Ryan Furrer taught himself to code [Podcast #166]](https://cdn.hashnode.com/res/hashnode/image/upload/v1743189826063/2080cde4-6fc0-46fb-b98d-b3d59841e8c4.png?#)


-1280x720.jpg?width=1920&height=1920&fit=bounds&quality=80&format=jpg&auto=webp#)


![Baldur's Gate 3-Themed Stardew Valley Mod Hit With Takedown By D&D Owner [Update: It's Back]](https://i.kinja-img.com/image/upload/c_fill,h_675,pg_1,q_80,w_1200/72456bbdaa2125a0df912aa9d205bb26.webp)


Getting Started with Vision Pro App Development Using Unity: “Metal” vs “RealityKit”
“Metal” vs “RealityKit” When developing Vision Pro applications, the most common method is to use “Xcode”. However, it is also possible to develop using “Unity”. This article explains two approaches available when developing Vision Pro apps with Unity: “Metal-based Apps on visionOS” and “RealityKit apps on visionOS”. We’ll refer to these two methods as “Metal mode” and “RealityKit mode” throughout this article. Note: Unity does not officially define something called “Metal mode” or “RealityKit mode”. In this article, we use these terms simply to make the distinction clearer when discussing each approach’s features and use cases. Note: In Unity, there is another development approach called “Windowed Apps in visionOS”. However, since it does not utilize the XR features unique to visionOS, it is not covered in this article. Two Rendering Methods in Unity for Vision Pro When developing for Vision Pro in Unity, two main rendering methods are available: Metal An approach that directly uses Apple’s low-level graphics API, “Metal”, for rendering Allows full utilization of Unity’s built-in rendering pipeline (e.g., shaders, post-processing, lighting) RealityKit (PolySpatial) An approach that uses Apple’s high-level 3D/AR framework, “RealityKit” Passes the Unity scene data to RealityKit, making it easier to build apps that leverage Vision Pro’s unique spatial computing capabilities What is Metal? Metal is Apple’s low-level graphics API, which allows applications to send commands directly to the GPU for maximum performance. Unity has long supported rendering functions that target Metal, so if you choose “Metal mode”, the development process will be quite similar to creating other 3D games for iOS. What is RealityKit? On the other hand, RealityKit is a high-level 3D framework designed by Apple specifically for AR/VR. It includes not only 3D rendering but also a physics engine, multi-user features, and other functions tailored for AR and VR. Because Vision Pro is designed with mixed reality (MR) capabilities in mind—overlapping virtual objects onto the real-world environment—RealityKit is especially well-suited for this device. Metal Mode Unity handles the rendering on its own You can fully utilize Unity’s built-in rendering pipeline, setting up shaders, post-processing, and more with great flexibility. Easy to use Unity’s standard XR toolkit You can employ development methods similar to other VR platforms in Unity, such as XR Origin, camera setups, and Tracked Pose Driver. RealityKit Mode Delegates rendering to Apple’s AR engine Unity sends its scene and object data to RealityKit for rendering, enabling native use of RealityKit’s spatial computing and AR/MR features. Constraints on Unity-specific features Custom shaders do not run directly on the RealityKit side. Instead, you must go through Shader Graph, and some features are limited. Creating a Sample Scene Below is a quick overview of how to set up a sample project in Unity for Vision Pro. Note: This section focuses only on the unique steps for each “Metal mode” and “RealityKit mode”. Also, keep in mind that versions and settings may change in the future, so always refer to Unity’s official documentation for the latest details. Creating a Project in Metal Mode 1. Project Settings Install the Apple visionOS XR Plugin From the “Package Manager”, install the “Apple visionOS XR Plugin”. (Or skip this step initially and let the next steps prompt you to install it automatically.) Set up XR Plug-in Management In “Project Settings > XR Plug-in Management”, select “Apple visionOS”. Select App Mode In “XR Plug-in Management > Apple visionOS > App Mode”, set it to “Metal Rendering with Compositor Services”. 2. Scene Creation Add AR Session and XR Origin From the menu, go to “GameObject > XR > AR Session” to add an AR Session. Then go to “GameObject > XR > XR Origin (Mobile AR)” to add an XR Origin. Background Settings If you want an immersive VR-like environment, set the Main Camera’s “Background Type” to SkyBox. If you want an MR-like scene that shows the real world in the background, set “Background Type” to Solid Color, choose black (e.g., [0, 0, 0, 0]) with Alpha 0 for full transparency. Place 3D Objects Place a 3D object near the center of the scene. 3. Build and Check Rendering Verify that the 3D object you placed is rendered correctly. Creating a Project in RealityKit Mode (PolySpatial) 1. Project Settings Install the Apple visionOS XR Plugin From the “Package Manager”, install the “Apple visionOS XR Plugin”. (Or skip this step initially and let the next steps prompt you to install it automatically.) Set up XR Plug-in Management In “Project Settings > XR Plug-in Management”, select “Apple visionOS”. Install PolySpatial From t
“Metal” vs “RealityKit”
When developing Vision Pro applications, the most common method is to use “Xcode”. However, it is also possible to develop using “Unity”.
This article explains two approaches available when developing Vision Pro apps with Unity: “Metal-based Apps on visionOS” and “RealityKit apps on visionOS”. We’ll refer to these two methods as “Metal mode” and “RealityKit mode” throughout this article.
Note: Unity does not officially define something called “Metal mode” or “RealityKit mode”. In this article, we use these terms simply to make the distinction clearer when discussing each approach’s features and use cases.
Note: In Unity, there is another development approach called “Windowed Apps in visionOS”. However, since it does not utilize the XR features unique to visionOS, it is not covered in this article.
Two Rendering Methods in Unity for Vision Pro
When developing for Vision Pro in Unity, two main rendering methods are available:
Metal
An approach that directly uses Apple’s low-level graphics API, “Metal”, for rendering
Allows full utilization of Unity’s built-in rendering pipeline (e.g., shaders, post-processing, lighting)
RealityKit (PolySpatial)
An approach that uses Apple’s high-level 3D/AR framework, “RealityKit”
Passes the Unity scene data to RealityKit, making it easier to build apps that leverage Vision Pro’s unique spatial computing capabilities
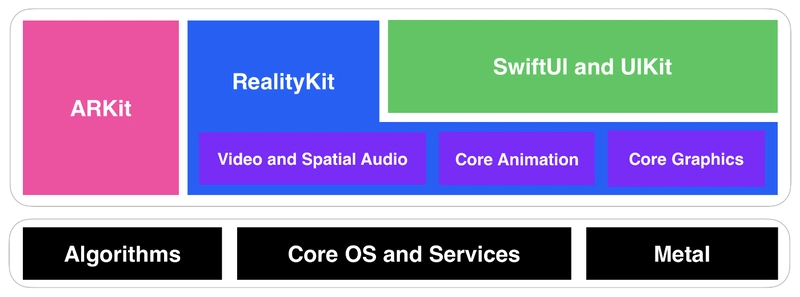
What is Metal?
Metal is Apple’s low-level graphics API, which allows applications to send commands directly to the GPU for maximum performance.
Unity has long supported rendering functions that target Metal, so if you choose “Metal mode”, the development process will be quite similar to creating other 3D games for iOS.
What is RealityKit?
On the other hand, RealityKit is a high-level 3D framework designed by Apple specifically for AR/VR. It includes not only 3D rendering but also a physics engine, multi-user features, and other functions tailored for AR and VR.
Because Vision Pro is designed with mixed reality (MR) capabilities in mind—overlapping virtual objects onto the real-world environment—RealityKit is especially well-suited for this device.
Metal Mode
Unity handles the rendering on its own
You can fully utilize Unity’s built-in rendering pipeline, setting up shaders, post-processing, and more with great flexibility.Easy to use Unity’s standard XR toolkit
You can employ development methods similar to other VR platforms in Unity, such as XR Origin, camera setups, and Tracked Pose Driver.
RealityKit Mode
Delegates rendering to Apple’s AR engine
Unity sends its scene and object data to RealityKit for rendering, enabling native use of RealityKit’s spatial computing and AR/MR features.Constraints on Unity-specific features
Custom shaders do not run directly on the RealityKit side. Instead, you must go through Shader Graph, and some features are limited.
Creating a Sample Scene
Below is a quick overview of how to set up a sample project in Unity for Vision Pro.
Note: This section focuses only on the unique steps for each “Metal mode” and “RealityKit mode”. Also, keep in mind that versions and settings may change in the future, so always refer to Unity’s official documentation for the latest details.
Creating a Project in Metal Mode
1. Project Settings
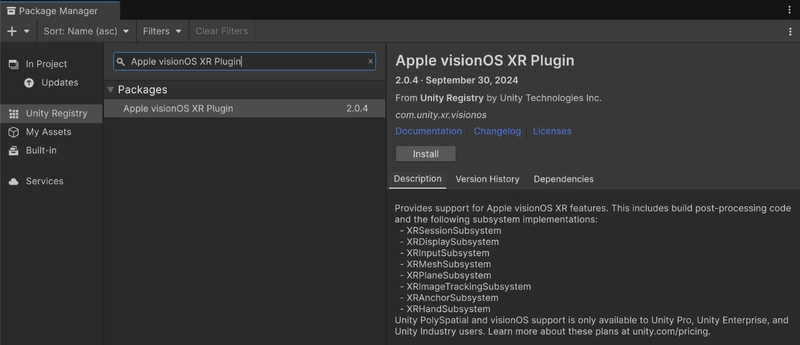
- Install the Apple visionOS XR Plugin
From the “Package Manager”, install the “Apple visionOS XR Plugin”.
(Or skip this step initially and let the next steps prompt you to install it automatically.)
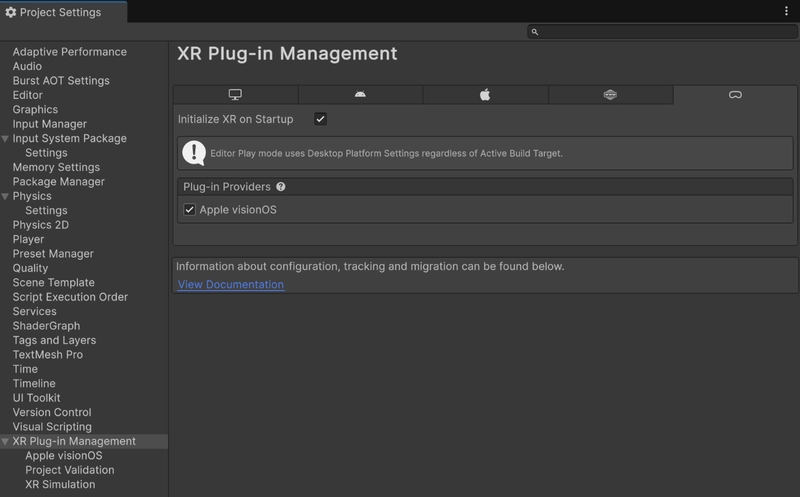
- Set up XR Plug-in Management
In “Project Settings > XR Plug-in Management”, select “Apple visionOS”.
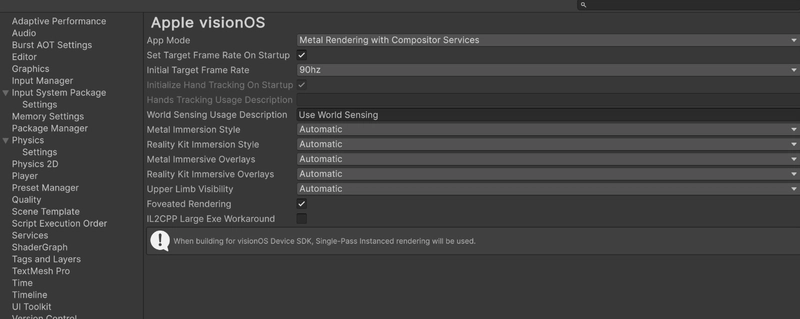
- Select App Mode
In “XR Plug-in Management > Apple visionOS > App Mode”, set it to “Metal Rendering with Compositor Services”.
2. Scene Creation
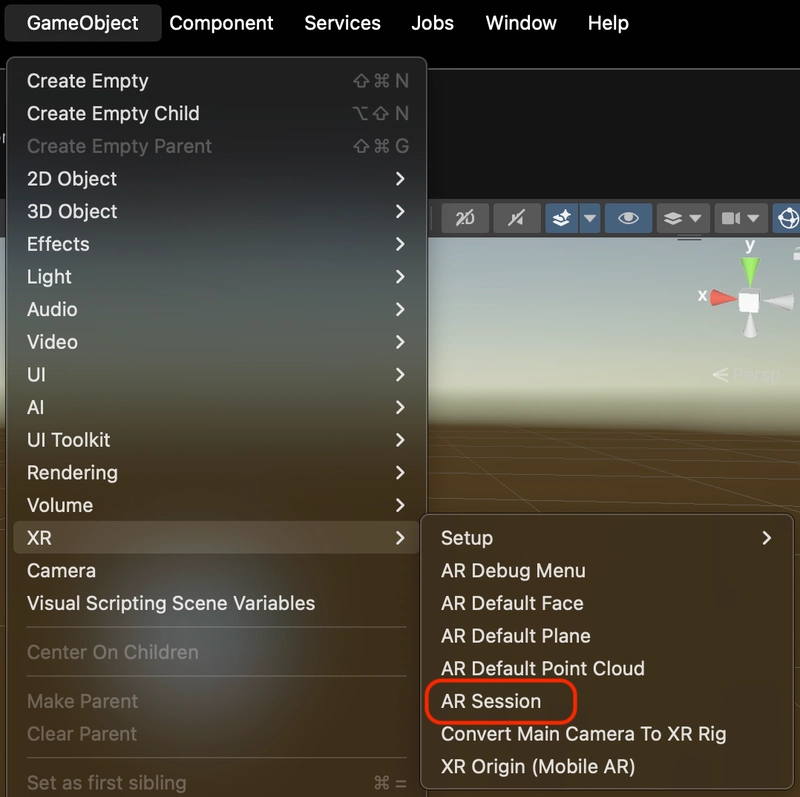
- Add AR Session and XR Origin
From the menu, go to “GameObject > XR > AR Session” to add an AR Session.
Then go to “GameObject > XR > XR Origin (Mobile AR)” to add an XR Origin.

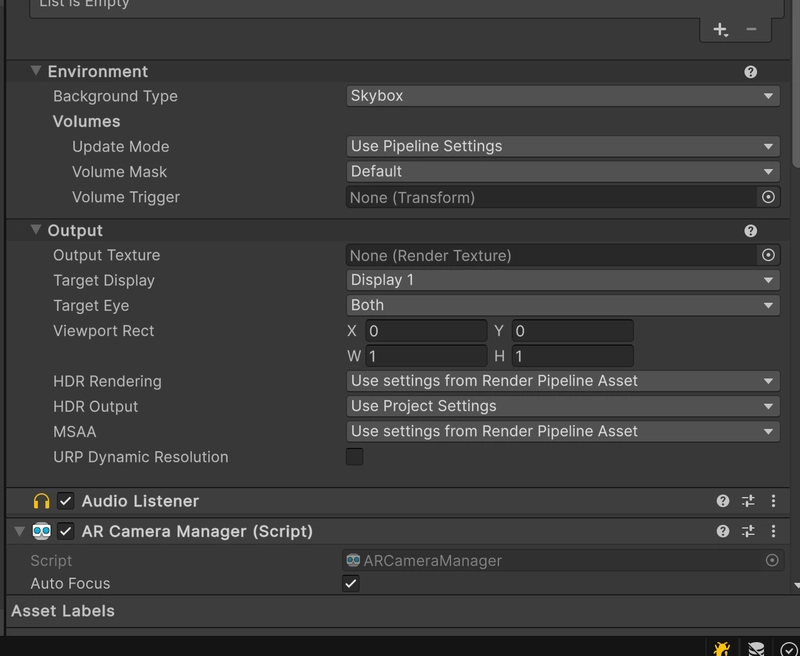
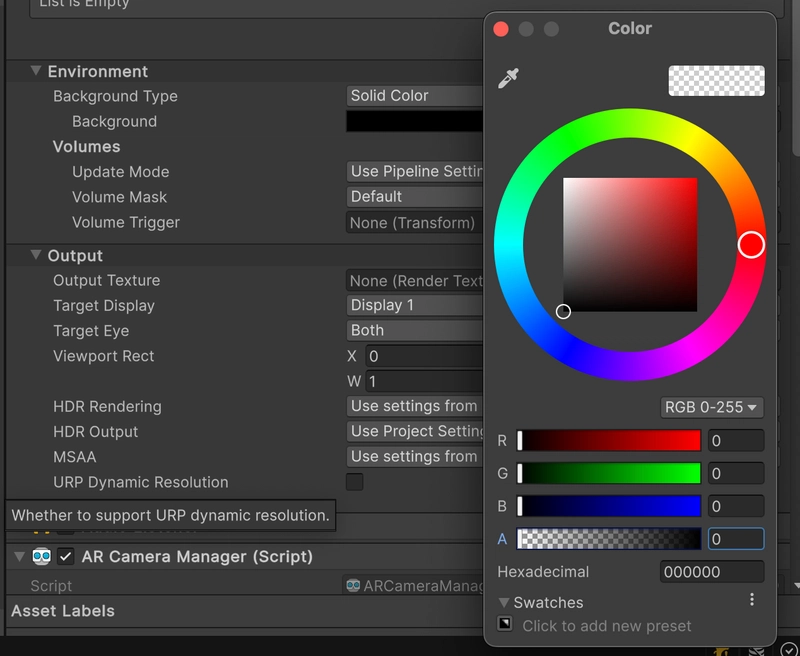
- Background Settings
If you want an immersive VR-like environment, set the Main Camera’s “Background Type” to SkyBox.
If you want an MR-like scene that shows the real world in the background, set “Background Type” to Solid Color, choose black (e.g., [0, 0, 0, 0]) with Alpha 0 for full transparency.
- Place 3D Objects
Place a 3D object near the center of the scene.
3. Build and Check Rendering
Verify that the 3D object you placed is rendered correctly.
Creating a Project in RealityKit Mode (PolySpatial)
1. Project Settings
- Install the Apple visionOS XR Plugin
From the “Package Manager”, install the “Apple visionOS XR Plugin”.
(Or skip this step initially and let the next steps prompt you to install it automatically.)
- Set up XR Plug-in Management
In “Project Settings > XR Plug-in Management”, select “Apple visionOS”.
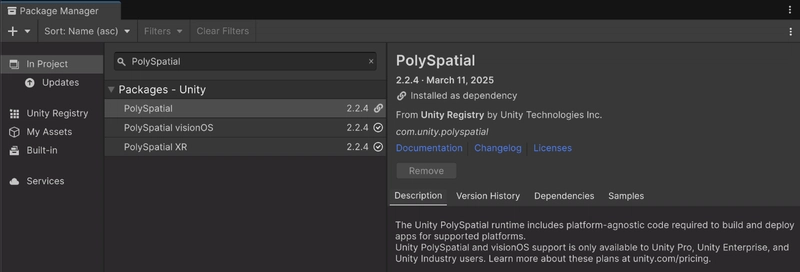
- Install PolySpatial
From the “Package Manager”, install the “PolySpatial” package.
(Or skip this step and proceed to the final step, which may automatically prompt installation.)
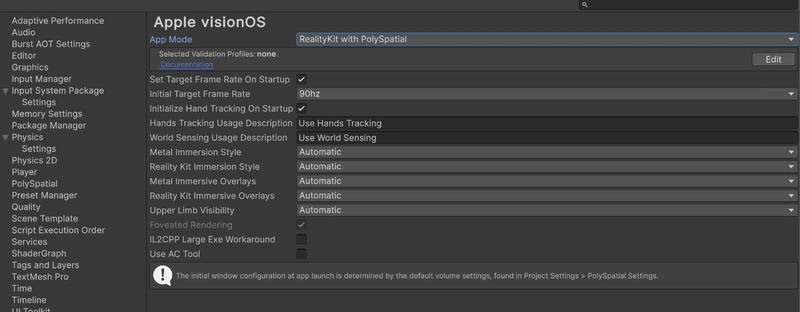
- Select App Mode
In “XR Plug-in Management > Apple visionOS > App Mode”, set it to “RealityKit with PolySpatial”.
2. Scene Creation
- Add AR Session
From the menu, go to “GameObject > XR > AR Session” to add an AR Session.
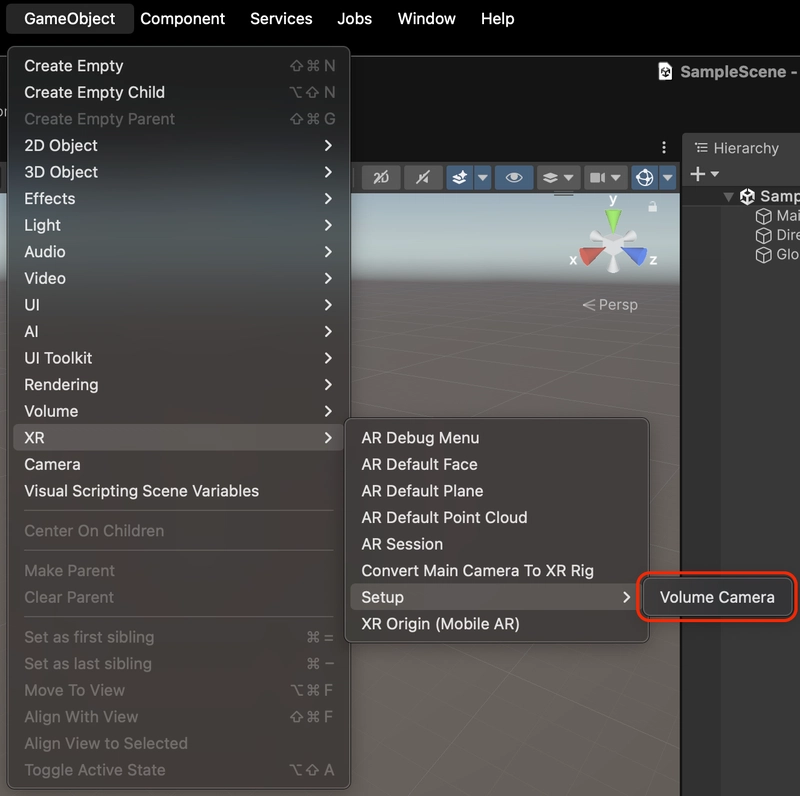
- Add Volume Camera
From the menu, go to “GameObject > XR > Setup > Volume Camera” to add a Volume Camera.
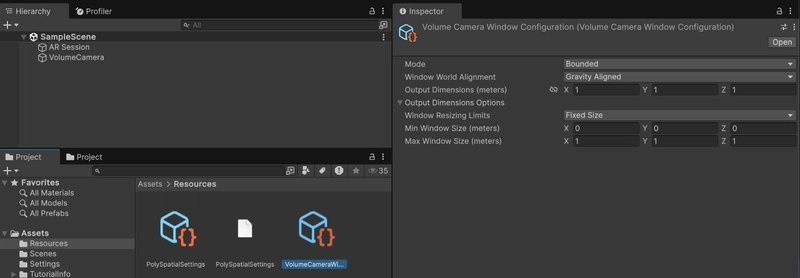
- VolumeCamera Window Configuration
From the menu, “Assets > Create > PolySpatial > Volume Camera Window Configuration”.

Then choose either Bounded volume (a fixed display area) or Unbounded volume (extended across the entire space) and attach this configuration to the Volume Camera.
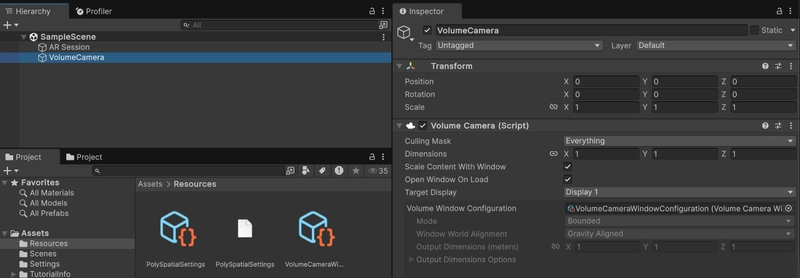
- Place 3D Objects
Place a 3D object within the Volume Camera’s area.
3. Build and Check Rendering
Verify that the placed 3D object is rendered correctly.
Use Cases for Each Mode
How do you decide whether to use Metal mode or RealityKit mode? Below are some practical examples.
When Metal Mode Is Suitable
If you want a fully virtual space
For VR games, simulations, or immersive cinematic experiences, where you want rich graphics in a purely virtual environment.If you want advanced shaders or post-processing
Ideal for utilizing custom shaders or high-end effects that come with Unity’s standard rendering capabilities.If you want to align with other VR platforms
For instance, when porting an existing VR project (for PC VR or standalone devices) to Vision Pro and you prefer to maintain a similar Unity XR workflow.
When RealityKit Mode Is Suitable
If you want to overlay virtual objects onto the real world
Take advantage of Vision Pro’s spatial computing features (tracking floors, walls, etc.) to create MR experiences.If you prefer a simple, utility-focused MR app
Great for displaying additional information or guides while viewing the real world.If you need a persistent, always-on app that works alongside other apps
For example, placing widgets within your environment. Instead of complex custom shaders, you focus on smooth spatial placement and multitasking.
In Closing
When developing Vision Pro apps with Unity, choosing between “Metal mode” and “RealityKit mode” largely depends on your app’s purpose and the kind of experience you want to create.
Metal mode
- Development follows a workflow similar to conventional VR, allowing for rich graphical expression and advanced shaders.
RealityKit mode
- By leveraging RealityKit’s optimization for spatial computing, it becomes easier to create apps that incorporate MR elements.
Each approach has its pros and cons, so you should carefully consider factors such as “the direction of your app”, “the level of visual quality required”, and “the depth of interaction” early in development.
Since Vision Pro may undergo substantial updates and new SDK features, it’s crucial to keep an eye on the official documentation and release notes—and, of course, to experiment hands-on to find the best workflow for your needs.