


![Nomad Goods Launches 15% Sitewide Sale for 48 Hours Only [Deal]](https://www.iclarified.com/images/news/96899/96899/96899-640.jpg)


![Apple Watch Series 10 Prototype with Mystery Sensor Surfaces [Images]](https://www.iclarified.com/images/news/96892/96892/96892-640.jpg)


![[The AI Show Episode 142]: ChatGPT’s New Image Generator, Studio Ghibli Craze and Backlash, Gemini 2.5, OpenAI Academy, 4o Updates, Vibe Marketing & xAI Acquires X](https://www.marketingaiinstitute.com/hubfs/ep%20142%20cover.png)


![Is this a suitable approach to architect a flutter app? [closed]](https://i.sstatic.net/4hMHGb1L.png)


![From broke musician to working dev. How college drop-out Ryan Furrer taught himself to code [Podcast #166]](https://cdn.hashnode.com/res/hashnode/image/upload/v1743189826063/2080cde4-6fc0-46fb-b98d-b3d59841e8c4.png?#)


_kYeMsh2.png?width=1920&height=1920&fit=bounds&quality=80&format=jpg&auto=webp#)


.png?width=1920&height=1920&fit=bounds&quality=80&format=jpg&auto=webp#)


How to Build a Team of AI Agents for Your Website for Free Using Agno and Groq
AI is quickly changing the way we work, and more and more companies are using it to help them get and retain clients. Teams are also using AI to create innovative and responsive websites capable of engaging visitors while also providing helpful infor...

AI is quickly changing the way we work, and more and more companies are using it to help them get and retain clients. Teams are also using AI to create innovative and responsive websites capable of engaging visitors while also providing helpful information.
AI agents are powerful tools for customer services. Having them power your platforms and websites might sound like an expensive proposition with high technical expertise required. But with the emergence of new modern platforms like Agno and Groq, it’s now easier to integrate an AI agent system into your website while still staying within budget.
In this article, you’ll go through the process of developing your own AI agent ecosystem (for free). This will enable you to have a website that can handle customer enquiries, create content, analyse a user's behaviour, and provide custom personal experiences for each user. It's a fantastic setup because you can automate part of your business, speeding up lead generation and freeing up your time to work on more high-priority tasks.
This article is for developers who are familiar with JavaScript, React, and Python. Even if you don’t have a complete understanding of all three, as long as you are a beginner or junior with some knowledge, you should be able to understand at least some of the code. For example, JavaScript and Python are pretty similar syntax-wise, so if you have experience with either of them, then just reading through the codebase will give you an idea of how everything works.
For this tutorial, we’ll build a portfolio website. But you can use the ideas and concepts you learn here for any type of website, regardless of whether you are a solo entrepreneur or part of a large company. With these tools and frameworks, it's possible to transform your web presence without going over budget.
Table of Contents
Prerequisites
Prior knowledge of JavaScript, React, and Python
Python installed and setup locally on your computer
An account on Groq Cloud
A code editor/IDE installed like Cursor, Windsurf, or VS Code
What Are AI Agents?
AI agents are computer systems or programs that are designed to use artificial intelligence to interact with their world and achieve certain objectives. They are able to perceive their world – through sensors, user input, or data – and act to achieve goals, typically with some degree of autonomy. This means that they will decide things for themselves, sometimes with little to no human intervention, depending on how they were designed.
What are Agno and Groq Cloud?
Agno is a lightweight library that lets you build Multimodal Agents. It’s an AI inference engine designed to optimise LLMs for speed and performance. This means it can provide super-fast AI model inference with reduced latency and improved resource utilisation. It has the potential to replace current inference platforms like NVIDIA TensorRT or Hugging Face's Text Generation Inference (TGI).
Groq Cloud is a cloud-based AI inference platform based on Groq LPU (Language Processing Unit) chips, which are optimised for ultra-low-latency AI workloads. Groq is great at high-speed token generation rates, making it perfect for real-time AI applications like chatbots, AI coding help, and other latency-sensitive workloads. The Groq Cloud platform offers free access to its large language models (LLMs) through a free tier, but there are some usage limits.
If you go to the Groq Cloud Playground you can find LLM models from different companies like:
Qwen
DeepSeek R1
Google Gemma 2
Hugging Face
Meta llama
Mistral AI
OpenAI
This is great because Groq Cloud gives us the flexibility to choose from any of these AI LLM models for our AI agent application. Agno basically acts as the orchestration layer for multiple AI agents. In our case, that would be WelcomeAgent, ProjectAgent, CareerAgent, BusinessAdvisor and ResearchAgent.
The platform is able to manage their conversations, task delegation, and memory. When any of our AI agents need to reason or generate output, Agno then uses Groq Cloud, which can run large language models (LLMs), and it does this with ultra-low latency. The advantage to this is that it ensures that it has fast and efficient responses. Groq Cloud itself is not an LLM – rather, it is a high-performance inference engine which hosts and serves LLMs from lots of different providers.
For this project, we will use Meta’s LLaMA 3 model because it strikes a strong balance between performance and accuracy and is openly accessible. This means that it is well-suited for the AI agents in our portfolio website.
It's worth mentioning that we could have used the LLaMA model from llama.com. Still, instead we will use it via Groq Cloud, because, this way, we get better optimisation, more capabilities, and better-quality responses for each AI agent. This is because Groq Cloud gives us the flexibility to test and choose between different AI models if we wish to do so, and that means that we can get the best one for our needs.
What You Will Be Building
Today, you will be building a portfolio website that incorporates AI agents with which anyone can interact. These AI agents are like customer service representatives because anyone can ask them questions about your skills and portfolio, and they will provide the person with information.
This is great because it means that potential clients can learn anything about you 24/7 without having actually to talk to you when you are unavailable. You could even use this portfolio as a template for building your portfolio website or as inspiration for creating one.
In total, there will be five AI agents on your portfolio website:
WelcomeAgent: a specialist in helping users navigate the website, whether the user is an employer, client, or fellow programmer
ProjectAgent: a project specialist that can provide information about projects, technology, and challenges
CareerAgent: a career specialist that can provide information about skills, experience, and professional background
BusinessAdvisor: a client specialist that can provide information about services, pricing, and project details
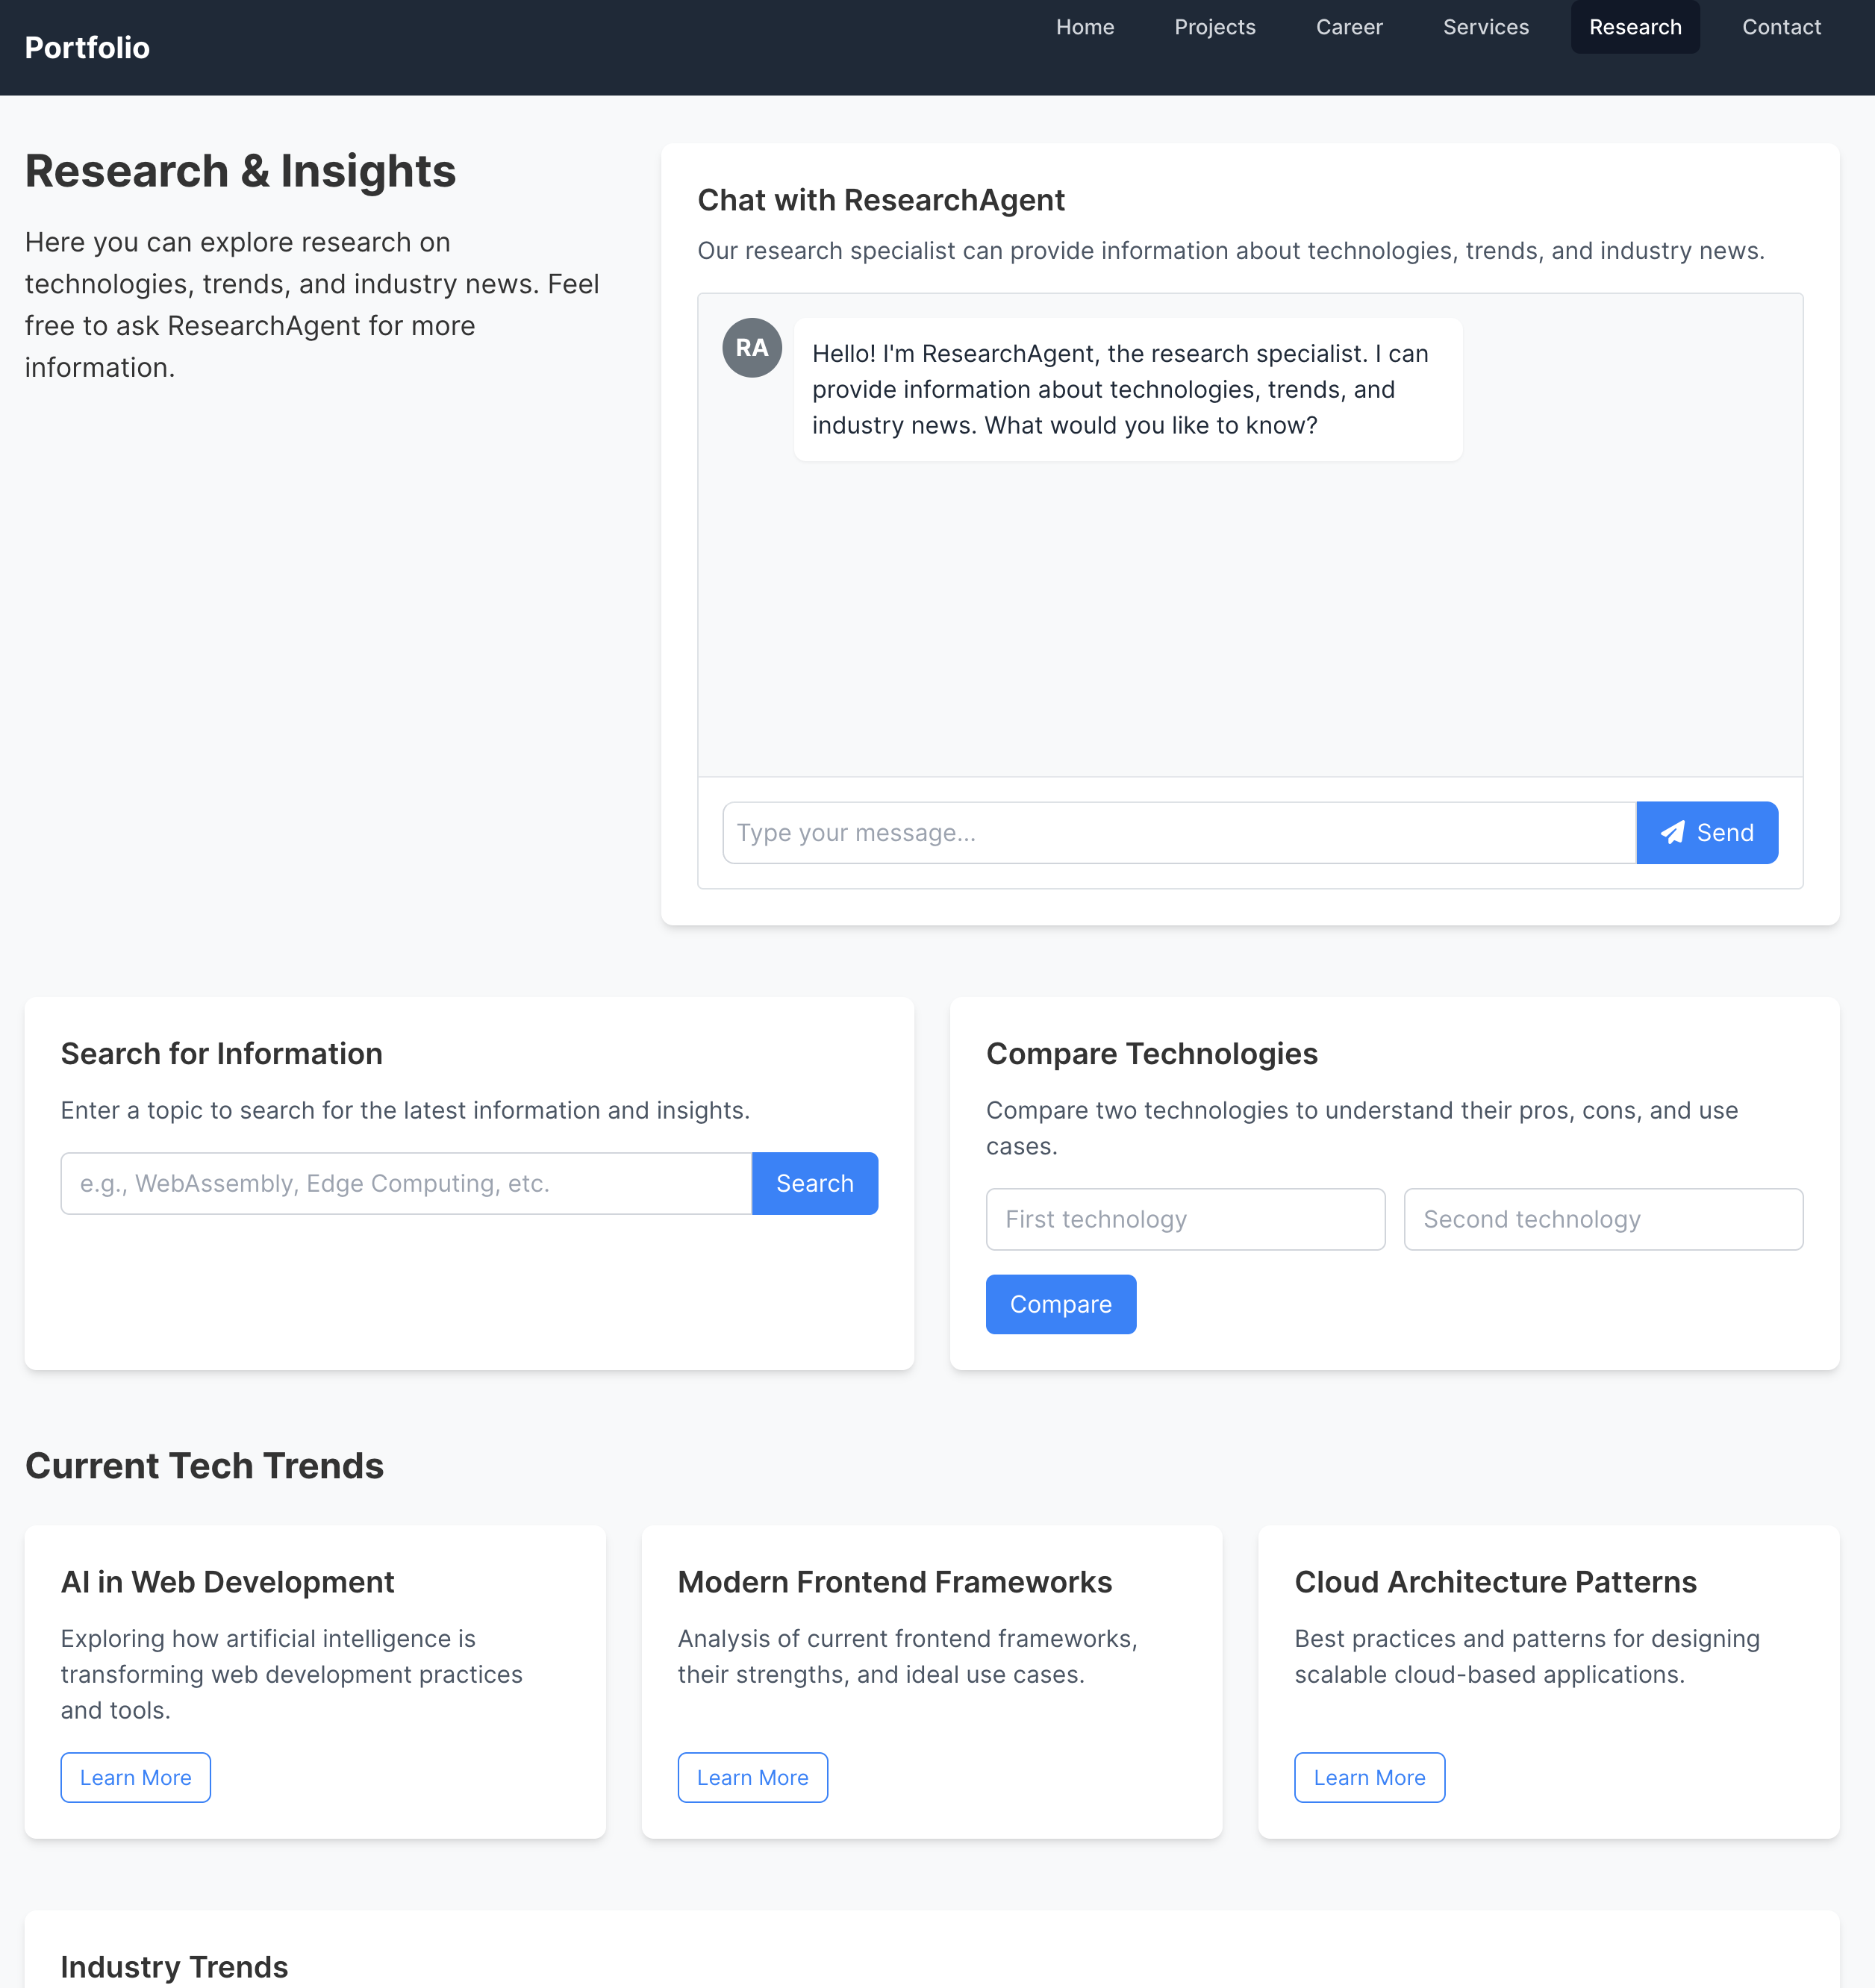
ResearchAgent: a research specialist that can provide information about technology, trends, and industry news
The massive benefit of incorporating AI agents into a portfolio website is that they can create a personalised experience by providing an interactive experience which is tailor-made and not as easily replicated on other, more generic websites.
This can set your website apart because, as opposed to having a static website for showcasing your talent, an AI agent is capable of guiding visitors, answering queries about your projects, and recommending relevant work based on an interest.
Another great feature is the ability to simulate a conversation, which can make the portfolio feel more dynamic, engaging, and immersive while also demonstrating how good you are at working with modern tooling.
All of this combined provides you with a practical and approachable way to explore AI agents. This can be a real-world example and a personal project that does not require the implementation of a full-scale business application to see how valuable this type of concept can be.
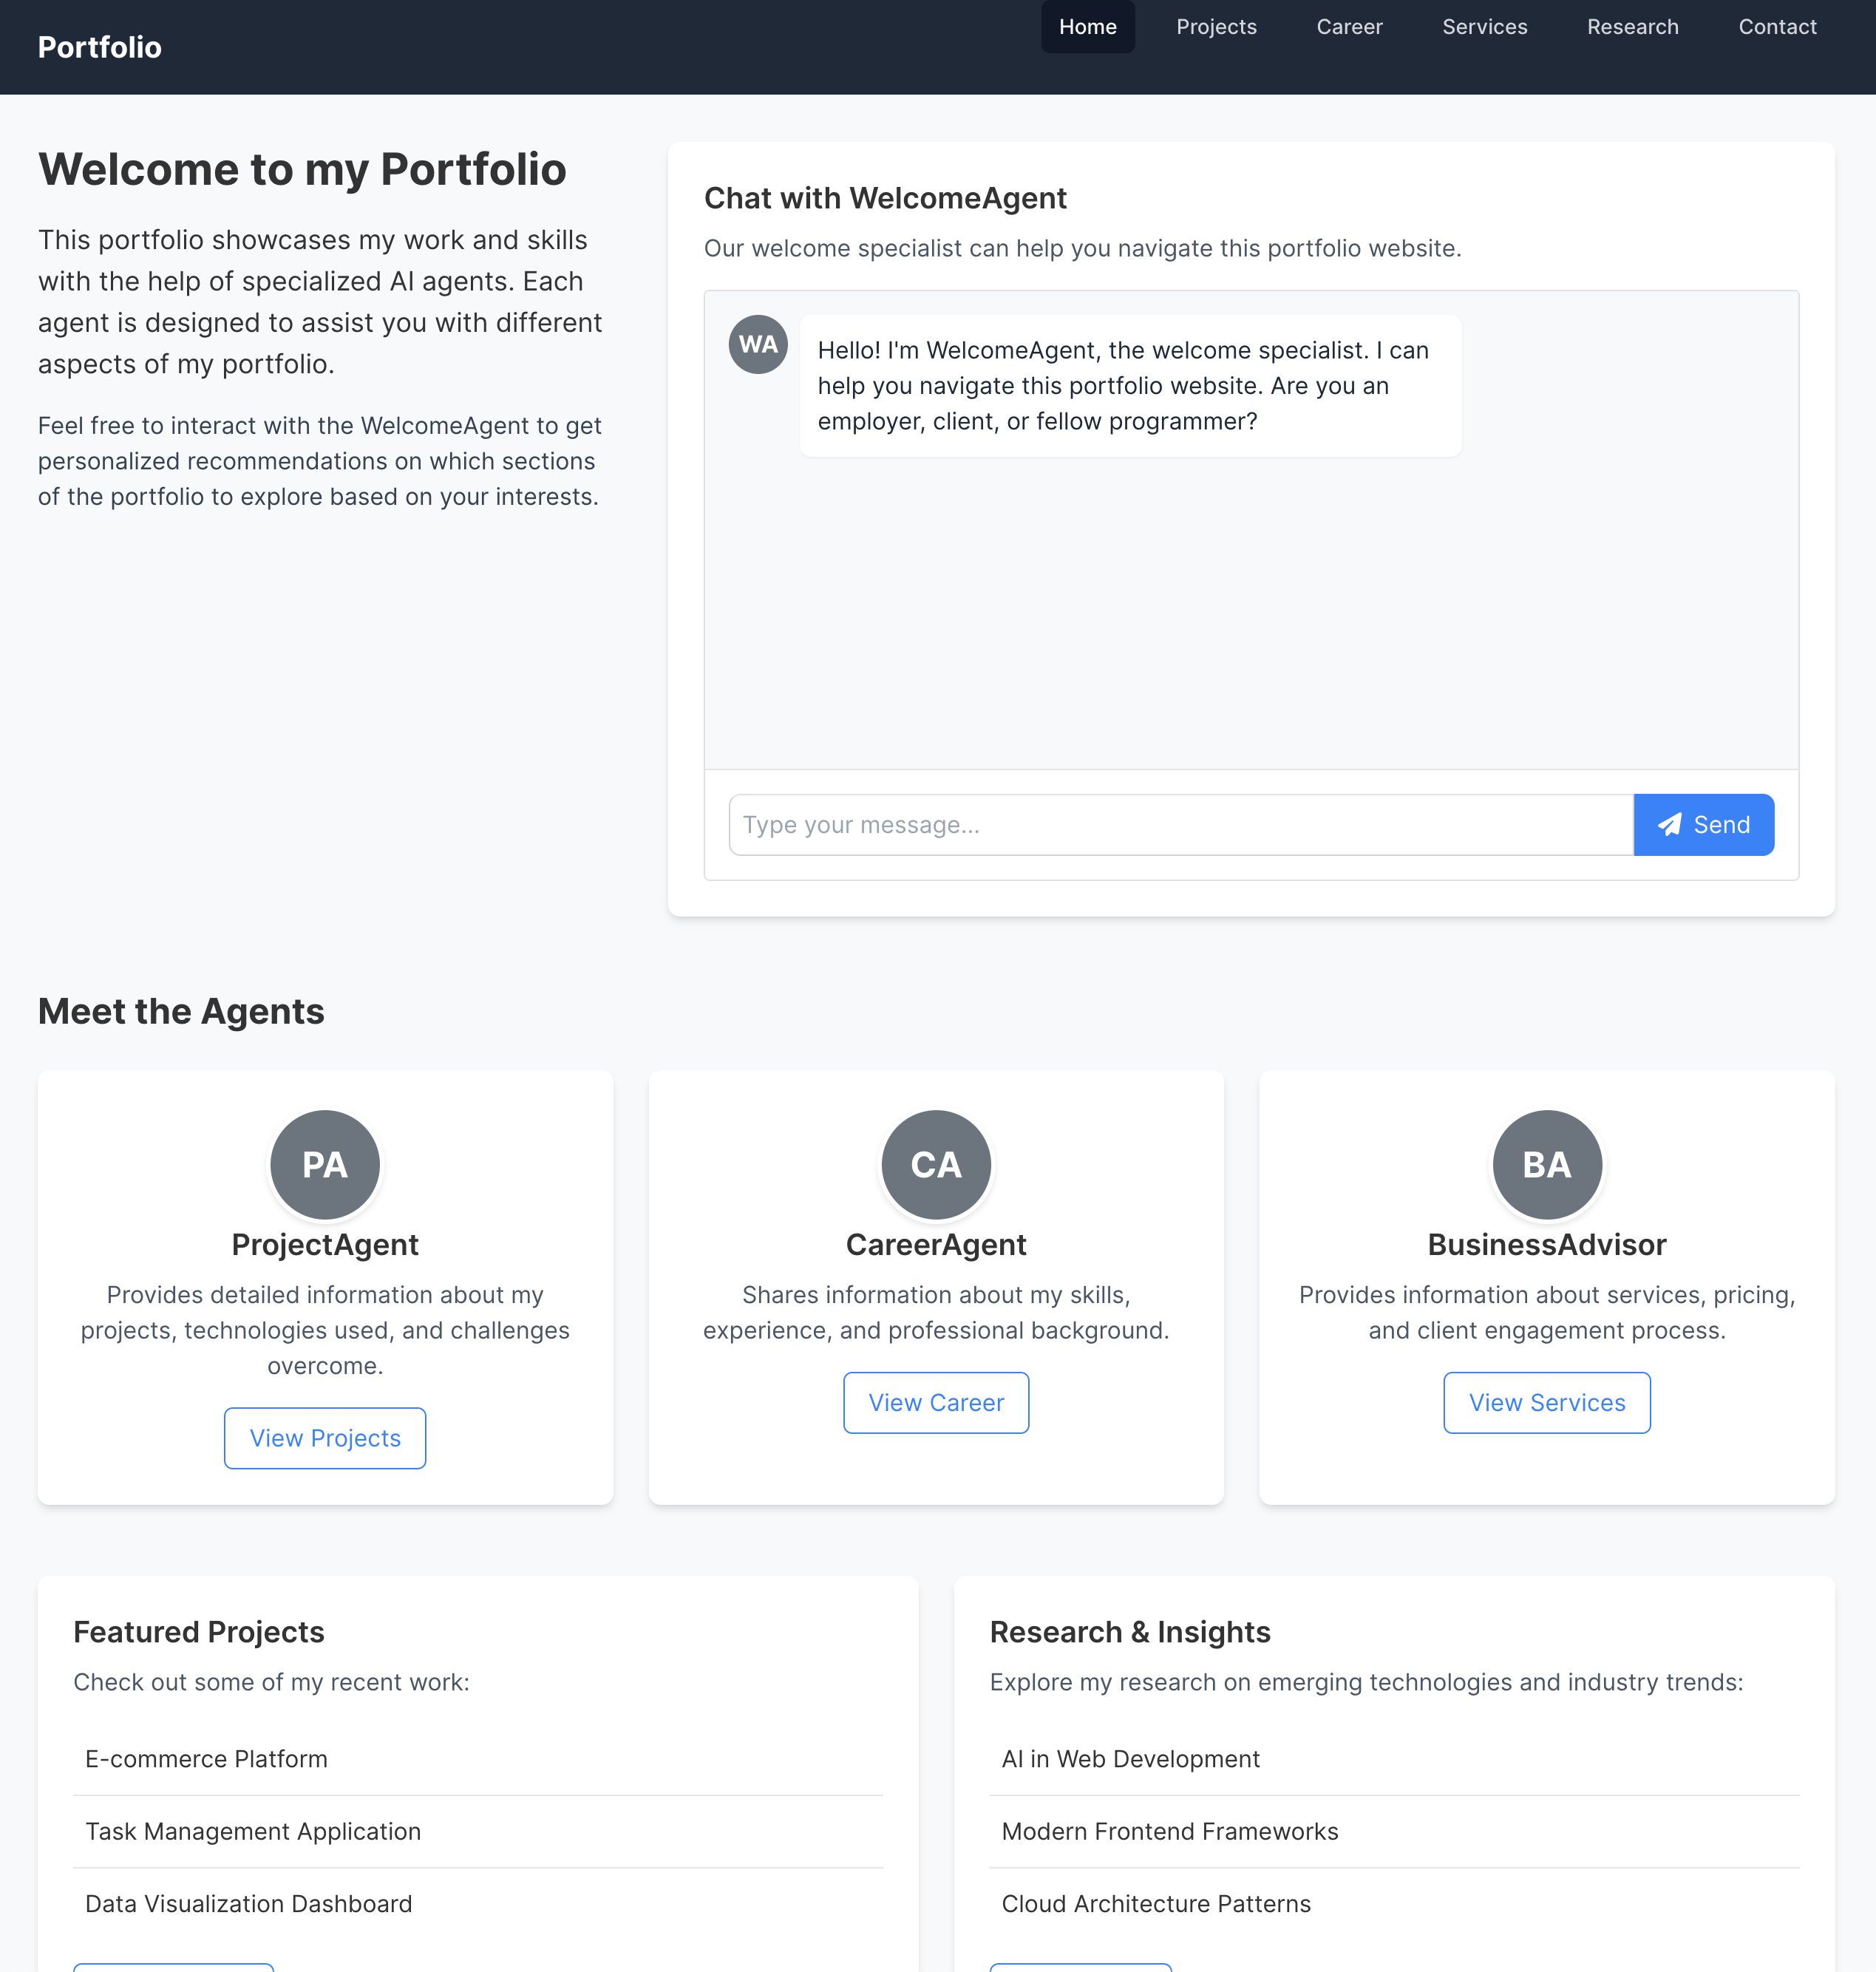
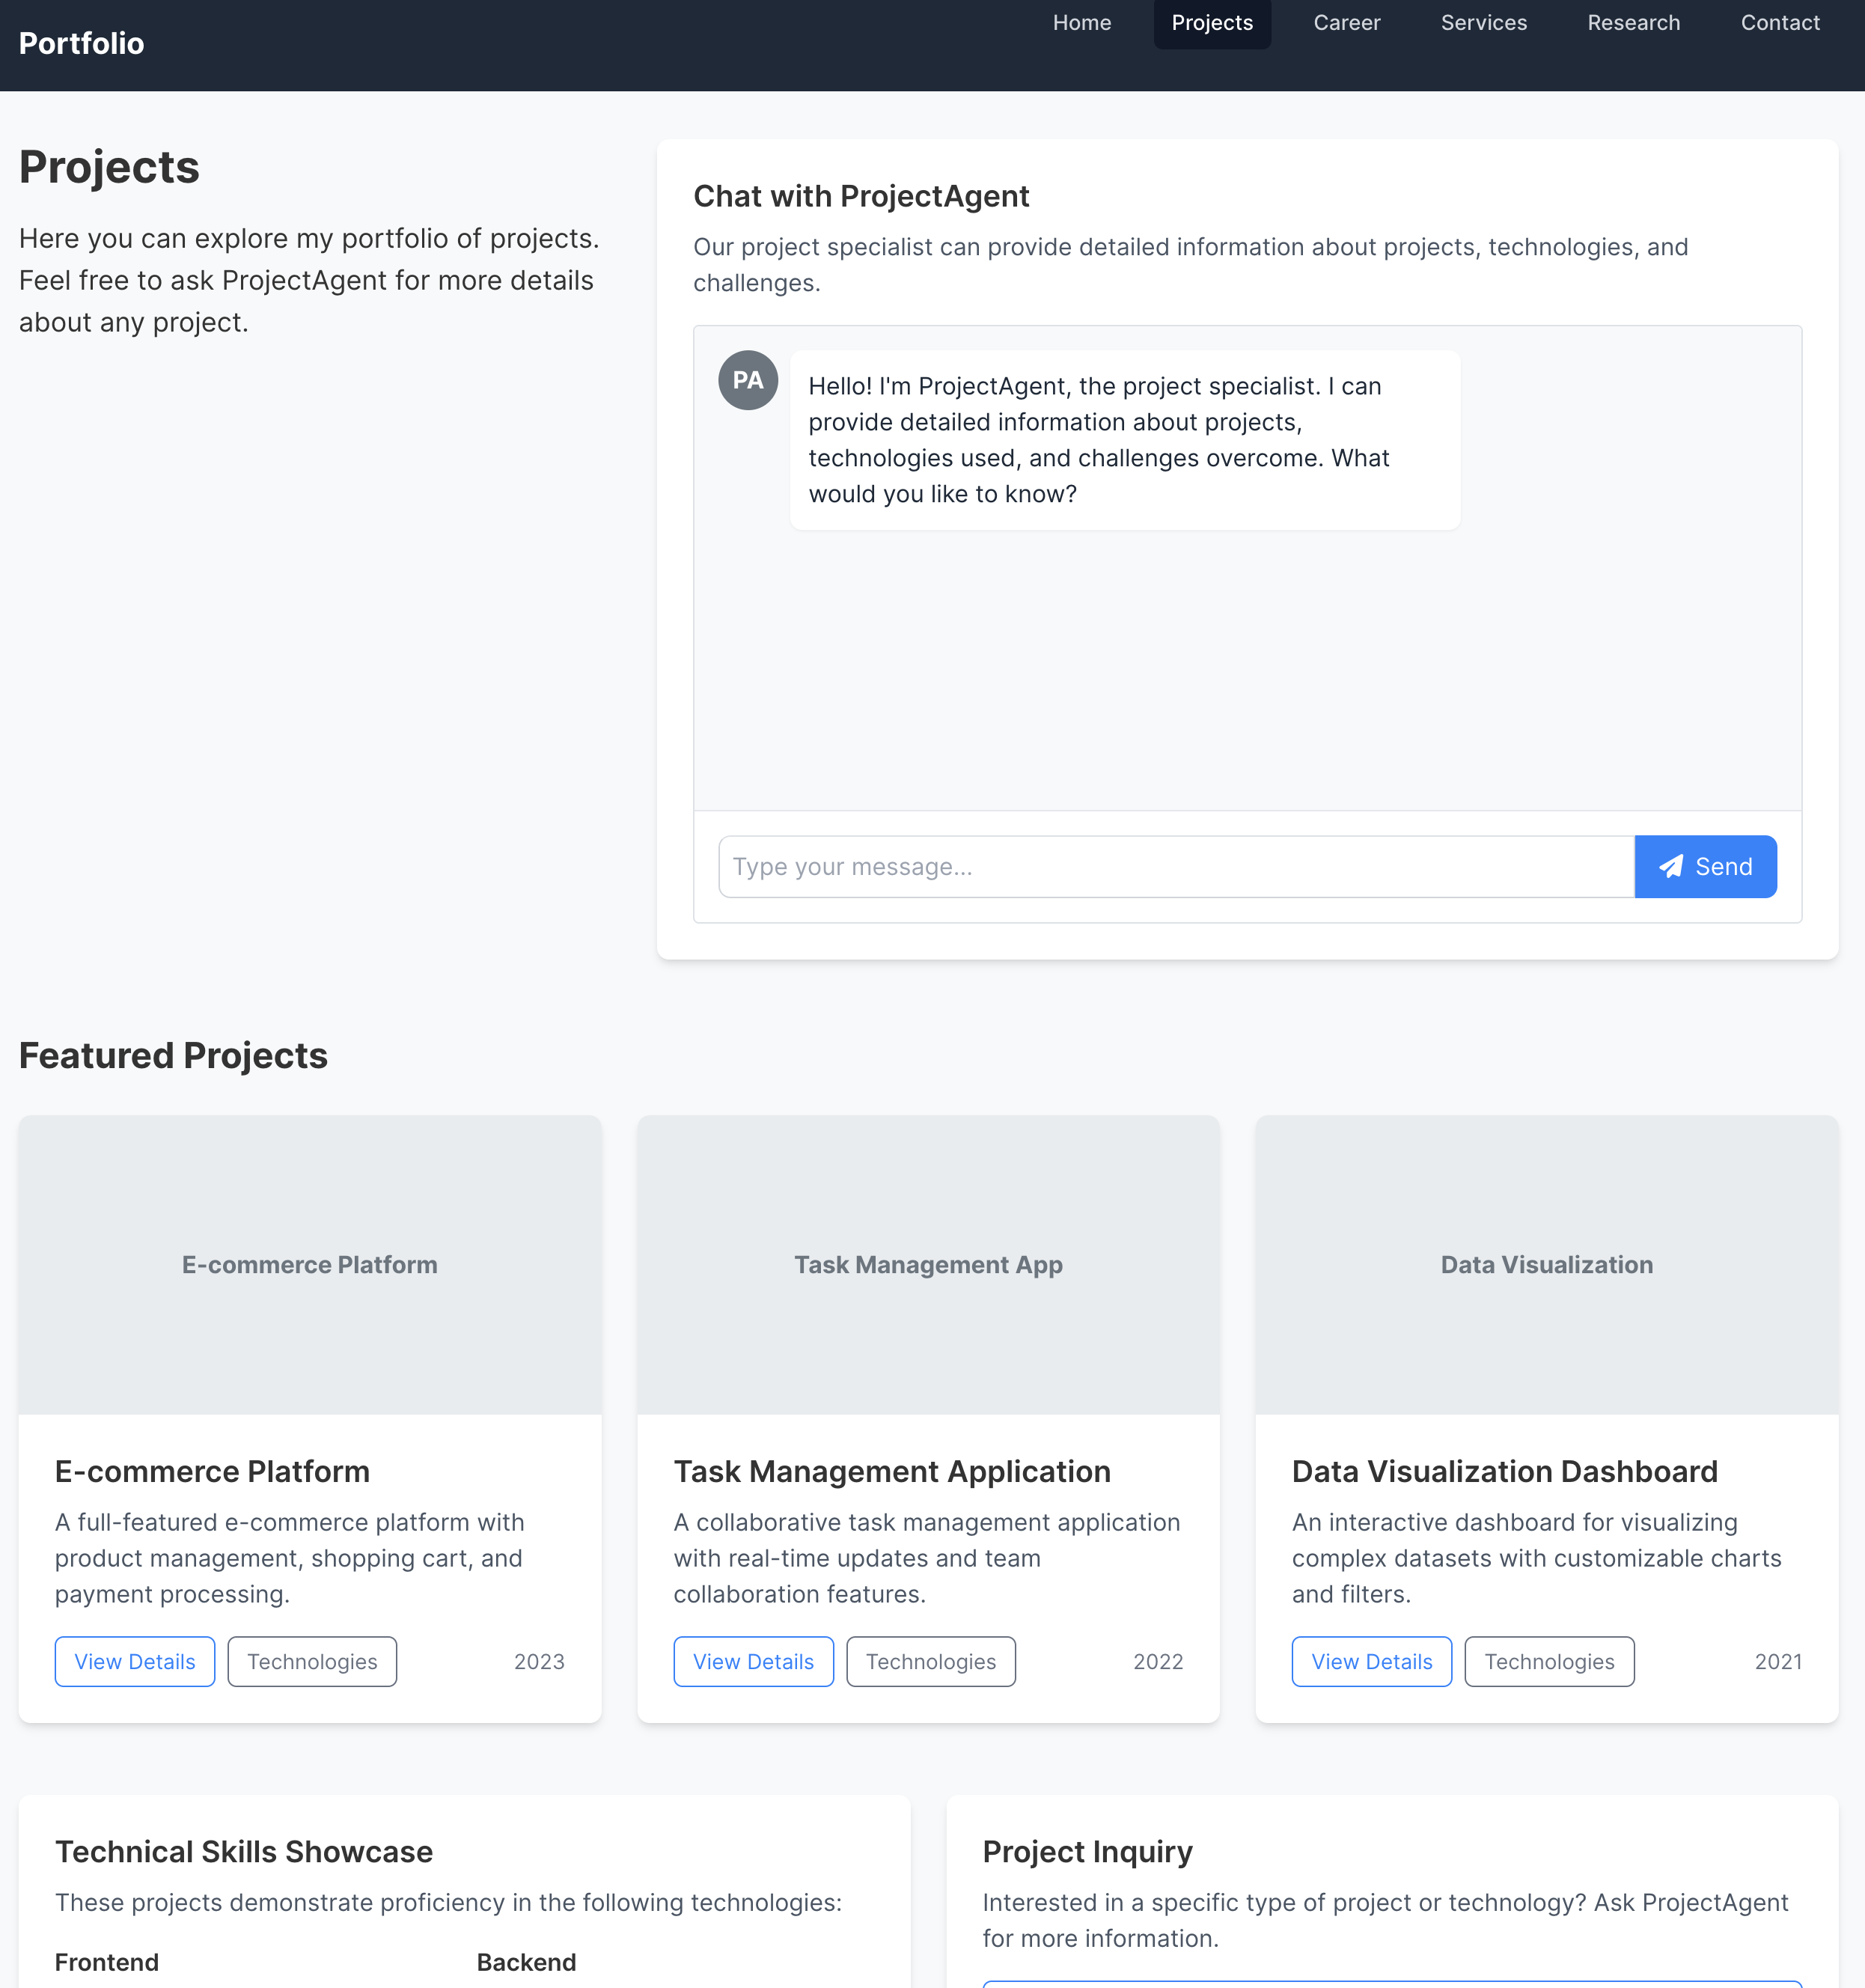
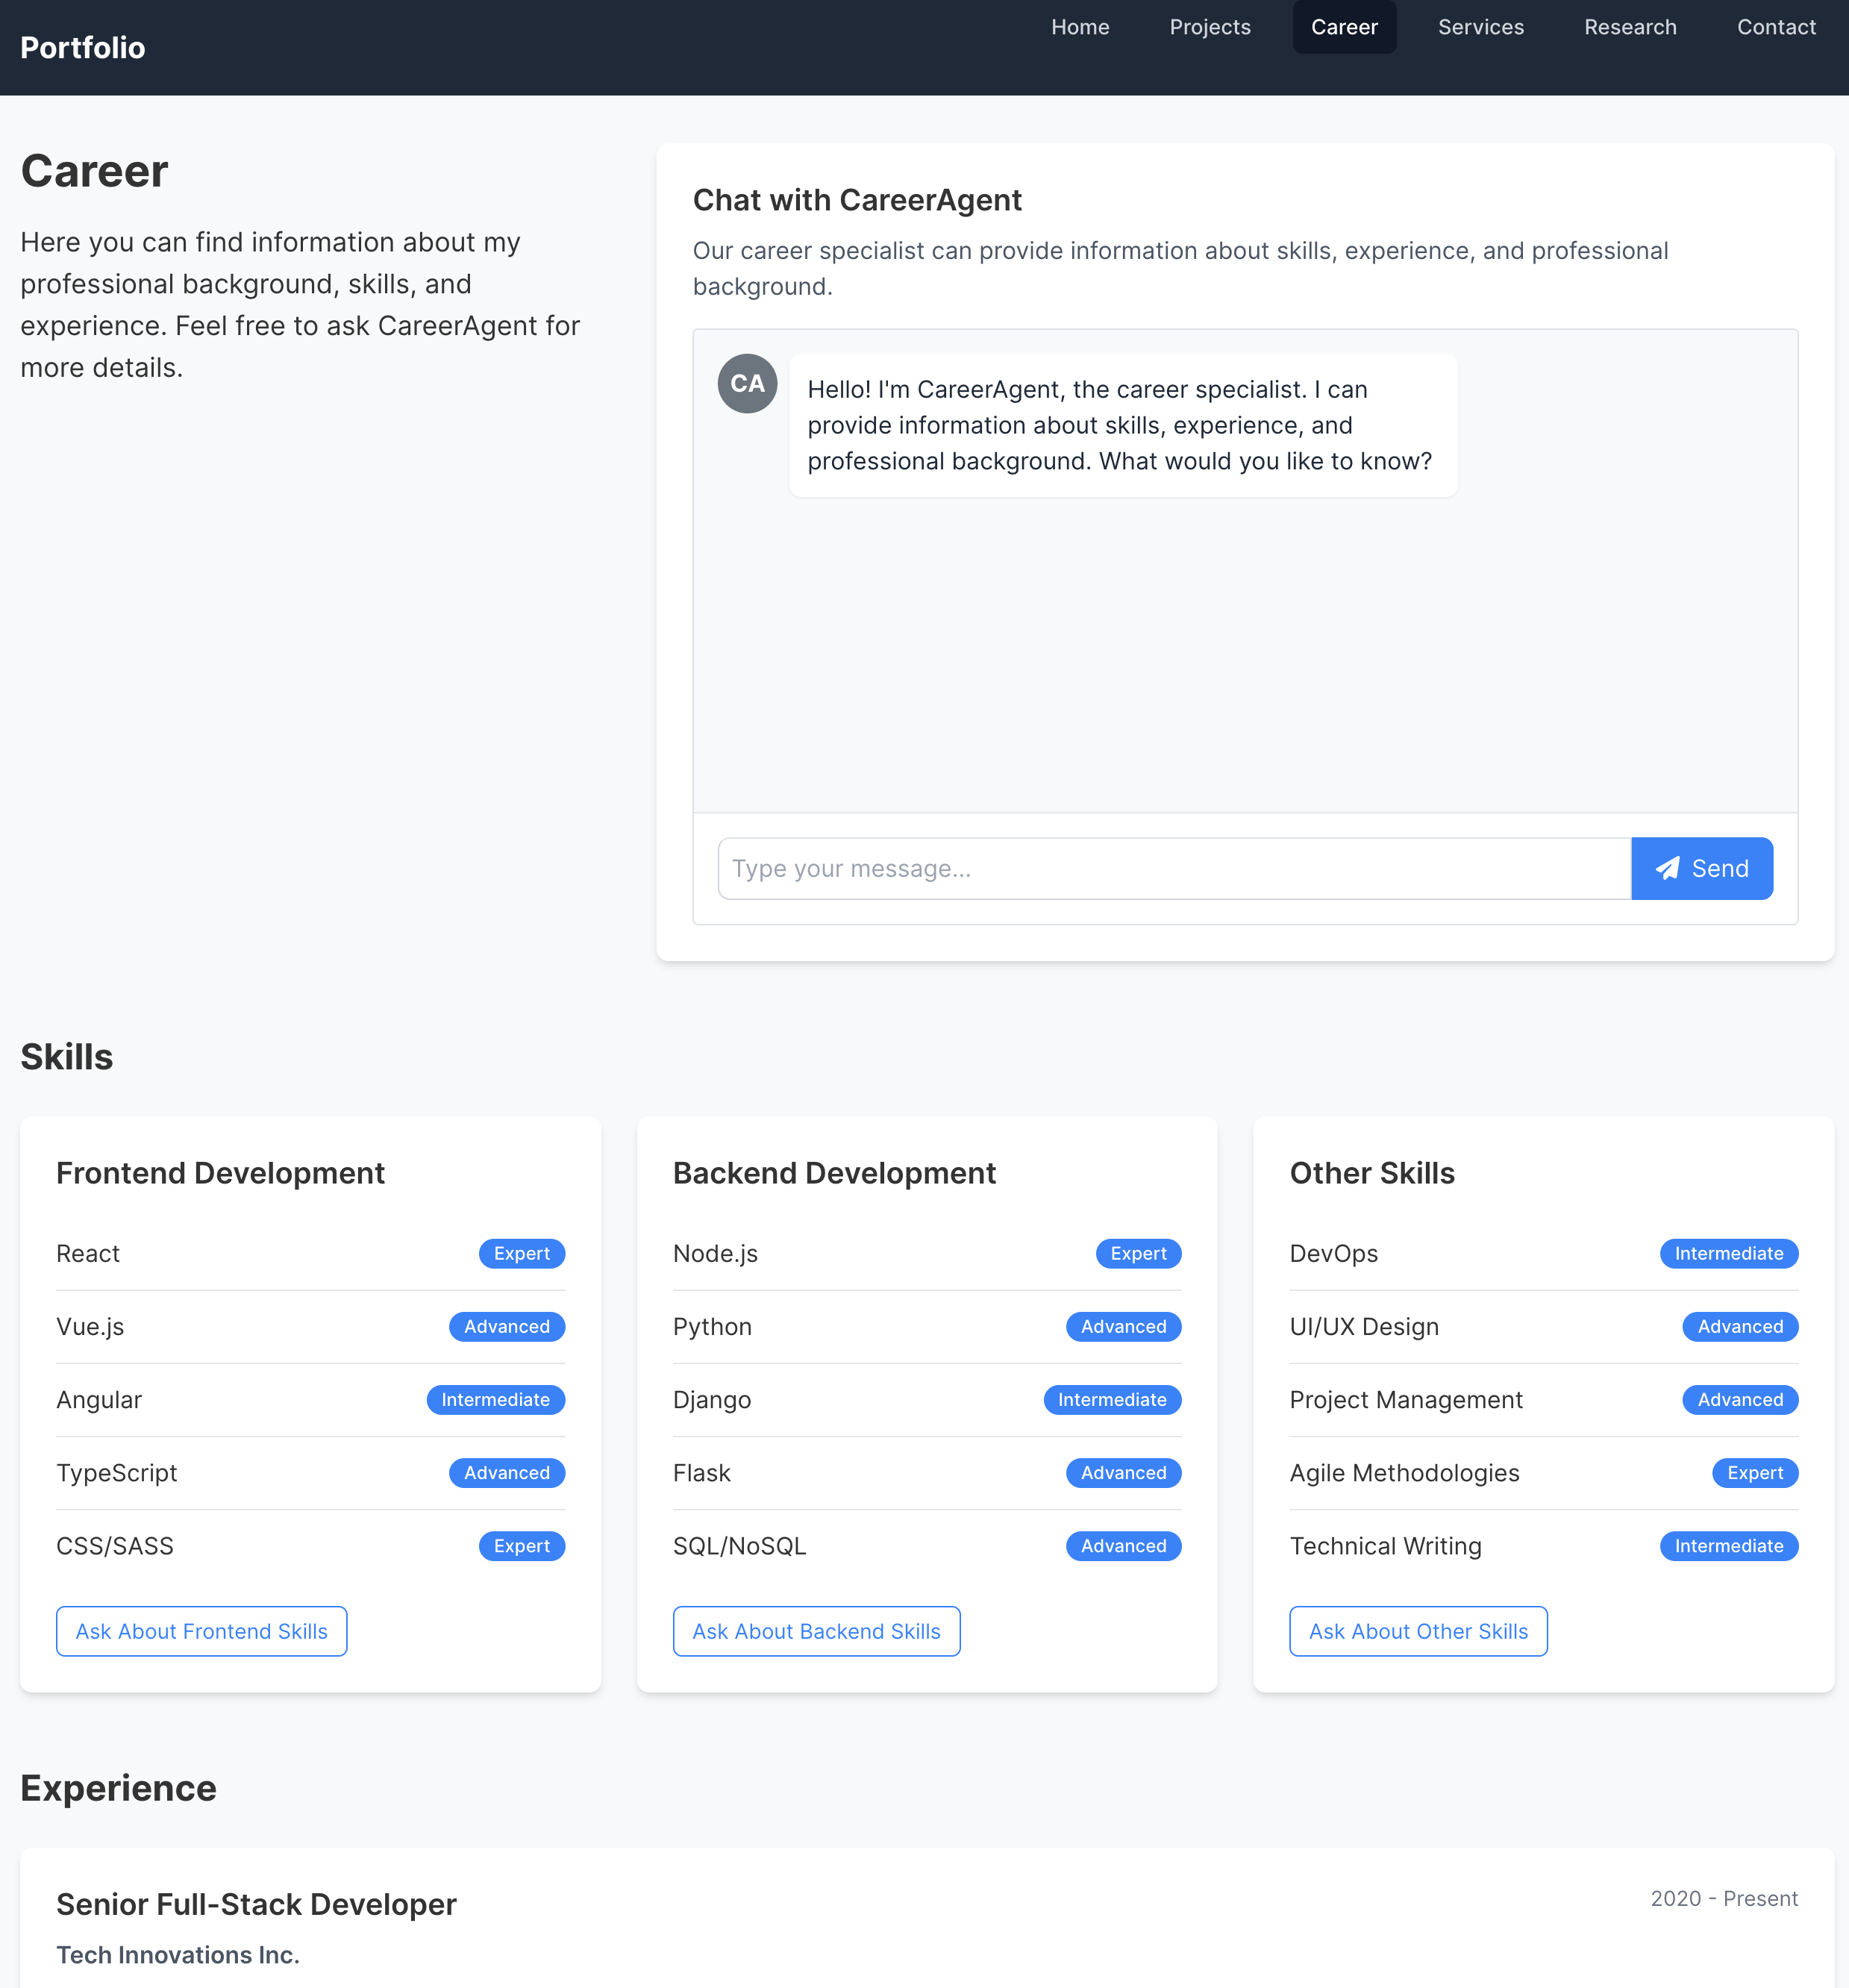
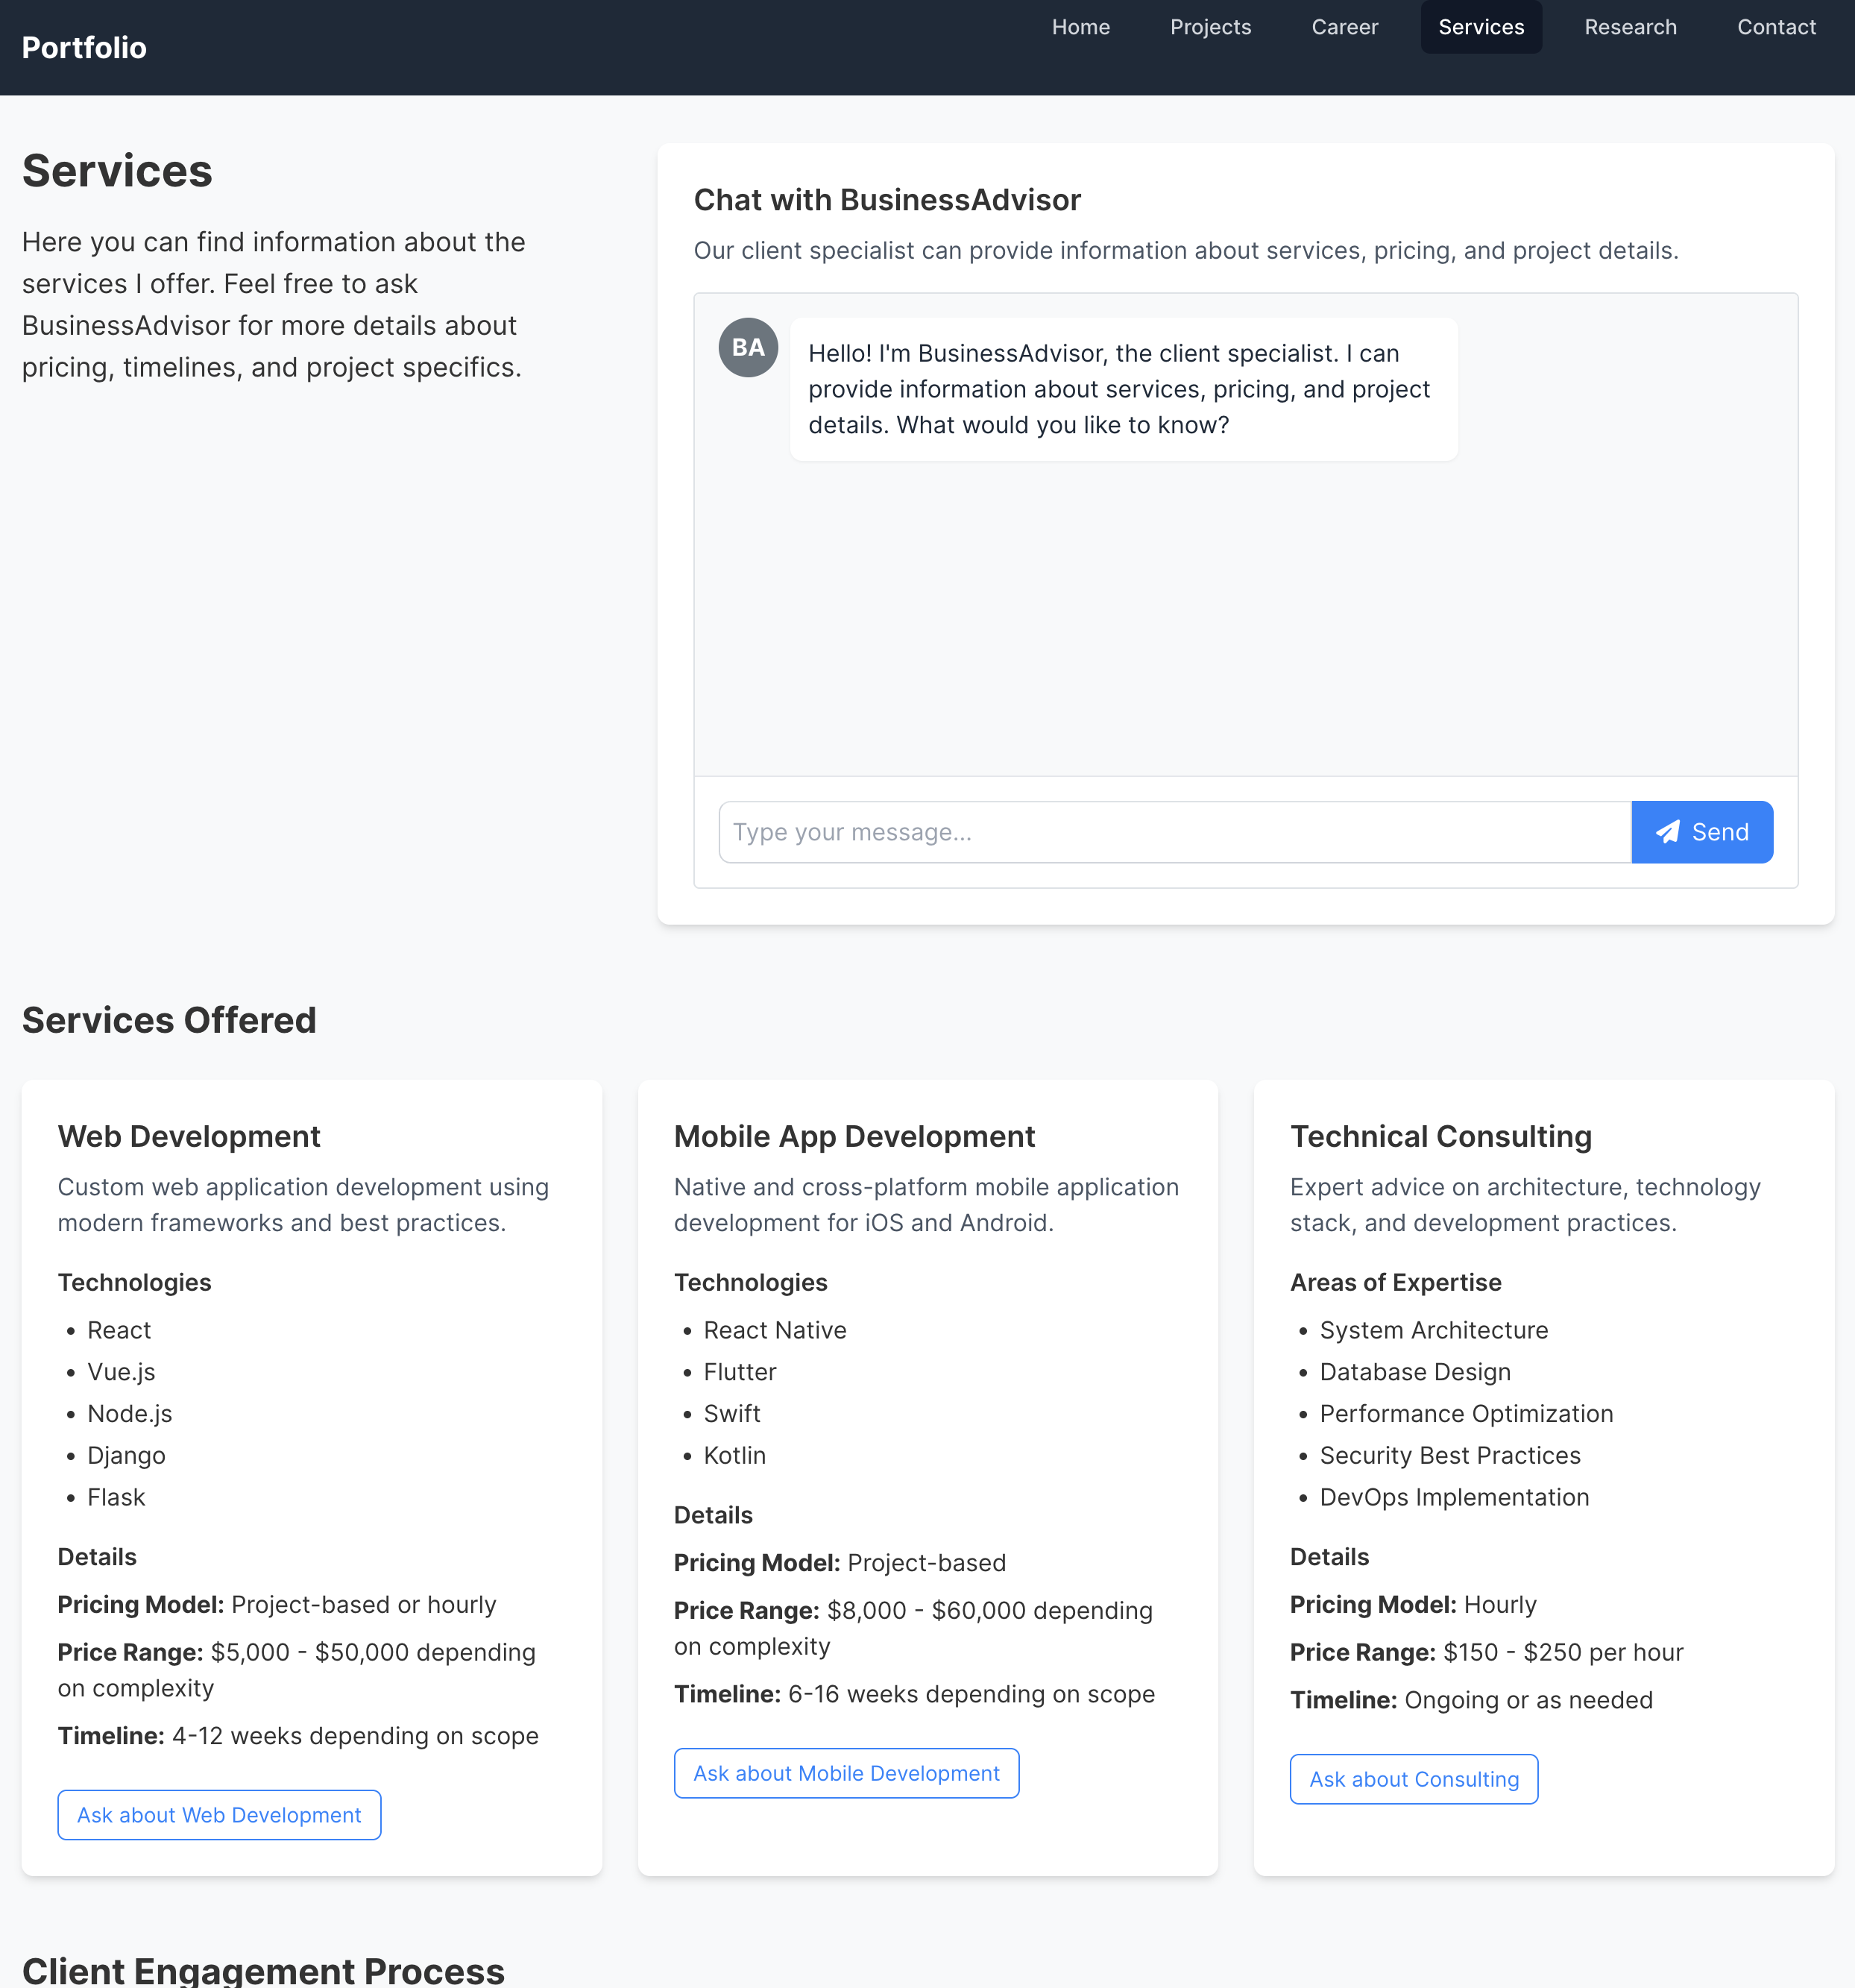
The website will have the following six pages:
Home – the main webpage
Projects – showcasing some featured projects and technical skills
Career – showing skills, experience, education, and certifications
Services – client services and the engagement process
Research – a way to search the web regarding the tech industry
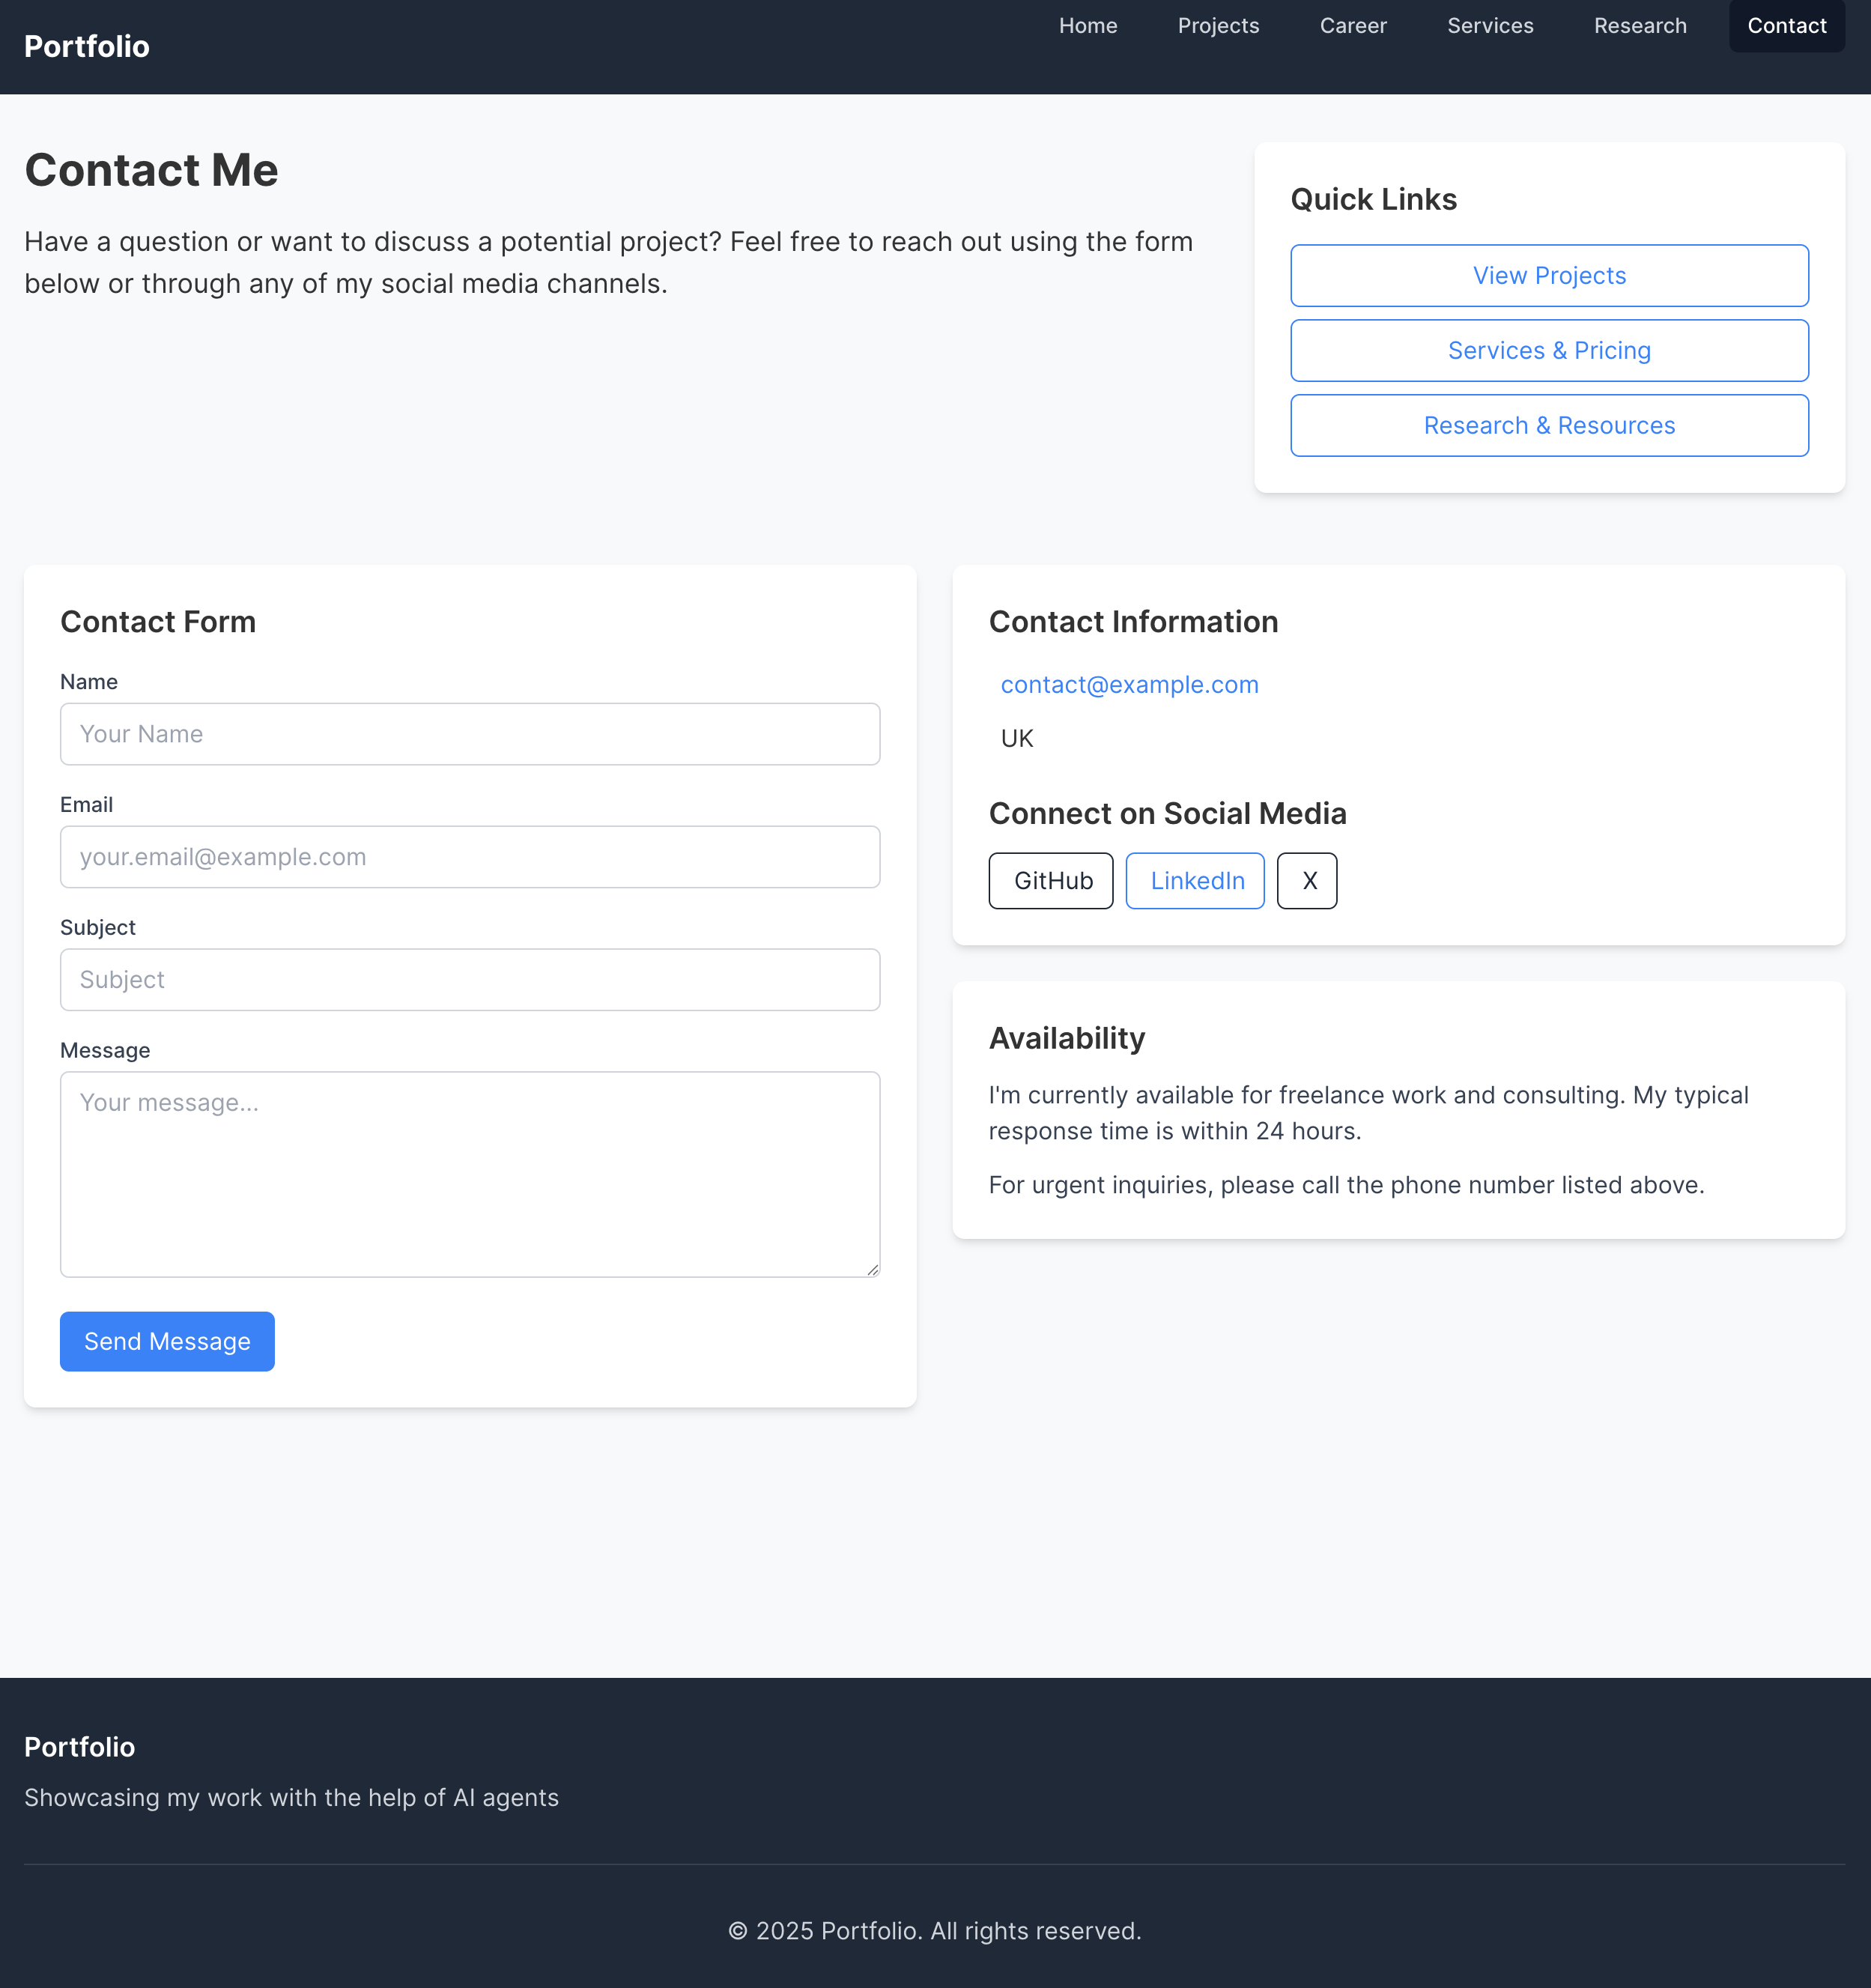
Contact – a page with a form to contact the user
You can see what your frontend React application will look like below:
First, you have your portfolio homepage:
Next is your Projects page:
Now you have your Career page:
Then you have the Services page:
Then you can see your Research and Insights page:
Lastly, you have your Contact page:
Now, let's begin building your application, starting with the Python Backend.
Building Our Python Backend
For this tutorial I will be using macOS, and the commands should also work on Linux. If you’re a Windows user, most of the commands should work (although there are some differences like activating a Python environment). You can find the correct commands by searching if need be – and you’ll know if your terminal gives you errors when trying to run a command.
Creating An Account On Groq Cloud
As mentioned earlier, we will use Meta’s LLaMA 3 via Groq Cloud, which is ideal. So, first, we have to create an account on Groq Cloud, as shown here.
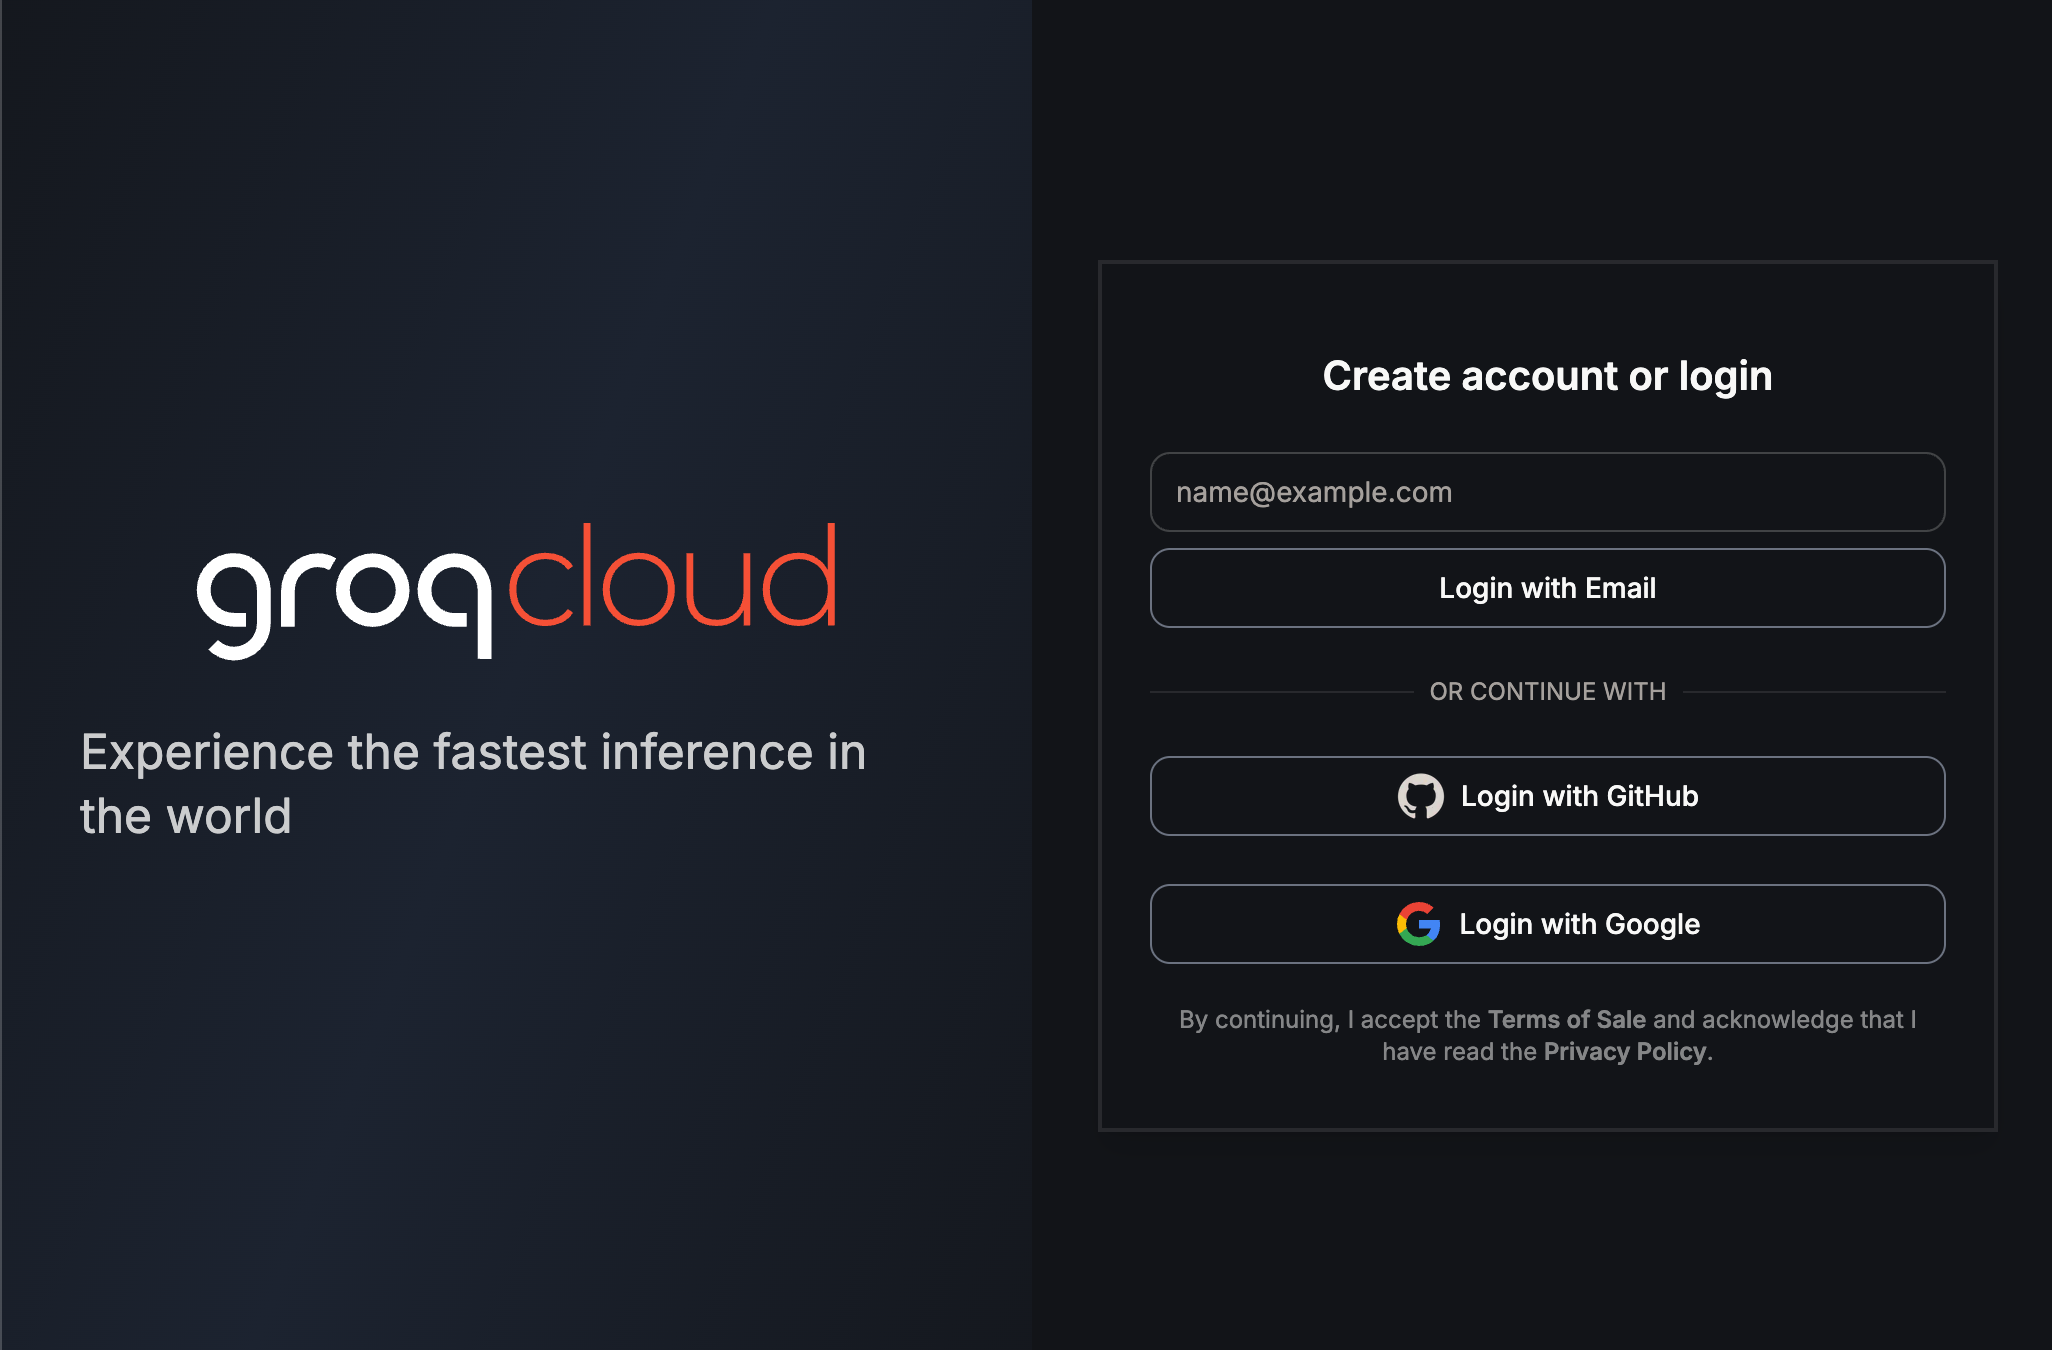
Once you have created an account on Groq Cloud, go to the API Keys page and create an API Key as shown in this example. I gave mine the name team-ai-agents:

You should have an API Key that looks like this example, so make sure that you save it somewhere safe – we will need it later.
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
Setting Up Our Python Project
Ok, now let's quickly set up our project. Navigate to a location on your computer, like the desktop, and create a folder called ai-agent-app. cd into the project folder and get ready – we’re going to start building our backend using Python.
I recommend installing agno and groq locally in a Python virtual environment. First, use this terminal command to setup a Python virtual environment inside of your ai-agent-app folder:
python3 -m venv venv
source venv/bin/activate
cd venv
Note: depending on your local Python environment, you might need to use either the python or python3 command for running Python commands. In my environment and examples, I use python3, so adjust the command to suit your needs.
The same applies when using either pip or pip3 when installing Python packages. You can check to see which version of Python and pip you have installed with the python --version, python3 --version , pip --version and pip3 --version commands in your terminal window.
The above command should create a venv folder inside of your ai-agent-app folder. This will be your REST backend with all of your API endpoints which your React frontend will use later on in this tutorial. Your Python virtual environment has also been activated.
To activate and deactivate your Python environment, you can use these commands:
# Activate on macOS/Linux
source venv/bin/activate

# Activate on Windows
venv\Scripts\activate

# Deactivate works on all platforms
conda deactivate
At this point, its a good idea to open the project in your code editor. Now you’ll need to install agno and groq using pip alongside a few other packages: flask, requests, and python-dotenv. You need these packages for setting up your server environment, so go ahead and install them all with this command:
pip install agno
pip install groq
pip install flask
pip install flask_cors
pip install requests
pip install python-dotenv
With these Python packages installed, you’re now ready to set up your API for this project. We’ll be using the Python web application framework Flask, along with the CORS package so that we can access the server anywhere. At the same time, we’ll also use the requests module, which allows us to send HTTP requests using Python.
Note that you’ll also need a .env file for your API keys, so make sure you have installed the python-dotenv package in your Python environment, although in some cases, it's installed automatically.
Working On The Python Codebase
Alright, time to make a start on the codebase. But first, let's generate all of the files for your project. You can do this simply by running the run script I created for the project. Run this command in the venv folder:
mkdir agents
touch .env main.py
cd agents
touch __init__.py base_agent.py career_agent.py client_agent.py project_agent.py research_agent.py welcome_agent.py
With this script, you should now have:
Created a
.envfile for your API KeysCreated an agents folder with all of the files for creating your different AI agents
Created a
main.pyfile, which will be the main project file for your entire backend app
Ok, your files are set. All that’s left is to add the codebase, and the backend is complete. Let's start with the .env file, as it only needs one line of code and that is for your API key. See my example and update it with your own API Key:
GROQ_API_KEY="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"
Your application now has an API key, which gives you access to Groq Cloud. Now let’s start to add the code for all the various AI agents. The first file we’ll work on will be the __init__.py which holds the imports for all of the AI agent files.
Add this code to the file:
from agents.welcome_agent import WelcomeAgent
from agents.project_agent import ProjectAgent
from agents.career_agent import CareerAgent
from agents.client_agent import ClientAgent
from agents.research_agent import ResearchAgent

# Export all agents
__all__ = ['WelcomeAgent', 'ProjectAgent', 'CareerAgent', 'ClientAgent', 'ResearchAgent']
As you can see, all of the classes for the AI agents will be imported and exported from here so you can use them in your main.py file later.
Ok, good. Now, we have 6 AI agent files to work on, beginning with the base_agent.py file.
Make sure that you add this code to the file:
from agno.agent import Agent
from agno.models.groq import Groq
import os


class BaseAgent:
    def __init__(self, name, description, avatar="default_avatar.png"):

        self.name = name
        self.description = description
        self.avatar = avatar
        self.model = Groq(id="llama-3.3-70b-versatile")
        self.agent = Agent(model=self.model, markdown=True)

    def get_response(self, query, stream=False):

        return self.agent.get_response(query, stream=stream)

    def print_response(self, query, stream=True):

        return self.agent.print_response(query, stream=stream)
This class uses the agno framework to create AI agents powered by Groq's LLama 3.3 70B model, which is free to use with some usage restrictions for API calls. This should be fine for your project. It provides the basic structure that other specialised agents in the application can inherit from and extend with domain-specific functionality.
The model we chose is available on the Groq Cloud platform, and we can change it if we want to. Each model has pros and cons, and a cut-off date for how up-to-date it is, so you can expect to get different results. Just keep in mind that using an up to date LLM like OpenAI will provide better results, but you might have to pay for it.
The next file we will work on will be the career_agent.py file.
And this is this code required for it:
from agents.base_agent import BaseAgent


class CareerAgent(BaseAgent):
    def __init__(self):
        super().__init__(
            name="CareerGuide",
            description="I'm the career specialist. I can provide information about skills, experience, and job suitability.",
            avatar="career_avatar.png"
        )

        self.skills = {
            "languages": ["Python", "JavaScript", "TypeScript", "Java", "SQL"],
            "frameworks": ["React", "Vue.js", "Node.js", "Django", "Flask", "Spring Boot"],
            "tools": ["Git", "Docker", "AWS", "Azure", "CI/CD", "Kubernetes"],
            "soft_skills": ["Team leadership", "Project management", "Agile methodologies", "Technical writing", "Client communication"]
        }

        self.experience = [
            {
                "title": "Senior Full Stack Developer",
                "company": "Tech Innovations Inc.",
                "period": "2020-Present",
                "responsibilities": [
                    "Led development of cloud-based SaaS platform",
                    "Managed team of 5 developers",
                    "Implemented CI/CD pipeline reducing deployment time by 40%",
                    "Architected microservices infrastructure"
                ]
            },
            {
                "title": "Full Stack Developer",
                "company": "WebSolutions Co.",
                "period": "2017-2020",
                "responsibilities": [
                    "Developed responsive web applications using React and Node.js",
                    "Implemented RESTful APIs and database schemas",
                    "Collaborated with UX/UI designers to implement user-friendly interfaces",
                    "Participated in code reviews and mentored junior developers"
                ]
            },
            {
                "title": "Junior Developer",
                "company": "StartUp Labs",
                "period": "2015-2017",
                "responsibilities": [
                    "Built and maintained client websites",
                    "Developed custom WordPress plugins",
                    "Implemented responsive designs and cross-browser compatibility",
                    "Assisted in database design and optimization"
                ]
            }
        ]

    def get_skills_summary(self):

        prompt = f"""
        Generate a professional summary of the following skills for a portfolio website:

        Programming Languages: {', '.join(self.skills['languages'])}
        Frameworks & Libraries: {', '.join(self.skills['frameworks'])}
        Tools & Platforms: {', '.join(self.skills['tools'])}
        Soft Skills: {', '.join(self.skills['soft_skills'])}

        Format the response in markdown with appropriate sections and highlights.
        """
        return self.get_response(prompt)

    def get_experience_summary(self):

        experience_text = "# Work Experience\n\n"
        for job in self.experience:
            experience_text += f"## {job['title']} at {job['company']}\n"
            experience_text += f"**{job['period']}**\n\n"
            experience_text += "**Responsibilities:**\n"
            for resp in job['responsibilities']:
                experience_text += f"- {resp}\n"
            experience_text += "\n"

        prompt = f"""
        Based on the following work experience, generate a professional career summary for a portfolio website:

        {experience_text}

        Highlight career progression, key achievements, and growth. Format the response in markdown.
        """
        return self.get_response(prompt)

    def assess_job_fit(self, job_description):

        skills_flat = []
        for skill_category in self.skills.values():
            skills_flat.extend(skill_category)

        experience_flat = []
        for job in self.experience:
            experience_flat.extend(job['responsibilities'])

        prompt = f"""
        Assess the fit for the following job description based on the skills and experience provided:

        Job Description:
        {job_description}

        Skills:
        {', '.join(skills_flat)}

        Experience:
        {' '.join(experience_flat)}

        Provide an analysis of strengths, potential gaps, and overall suitability for the role. Format the response in markdown.
        """
        return self.get_response(prompt)
This agent is designed to help users with career-related tasks such as:
Creating professional summaries of technical and soft skills
Generating career narratives based on work experience
Evaluating job fit by comparing skills and experience against job descriptions
The agent uses the LLM capabilities of the base agent (using Groq's LLama 3.3 70B model) to generate natural language responses that are formatted in markdown, making them suitable for inclusion in portfolio websites, résumés, or job applications. This file has sample career data, and in a real implementation, this would come from a database
Ok time for the next AI agent – this time it’s client_agent.py, which receives this code:
from agents.base_agent import BaseAgent


class ClientAgent(BaseAgent):
    def __init__(self):
        super().__init__(
            name="BusinessAdvisor",
            description="I'm the client specialist. I can provide information about services, pricing, and project details.",
            avatar="client_avatar.png"
        )

        self.services = {
            "web_development": {
                "name": "Web Development",
                "description": "Custom web application development using modern frameworks and best practices.",
                "pricing_model": "Project-based or hourly",
                "price_range": "$5,000 - $50,000 depending on complexity",
                "timeline": "4-12 weeks depending on scope",
                "technologies": ["React", "Vue.js", "Node.js", "Django", "Flask"]
            },
            "mobile_development": {
                "name": "Mobile App Development",
                "description": "Native and cross-platform mobile application development for iOS and Android.",
                "pricing_model": "Project-based",
                "price_range": "$8,000 - $60,000 depending on complexity",
                "timeline": "6-16 weeks depending on scope",
                "technologies": ["React Native", "Flutter", "Swift", "Kotlin"]
            },
            "consulting": {
                "name": "Technical Consulting",
                "description": "Expert advice on architecture, technology stack, and development practices.",
                "pricing_model": "Hourly",
                "price_range": "$150 - $250 per hour",
                "timeline": "Ongoing or as needed",
                "technologies": ["Various based on client needs"]
            }
        }

        self.process = [
            "Initial consultation to understand requirements",
            "Proposal and quote preparation",
            "Contract signing and project kickoff",
            "Design and prototyping phase",
            "Development sprints with regular client feedback",
            "Testing and quality assurance",
            "Deployment and launch",
            "Post-launch support and maintenance"
        ]

    def get_services_overview(self):

        services_text = "# Services Offered\n\n"
        for service_id, service in self.services.items():
            services_text += f"## {service['name']}\n"
            services_text += f"{service['description']}\n\n"
            services_text += f"**Pricing Model**: {service['pricing_model']}\n"
            services_text += f"**Price Range**: {service['price_range']}\n"
            services_text += f"**Timeline**: {service['timeline']}\n"
            services_text += f"**Technologies**: {', '.join(service['technologies'])}\n\n"

        prompt = f"""
        Generate a professional overview of the following services for a programmer's portfolio website:

        {services_text}

        Format the response in markdown with appropriate sections and highlights.
        """
        return self.get_response(prompt)

    def get_service_details(self, service_id):

        if service_id in self.services:
            service = self.services[service_id]
            prompt = f"""
            Generate a detailed description for the following service:

            Service Name: {service['name']}
            Description: {service['description']}
            Pricing Model: {service['pricing_model']}
            Price Range: {service['price_range']}
            Timeline: {service['timeline']}
            Technologies: {', '.join(service['technologies'])}

            Include information about the value proposition, typical deliverables, and client benefits. Format the response in markdown.
            """
            return self.get_response(prompt)
        else:
            return "Service not found. Please check the service ID and try again."

    def explain_process(self):

        process_text = "# Client Engagement Process\n\n"
        for i, step in enumerate(self.process, 1):
            process_text += f"## Step {i}: {step}\n\n"

        prompt = f"""
        Based on the following client engagement process, generate a detailed explanation for potential clients:

        {process_text}

        For each step, provide a brief explanation of what happens, what the client can expect, and any deliverables. Format the response in markdown.
        """
        return self.get_response(prompt)

    def generate_proposal(self, project_description):

        prompt = f"""
        Generate a professional project proposal based on the following client requirements:

        Project Description:
        {project_description}

        Include the following sections:
        1. Project Understanding
        2. Proposed Approach
        3. Estimated Timeline
        4. Estimated Budget Range
        5. Next Steps

        Base your proposal on the services and processes described in the portfolio. Format the response in markdown.
        """
        return self.get_response(prompt)
This agent is designed to help users with client and business-related tasks such as:
Providing overviews of available services for marketing materials
Generating detailed service descriptions for specific offerings
Explaining the client engagement process to potential clients
Creating customised project proposals based on client requirements
The agent also uses the LLM capabilities of the base agent (using Groq's LLama 3.3 70B model) to generate professional, business-oriented content formatted in markdown. Like before, this file also has sample service data.
Now we can start to work on the project_agent.py file and add this code to its codebase:
from agents.base_agent import BaseAgent


class ProjectAgent(BaseAgent):
    def __init__(self):
        super().__init__(
            name="TechExpert",
            description="I'm the project specialist. I can provide detailed information about any project in this portfolio.",
            avatar="project_avatar.png"
        )

        self.projects = {
            "project1": {
                "name": "E-commerce Platform",
                "tech_stack": ["React", "Node.js", "MongoDB", "Express"],
                "description": "A full-stack e-commerce platform with user authentication, product catalog, shopping cart, and payment processing.",
                "highlights": ["Responsive design", "RESTful API", "Stripe integration", "JWT authentication"],
                "github_link": "https://github.com/username/ecommerce-platform",
                "demo_link": "https://ecommerce-demo.example.com"
            },
            "project2": {
                "name": "Task Management App",
                "tech_stack": ["Vue.js", "Firebase", "Tailwind CSS"],
                "description": "A real-time task management application with collaborative features, notifications, and progress tracking.",
                "highlights": ["Real-time updates", "User collaboration", "Drag-and-drop interface", "Progressive Web App"],
                "github_link": "https://github.com/username/task-manager",
                "demo_link": "https://taskmanager-demo.example.com"
            },
            "project3": {
                "name": "Data Visualization Dashboard",
                "tech_stack": ["Python", "Django", "D3.js", "PostgreSQL"],
                "description": "An interactive dashboard for visualizing complex datasets with filtering, sorting, and export capabilities.",
                "highlights": ["Interactive charts", "Data filtering", "CSV/PDF export", "Responsive design"],
                "github_link": "https://github.com/username/data-dashboard",
                "demo_link": "https://dataviz-demo.example.com"
            }
        }

    def get_project_list(self):

        project_list = "# Available Projects\n\n"
        for project_id, project in self.projects.items():
            project_list += f"## {project['name']}\n"
            project_list += f"**Tech Stack**: {', '.join(project['tech_stack'])}\n"
            project_list += f"{project['description']}\n\n"

        return project_list

    def get_project_details(self, project_id):

        if project_id in self.projects:
            project = self.projects[project_id]
            prompt = f"""
            Generate a detailed description for the following project:

            Project Name: {project['name']}
            Tech Stack: {', '.join(project['tech_stack'])}
            Description: {project['description']}
            Highlights: {', '.join(project['highlights'])}
            GitHub: {project['github_link']}
            Demo: {project['demo_link']}

            Include technical details about implementation challenges and solutions. Format the response in markdown.
            """
            return self.get_response(prompt)
        else:
            return "Project not found. Please check the project ID and try again."

    def answer_technical_question(self, project_id, question):

        if project_id in self.projects:
            project = self.projects[project_id]
            prompt = f"""
            Answer the following technical question about this project:

            Project Name: {project['name']}
            Tech Stack: {', '.join(project['tech_stack'])}
            Description: {project['description']}
            Highlights: {', '.join(project['highlights'])}

            Question: {question}

            Provide a detailed technical answer with code examples if relevant.
            """
            return self.get_response(prompt)
        else:
            return "Project not found. Please check the project ID and try again."
This agent is designed to help users with project-related tasks such as:
Providing an overview of all projects in a portfolio
Generating detailed descriptions of specific projects
Answering technical questions about implementation details
The agent, like in the previous examples, uses the LLM capabilities of the base agent (using Groq's LLama 3.3 70B model) to generate technical, project-oriented content formatted in markdown. This is good for technical documentation, or when responding to inquiries about project implementations. We’re using mock data here as opposed to a database.
With that file completed, we have two left. The next is the research_agent.py file, so go ahead and add this code:
from agents.base_agent import BaseAgent
import requests
import os
import json


class ResearchAgent(BaseAgent):
    def __init__(self):
        super().__init__(
            name="ResearchAssistant",
            description="I'm the research specialist. I can search the web for information about technologies, trends, and industry news.",
            avatar="research_avatar.png"
        )
        self.api_key = os.getenv("GROQ_API_KEY")

    def search_web(self, query):

        headers = {
            "Authorization": f"Bearer {self.api_key}",
            "Content-Type": "application/json"
        }

        payload = {
            "model": "llama-3.3-70b-versatile",
            "messages": [
                {"role": "system", "content": "You are a helpful research assistant."},
                {"role": "user", "content": f"Search the web for: {query}"}
            ],
            "tools": [
                {
                    "type": "web_search"
                }
            ]
        }

        try:
            response = requests.post(
                "https://api.groq.com/openai/v1/chat/completions",
                headers=headers,
                json=payload
            )

            if response.status_code == 200:
                result = response.json()
                return result["choices"][0]["message"]["content"]
            else:
                return f"Error searching the web: {response.status_code} - {response.text}"
        except Exception as e:
            return f"Error searching the web: {str(e)}"

    def research_technology(self, technology):

        query = f"latest developments and best practices for {technology} in software development"
        search_results = self.search_web(query)

        prompt = f"""
        Based on the following search results about {technology}, provide a concise summary of:
        1. What it is
        2. Current state and popularity
        3. Key features and benefits
        4. Common use cases
        5. Future trends

        Search Results:
        {search_results}

        Format the response in markdown with appropriate sections.
        """
        return self.get_response(prompt)

    def compare_technologies(self, tech1, tech2):

        query = f"comparison between {tech1} and {tech2} for software development"
        search_results = self.search_web(query)

        prompt = f"""
        Based on the following search results comparing {tech1} and {tech2}, provide a detailed comparison including:
        6. Core differences
        7. Performance considerations
        8. Learning curve
        9. Community support
        10. Use case recommendations

        Search Results:
        {search_results}

        Format the response in markdown with a comparison table and explanatory text.
        """
        return self.get_response(prompt)

    def get_industry_trends(self):

        query = "latest trends in software development industry"
        search_results = self.search_web(query)

        prompt = f"""
        Based on the following search results about software development trends, provide a summary of:
        11. Emerging technologies
        12. Industry shifts
        13. In-demand skills
        14. Future predictions

        Search Results:
        {search_results}

        Format the response in markdown with appropriate sections and highlights.
        """
        return self.get_response(prompt)
This agent is designed to help users with research-related tasks such as:
Researching specific technologies to understand their features, benefits, and use cases
Comparing different technologies to make informed decisions
Staying updated on industry trends and emerging technologies
What makes this agent unique compared to the other agents is that it actively fetches real-time information from the web using the Groq Toolhouse API's web search capability instead of relying solely on pre-defined data or the LLM's training data. This allows it to provide more current and comprehensive information about rapidly evolving technology topics.
Ok, now we have one last AI agent to create and it’s the welcome_agent.py file. Add this code to the file:
from agents.base_agent import BaseAgent


class WelcomeAgent(BaseAgent):
    def __init__(self):
        super().__init__(
            name="Greeter",
            description="I'm the welcome agent for this portfolio. I can help guide you to the right section based on your interests.",
            avatar="welcome_avatar.png"
        )

    def greet(self, visitor_type=None):

        if visitor_type == "employer":
            return self.get_response(
                "Generate a friendly, professional greeting for a potential employer visiting a programmer's portfolio website. "
                "Mention that they can explore the Projects section to see technical skills and the Career section for professional experience."
            )
        elif visitor_type == "client":
            return self.get_response(
                "Generate a friendly, business-oriented greeting for a potential client visiting a programmer's portfolio website. "
                "Mention that they can check out the Projects section for examples of past work and the Client section for service details."
            )
        elif visitor_type == "fellow_programmer":
            return self.get_response(
                "Generate a friendly, casual greeting for a fellow programmer visiting a portfolio website. "
                "Mention that they can explore the Projects section for technical details and code samples."
            )
        else:
            return self.get_response(
                "Generate a friendly, general greeting for a visitor to a programmer's portfolio website. "
                "Ask if they are an employer, client, or fellow programmer to provide more tailored information."
            )

    def suggest_section(self, interest):

        prompt = f"Based on a visitor expressing interest in '{interest}', suggest which section of a programmer's portfolio they should visit. Options include: Projects, Career, Client Work, About Me, Contact. Explain why in 1-2 sentences."
        return self.get_response(prompt)
This agent is designed to serve as the initial point of contact for visitors to a portfolio website, providing:
Personalised greetings based on visitor type
Guidance to relevant sections based on specific interests
A friendly, conversational introduction to the portfolio
The WelcomeAgent is simpler than some of the other agents we've looked at because it focuses on creating a positive first impression and helping visitors navigate to the content most relevant to their needs. It uses the LLM capabilities of the base agent to generate natural, contextually appropriate responses.
Ok good – your backend API is almost ready. You just have one last file to work on: the main.py file that completes your codebase. This file is quite big, so I will split it into three parts. You’ll need to copy and paste each section into the file. If you have not done so already, its worth installing the Python extension for VS Code as this has debugging, linting, and formatting for Python files.
Alright, here is the first part of the codebase for our main.py file:
from flask import Flask, request, jsonify
import os
from dotenv import load_dotenv
import json
import requests
from flask_cors import CORS


load_dotenv()


app = Flask(__name__)
CORS(app)


class BaseAgent:
    def __init__(self, name, description):
        self.name = name
        self.description = description

        self.api_key = os.getenv("GROQ_API_KEY")

    def get_response(self, prompt):

        try:
            headers = {
                "Authorization": f"Bearer {self.api_key}",
                "Content-Type": "application/json"
            }

            data = {
                "model": "llama3-8b-8192",
                "messages": [
                    {"role": "system", "content": f"You are {self.name}, {self.description}. Respond in a helpful, concise, and professional manner."},
                    {"role": "user", "content": prompt}
                ],
                "temperature": 0.7,
                "max_tokens": 500
            }

            response = requests.post(
                "https://api.groq.com/openai/v1/chat/completions",
                headers=headers,
                json=data
            )

            if response.status_code == 200:
                return response.json()["choices"][0]["message"]["content"]
            else:
                return f"Error: {response.status_code} - {response.text}"
        except Exception as e:
            return f"An error occurred: {str(e)}"


class WelcomeAgent(BaseAgent):
    def __init__(self):
        super().__init__(
            "WelcomeAgent",
            "a welcome specialist who greets visitors and helps them navigate the portfolio website"
        )

    def greet(self, visitor_type=None):
        if visitor_type == "employer":
            return self.get_response("Generate a warm welcome message for an employer visiting a programmer's portfolio website. Suggest they check out the Projects and Career sections.")
        elif visitor_type == "client":
            return self.get_response("Generate a warm welcome message for a potential client visiting a programmer's portfolio website. Suggest they check out the Services section.")
        elif visitor_type == "fellow_programmer":
            return self.get_response("Generate a warm welcome message for a fellow programmer visiting a programmer's portfolio website. Suggest they check out the Projects and Research sections.")
        else:
            return self.get_response("Generate a general welcome message for a visitor to a programmer's portfolio website. Ask if they are an employer, client, or fellow programmer.")

    def suggest_section(self, interest):
        return self.get_response(f"A visitor to my portfolio website has expressed interest in {interest}. Suggest which section(s) of the website they should visit based on this interest.")


class ProjectAgent(BaseAgent):
    def __init__(self):
        super().__init__(
            "ProjectAgent",
            "a project specialist who provides detailed information about the programmer's projects"
        )

    def get_project_list(self):
        return self.get_response("Generate a list of 3-5 impressive software development projects that could be in a programmer's portfolio. Include a brief description for each.")

    def get_project_details(self, project_id):
        project_prompts = {
            "project1": "Describe in detail an e-commerce platform project for a programmer's portfolio. Include technologies used, challenges overcome, and key features.",
            "project2": "Describe in detail a task management application project for a programmer's portfolio. Include technologies used, challenges overcome, and key features.",
            "project3": "Describe in detail a data visualization dashboard project for a programmer's portfolio. Include technologies used, challenges overcome, and key features."
        }

        prompt = project_prompts.get(
            project_id, f"Describe a project called {project_id} in detail.")
        return self.get_response(prompt)

    def answer_technical_question(self, project_id, question):
        return self.get_response(f"Answer this technical question about a project: '{question}'. The project is {project_id}.")
This part of the code has your imports, set up, and some greetings for the AI agent.
Now for part two, add this code to the file underneath the first code you added:
class CareerAgent(BaseAgent):
    def __init__(self):
        super().__init__(
            "CareerAgent",
            "a career specialist who provides information about the programmer's skills and experience"
        )

    def get_skills_summary(self):
        return self.get_response("Generate a comprehensive summary of technical and professional skills for a full-stack developer's portfolio.")

    def get_experience_summary(self):
        return self.get_response("Generate a summary of work experience for a full-stack developer with 5+ years of experience.")

    def assess_job_fit(self, job_description):
        return self.get_response(f"Assess how well a full-stack developer with 5+ years of experience would fit this job description: '{job_description}'. Highlight matching skills and experience.")


class ClientAgent(BaseAgent):
    def __init__(self):
        super().__init__(
            "ClientAgent",
            "a client specialist who provides information about services, pricing, and the client engagement process"
        )

    def get_services_overview(self):
        return self.get_response("Generate an overview of services that a freelance full-stack developer might offer to clients.")

    def get_service_details(self, service_type):
        service_prompts = {
            "web_development": "Describe web development services offered by a freelance full-stack developer, including technologies, pricing range, and typical timeline.",
            "mobile_development": "Describe mobile app development services offered by a freelance full-stack developer, including technologies, pricing range, and typical timeline.",
            "consulting": "Describe technical consulting services offered by a freelance full-stack developer, including areas of expertise, hourly rate range, and engagement model."
        }

        prompt = service_prompts.get(
            service_type, f"Describe {service_type} services in detail.")
        return self.get_response(prompt)

    def explain_process(self):
        return self.get_response("Explain the client engagement process for a freelance full-stack developer, from initial consultation to project delivery.")

    def generate_proposal(self, project_description):
        return self.get_response(f"Generate a project proposal for this client request: '{project_description}'. Include estimated timeline, cost range, and approach.")


class ResearchAgent(BaseAgent):
    def __init__(self):
        super().__init__(
            "ResearchAgent",
            "a research specialist who provides information about technologies, trends, and industry news"
        )

    def search_web(self, query):
        return self.get_response(f"Provide information about '{query}' as if you've just searched the web for the latest information. Include key points and insights.")

    def compare_technologies(self, tech1, tech2):
        return self.get_response(f"Compare {tech1} vs {tech2} in terms of features, performance, use cases, community support, and future prospects.")

    def get_industry_trends(self):
        return self.get_response("Describe current trends in software development and technology that are important for developers to be aware of.")


welcome_agent = WelcomeAgent()
project_agent = ProjectAgent()
career_agent = CareerAgent()
client_agent = ClientAgent()
research_agent = ResearchAgent()


@app.route('/static/images/default_avatar.png')
@app.route('/static/images/default_project.jpg')
def block_default_images():

    response = app.make_response(
        b'GIF89a\x01\x00\x01\x00\x80\x00\x00\xff\xff\xff\x00\x00\x00!\xf9\x04\x01\x00\x00\x00\x00,\x00\x00\x00\x00\x01\x00\x01\x00\x00\x02\x02D\x01\x00;')
    response.headers['Content-Type'] = 'image/gif'

    response.headers['Cache-Control'] = 'public, max-age=31536000'
    response.headers['Expires'] = 'Thu, 31 Dec 2037 23:59:59 GMT'
    return response


@app.route('/api/welcome', methods=['POST'])
def welcome_agent_endpoint():
    data = request.json
    message = data.get('message', '')

    visitor_type = None
    if 'employer' in message.lower():
        visitor_type = 'employer'
    elif 'client' in message.lower():
        visitor_type = 'client'
    elif 'programmer' in message.lower() or 'developer' in message.lower():
        visitor_type = 'fellow_programmer'

    if 'interest' in message.lower() or 'looking for' in message.lower():

        interest = message.replace('interest', '').replace(
            'looking for', '').strip()
        response = welcome_agent.suggest_section(interest)
    else:
        response = welcome_agent.greet(visitor_type)

    return jsonify({'response': response})
In this part of your codebase, you have more AI responses and a welcome API route.
Lastly, complete the code by adding this final piece at the end:
@app.route('/api/project', methods=['POST'])
def project_agent_endpoint():
    data = request.json
    message = data.get('message', '')

    project_id = None
    if 'e-commerce' in message.lower() or 'ecommerce' in message.lower():
        project_id = 'project1'
    elif 'task' in message.lower() or 'management' in message.lower():
        project_id = 'project2'
    elif 'data' in message.lower() or 'visualization' in message.lower() or 'dashboard' in message.lower():
        project_id = 'project3'

    if project_id and ('tell me more' in message.lower() or 'details' in message.lower()):
        response = project_agent.get_project_details(project_id)
    elif 'list' in message.lower() or 'all projects' in message.lower():
        response = project_agent.get_project_list()
    elif project_id:

        response = project_agent.answer_technical_question(project_id, message)
    else:

        response = project_agent.get_response(
            f"The user asked: '{message}'. Respond as if you are a project specialist for a portfolio website. "
            "If they're asking about a specific project, suggest they mention one of the projects: "
            "E-commerce Platform, Task Management App, or Data Visualization Dashboard."
        )

    return jsonify({'response': response})


@app.route('/api/career', methods=['POST'])
def career_agent_endpoint():
    data = request.json
    message = data.get('message', '')

    if 'skills' in message.lower():
        response = career_agent.get_skills_summary()
    elif 'experience' in message.lower() or 'work history' in message.lower():
        response = career_agent.get_experience_summary()
    elif 'job' in message.lower() or 'position' in message.lower() or 'role' in message.lower():

        response = career_agent.assess_job_fit(message)
    else:

        response = career_agent.get_response(
            f"The user asked: '{message}'. Respond as if you are a career specialist for a portfolio website. "
            "Suggest they ask about skills, experience, or job fit assessment."
        )

    return jsonify({'response': response})


@app.route('/api/client', methods=['POST'])
def client_agent_endpoint():
    data = request.json
    message = data.get('message', '')

    if 'services' in message.lower() or 'offerings' in message.lower():
        response = client_agent.get_services_overview()
    elif 'web' in message.lower() and 'development' in message.lower():
        response = client_agent.get_service_details('web_development')
    elif 'mobile' in message.lower() and 'development' in message.lower():
        response = client_agent.get_service_details('mobile_development')
    elif 'consulting' in message.lower() or 'technical consulting' in message.lower():
        response = client_agent.get_service_details('consulting')
    elif 'process' in message.lower() or 'how does it work' in message.lower():
        response = client_agent.explain_process()
    elif 'proposal' in message.lower() or 'quote' in message.lower() or 'estimate' in message.lower():

        response = client_agent.generate_proposal(message)
    else:

        response = client_agent.get_response(
            f"The user asked: '{message}'. Respond as if you are a client specialist for a portfolio website. "
            "Suggest they ask about services, the client engagement process, or request a proposal."
        )

    return jsonify({'response': response})


@app.route('/api/research', methods=['POST'])
def research_agent_endpoint():
    data = request.json
    message = data.get('message', '')

    if 'compare' in message.lower() and ('vs' in message.lower() or 'versus' in message.lower()):

        tech_parts = message.lower().replace('compare', '').replace(
            'vs', ' ').replace('versus', ' ').split()
        tech1 = tech_parts[0] if len(tech_parts) > 0 else ''
        tech2 = tech_parts[-1] if len(tech_parts) > 1 else ''
        response = research_agent.compare_technologies(tech1, tech2)
    elif 'trends' in message.lower() or 'industry' in message.lower():
        response = research_agent.get_industry_trends()
    else:
        response = research_agent.search_web(message)

    return jsonify({'response': response})


if __name__ == '__main__':

    app.config['SEND_FILE_MAX_AGE_DEFAULT'] = 0
    app.config['TEMPLATES_AUTO_RELOAD'] = True   # Ensure templates reload

    @app.after_request
    def add_header(response):
        response.headers['Cache-Control'] = 'no-store, no-cache, must-revalidate, max-age=0'
        response.headers['Pragma'] = 'no-cache'
        response.headers['Expires'] = '0'
        return response

    app.run(host='0.0.0.0', port=5001, debug=True,
            use_reloader=False, threaded=True)
Okay, if your file has errors, they're probably caused by the Python indentation. Hopefully, the formatting will not make them too difficult to fix.
The file is now complete, and you’ve created the rest of your AI API routes.
Running Our Python Backend
All that's left is to run your Flask server and get the backend up and running. You can do that with this run script inside the venv folder:
python3 main.py
Your backend should now be running on http://127.0.0.1:5001/. If you go to the page you will see an error like this:
Not Found

The requested URL was not found on the server. If you entered the URL manually please check your spelling and try again.
This is expected, because if you have checked the codebase, you’ll realise that there are no GET routes, only POST routes. To see them working, you need to use an HTTP client like Postman. Another option is to create some curl commands that send a POST request, which you can run from your terminal. Let's use curl because there is less setup. You’ll need to copy and paste the commands.
Each POST request will use exactly one API call on Groq Cloud for your API Key which you can view here https://console.groq.com/keys. Remember that it’s free to use but there are usage limits which you can read about in their documentation on Rate Limits.
I have provided some sample curl commands below – just copy and paste them into your terminal and hit enter, and you should see the response message:
1. Testing the Welcome Agent Endpoint
curl -X POST http://localhost:5001/api/welcome \
  -H "Content-Type: application/json" \
  -d '{"message": "I am an employer looking for a skilled developer"}'
2. Testing the Project Agent Endpoint
curl -X POST http://localhost:5001/api/project \
  -H "Content-Type: application/json" \
  -d '{"message": "Tell me more about the e-commerce project"}'
3. Testing the Career Agent Endpoint
curl -X POST http://localhost:5001/api/career \
  -H "Content-Type: application/json" \
  -d '{"message": "What skills do you have?"}'
4. Testing the Client Agent Endpoint
curl -X POST http://localhost:5001/api/client \
  -H "Content-Type: application/json" \
  -d '{"message": "What services do you offer?"}'
5. Testing the Research Agent Endpoint
curl -X POST http://localhost:5001/api/research \
  -H "Content-Type: application/json" \
  -d '{"message": "What are the current trends in web development?"}'
Building Our React Frontend
We have reached halfway point, and all that's left is to build your front end. We’ll build the front end using Vite, and the website will have six pages. Make sure that you are now inside the root folder for the ai-agent-app project. You can leave the Python server running because your front end is going to connect to the API routes you created.
Now, run the commands below to setup your React project using Vite, Tailwind CSS, react-router and Axios, which we need for page routing and fetch requests:
npm create vite@latest frontend -- --template react
cd frontend
npm install -D tailwindcss@3 postcss autoprefixer react-router axios
npx tailwindcss init -p
npm install
Great, now with those packages installed and our dependencies set up, we are almost ready to start on the codebase. But before that, we need to run one more script, which is going to create all of the files and folders for our project. It's much faster than doing them all manually.
Run this command inside the frontend folder:
mkdir -p src/components src/pages
touch src/style.css src/components/{Chat,Footer,Layout,Navbar}.jsx
touch src/pages/{Career,Contact,Home,Projects,Research,Services}.jsx
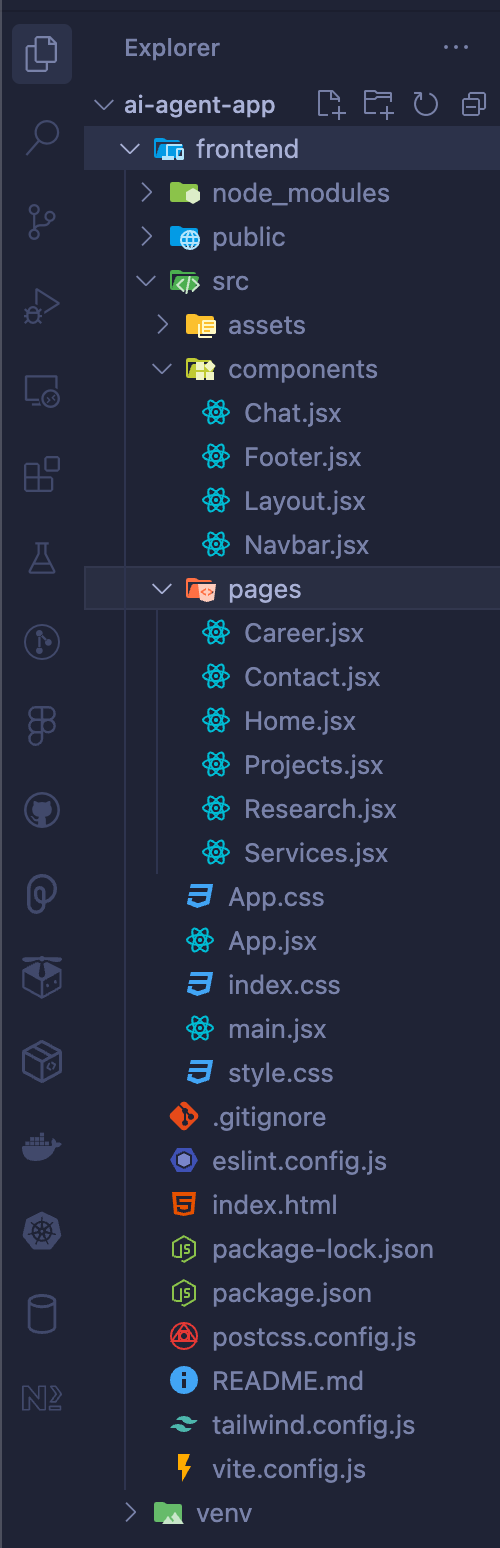
Our React frontend should now have a project structure like the example shown below:
We are now ready to start writing some code.
Up first is the tailwind.config.js file. This is the only configuration file you’ll need to work on, as the others already have the configuration we need. Replace all of the code in the file with the code below:
/** @type {import('tailwindcss').Config} */
export default {
  content: ['./index.html', './src/**/*.{js,ts,jsx,tsx}'],
  theme: {
    extend: {},
  },
  plugins: [],
};
All this code does is add the paths to all of your template files.
Ok, next, you are going to work on your styles and Tailwind CSS. There are three CSS files to work on: App.css, index.css, and style.css.
First up is the App.css file. Replace all of the code with this code here:
#root {
  max-width: 100%;
  margin: 0;
  padding: 0;
  text-align: left;
  display: flex;
  flex-direction: column;
  min-height: 100vh;
}

main {
  flex: 1;
}
We just have some basic layout styles here for root and main.
Next is the index.css file. Below is the code you’ll need, so replace everything in the file with it:
@tailwind base;
@tailwind components;
@tailwind utilities;

:root {
  font-family: system-ui, Avenir, Helvetica, Arial, sans-serif;
  font-synthesis: none;
  text-rendering: optimizeLegibility;
  -webkit-font-smoothing: antialiased;
  -moz-osx-font-smoothing: grayscale;
}

@layer components {
  .chat-container {
    @apply w-full h-96 flex flex-col;
  }

  .chat-messages {
    @apply flex-1 overflow-y-auto p-4;
  }

  .message {
    @apply flex mb-4;
  }

  .user-message {
    @apply justify-end;
  }

  .agent-message {
    @apply justify-start;
  }

  .message-avatar {
    @apply flex-shrink-0 mr-2;
  }

  .avatar-placeholder {
    @apply w-10 h-10 rounded-full bg-blue-500 text-white flex items-center justify-center font-bold;
  }

  .message-content {
    @apply p-3 rounded-lg max-w-xs sm:max-w-sm md:max-w-md;
  }

  .user-message .message-content {
    @apply bg-blue-500 text-white;
  }

  .agent-message .message-content {
    @apply bg-gray-200 text-gray-800;
  }

  .chat-input-container {
    @apply p-4 border-t border-gray-200;
  }

  .chat-input-group {
    @apply flex;
  }

  .chat-input {
    @apply flex-1 border border-gray-300 rounded-l-lg p-2 focus:outline-none focus:ring-2 focus:ring-blue-500;
  }

  .chat-send-button {
    @apply bg-blue-500 text-white px-4 py-2 rounded-r-lg hover:bg-blue-600 focus:outline-none focus:ring-2 focus:ring-blue-500;
  }

  .loading-dots:after {
    @apply content-['...'] animate-pulse;
  }

  .project-image-placeholder {
    @apply h-48 bg-gray-300 flex items-center justify-center text-gray-600 font-semibold;
  }

  .agent-avatar-placeholder {
    @apply w-16 h-16 rounded-full bg-blue-500 text-white flex items-center justify-center font-bold mx-auto;
  }
}
All of these styles relate to your Tailwind CSS setup throughout your project.
Just one file remains for the CSS and it’s the style.css file. This is a big file, so I will split the code into two parts – just copy and paste them into the file.
Here is the first part:
/* Main Styles */
body {
  font-family: 'Inter', -apple-system, BlinkMacSystemFont, 'Segoe UI', Roboto, Oxygen,
    Ubuntu, Cantarell, 'Open Sans', 'Helvetica Neue', sans-serif;
  color: #333;
  background-color: #f8f9fa;
}

/* Layout Styles */
#root {
  max-width: 100%;
  margin: 0;
  padding: 0;
  text-align: left;
  display: flex;
  flex-direction: column;
  min-height: 100vh;
}

main {
  flex: 1;
}

h1,
h2,
h3,
h4,
h5,
h6 {
  font-weight: 600;
}

footer {
  margin-top: auto;
}

/* Navbar Styles */
.navbar {
  box-shadow: 0 2px 4px rgba(0, 0, 0, 0.1);
}

.navbar-brand {
  font-weight: 700;
}

.navbar .container {
  max-width: 1320px;
}

/* Card Styles */
.card {
  border: none;
  border-radius: 0.5rem;
  transition: transform 0.3s ease, box-shadow 0.3s ease;
  margin-bottom: 1rem;
  padding: 2em;
}

.card:hover {
  transform: translateY(-5px);
  box-shadow: 0 10px 20px rgba(0, 0, 0, 0.1);
}

/* Agent Styles */
.agent-avatar-placeholder {
  width: 80px;
  height: 80px;
  border-radius: 50%;
  background-color: #6c757d;
  color: white;
  display: flex;
  align-items: center;
  justify-content: center;
  font-size: 24px;
  font-weight: bold;
  margin: 0 auto;
  border: 3px solid #fff;
  box-shadow: 0 2px 4px rgba(0, 0, 0, 0.1);
}

.avatar-placeholder {
  width: 40px;
  height: 40px;
  border-radius: 50%;
  background-color: #6c757d;
  color: white;
  display: flex;
  align-items: center;
  justify-content: center;
  font-size: 16px;
  font-weight: bold;
}

/* Chat Container Styles */
.chat-container {
  display: flex;
  flex-direction: column;
  height: 400px;
  border: 1px solid #dee2e6;
  border-radius: 0.25rem;
  overflow: hidden;
}

.chat-messages {
  flex: 1;
  overflow-y: auto;
  padding: 1rem;
  background-color: #f8f9fa;
}
And here is the second part:
.chat-input-container {
  padding: 0.5rem;
  background-color: #fff;
  border-top: 1px solid #dee2e6;
}

.chat-input-group {
  display: flex;
}

.chat-input {
  flex: 1;
  margin-right: 0.5rem;
  border: 1px solid #dee2e6;
  border-radius: 0.25rem;
  padding: 0.5rem;
}

.chat-send-button {
  background-color: #007bff;
  color: white;
  border: none;
  border-radius: 0.25rem;
  padding: 0.5rem 1rem;
  cursor: pointer;
}

.chat-send-button:hover {
  background-color: #0069d9;
}

/* Message Styles */
.message {
  margin-bottom: 1rem;
  max-width: 80%;
}

.user-message {
  margin-left: auto;
  text-align: right;
}

.agent-message {
  display: flex;
  align-items: flex-start;
}

.message-avatar {
  margin-right: 0.5rem;
}

.message-content {
  background-color: #fff;
  padding: 0.75rem;
  border-radius: 0.5rem;
  box-shadow: 0 1px 2px rgba(0, 0, 0, 0.05);
}

.user-message .message-content {
  background-color: #007bff;
  color: #fff;
}

.agent-message .message-content {
  background-color: #fff;
}

/* Loading Animation */
.loading-dots:after {
  content: '.';
  animation: dots 1.5s steps(5, end) infinite;
}

@keyframes dots {
  0%,
  20% {
    content: '.';
  }
  40% {
    content: '..';
  }
  60% {
    content: '...';
  }
  80%,
  100% {
    content: '';
  }
}
This code has the main styles for the layout of the website’s content. That takes care of the styling. We just have the components and pages left, and then you can run your app. Before we start on those folders, let’s quickly do the App.jsx and main.jsx files in the src folder.
So, add this code to the App.jsx file:
import { BrowserRouter as Router, Routes, Route } from 'react-router';
import Layout from './components/Layout';
import Home from './pages/Home';
import Projects from './pages/Projects';
import Career from './pages/Career';
import Services from './pages/Services';
import Research from './pages/Research';
import Contact from './pages/Contact';
import './App.css';

function App() {
  return (
    <Router>
      <Layout>
        <Routes>
          <Route path="/" element={<Home />} />
          <Route path="/projects" element={<Projects />} />
          <Route path="/career" element={<Career />} />
          <Route path="/services" element={<Services />} />
          <Route path="/research" element={<Research />} />
          <Route path="/contact" element={<Contact />} />
        Routes>
      Layout>
    Router>
  );
}

export default App;
In this file, you have all of your routes. This is how you’ll navigate between pages using BrowserRouter.
Finally, replace and update all of the code inside of main.jsx with this:
import { StrictMode } from 'react';
import { createRoot } from 'react-dom/client';
import './index.css';
import './style.css';
import App from './App.jsx';

createRoot(document.getElementById('root')).render(
  <StrictMode>
    <App />
  StrictMode>
);
The only update we did here was add an import for import './style.css' so now you can access the styles from this file across your application.
Time to work on your component files, starting with the Chat.jsx file. I split the codebase because it’s a big file, so make sure you add it all together.
Like before, here is the first part:
import { useState, useEffect, useRef, useCallback } from "react";
import axios from "axios";

function Chat({ agentType, initialMessage, agentInitials, directQuestion }) {
  const [messages, setMessages] = useState([]);
  const [input, setInput] = useState("");
  const [isLoading, setIsLoading] = useState(false);
  const messagesEndRef = useRef(null);
  const [processedQuestions, setProcessedQuestions] = useState([]);

  const API_BASE_URL = "http://127.0.0.1:5001";

  const scrollToBottom = () => {
    messagesEndRef.current?.scrollIntoView({ behavior: "smooth" });
  };

  const handleSendMessage = useCallback(
    async (questionOverride = null) => {
      const messageToSend = questionOverride || input;

      if (!messageToSend.trim()) return;

      const userMessage = {
        content: messageToSend,
        isUser: true,
      };

      setMessages((prev) => [...prev, userMessage]);

      if (!questionOverride) {
        setInput("");
      }

      setIsLoading(true);

      try {
        const response = await axios.post(
          `${API_BASE_URL}/api/${agentType}`,
          {
            message: messageToSend,
          },
          {
            headers: {
              "Content-Type": "application/json",
              "Access-Control-Allow-Origin": "*",
            },
          }
        );

        if (response.data && response.data.response) {
          setMessages((prev) => [
            ...prev,
            {
              content: response.data.response,
              isUser: false,
            },
          ]);
        }
      } catch (error) {
        console.error("Error sending message:", error);
        setMessages((prev) => [
          ...prev,
          {
            content:
              "Sorry, there was an error connecting to the AI agent. Please make sure the Flask server is running at http://127.0.0.1:5001/",
            isUser: false,
          },
        ]);
      } finally {
        setIsLoading(false);
      }
    },
    [input, agentType, API_BASE_URL]
  );

  const handleKeyPress = (e) => {
    if (e.key === "Enter") {
      handleSendMessage();
    }
  };

  const cleanQuestion = (question) => {
    return question.replace(/\s*\[\d+\]\s*$/, "");
  };

  useEffect(() => {
    if (initialMessage) {
      setMessages([
        {
          content: initialMessage,
          isUser: false,
        },
      ]);
    }
  }, [initialMessage]);

  useEffect(() => {
    scrollToBottom();
  }, [messages]);
The first part of this code has your imports, base URL to connect to the backend, and the functions.
Now let’s add the second part of the codebase:
useEffect(() => {
if (
directQuestion &&
directQuestion.trim() !== "" &&
!processedQuestions.includes(directQuestion)
) {
const cleanedQuestion = cleanQuestion(directQuestion);
setInput(cleanedQuestion);
handleSendMessage(cleanedQuestion);
setProcessedQuestions((prev) => [...prev, directQuestion]);
}
}, [directQuestion, processedQuestions, handleSendMessage]);
const renderContent = (content) => {
let formattedContent = content;
formattedContent = formattedContent.replace(
/#{6}\s+(.*?)(?=\n|$)/g,
"$1
"
);
formattedContent = formattedContent.replace(
/#{5}\s+(.*?)(?=\n|$)/g,
"$1
"
);
formattedContent = formattedContent.replace(
/#{4}\s+(.*?)(?=\n|$)/g,
"$1
"
);
formattedContent = formattedContent.replace(
/#{3}\s+(.*?)(?=\n|$)/g,
"$1
"
);
formattedContent = formattedContent.replace(
/#{2}\s+(.*?)(?=\n|$)/g,
"$1
"
);
formattedContent = formattedContent.replace(
/#{1}\s+(.*?)(?=\n|$)/g,
"$1
"
);
formattedContent = formattedContent.replace(
/\*\*(.*?)\*\*/g,
"$1"
);
formattedContent = formattedContent.replace(/\*(.*?)\*/g, "$1");
formattedContent = formattedContent.replace(/`(.*?)`/g, "$1");
formattedContent = formattedContent.replace(
/\[(.*?)\]\((.*?)\)/g,
'$1'
);
formattedContent = formattedContent.replace(
/^\s*\*\s+(.*?)(?=\n|$)/gm,
"$1 "
);
formattedContent = formattedContent.replace(
/(.*?)<\/li>(?:\s* .*?<\/li>)*/g ,
"$&
"
);
formattedContent = formattedContent.replace(
/^\s*\d+\.\s+(.*?)(?=\n|$)/gm,
"$1 "
);
formattedContent = formattedContent.replace(
/(.*?)<\/li>(?:\s* .*?<\/li>)*/g ,
"$&
"
);
return { __html: formattedContent };
};
return (
<div className="chat-container">
<div className="chat-messages" id={`${agentType}-messages`}>
{messages.map((message, index) => (
<div
key={index}
className={`message ${
message.isUser ? "user-message" : "agent-message"
}`}
>
{!message.isUser && (
<div className="message-avatar">
<div className="avatar-placeholder">
{agentInitials || "AI"}
div>
div>
)}
<div className="message-content">
<div dangerouslySetInnerHTML={renderContent(message.content)} />
div>
div>
))}
{isLoading && (
<div className="message agent-message">
<div className="message-avatar">
<div className="avatar-placeholder">{agentInitials || "AI"}div>
div>
<div className="message-content">
<p className="loading-dots">Thinkingp>
div>
div>
)}
<div ref={messagesEndRef} />
div>
<div className="chat-input-container">
<div className="chat-input-group">
<input
type="text"
id={`${agentType}-input`}
className="chat-input"
placeholder="Type your message..."
value={input}
onChange={(e) => setInput(e.target.value)}
onKeyPress={handleKeyPress}
/>
<button
id={`${agentType}-send`}
className="chat-send-button"
onClick={() => handleSendMessage()}
>
<i className="fa-solid fa-paper-plane mr-2">i>Send
button>
div>
div>
div>
);
}
export default Chat;
The second part of the code mostly has the JSX for the components.
Right, next let’s do the Footer.jsx file by adding this code to the file:
function Footer() {
  return (
    <footer className="bg-dark text-white py-4">
      <div className="container">
        <div className="row">
          <div className="col-md-6">
            <h5>Portfolioh5>
            <p>Showcasing my work with the help of AI agentsp>
          div>
          <div className="col-md-6 text-md-end">
            <h5>Connecth5>
            <div className="social-links">
              <a href="#" className="text-white me-2">a>
              <a href="#" className="text-white me-2">a>
              <a href="#" className="text-white me-2">a>
            div>
          div>
        div>
        <div className="row mt-3">
          <div className="col-12 text-center">
            <p className="mb-0">
              © {new Date().getFullYear()} Portfolio. All rights reserved.
            p>
          div>
        div>
      div>
    footer>
  );
}

export default Footer;
The code is pretty much self-explanatory – it has some contact details which will show up at the bottom of your page in the footer section.
Now we can work on the Layout.jsx. I have also split it into two parts.
Add the first part of the codebase here:
import { Link, useLocation } from "react-router";
import { useState } from "react";
function Layout({ children }) {
const location = useLocation();
const [isMenuOpen, setIsMenuOpen] = useState(false);
return (
<main className="flex-grow max-w-7xl w-full mx-auto px-4 sm:px-6 lg:px-8 py-8">
{children}
main>
<footer className="bg-gray-800 text-white py-8">
<div className="max-w-7xl mx-auto px-4 sm:px-6 lg:px-8">
<div className="md:flex md:justify-between">
<div className="mb-8 md:mb-0">
<h5 className="text-lg font-semibold mb-2">Portfolioh5>
<p className="text-gray-300">
Showcasing my work with the help of AI agents
p>
div>
div>
<div className="mt-8 border-t border-gray-700 pt-8 text-center">
<p className="text-gray-300">
© 2025 Portfolio. All rights reserved.
p>
div>
div>
footer>
);
}
export default Layout;
This code has more components, which completes the Layout component.
We’re almost done. Now for the last component, Navbar.jsx, before we move on to the pages.
This is the code you need for the file:
import { Link, useLocation } from 'react-router';

function Navbar() {
  const location = useLocation();

  return (
    <nav className="navbar navbar-expand-lg navbar-dark bg-dark">
      <div className="container">
        <Link className="navbar-brand" to="/">
          Portfolio
        Link>
        <button
          className="navbar-toggler"
          type="button"
          data-bs-toggle="collapse"
          data-bs-target="#navbarNav"
        >
          <span className="navbar-toggler-icon">span>
        button>
        <div className="collapse navbar-collapse" id="navbarNav">
          <ul className="navbar-nav ms-auto">
            <li className="nav-item">
              <Link
                className={`nav-link ${
                  location.pathname === '/' ? 'active' : ''
                }`}
                to="/"
              >
                Home
              Link>
            li>
            <li className="nav-item">
              <Link
                className={`nav-link ${
                  location.pathname === '/projects' ? 'active' : ''
                }`}
                to="/projects"
              >
                Projects
              Link>
            li>
            <li className="nav-item">
              <Link
                className={`nav-link ${
                  location.pathname === '/career' ? 'active' : ''
                }`}
                to="/career"
              >
                Career
              Link>
            li>
            <li className="nav-item">
              <Link
                className={`nav-link ${
                  location.pathname === '/services' ? 'active' : ''
                }`}
                to="/services"
              >
                Services
              Link>
            li>
            <li className="nav-item">
              <Link
                className={`nav-link ${
                  location.pathname === '/research' ? 'active' : ''
                }`}
                to="/research"
              >
                Research
              Link>
            li>
            <li className="nav-item">
              <Link
                className={`nav-link ${
                  location.pathname === '/contact' ? 'active' : ''
                }`}
                to="/contact"
              >
                Contact
              Link>
            li>
          ul>
        div>
      div>
    nav>
  );
}

export default Navbar;
The navbar component has your navigation links, which lets you navigate between pages using react-router.
Alright, the component codebase is ready! All that remains is the six page routes in our pages folder.
The first file we’ll work on will be the Career.jsx file. I will split the codebase for readability like before, so copy the different sections starting with the first part here:
import { useState } from "react";
import Chat from "../components/Chat";
function Career() {
const initialMessage =
"Hello! I'm CareerAgent, the career specialist. I can provide information about skills, experience, and professional background. What would you like to know?";
const [currentQuestion, setCurrentQuestion] = useState("");
const askCareerQuestion = (question) => {
setCurrentQuestion(`${question} [${Date.now()}]`);
setTimeout(() => {
setCurrentQuestion("");
}, 500);
};
return (
Career
Here you can find information about my professional background,
skills, and experience. Feel free to ask CareerAgent for more
details.
Chat with CareerAgent
Our career specialist can provide information about skills,
experience, and professional background.
Skills
Frontend Development
-
React
Expert
-
Vue.js
Advanced
-
Angular
Intermediate
-
TypeScript
Advanced
-
CSS/SASS
Expert
Like before, we have imports, states, and some components. Now for the second part, which is here:
<div className="bg-white rounded-lg shadow-md overflow-hidden h-full">
<div className="p-6">
<h5 className="text-xl font-semibold mb-4">
Backend Development
h5>
<ul className="divide-y divide-gray-200">
<li className="py-3 flex justify-between items-center">
Node.js
<span className="px-2.5 py-0.5 bg-blue-500 text-white text-xs font-medium rounded-full">
Expert
span>
li>
<li className="py-3 flex justify-between items-center">
Python
<span className="px-2.5 py-0.5 bg-blue-500 text-white text-xs font-medium rounded-full">
Advanced
span>
li>
<li className="py-3 flex justify-between items-center">
Django
<span className="px-2.5 py-0.5 bg-blue-500 text-white text-xs font-medium rounded-full">
Intermediate
span>
li>
<li className="py-3 flex justify-between items-center">
Flask
<span className="px-2.5 py-0.5 bg-blue-500 text-white text-xs font-medium rounded-full">
Advanced
span>
li>
<li className="py-3 flex justify-between items-center">
SQL/NoSQL
<span className="px-2.5 py-0.5 bg-blue-500 text-white text-xs font-medium rounded-full">
Advanced
span>
li>
ul>
<button
className="mt-4 py-1.5 px-3 text-sm border border-blue-500 text-blue-500 rounded-md hover:bg-blue-50 transition-colors"
onClick={() =>
askCareerQuestion(
"Tell me more about your backend development skills"
)
}
>
Ask About Backend Skills
button>
div>
div>
<div className="bg-white rounded-lg shadow-md overflow-hidden h-full">
<div className="p-6">
<h5 className="text-xl font-semibold mb-4">Other Skillsh5>
<ul className="divide-y divide-gray-200">
<li className="py-3 flex justify-between items-center">
DevOps
<span className="px-2.5 py-0.5 bg-blue-500 text-white text-xs font-medium rounded-full">
Intermediate
span>
li>
<li className="py-3 flex justify-between items-center">
UI/UX Design
<span className="px-2.5 py-0.5 bg-blue-500 text-white text-xs font-medium rounded-full">
Advanced
span>
li>
<li className="py-3 flex justify-between items-center">
Project Management
<span className="px-2.5 py-0.5 bg-blue-500 text-white text-xs font-medium rounded-full">
Advanced
span>
li>
<li className="py-3 flex justify-between items-center">
Agile Methodologies
<span className="px-2.5 py-0.5 bg-blue-500 text-white text-xs font-medium rounded-full">
Expert
span>
li>
<li className="py-3 flex justify-between items-center">
Technical Writing
<span className="px-2.5 py-0.5 bg-blue-500 text-white text-xs font-medium rounded-full">
Intermediate
span>
li>
ul>
<button
className="mt-4 py-1.5 px-3 text-sm border border-blue-500 text-blue-500 rounded-md hover:bg-blue-50 transition-colors"
onClick={() =>
askCareerQuestion("What other skills do you have?")
}
>
Ask About Other Skills
button>
div>
div>
There is a lot more component code here for the career page. Lastly, lets add the last part of the code for this page:
"mb-12">
<div className="mb-6">
<h2 className="text-2xl font-bold mb-4">Experienceh2>
div>
<div className="space-y-6">
<div className="bg-white rounded-lg shadow-md overflow-hidden">
<div className="p-6">
<div className="flex justify-between items-start mb-2">
<h5 className="text-xl font-semibold">
Senior Full-Stack Developer
h5>
<span className="text-gray-500 text-sm">2020 - Presentspan>
div>
<h6 className="text-gray-600 mb-3">Tech Innovations Inc.h6>
<p className="text-gray-700 mb-4">
Lead developer for multiple web and mobile applications,
managing a team of 5 developers. Implemented CI/CD pipelines and
improved development workflow efficiency by 30%.
p>
<button
className="py-1.5 px-3 text-sm border border-blue-500 text-blue-500 rounded-md hover:bg-blue-50 transition-colors"
onClick={() =>
askCareerQuestion(
"Tell me more about your experience at Tech Innovations Inc."
)
}
>
More Details
button>
div>
div>
<div className="bg-white rounded-lg shadow-md overflow-hidden">
<div className="p-6">
<div className="flex justify-between items-start mb-2">
<h5 className="text-xl font-semibold">Full-Stack Developerh5>
<span className="text-gray-500 text-sm">2017 - 2020span>
div>
<h6 className="text-gray-600 mb-3">WebSolutions Co.h6>
<p className="text-gray-700 mb-4">
Developed and maintained multiple client websites and web
applications. Specialized in React frontend development and
Node.js backend services.
p>
<button
className="py-1.5 px-3 text-sm border border-blue-500 text-blue-500 rounded-md hover:bg-blue-50 transition-colors"
onClick={() =>
askCareerQuestion(
"Tell me more about your experience at WebSolutions Co."
)
}
>
More Details
button>
div>
div>
<div className="bg-white rounded-lg shadow-md overflow-hidden">
<div className="p-6">
<div className="flex justify-between items-start mb-2">
<h5 className="text-xl font-semibold">Junior Web Developerh5>
<span className="text-gray-500 text-sm">2015 - 2017span>
div>
<h6 className="text-gray-600 mb-3">Digital Creations Ltd.h6>
<p className="text-gray-700 mb-4">
Worked on frontend development for e-commerce websites. Gained
experience with JavaScript, CSS, and responsive design
principles.
p>
<button
className="py-1.5 px-3 text-sm border border-blue-500 text-blue-500 rounded-md hover:bg-blue-50 transition-colors"
onClick={() =>
askCareerQuestion(
"Tell me more about your experience at Digital Creations Ltd."
)
}
>
More Details
button>
div>
div>
div>
<div className="grid grid-cols-1 md:grid-cols-2 gap-6">
<div className="bg-white rounded-lg shadow-md overflow-hidden">
<div className="p-6">
<h5 className="text-xl font-semibold mb-4">Educationh5>
<div className="mb-6">
<div className="flex justify-between items-start mb-1">
<h6 className="font-medium">
Master of Science in Computer Science
h6>
<span className="text-gray-500 text-sm">2013 - 2015span>
div>
<p className="text-gray-600">University of Technologyp>
div>
<div>
<div className="flex justify-between items-start mb-1">
<h6 className="font-medium">
Bachelor of Science in Software Engineering
h6>
<span className="text-gray-500 text-sm">2009 - 2013span>
div>
<p className="text-gray-600">State Universityp>
div>
<button
className="mt-4 py-1.5 px-3 text-sm border border-blue-500 text-blue-500 rounded-md hover:bg-blue-50 transition-colors"
onClick={() =>
askCareerQuestion(
"Tell me more about your educational background"
)
}
>
Ask About Education
button>
div>
div>
<div className="bg-white rounded-lg shadow-md overflow-hidden">
<div className="p-6">
<h5 className="text-xl font-semibold mb-4">Certificationsh5>
<ul className="divide-y divide-gray-200">
<li className="py-3 flex justify-between items-center">
AWS Certified Solutions Architect
<span className="text-gray-500 text-sm">2022span>
li>
<li className="py-3 flex justify-between items-center">
Google Cloud Professional Developer
<span className="text-gray-500 text-sm">2021span>
li>
<li className="py-3 flex justify-between items-center">
Microsoft Certified: Azure Developer Associate
<span className="text-gray-500 text-sm">2020span>
li>
<li className="py-3 flex justify-between items-center">
Certified Scrum Master
<span className="text-gray-500 text-sm">2019span>
li>
ul>
<button
className="mt-4 py-1.5 px-3 text-sm border border-blue-500 text-blue-500 rounded-md hover:bg-blue-50 transition-colors"
onClick={() =>
askCareerQuestion("Tell me more about your certifications")
}
>
Ask About Certifications
button>
div>
div>
div>
);
}
export default Career;
And this completes our Career.jsx page: we have forms and more components in this part of the code.
Next is our Contact.jsx page. Like before, I will split the codebase for readability, so add the first part of this code to it:
import { useState } from "react";
function Contact() {
const [formData, setFormData] = useState({
name: "",
email: "",
subject: "",
message: "",
});
const [formResponse, setFormResponse] = useState(null);
const handleChange = (e) => {
const { id, value } = e.target;
setFormData((prevData) => ({
...prevData,
[id]: value,
}));
};
const handleSubmit = (e) => {
e.preventDefault();
setFormResponse({
type: "success",
message:
"Thank you for your message! I'll get back to you as soon as possible.",
});
setFormData({
name: "",
email: "",
subject: "",
message: "",
});
document
.getElementById("form-response")
.scrollIntoView({ behavior: "smooth" });
};
return (
Contact Me
Have a question or want to discuss a potential project? Feel free to
reach out using the form below or through any of my social media
channels.
Quick Links
Contact Form
<div
id="form-response"
className="mt-4"
style={{ display: formResponse ? "block" : "none" }}
>
{formResponse && (
<div
className={`p-4 ${
formResponse.type === "success"
? "bg-green-100 text-green-700"
: "bg-red-100 text-red-700"
} rounded-md`}
>
<i className="bi bi-check-circle-fill mr-2">i>
{formResponse.message}
div>
)}
div>
<div className="space-y-6">
<div className="bg-white rounded-lg shadow-md overflow-hidden">
<div className="p-6">
<h5 className="text-xl font-semibold mb-4">
Contact Information
h5>
<ul className="space-y-3">
<li className="flex items-center">
<i className="bi bi-envelope mr-2">i>
<a
href="mailto:contact@example.com"
className="text-blue-500 hover:underline"
>
contact@example.com
a>
li>
<li className="flex items-center">
<i className="bi bi-geo-alt mr-2">i>
UK
li>
ul>
<h5 className="text-xl font-semibold mt-6 mb-3">
Connect on Social Media
h5>
<div className="flex flex-wrap gap-2">
<a
href="#"
className="px-3 py-1.5 border border-gray-800 text-gray-800 rounded-md hover:bg-gray-100 flex items-center transition-colors"
>
<i className="bi bi-github mr-1">i> GitHub
a>
<a
href="#"
className="px-3 py-1.5 border border-blue-500 text-blue-500 rounded-md hover:bg-blue-50 flex items-center transition-colors"
>
<i className="bi bi-linkedin mr-1">i> LinkedIn
a>
<a
href="#"
className="px-3 py-1.5 border border-gray-800 text-gray-800 rounded-md hover:bg-gray-100 flex items-center transition-colors"
>
<i className="bi bi-twitter mr-1">i> X
a>
div>
div>
div>
<div className="bg-white rounded-lg shadow-md overflow-hidden">
<div className="p-6">
<h5 className="text-xl font-semibold mb-3">Availabilityh5>
<p className="text-gray-700 mb-3">
I'm currently available for freelance work and consulting. My
typical response time is within 24 hours.
p>
<p className="text-gray-700">
For urgent inquiries, please call the phone number listed above.
p>
div>
div>
div>
);
}
export default Contact;
With that, this page is now done, and we have the rest of the components and form.
Ok just four pages left: let’s work on the home page first. The code is not that big so we can do it all at once.
This is the code to add to the Home.jsx page file:
import { Link } from 'react-router';
import Chat from '../components/Chat';

function Home() {
  const initialMessage =
    "Hello! I'm WelcomeAgent, the welcome specialist. I can help you navigate this portfolio website. Are you an employer, client, or fellow programmer?";

  return (
    <div>
      <div className="flex flex-col md:flex-row gap-8 mb-12">
        <div className="md:w-1/3">
          <h1 className="text-3xl font-bold mb-4">Welcome to my Portfolioh1>
          <p className="text-lg mb-4">
            This portfolio showcases my work and skills with the help of
            specialized AI agents. Each agent is designed to assist you with
            different aspects of my portfolio.
          p>
          <p className="text-gray-700">
            Feel free to interact with the WelcomeAgent to get personalized
            recommendations on which sections of the portfolio to explore based
            on your interests.
          p>
        div>
        <div className="md:w-2/3">
          <div className="bg-white rounded-lg shadow-md overflow-hidden">
            <div className="p-6">
              <h5 className="text-xl font-semibold mb-2">
                Chat with WelcomeAgent
              h5>
              <p className="text-gray-600 mb-4">
                Our welcome specialist can help you navigate this portfolio
                website.
              p>
              <Chat
                agentType="welcome"
                initialMessage={initialMessage}
                agentInitials="WA"
              />
            div>
          div>
        div>
      div>

      <div className="mb-12">
        <div className="mb-6">
          <h2 className="text-2xl font-bold mb-4">Meet the Agentsh2>
        div>
        <div className="grid grid-cols-1 md:grid-cols-3 gap-6">
          <div className="bg-white rounded-lg shadow-md overflow-hidden h-full">
            <div className="p-6 flex flex-col items-center">
              <div className="agent-avatar-placeholder mb-4">PAdiv>
              <h5 className="text-xl font-semibold mb-2">ProjectAgenth5>
              <p className="text-gray-600 mb-4 text-center">
                Provides detailed information about my projects, technologies
                used, and challenges overcome.
              p>
              <Link
                to="/projects"
                className="mt-auto py-2 px-4 border border-blue-500 text-blue-500 rounded-md hover:bg-blue-50 transition-colors"
              >
                View Projects
              Link>
            div>
          div>
          <div className="bg-white rounded-lg shadow-md overflow-hidden h-full">
            <div className="p-6 flex flex-col items-center">
              <div className="agent-avatar-placeholder mb-4">CAdiv>
              <h5 className="text-xl font-semibold mb-2">CareerAgenth5>
              <p className="text-gray-600 mb-4 text-center">
                Shares information about my skills, experience, and professional
                background.
              p>
              <Link
                to="/career"
                className="mt-auto py-2 px-4 border border-blue-500 text-blue-500 rounded-md hover:bg-blue-50 transition-colors"
              >
                View Career
              Link>
            div>
          div>
          <div className="bg-white rounded-lg shadow-md overflow-hidden h-full">
            <div className="p-6 flex flex-col items-center">
              <div className="agent-avatar-placeholder mb-4">BAdiv>
              <h5 className="text-xl font-semibold mb-2">BusinessAdvisorh5>
              <p className="text-gray-600 mb-4 text-center">
                Provides information about services, pricing, and client
                engagement process.
              p>
              <Link
                to="/services"
                className="mt-auto py-2 px-4 border border-blue-500 text-blue-500 rounded-md hover:bg-blue-50 transition-colors"
              >
                View Services
              Link>
            div>
          div>
        div>
      div>

      <div className="grid grid-cols-1 md:grid-cols-2 gap-6">
        <div className="bg-white rounded-lg shadow-md overflow-hidden h-full">
          <div className="p-6">
            <h5 className="text-xl font-semibold mb-2">Featured Projectsh5>
            <p className="text-gray-600 mb-4">
              Check out some of my recent work:
            p>
            <ul className="divide-y divide-gray-200">
              <li className="py-3 px-2">E-commerce Platformli>
              <li className="py-3 px-2">Task Management Applicationli>
              <li className="py-3 px-2">Data Visualization Dashboardli>
            ul>
            <div className="mt-4">
              <Link
                to="/projects"
                className="inline-block py-1.5 px-3 text-sm border border-blue-500 text-blue-500 rounded-md hover:bg-blue-50 transition-colors"
              >
                View All Projects
              Link>
            div>
          div>
        div>
        <div className="bg-white rounded-lg shadow-md overflow-hidden h-full">
          <div className="p-6">
            <h5 className="text-xl font-semibold mb-2">Research & Insightsh5>
            <p className="text-gray-600 mb-4">
              Explore my research on emerging technologies and industry trends:
            p>
            <ul className="divide-y divide-gray-200">
              <li className="py-3 px-2">AI in Web Developmentli>
              <li className="py-3 px-2">Modern Frontend Frameworksli>
              <li className="py-3 px-2">Cloud Architecture Patternsli>
            ul>
            <div className="mt-4">
              <Link
                to="/research"
                className="inline-block py-1.5 px-3 text-sm border border-blue-500 text-blue-500 rounded-md hover:bg-blue-50 transition-colors"
              >
                View Research
              Link>
            div>
          div>
        div>
      div>
    div>
  );
}

export default Home;
This has the code for our home page and WelcomeAgent.
Alright, now let's work on the Projects.jsx page. For readability it's easier to split the code in half again. So here is the first part:
import { useState } from "react";
import Chat from "../components/Chat";
function Projects() {
const initialMessage =
"Hello! I'm ProjectAgent, the project specialist. I can provide detailed information about projects, technologies used, and challenges overcome. What would you like to know?";
const [currentQuestion, setCurrentQuestion] = useState("");
const askProjectQuestion = (question) => {
setCurrentQuestion(`${question} [${Date.now()}]`);
setTimeout(() => {
setCurrentQuestion("");
}, 500);
};
return (
Projects
Here you can explore my portfolio of projects. Feel free to ask
ProjectAgent for more details about any project.
Chat with ProjectAgent
Our project specialist can provide detailed information about
projects, technologies, and challenges.
Featured Projects
E-commerce Platform
E-commerce Platform
A full-featured e-commerce platform with product management,
shopping cart, and payment processing.
2023
Task Management App
Task Management Application
A collaborative task management application with real-time
updates and team collaboration features.
As previously mentioned, we have our imports, functions, and some components. Complete the page with the second part of the code here:
<span className="text-sm text-gray-500">2022span>
<div className="bg-white rounded-lg shadow-md overflow-hidden">
<div className="project-image-placeholder">Data Visualizationdiv>
<div className="p-6">
<h5 className="text-xl font-semibold mb-2">
Data Visualization Dashboard
h5>
<p className="text-gray-600 mb-4">
An interactive dashboard for visualizing complex datasets with
customizable charts and filters.
p>
<div className="flex justify-between items-center">
<div className="flex space-x-2">
<button
type="button"
className="py-1.5 px-3 text-sm border border-blue-500 text-blue-500 rounded-md hover:bg-blue-50 transition-colors"
onClick={() =>
askProjectQuestion(
"Tell me more about the Data Visualization Dashboard project"
)
}
>
View Details
button>
<button
type="button"
className="py-1.5 px-3 text-sm border border-gray-500 text-gray-500 rounded-md hover:bg-gray-50 transition-colors"
onClick={() =>
askProjectQuestion(
"What technologies were used in the Data Visualization Dashboard project?"
)
}
>
Technologies
button>
div>
<span className="text-sm text-gray-500">2021span>
div>
div>
div>
<div className="grid grid-cols-1 md:grid-cols-2 gap-6">
<div className="bg-white rounded-lg shadow-md overflow-hidden">
<div className="p-6">
<h5 className="text-xl font-semibold mb-2">
Technical Skills Showcase
h5>
<p className="text-gray-600 mb-4">
These projects demonstrate proficiency in the following
technologies:
p>
<div className="grid grid-cols-1 md:grid-cols-2 gap-4">
<div>
<h6 className="font-semibold mb-2">Frontendh6>
<ul className="list-disc pl-5 space-y-1">
<li>Reactli>
<li>Vue.jsli>
<li>Angularli>
<li>TypeScriptli>
<li>CSS/SASSli>
ul>
div>
<div>
<h6 className="font-semibold mb-2">Backendh6>
<ul className="list-disc pl-5 space-y-1">
<li>Node.jsli>
<li>Pythonli>
<li>Djangoli>
<li>Flaskli>
<li>MongoDBli>
ul>
div>
div>
<button
className="mt-4 py-1.5 px-3 text-sm border border-blue-500 text-blue-500 rounded-md hover:bg-blue-50 transition-colors"
onClick={() =>
askProjectQuestion(
"What other technologies are you proficient in?"
)
}
>
Ask About Other Skills
button>
div>
div>
<div className="bg-white rounded-lg shadow-md overflow-hidden">
<div className="p-6">
<h5 className="text-xl font-semibold mb-2">Project Inquiryh5>
<p className="text-gray-600 mb-4">
Interested in a specific type of project or technology? Ask
ProjectAgent for more information.
p>
<div className="flex flex-col space-y-3">
<button
className="py-2 px-4 border border-blue-500 text-blue-500 rounded-md hover:bg-blue-50 transition-colors"
onClick={() =>
askProjectQuestion(
"Do you have any projects involving machine learning or AI?"
)
}
>
Ask About AI Projects
button>
<button
className="py-2 px-4 border border-blue-500 text-blue-500 rounded-md hover:bg-blue-50 transition-colors"
onClick={() =>
askProjectQuestion("What are your most challenging projects?")
}
>
Ask About Challenging Projects
button>
<button
className="py-2 px-4 border border-blue-500 text-blue-500 rounded-md hover:bg-blue-50 transition-colors"
onClick={() =>
askProjectQuestion(
"Can you show me examples of your UI/UX work?"
)
}
>
Ask About UI/UX Work
button>
div>
div>
div>
div>
);
}
export default Projects;
With the remaining components added, this page is now complete.
Its time to do the Research.jsx page, starting with the first half of the codebase:
import { useState } from "react";
import Chat from "../components/Chat";
function Research() {
const initialMessage =
"Hello! I'm ResearchAgent, the research specialist. I can provide information about technologies, trends, and industry news. What would you like to know?";
const [searchQuery, setSearchQuery] = useState("");
const [tech1, setTech1] = useState("");
const [tech2, setTech2] = useState("");
const [currentQuestion, setCurrentQuestion] = useState("");
const askResearchQuestion = (question) => {
setCurrentQuestion(`${question} [${Date.now()}]`);
setTimeout(() => {
setCurrentQuestion("");
}, 500);
};
const handleSearch = (e) => {
e.preventDefault();
if (searchQuery.trim()) {
askResearchQuestion(`Search for information about: ${searchQuery}`);
setSearchQuery("");
}
};
const handleCompare = (e) => {
e.preventDefault();
if (tech1.trim() && tech2.trim()) {
askResearchQuestion(`Compare ${tech1} vs ${tech2}`);
setTech1("");
setTech2("");
}
};
return (
Research & Insights
Here you can explore research on technologies, trends, and industry
news. Feel free to ask ResearchAgent for more information.
Chat with ResearchAgent
Our research specialist can provide information about
technologies, trends, and industry news.
Search for Information
Enter a topic to search for the latest information and insights.
Compare Technologies
Compare two technologies to understand their pros, cons, and use
cases.
<div className="mb-12">
<div className="mb-6">
<h2 className="text-2xl font-bold mb-4">Current Tech Trendsh2>
div>
<div className="grid grid-cols-1 md:grid-cols-3 gap-6">
<div className="bg-white rounded-lg shadow-md overflow-hidden h-full">
<div className="p-6 flex flex-col h-full">
<h5 className="text-xl font-semibold mb-3">
AI in Web Development
h5>
<p className="text-gray-600 mb-4 flex-grow">
Exploring how artificial intelligence is transforming web
development practices and tools.
p>
<button
className="py-1.5 px-3 text-sm border border-blue-500 text-blue-500 rounded-md hover:bg-blue-50 transition-colors self-start"
onClick={() =>
askResearchQuestion("Tell me about AI in web development")
}
>
Learn More
button>
div>
div>
<div className="bg-white rounded-lg shadow-md overflow-hidden h-full">
<div className="p-6 flex flex-col h-full">
<h5 className="text-xl font-semibold mb-3">
Modern Frontend Frameworks
h5>
<p className="text-gray-600 mb-4 flex-grow">
Analysis of current frontend frameworks, their strengths, and
ideal use cases.
p>
<button
className="py-1.5 px-3 text-sm border border-blue-500 text-blue-500 rounded-md hover:bg-blue-50 transition-colors self-start"
onClick={() =>
askResearchQuestion("Compare modern frontend frameworks")
}
>
Learn More
button>
div>
div>
<div className="bg-white rounded-lg shadow-md overflow-hidden h-full">
<div className="p-6 flex flex-col h-full">
<h5 className="text-xl font-semibold mb-3">
Cloud Architecture Patterns
h5>
<p className="text-gray-600 mb-4 flex-grow">
Best practices and patterns for designing scalable cloud-based
applications.
p>
<button
className="py-1.5 px-3 text-sm border border-blue-500 text-blue-500 rounded-md hover:bg-blue-50 transition-colors self-start"
onClick={() =>
askResearchQuestion("Explain cloud architecture patterns")
}
>
Learn More
button>
div>
div>
div>
div>
<div className="mb-6">
<div className="bg-white rounded-lg shadow-md overflow-hidden">
<div className="p-6">
<h5 className="text-xl font-semibold mb-3">Industry Trendsh5>
<p className="text-gray-600 mb-4">
Stay updated on the latest trends in software development and
technology.
p>
<button
className="py-2 px-4 border border-blue-500 text-blue-500 rounded-md hover:bg-blue-50 transition-colors"
onClick={() =>
askResearchQuestion(
"What are the current trends in software development and technology?"
)
}
>
Get Industry Trends
button>
div>
div>
div>
);
}
export default Research;
The second half of the code has the remaining components, which complete the page.
Now for the final page which is for Services.jsx. The codebase is quite large so we will break it down.
And here's the first part of the codebase to add:
import { useState } from "react";
import axios from "axios";
import Chat from "../components/Chat";
function Services() {
const initialMessage =
"Hello! I'm BusinessAdvisor, the client specialist. I can provide information about services, pricing, and project details. What would you like to know?";
const [projectDescription, setProjectDescription] = useState("");
const [currentQuestion, setCurrentQuestion] = useState("");
const askClientQuestion = (question) => {
setCurrentQuestion(`${question} [${Date.now()}]`);
setTimeout(() => {
setCurrentQuestion("");
}, 500);
};
const generateProposal = async () => {
if (!projectDescription.trim()) return;
try {
const response = await axios.post("/api/client/proposal", {
project_description: projectDescription,
});
if (response.data && response.data.proposal) {
askClientQuestion(
`Can you provide a proposal for this project: ${projectDescription}`
);
}
} catch (error) {
console.error("Error generating proposal:", error);
}
};
return (
Services
Here you can find information about the services I offer. Feel free
to ask BusinessAdvisor for more details about pricing, timelines,
and project specifics.
Chat with BusinessAdvisor
Our client specialist can provide information about services,
pricing, and project details.
Services Offered
Web Development
Custom web application development using modern frameworks and
best practices.
Technologies
- React
- Vue.js
- Node.js
- Django
- Flask
Details
-
Pricing Model: Project-based or hourly
-
Price Range: $5,000 - $50,000 depending on
complexity
-
Timeline: 4-12 weeks depending on scope
We have more import statements, state, and components for our BusinessAdvisor AI agent. Onto the next part of this codebase here:
"bg-white rounded-lg shadow-md overflow-hidden h-full">
<div className="p-6">
<h5 className="text-xl font-semibold mb-2">
Mobile App Development
h5>
<p className="text-gray-600 mb-4">
Native and cross-platform mobile application development for iOS
and Android.
p>
<h6 className="font-semibold mb-2">Technologiesh6>
<ul className="list-disc pl-5 space-y-1 mb-4">
<li>React Nativeli>
<li>Flutterli>
<li>Swiftli>
<li>Kotlinli>
ul>
<h6 className="font-semibold mb-2">Detailsh6>
<ul className="space-y-2 mb-4">
<li>
<strong>Pricing Model:strong> Project-based
li>
<li>
<strong>Price Range:strong> $8,000 - $60,000 depending on
complexity
li>
<li>
<strong>Timeline:strong> 6-16 weeks depending on scope
li>
ul>
<button
className="mt-2 py-1.5 px-3 text-sm border border-blue-500 text-blue-500 rounded-md hover:bg-blue-50 transition-colors"
onClick={() =>
askClientQuestion(
"Tell me more about your mobile app development services"
)
}
>
Ask about Mobile Development
button>
div>
<div className="bg-white rounded-lg shadow-md overflow-hidden h-full">
<div className="p-6">
<h5 className="text-xl font-semibold mb-2">
Technical Consulting
h5>
<p className="text-gray-600 mb-4">
Expert advice on architecture, technology stack, and development
practices.
p>
<h6 className="font-semibold mb-2">Areas of Expertiseh6>
<ul className="list-disc pl-5 space-y-1 mb-4">
<li>System Architectureli>
<li>Database Designli>
<li>Performance Optimizationli>
<li>Security Best Practicesli>
<li>DevOps Implementationli>
ul>
<h6 className="font-semibold mb-2">Detailsh6>
<ul className="space-y-2 mb-4">
<li>
<strong>Pricing Model:strong> Hourly
li>
<li>
<strong>Price Range:strong> $150 - $250 per hour
li>
<li>
<strong>Timeline:strong> Ongoing or as needed
li>
ul>
<button
className="mt-2 py-1.5 px-3 text-sm border border-blue-500 text-blue-500 rounded-md hover:bg-blue-50 transition-colors"
onClick={() =>
askClientQuestion(
"Tell me more about your technical consulting services"
)
}
>
Ask about Consulting
button>
div>
div>
We can expect to see lots of component code here for the page, so lets finish it off with the final part now:
"mb-12">
<div className="mb-6">
<h2 className="text-2xl font-bold mb-4">Client Engagement Processh2>
div>
<div className="w-full">
<div className="bg-white rounded-lg shadow-md overflow-hidden">
<div className="p-6">
<div className="grid grid-cols-1 md:grid-cols-4 gap-6">
<div className="mb-6 md:mb-0">
<div className="flex flex-col items-center">
<div className="w-12 h-12 rounded-full bg-blue-500 text-white flex items-center justify-center text-xl font-bold mb-4">
1
div>
<h5 className="text-lg font-semibold mt-2 mb-1">
Initial Consultation
h5>
<p className="text-gray-600 text-center">
Understanding your requirements and project goals
p>
div>
div>
<div className="mb-6 md:mb-0">
<div className="flex flex-col items-center">
<div className="w-12 h-12 rounded-full bg-blue-500 text-white flex items-center justify-center text-xl font-bold mb-4">
2
div>
<h5 className="text-lg font-semibold mt-2 mb-1">
Proposal
h5>
<p className="text-gray-600 text-center">
Detailed quote and project plan preparation
p>
div>
div>
<div className="mb-6 md:mb-0">
<div className="flex flex-col items-center">
<div className="w-12 h-12 rounded-full bg-blue-500 text-white flex items-center justify-center text-xl font-bold mb-4">
3
div>
<h5 className="text-lg font-semibold mt-2 mb-1">
Development
h5>
<p className="text-gray-600 text-center">
Regular sprints with client feedback
p>
div>
div>
<div className="mb-6 md:mb-0">
<div className="flex flex-col items-center">
<div className="w-12 h-12 rounded-full bg-blue-500 text-white flex items-center justify-center text-xl font-bold mb-4">
4
div>
<h5 className="text-lg font-semibold mt-2 mb-1">
Delivery
h5>
<p className="text-gray-600 text-center">
Testing, deployment, and ongoing support
p>
div>
div>
div>
<div className="flex justify-center mt-8">
<button
className="py-2 px-4 border border-blue-500 text-blue-500 rounded-md hover:bg-blue-50 transition-colors"
onClick={() =>
askClientQuestion(
"Explain your client engagement process in detail"
)
}
>
Learn More About the Process
button>
div>
div>
div>
div>
<div className="w-full">
<div className="bg-white rounded-lg shadow-md overflow-hidden">
<div className="p-6">
<h5 className="text-xl font-semibold mb-2">Request a Proposalh5>
<p className="text-gray-600 mb-4">
Interested in working together? Describe your project below and
BusinessAdvisor will generate a custom proposal for you.
p>
<div className="mb-4">
<label
htmlFor="project-description"
className="block text-sm font-medium text-gray-700 mb-1"
>
Describe your project:
label>
<textarea
id="project-description"
className="w-full px-3 py-2 border border-gray-300 rounded-md focus:outline-none focus:ring-2 focus:ring-blue-500 focus:border-transparent"
rows="5"
placeholder="Enter project description..."
value={projectDescription}
onChange={(e) => setProjectDescription(e.target.value)}
>textarea>
div>
<button
className="py-2 px-4 bg-blue-500 text-white rounded-md hover:bg-blue-600 transition-colors"
onClick={generateProposal}
>
Generate Proposal
button>
div>
div>
div>
);
}
export default Services;
Our services page is complete, and so is the application!
Make sure that the Python backend server is running, and then start your React frontend with the usual Vite run script here inside the frontend folder:
npm run dev
You should see the website up and running on http://localhost:5173/ with working AI agents on all pages (apart from the contact page, which does not have one). Remember that every time you use one of the AI agents to ask a question, it will use 1 API call on Groq Cloud, so check the Rate Limits for the different LLMs.
Conclusion
Building a squad of AI agents for your website using platforms like Agno and Groq is a powerful way to showcase how innovative automated workflows can enhance user experience without spending a lot of money.
The combination of Agno and Groq provides a free route for exploring AI agents, which can be very beneficial. With Agno's no-code agent orchestration and Groq's super-fast inference, you can deploy AI-powered features that engage with visitors and make interactions easier.
So, whether it's a chatbot, content generator, or intelligent assistant, these tools are making it easier than ever to integrate AI into your brand. With the advancements that AI technology is making, being able to try out these free solutions will definitely keep you ahead and make your website truly shine as you continue to modernise your brand.
Stay up to date with tech, programming, productivity, and AI
If you enjoyed these articles, connect and follow me across social media, where I share content related to all of these topics


